| 锚 | ||||
|---|---|---|---|---|
|
| 目录 | ||||
|---|---|---|---|---|
|
| 锚 | ||||
|---|---|---|---|---|
|
Thank you for choosing the Htek IP phones, which are exquisitely designed to provide basic phone features plus advanced business features, such as Call Park, Call Pickup, Intercom and Enhanced Monitor Extension over IP network.
...
Firmware version x.0.4.2 or later and 3CX phone system running version V15 or later. The configuration process described in this guide take the Htek UC923 as an example.
| 锚 | ||||
|---|---|---|---|---|
|
Topics provided in this guide include:
| 锚 | ||||
|---|---|---|---|---|
|
V1.0 (2017-06-09): Provide a basic guidance for auto-provision Htek IP phones with 3CX phone system.
| 锚 | ||||
|---|---|---|---|---|
|
| 锚 | ||||
|---|---|---|---|---|
|
This chapter will show you the basic process of phone's start-up and instructions of the way to get the basic information of the phone. Topics include:
| 锚 | ||||
|---|---|---|---|---|
|
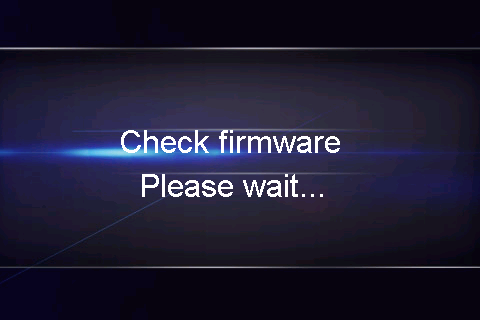
After your phone is powered on, the phone will boots up, complete the initialization and check firmware. Please refer to the three phases of the LCD display:

In the process of initializing, the phone will attempts to contact a DHCP server in your network to obtain valid IPv4 network settings (e.g., IP address, subnet mask, default gateway address and DNS address) by default.
| 锚 | ||||
|---|---|---|---|---|
|
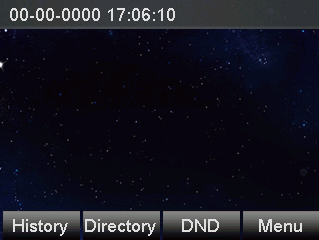
After the phone comes up, you can view phone status on phone user interface (LCD) via the following ways:
Press "OK" button twice.
Press the following button one by one: "Menu" -> "Status" -> "information".
Available information of phone status includes:
Network status (e.g., IPv4 status, IP mode, MAC address).
Phone status (e.g., product name, firmware version, MAC address and device certificate status).
Language infomation.
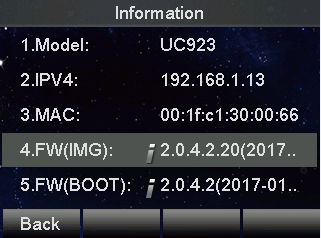
Press "Up"or "Down"to scroll through the list and view the specific information.
| 锚 | ||||
|---|---|---|---|---|
|
There are mainly two ways of provision with 3CX phone system: one is 655597, 3CX_Configuring_Guide#_Provisioning_via_Plug, which is mainly used in the situation where Htek phone and 3CX phone system are in same subnet. And the other one is 6555973CX_Configuring_Guide#_Provisioning_via_RPS, which is mainly used in the situation where Htek phone is remote from 3CX phone system. Please refer to the following picture:
This chapter provides the following instructions of auto-provisioning with 3CX phone system and show you how to edit the custom provision template on 3CX. Topics include:
Phone model mapping on 3CX
Configuration Template on 3CX | Corresponding Phone Model |
|---|---|
Htek UC902 | Htek UC902 |
Htek UC902S | Htek UC902S |
Htek UC903 | Htek UC903 |
Htek UC912 | Htek UC912 |
Htek UC912E | Htek UC912E |
Htek UC912G | Htek UC912G |
Htek UC921 | Htek UC921 |
Htek UC921U | |
Htek UC921E | |
Htek UC923 | Htek UC923 |
Htek UC923U | |
Htek UC924 | Htek UC924 |
Htek UC924E | Htek UC924E |
Htek UC924W | |
Htek 926 | Htek UC926 |
Htek UC926E | Htek UC926E |
Htek UC926U | |
Htek UCV10 | |
Htek UC V20 |
, V22 |
Htek UC V50, V52, V53 |
| 锚 | ||||
|---|---|---|---|---|
|
| 锚 | ||||
|---|---|---|---|---|
|
If the 3CX Phone System runs on the default sip port 5060 and that the IP phones resides on the same local lan subnet as 3CX. Then, Provisioning via Plug and play is a good choice to provision your phones. 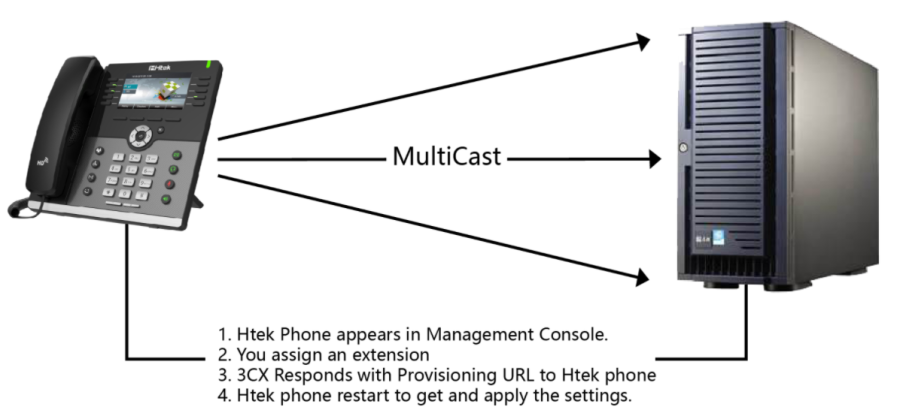
| 锚 | ||||
|---|---|---|---|---|
|
Plug the phone into the network.
The phone will send a multicast message across the LAN. This will be picked up by 3CX Phone System.
The phone will show up in the "Phones" node in the 3CX Management Console as a new phone.
...

Now assign it to an existing extension or create a new one.
...

You will then be taken to the extension's provisioning tab where you can specify other configuration settings for the phone.
...

Leave "Provisioning Method", Mac Address default
Select "Phone Display Language" and "Timezone" for the phone.
Click "OK".
The phone will be sent a link to the configuration file with the settings you specified and configure itself.
The phone will apply the settings and connect to 3CX Phone System. The IP phone will be manageable from within the 3CX Management Console.
| 锚 | ||||
|---|---|---|---|---|
|
| 锚 | ||||
|---|---|---|---|---|
|
If your phones are not behind the same Local LAN with 3CX phone system. Then you can try to use Provisioning via PRS to provision your phones. Please refer the following picture. 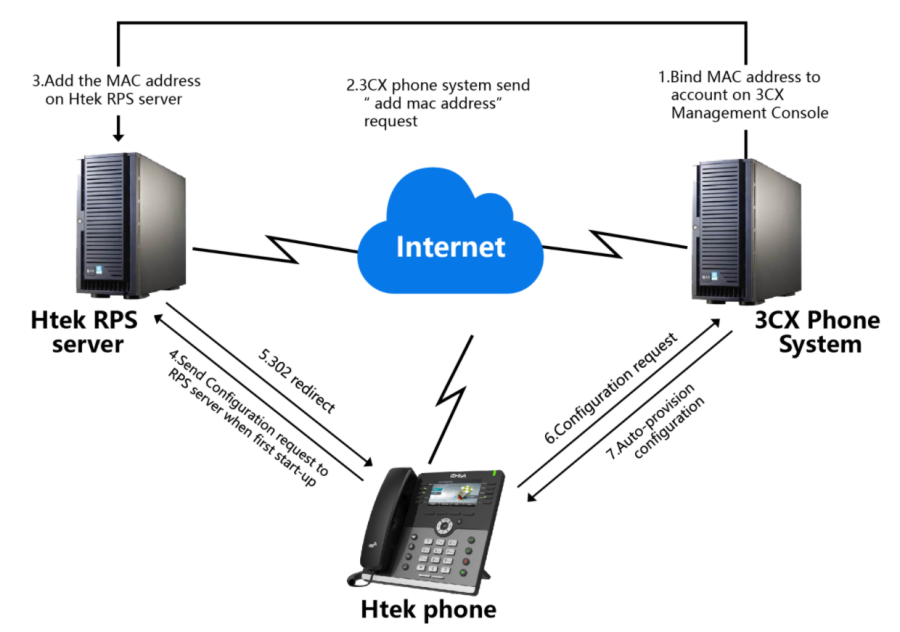
| 锚 | ||||
|---|---|---|---|---|
|
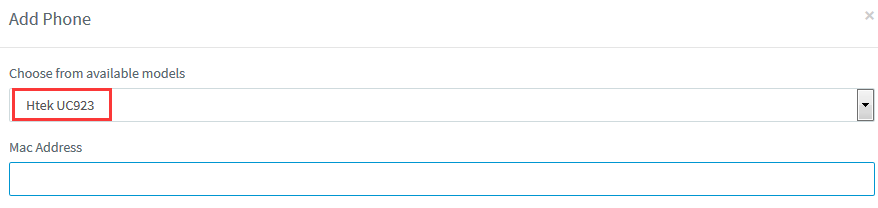
From the Phones node in the 3CX Management Console, select "Add Phone.
...

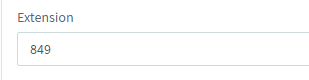
Select the extension for which this phone is.
Enter the MAC address of the phone (which can be found at the bottom of the phone).
Select the appropriate phone model from the drop down menu.
...
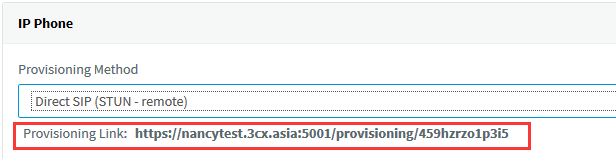
In the "Provisioning Method" drop-down menu, select "Direct SIP (STUN - Remote)."
Select "Phone Display Language" and "Timezone" for the phone.
Click "OK." The provisioning files will now be created and the link published to the RPS server. You can check the server "Event Log" if the RPS was successfully sent
...

Power on and connect the phone to the network within 14 days.
The phone will boot up and request a username and password. Enter the corresponding extension number as username and voicemail pin for that extension as password - it should be provisioned automatically.
If you don't want to use RPS, you can insert the provisioning link manually into the phones. You can find it in extension configuration "Phone Provisioning" tab.
...
| 锚 | ||||
|---|---|---|---|---|
|
| 锚 | ||||
|---|---|---|---|---|
|
Maybe you are not satisfied with the default configuration of auto-provision. Each Htek phone setting provisioned by 3CX phone system is connect with a P number of Htek template file on 3CX phone system. We can modify the value of the p number in template so that to change the configuration which is provisioned by 3CX Phone system.
The following part "Operating Instructions" will show you how to modify the template by an example.
| 锚 | ||||
|---|---|---|---|---|
|
For example, we can refer to the following steps to change the default ringtone to ring 5.
Step 1, Find out which P number do you want to change and what value do you want to change to for the P number by the browser(e.g. firefox).
Login phone's webpage -> setting -> Preference -> ringtones
...

Right click the drop-down box and chose the "Check the elements" item.

Now, I know the P number of setting ringtone is P8721, and the value 5 mean ring5.
Tips: You also can refer to our another document "parameters list"
Step 2, Find out the P number in the htektemplate and modify its value.
Find the folder that holds the Htek template, and open the template. You can refer to the following path.

Open the template, and location the P1872 in the template by "Ctrl + F".And modify the value to what you want.

If you can't find it in the template. You can add this item in the "Custom parameters" area.
...

Step 3, After modify the template successful, you just need torestart the 3CX phone system and the re-provision the phones.
| 锚 | ||||
|---|---|---|---|---|
|
This chapter provides the detail instructions and configurations for the following 3CX integrated features:
| 锚 | ||||
|---|---|---|---|---|
|
Over View
This chapter introduces the necessary configuration of account registration and common optional configuration. Topics include:
...
| 锚 | ||||
|---|---|---|---|---|
|
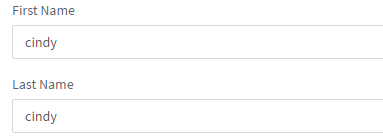
On the general page, you need to fill in some information about the extension.
Extension is your phone number, it must be filled.
...
First Name and Last Name will be combined to display on LCD after auto-provisioning success.
...
Authenticate ID and Password are used to verify the registration. They must be filled.
...
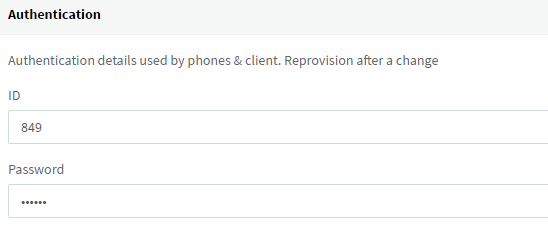
After complete to fill in all of the information, click "OK".
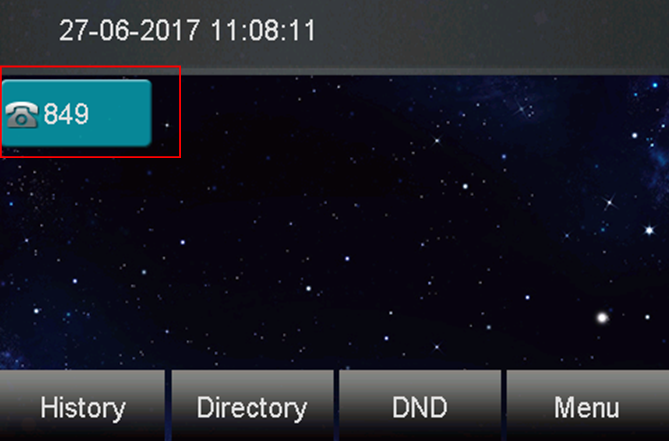
If the extension is registered successfully, you will see the icon turns green in 3CX Management Console.
...

The line state in the LCD screen is "?", not "×".
...
| 锚 | ||||
|---|---|---|---|---|
|
To configure the TimeZone via 3CX Management Console
Extensions -> Phone Provision -> Options -> TimeZone
To configure the NTP server via phone user interface (LCD):
press Menu -> Setting -> Basic Setting -> Time&Date -> SNTP Settings -> NTP server.
Enter the specific NTP server.
...
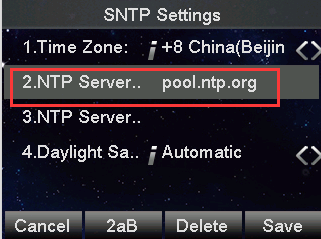
Press the Save soft key to accept the change.
To configure the NTP server via 3CX template
The chapter 655597 3CX_Configuring_Guide#_Edit_custom_provision will show you how to edit custom provision template, you can refer to the chapter at first.
The P number of NTP server is P30, The value type is string.
Locate the P number in the template and change the value of this setting.
...

Click Save button and re-provision the phone.
| 锚 | ||||
|---|---|---|---|---|
|
To configure the Display Language via 3CX Management Console
You can choose the Display Language when you bind MAC address to account on 3CX Management Console.
| 锚 | ||||
|---|---|---|---|---|
|
To configure the Basic NetworkSetting via 3CX template
The parameter of ipv4 mode is P8. Please refer to the value list of ipv4 mode(P8): DHCP – 0?static – 1 ?PPOE – 2.
If the P8 is blank, the network mode will not be changed after auto- provision.![]()
The chapter 655597 3CX_Configuring_Guide#_Edit_custom_provision will show you how to edit custom provision template, you can refer to the chapter.
| 锚 | ||||
|---|---|---|---|---|
|
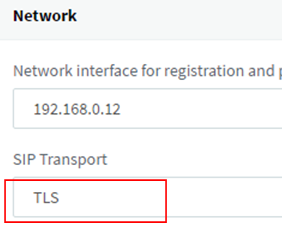
You can refer to the introduction about how to configure secure SIP – TLS:
http://www.3cx.com/blog/voip-howto/secure-sip/
Configuring IP Phones with TLS
Login phone's webpage -> Management -> Trusted CA -> Import Trusted Certificates Files.
Chose the Certificates File and press "Import Trusted Certificates" button to import the Certificates File.
...
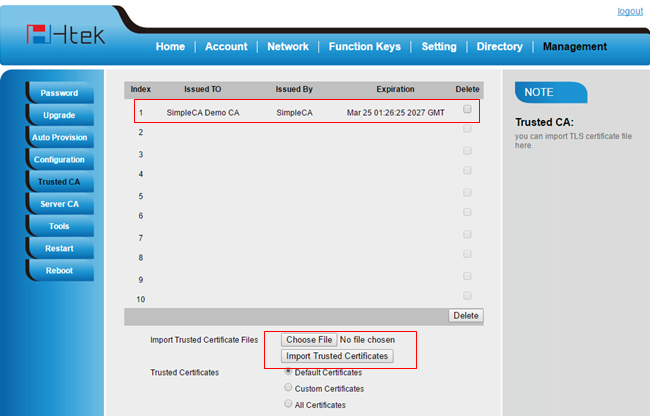
When you prepare provision an extension to this phone, Please set the SIP Transport to TLS on 3CX Management console.
...
| 锚 | ||||
|---|---|---|---|---|
|
Over View
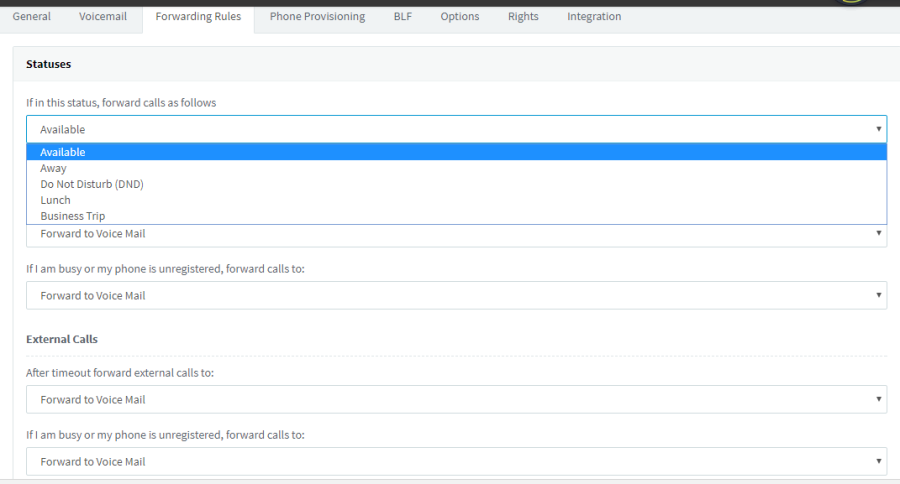
3CX phone system provide forward rules for the different phone status (Available/Available/Do Not Disturb). Make sure that you won't miss all of your calls.
How To Config
To configure forward via 3CX ManagementConsole:
Log in 3CX Management Console -> Extensions -> choose one extension -> Forwarding Rules. You can configure the forwarding rules for the three kind of phone status Available, Away, Do Not Disturb. Now we take Available as an example.
There are two cases of forward rule for Internal Calls.
If you do not answer the calls within seconds, 3CX phone system will forward the call to the extension which you have chosen.

If I am busy or my phone is unregistered, 3CX phone system will forward calls to the extension which you have chosen.

There are two cases of forward rule for External Calls.
If I do not answer calls within seconds, 3CX phone system will forward the call to the extension which you have chosen.
...

If I am busy or my phone is unregistered, 3CX phone system will forward the call to the extension which you have chosen.
| 锚 | ||||
|---|---|---|---|---|
|
Over View
You can transfer a call to another extension in one of three ways:
Blind Transfer: Transfer a call directly to another party without consulting.
Semi-Attended Transfer: Transfer a call when the target phone is ringing.
Attended Transfer: Transfer a call with prior consulting.
How To Use
To perform a blind transfer:
Press the Transfer soft key during a call.
Enter the extension number which you want to transfer the call to.
...
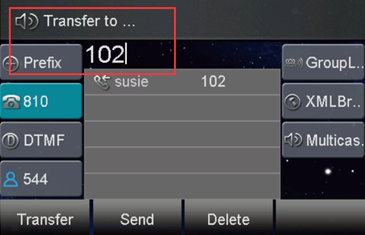
Press the Transfer soft key to complete the transfer, then the call is connected to the number to which you are transferring.
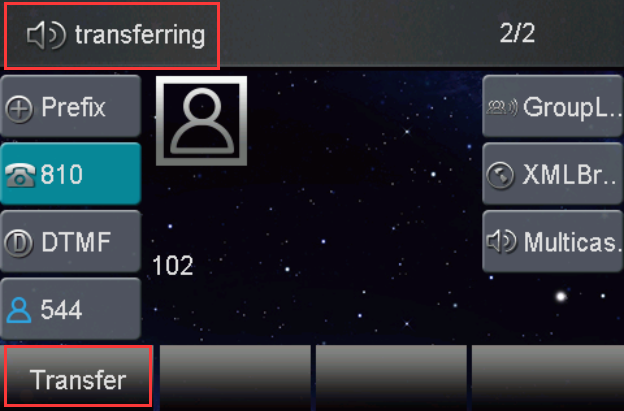
To perform a semi-attended transfer:
Press the Transfer soft key during a call.
Do one of the following:- Enter the number you want to transfer the call to.- Press the Dir soft key, and then select the desired group and search for the contact
Press send soft key or "#"button to dial out the transferring call, when the phone which is transferred ringing and then press the transfer soft key to complete the transfer.
...
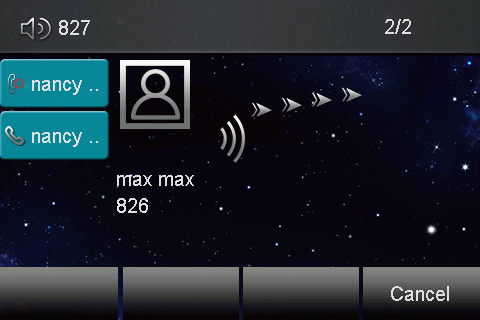
To perform an attended transfer:
Press the Transfer soft key during a call.
Do one of the following:
-Enter the number you want to transfer the call to.
-Press the Directory soft key, and then select the desired group and search for the contact.Press send soft key or "#"button to dial out the transferring call,when the phone which is transferred ringing and answer a call ,then press the transfer soft key to complete the transfer.If you are using a handset, the transfer can be completed by hanging up the handset. You can cancel the transfer before the call is connected by pressing the Cancel soft key
There is some additional functionof transfer
1. Login phone webpage->Settings->Features->Transfer Settings. There are some additional settings of transfer. Please refer the following picture.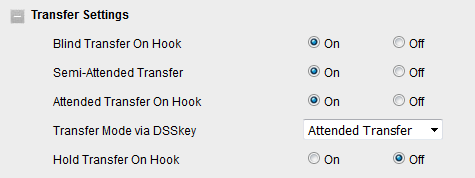
Blind Transfer On Hooks: If you have already complete the step 2 of blind transfer. Then you can transfer the call by on hook.
The P number of this setting is P3201, the value list is: 0 – off, 1 – on.
You can refer to the chapter 655597 3CX_Configuring_Guide#_Edit_custom_provision to edit custom template.
Attended Transfer On Hooks: If you have already complete the step 3 of attend transfer. Then you can transfer the call by on hook.
The P number of this setting is P3204, the value list is: 0 – off, 1 – on.
You can refer to the chapter 655597 the chapter 3CX_Configuring_Guide#_Edit_custom_provision to edit custom template.
Transfer Mode via DSSkey( DSSkey type must be BLF ): when two phones build a call, one phone which config the BLF can press the BLF line key to achieve the new call/Blind Transfer or Attended Transfer to another extension.
The P number of this setting is P3205, the value list is: 0 –Attended Transfer, 1 –Blind Transfer, 2 – New Call. You can refer to the chapter 655597 3CX_Configuring_Guide#_Edit_custom_provision to edit custom template.
| 锚 | ||||
|---|---|---|---|---|
|
Over View
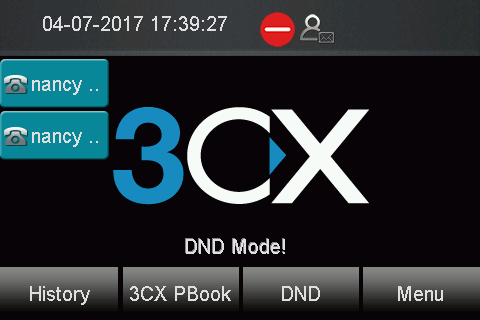
You can use DND to reject incoming calls automatically on the phone. The message "n New Missed Call(s)" ("n" indicates the number of missed calls) will appear on the LCD screen, and callers will receive a busy message.
How to config and Use
Check the DND setting in 3CX phone system side
Log in 3CX Management Console -> Settings -> Dial Codes
Code of Set Do Disturb OFF: If you press the DND key to set the DND ON status on the phone, the phone will send the DND ON code to the 3CX server to Synchronize the DND status on the server side.
Code of Set Do Disturb ON: If you press the DND key to set the DND OFF status on the phone, the phone will send the DND OFF code to the 3CX server to Synchronize the DND status on the server side.
To activate DND in phone mode:
Press the DND soft key when the phone is idle. The icon on the status bar indicates that DND is enabled. Incoming calls will be rejected automatically and "n New Missed Call(s)" will prompt on the LCD screen. 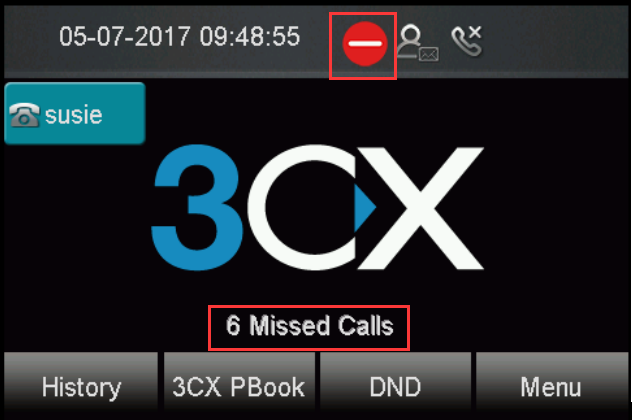
| 锚 | ||||
|---|---|---|---|---|
|
Over view
You can set up a conference call with other four parties. It support up to 5 parties (including yourself) in a conference call.
How to config and use
To set up a conference call: 1. Place a call to the first party. 2. When the first party answers the call, press the Conference soft key to place a new call. The active call is placed on hold. 3. Enter the number of the second party and press "#"or the Send soft key.
When the second party answers the call, press the Conference soft key again to join all parties in the conference.
Press "split" button, then other two parties will be in hold state. then the active call press "new call" button and enter the number of the third party and press "#"or the Send soft key.
When the third party answers the call, press the Conference soft key again to join all parties in the conference.
Press "split" button, then other third parties will be in hold state. then the active call press "new call" button and enter the number of the fourth party and press "#"or the Send soft key.
When the fourth party answers the call, press the Conference soft key again to join all parties in the conference.
During the conference call, you can do the following actions: - Press the "Hold" soft key to place the conference on hold.- Press the "Split" soft key to split the conference call into four individual calls on hold.- Press to "mute" the conference call.- Press the "End Call" soft key to drop the conference call.
| 锚 | ||||
|---|---|---|---|---|
|
Over View
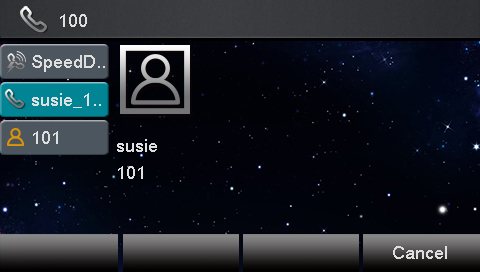
You can use BLF to monitor a specific extension for status changes on the phone. The BLF key illuminates solid red when the specific externsion is in use. You can tap a BLF key to dial out the monitored phone number when the monitored extension is idle. You can also pick up calls that are received on the monitored extension.
How To Config
To configure forward via 3CX Management Console:
Log in 3CX Management Console->Settings->Features->BLF
Then choose BLF function and one extension which you want to monitor
...

Click ok button and re-provision the phone.
...
How To Use
When you complete the configuration:
The BLF key's light will solid green and icon will solid blue when monitored number is in idle status.
The BLF key's light will flashing red and icon will flashing yellow when monitored number has a incoming call.
The BLF key's light will flashing red and icon will solid yellow when monitored number are talking.
| 锚 | ||||
|---|---|---|---|---|
|
| 锚 | ||||
|---|---|---|---|---|
|
You can use call park feature to park a call, and then retrieve the parked call from another phone. Htek IP phone supports park call Feature. For park call feature, the server will automatically hunt for the first available orbit in the call park orbits and parks the call there. The call park orbits should be predefined. You can park an active call by pressing the park call key(if configured) on the phone. And you also can retrieve the parked call by pressing a (retrieve) parked call key or dialing the retrieve access code.
| 锚 | ||||
|---|---|---|---|---|
|
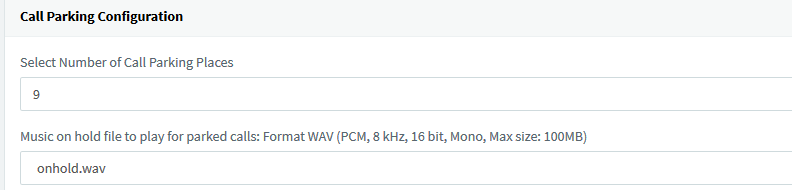
Check the Call Park setting in 3CX phone system side
3CX Management Console -> Settings -> Call Parking
...
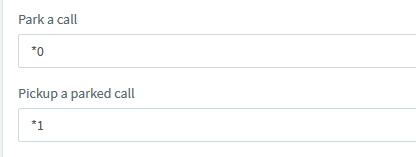
Dial codes
Code of Park a call: when you dial the code during a call, you will park the call to the call park orbits.
Code of Pickup a parked call: when you dial the code, you will pick up a parked call from the call park orbits.
...
To provision Htek phone a park call key via the 3CX Management Console:
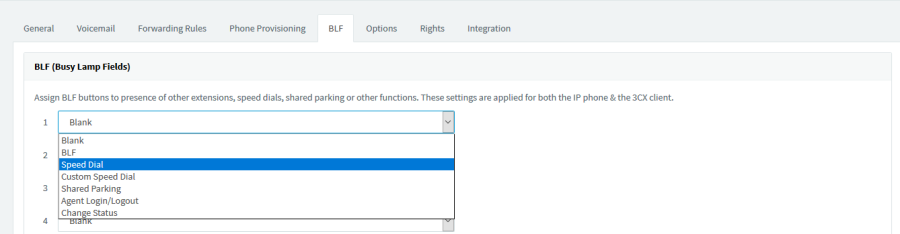
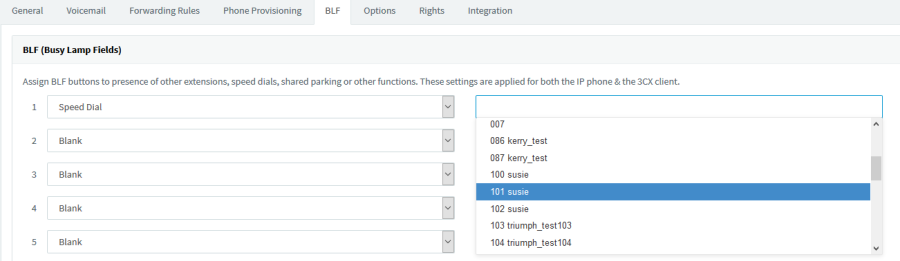
Login 3CX Management Console -> Extensions -> select the extension which you want to provision -> BLF.
Chose a BLF buttons which you want to provision, Click the drop-down box and select the Shared Parking item.
After you configure a BLF to Shared Parking, A new drop-down box will appear in the back. Chose a Shared park extension which you want.
...
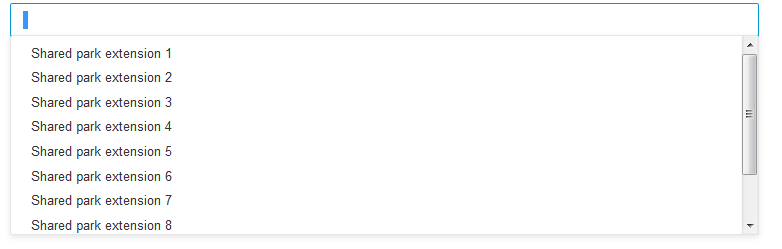
Shared park extension: A share park extension is connect with a call park orbit. If you chose the Shared park extension 1. Then when you press the call park button, the call will be parked to call park orbit. If you want to pick up the call with other phone, the call park button must be configured toShared park extension 1 too.Click the ok button.
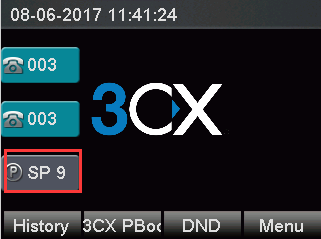
Provision or re-provision this extension, The call park key will appear on the Htek IP phone. And the lamp of Line Key 3 will be turn on green.
...
| 锚 | ||||
|---|---|---|---|---|
|
Suppose Phone A and B were provisioned a Call park key with the same Shared park extension.
Phone A make a call with phone C.A press Call park key. The call will be parked and you will heard call park tone from A. And the Call park key of phone A and B will turn red.
B press the call park key, the parked call will be picked up. Now B have a call with C. And the Call park key of phone A and B will turn green.
| 锚 | ||||
|---|---|---|---|---|
|
Over View
When you want to make a call to someone quickly, you can configure his number as the speed dial, then press the speed dial button to dial the extension directly.
How to Config
To configure forward via3CX Management Console:
Log in 3CX Management Console->Settings->Features->speed dial
Then Choose speed dial function and one extension.
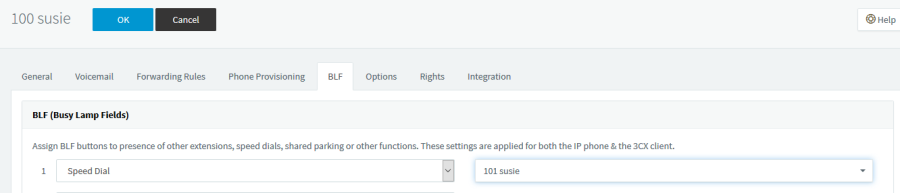
Click ok button and re-provision the phone.
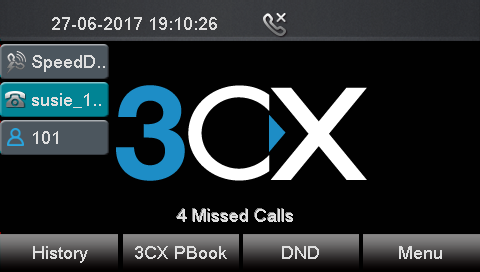
The speed dial key will be display on phone's interface.
...
How to Use
| 锚 | ||||
|---|---|---|---|---|
|
| 锚 | ||||
|---|---|---|---|---|
|
Over View
When someone make a call to the queue, the extensions in the queues will ring followed a principle if they are logged in. You also can logout the queue when you didn't want to receive any call by the queue.
How to Config
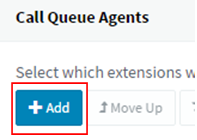
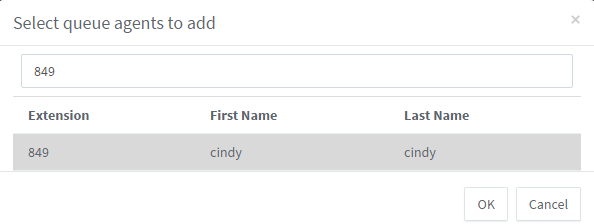
Chose a queue, add your extensions to the queue. If your extension is already in the queue, Please skip this step.
...
...
Configure Agent Login / Logout on the extension's BLF page.
...

Click the OK button to complete the configuration and re-provision the phone.
...
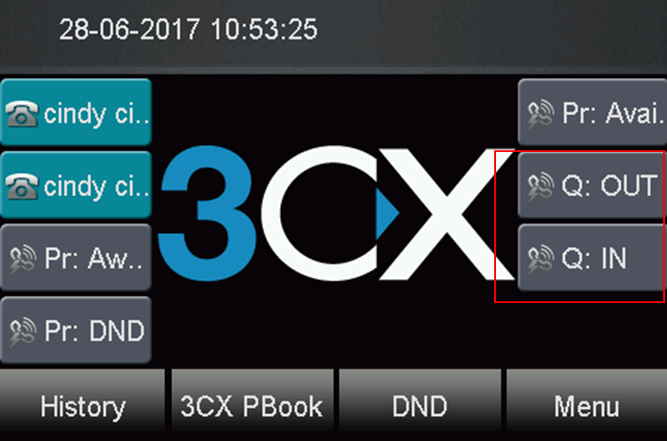
How To Use
If you press the "IN" button, the extension will login the queue, when someone calls the queue number, your phone will ring.
If the extension have already login the queue, Press the "OUT" button will make the extension logout from the queue. Then others can not call you by queue number.
| 锚 | ||||
|---|---|---|---|---|
|
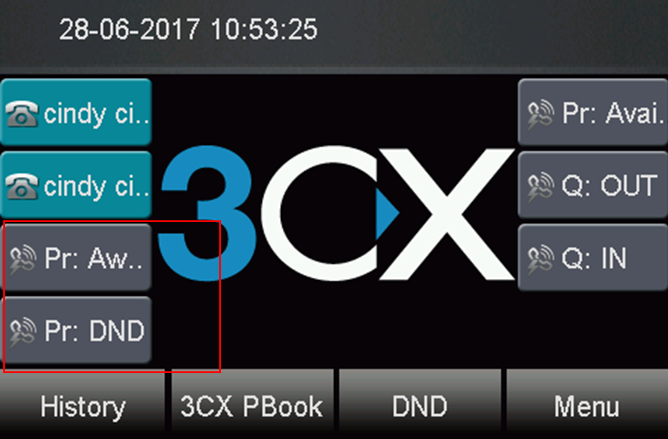
Over View
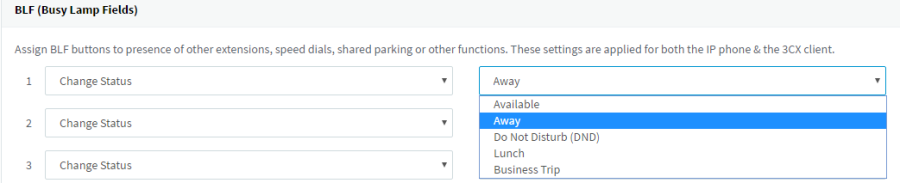
There are 5 statuses in 3CX. They are Available?Away?Do Not Disturb(DND)?Lanuch and Bussiness Trip. The Extension can receive calls only when the extension is in Available status. You can change the status of the extension by press the "change status" button as you need.
How To Config
3CX Management console -> Extension -> BLF. Configure a BLF key to Change status button
...
3CX Management console -> Extension -> Forwarding rules. Configure the forwarding rules to confirm that when you can't receive the call, the 3CX phone system can forward the call to the right place.
...
Click the OK button to complete the configuration and re-provision the phone.
...
How To Use
Before you away from the office, you can press the "Away" key to change the status of the extension, if someone makes a call to your extension, the call will be forwarded to the place where you have configure before.
When you go back to your office, you can press the "Available" button to change your extension status to Available. Then your phone can receive calls.
| 锚 | ||||
|---|---|---|---|---|
|
| 锚 | ||||
|---|---|---|---|---|
|
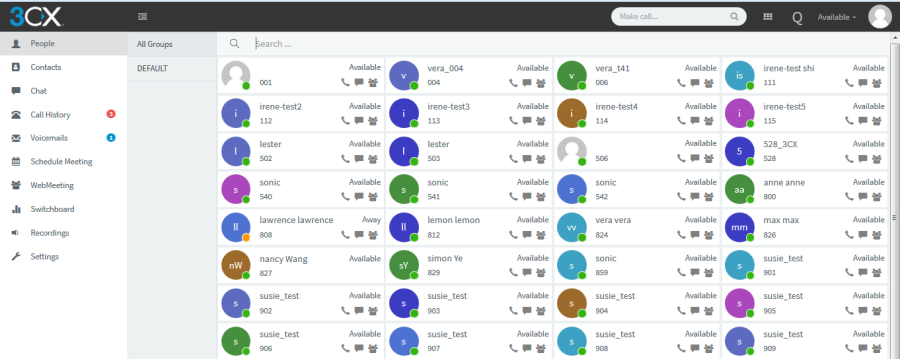
The 3CX web client gives you easy access to all features of 3CX, including Presence, conferencing, chat and the switchboard. It also allows you to easily make calls from your IP Phone, desktop or smart phone.You can view the presence of your colleagues, divert & transfer calls with a mouse click, see your call history, voice mail and setup chat using the web client. The web client requires Google Chrome, Mozilla Firefox or Microsoft Edge.http://192.168.0.12:5000/webclient#/app/extension_editor/_blank
| 锚 | ||||
|---|---|---|---|---|
|
To enable UACSTA feature for an extension (which have registered on Phone):
Log in the 3CX Management Console->Extension
Choose the Target extension number
Click the "General" tab
Enable the web client for this target extension
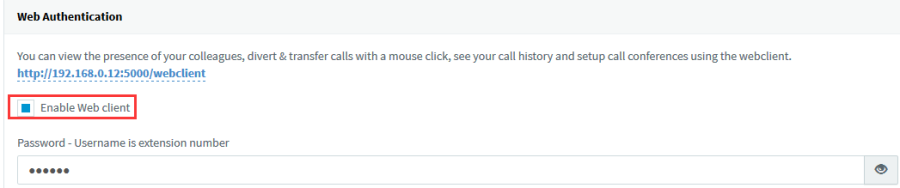
To get Web client URL and password for this extension:
Get the web client URL and password from "General" tab
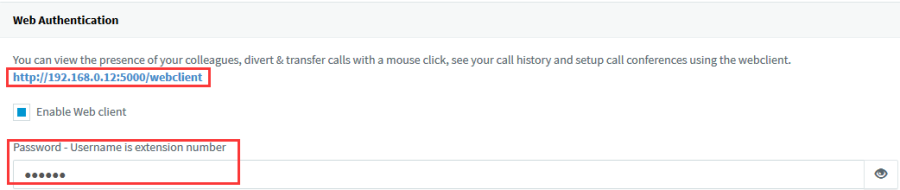
Access the web client use this extension:
Open your Browser
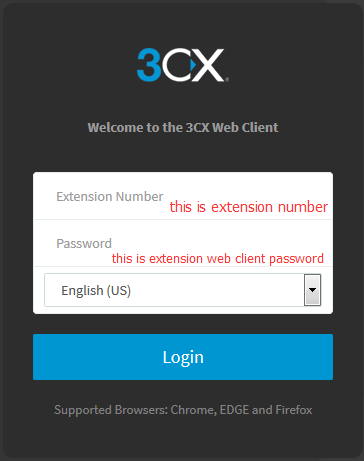
Enter the above URL:http://192.168.0.12:5000/webclient
You will see the below windows, please enter the extension number and web client password:
Log in successfully, you will view presence of your colleagues.
| 锚 | ||||
|---|---|---|---|---|
|
To Change the status from the web client:
There are available, Away, Do not Disturb, Lunch, Business Trip status, and you can also set the time for a status.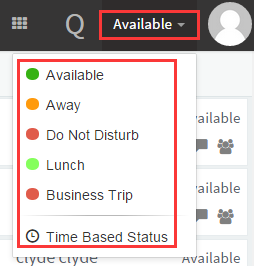
Available: Your extension will be marked as a green icon, you can receive any call.
Away: Your extension will be marked as a orange icon, you cannot receive any call.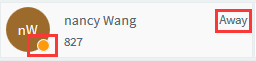
Do not Disturb: Your extension will be marked as a red icon, you cannot receive any call, you will see the DND icon on Phone interface (If you press the DND on phone, web client will also be changed to Do Not Disturb status.)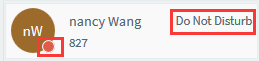
Lunch: Your extension will be marked as a light green icon, you can receive any call.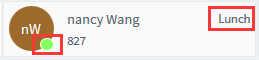
Business Trip: Your extension will be marked as a red icon, you cannot receive any call.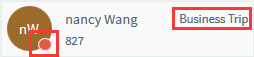
Time Basic Status: You can set the time for the different status.
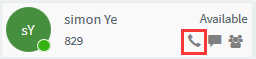
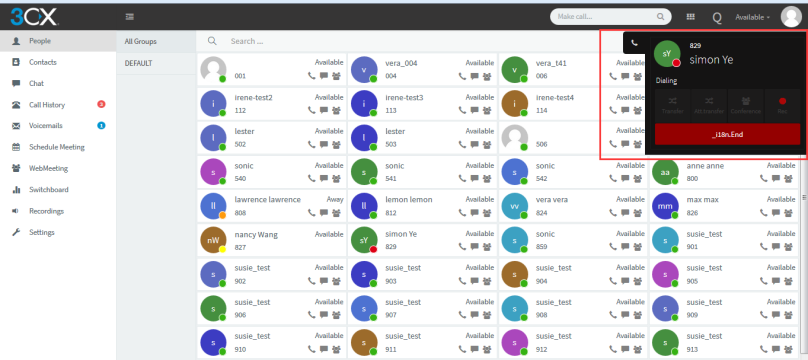
To make a call from the web client
Choose a target number
Click this icon from below picture:
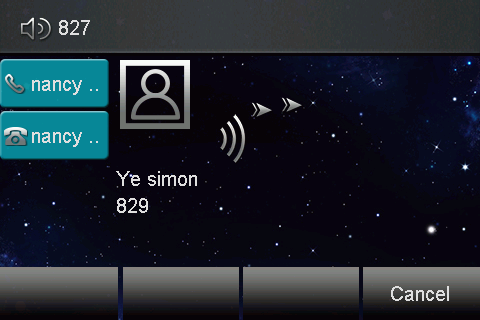
You will view the outgoing status on web client. At the same time, The phone is also outgoing status and you can listen the back ringing tone.
You will view the talking status on Web client when other phone answer this call. This call is successfully established.
To end this call from web client:
You can click the End button to end this call when dial out.
To answer a call from the web client:
You can clink the answer button directly when you phone has an incoming call. This incoming call will be answer successfully.

To decline a call from the web client:
1. You can click the decline button to reject this call when phone have an incoming call.
...
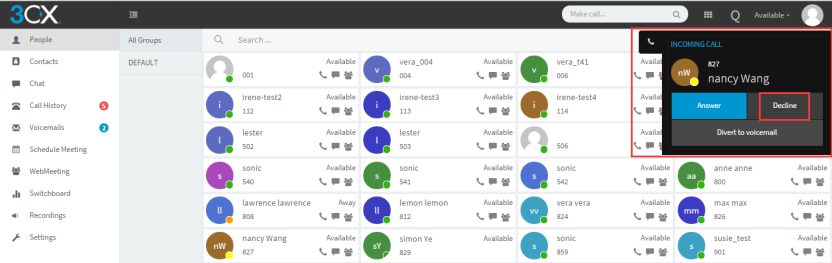
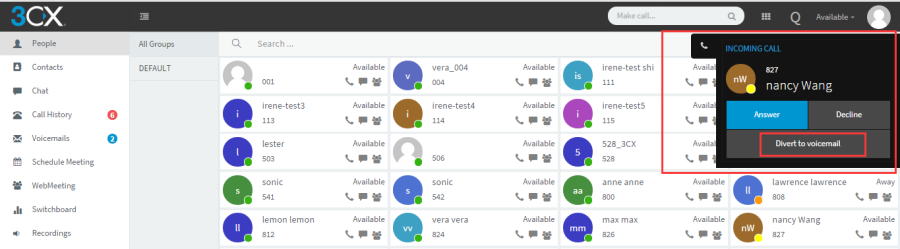
To Divert to voice mail from the web client:
You can click the Divert to voice mail button when phone has an incoming call, this call will be divert to voice mail successfully.
To Blind Transfer this call from the web client:
You can click the Transfer button when phone is talking
Enter the transfer call number:826
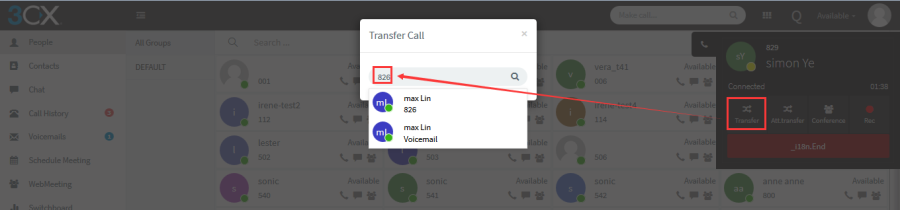
This call will be blind transfer successfully, phone will back to idle interface when 826 answer this call:

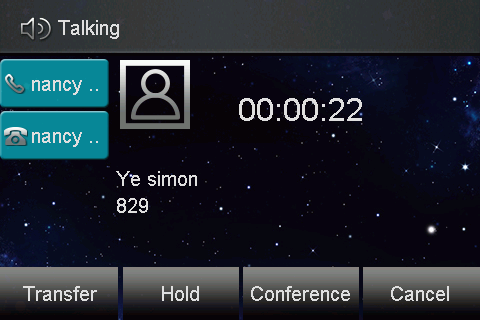
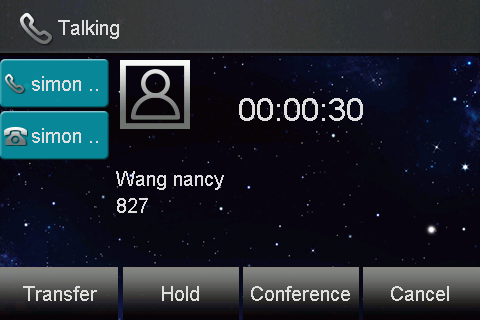
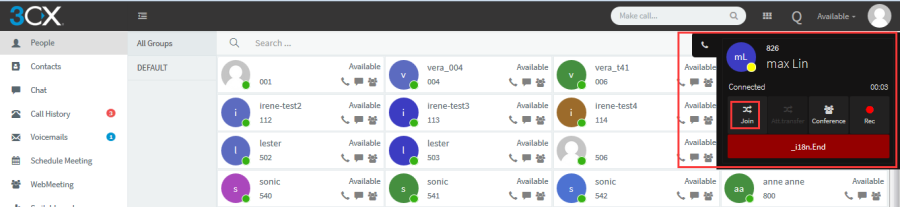
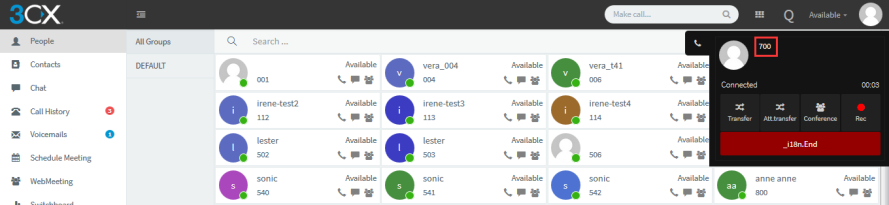
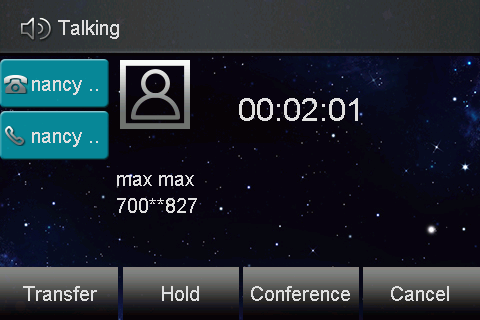
To Attend Transfer this call from the web client:
You can click the Att.transfer button when phone is talking
Enter the transfer call number:826
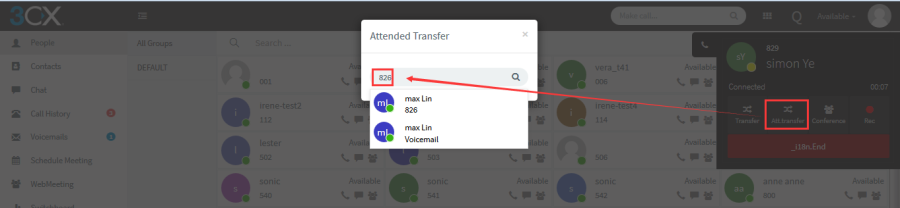
You will view the dialing status on the web client.
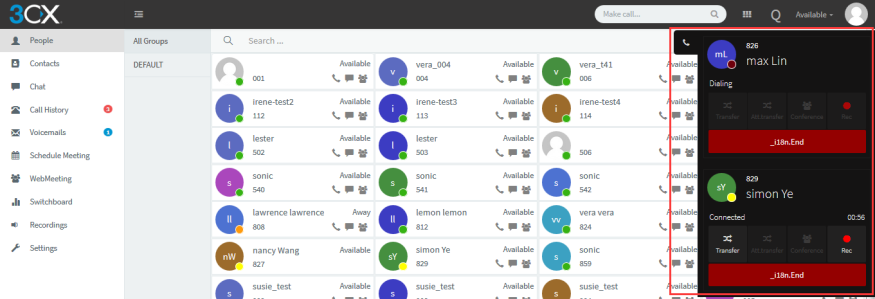
You will view the below picture on web client when 826 answer this call.
You can click the Join button to finish the attend transfer, phone will back to idle interface.

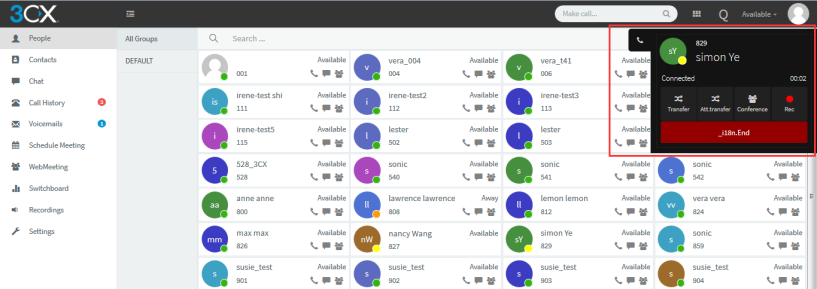
To make a conference from the web client:
You can click the Conference button when phone is talking
Enter the target participant number:826
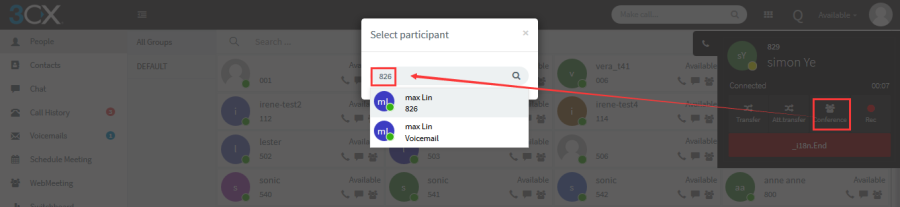
You will view the dialing status on the web client.


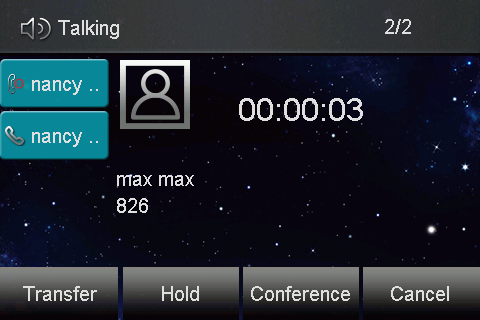
You will view the below picture on web client when 826 answer this call.
Three-way conference will be established successfully.
| 锚 | ||||
|---|---|---|---|---|
|
| 锚 | ||||
|---|---|---|---|---|
|
This part is to serve as a basic guidance for upgrading firmware and resetting the phone.
| 锚 | ||||
|---|---|---|---|---|
|
To upgrade firmware via 3CX Management Console
Login 3CX Management Console -> phone
Chose the phone which you want to upgrading firmware. The phone must
...
be Provisioned by 3CX phone system before.
Click the firmware button. You will see the popover as following picture.
...
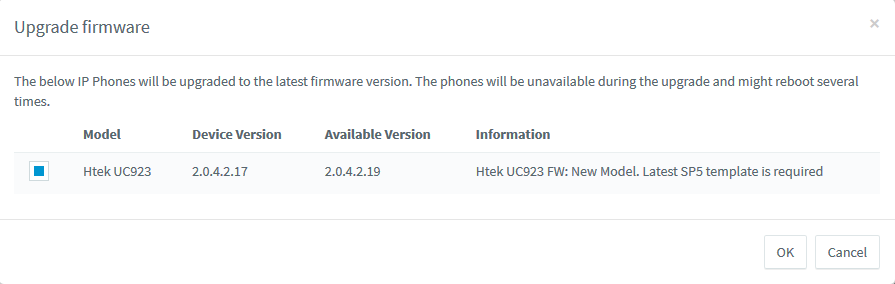
Click the OK button. Then the phone will restart and upgrade firmware.
Manual upgrading firmware
Visit the official Htek website, go to Support and press Download to latest Firmware for IP Phone. From the provided list choose the htek .txt file url with the latest FW.
Download the desired FW image .zip file and extract it on your hard disk.
Locate the folder where holds the Htek firmware on 3CX phone system. Please refer my folder path.
...
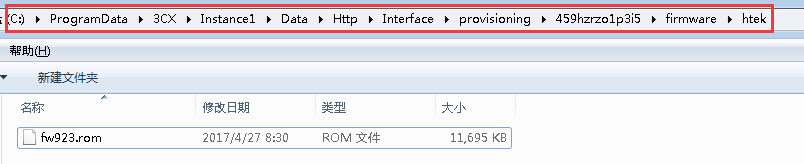
Copy the rom files to the folder.
Restart the phones.
After you upgrade this firmware by this way. If you found the red font on 3CX Management Console as the following picture prompts 3CX don't support this version.![]()
Don't worry, it just means the 3CX still not support this version yet. 3CX may release this firmware very soon. And the version also can support all of features of 3CX.
| 锚 | ||||
|---|---|---|---|---|
|
Reset the phone to factory configurations after you have tried all troubles-
Hooting suggestions but do not solve the problem. You need to note that all customized settings will be overwritten after reset.
To reset the phone via phone user interface(LCD):
Press Menu ->Settings ->Advanced ->Settings →Rese
The password of Advanced is provisioned by 3CX phone system.Press the Enter softkey or OK key.
...
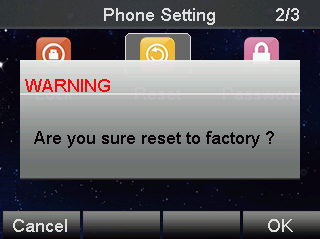
Press OK softkey.
Note: Reset of your phone may take a few minutes. Do not power off until the phone has started up successful.The phone will be reset to factory settings sucessfully after startup.
| 锚 | ||||
|---|---|---|---|---|
|
This chapter provides general troubleshooting information to help you solve the problems you might encounter when using your phone. If you require additional information or assistance with your new phone, contact your system administrator.
Why is the LCD screen blank?
Ensure that the phone is properly plugged into a functional AC outlet.
Ensure that the phone is plugged into a socket controlled by a switch that is on.
If the phone is plugged into a power strip, try to plug it directly into a wall out let instead.
If the phone is powered from POE, ensure that you use a POE-compliant switch or hub.
Why does the phone display "Network unavailable"?
Ensure that the Ethernet cable is plugged into the Internet port on the phone and the Ethernet cable is not loose.
Ensure that the switch or hub in your network is operational.
Why doesn't the phone display time and date correctly?
Check if you have configured the phone to obtain the time and date from the SNTP server automatically. If the phone fails to connect to the SNTP server, you need to configure the time and date manually.
Why the phone can't upgrading by 3CX Management Consolesuccessful?
Please check that whether the version of the phone is the latest version on the 3CX.
Locate the folder where holds the Htek firmware on 3CX phone system. And check whether there is firmware files in the folder.
Why the phone can't auto-provision vis RPS successful?
Make sure that the phone is connect to internet successful.
Make sure that you the 3CX have already send the RPS request to Htek RPS server successful. You can check this in 3CX Management console -> Dashboard -> Event log when you add the extension for this phone. If it is successful you will see the information as following picture.

...