Htek IP Phones Integrated with NetSapiens Platform Configuring Guide V1.0
目录
| 锚 | ||||
|---|---|---|---|---|
|
| 锚 | ||||
|---|---|---|---|---|
|
Thank you for choosing the Htek IP phones, which are exquisitely designed to provide basic phone features plus advanced business features, such as Forward, Transfer, Network conference, share line and Enhanced Monitor Extension over IP network.
The purpose of this guide is to serve as a basic guidance for auto-provision
With with the NetSapiens Platform.
- NetSapiens SNAPsolution v39 is the minimum system version needed for HTEK provisioning.
- Htek Provisionable Devices on NetSapiens platform including:
UC926U, UC926E, UC926, UC924W, UC924E, UC924, UC923U, UC923, UC912, UC903, UC902, UC46 sidecar. - HTEK firmwares no older than 2.0.4.4.46 are recommended.
- For support, please send requests to the Htek Ticket System (http://www.htek.com/TicketingSystem/), or send email to support@htek.com, or contact Htek FAE team on Skype (skype ID: hanlong.fae).
| 锚 | ||||
|---|---|---|---|---|
|
| 锚 | ||||
|---|---|---|---|---|
|
Topics provided in this guide include:
- Chapter 1 _Getting Started
- Chapter 2 _Auto-provisioning Provisioning your Phonephone
- Chapter 3 Use NetSapiens Integrated Features _Use Netsapiens platform Feature
- Chapter 4 _Resetting your the phone
- Chapter 5 _Troubleshooting
| 锚 | ||||
|---|---|---|---|---|
|
| 锚 | ||||
|---|---|---|---|---|
|
- V1.0 (2018-06-19): Provide a basic guidance for auto-provision Htek IP phones with NetSapiens platform.
...
| 锚 | ||||
|---|---|---|---|---|
|
| 锚 | ||||
|---|---|---|---|---|
|
This chapter will show you the basic process of phone's start-up and instructions of the way to get the basic information of the phone. Topics include:
| 锚 | ||||
|---|---|---|---|---|
|
| 锚 | ||||
|---|---|---|---|---|
|
After your phone is powered on, the phone will boots up, complete the initialization and check firmware. Please refer to the three phases of the LCD display:


In the process of initializing, the phone will attempts to contact a DHCP server in your network to obtain valid IPv4 network settings (e.g., IP address, subnet mask, default gateway address and DNS address) by default.
...
| 锚 | ||||
|---|---|---|---|---|
|
| 锚 | ||||
|---|---|---|---|---|
|
After the phone comes up, you can view phone status on phone user interface (LCD) via the following ways:
...
- Network status (e.g., IPv4 status, IP mode, MAC address).
- Phone status (e.g., product name, firmware version, MAC address and device certificate status).
- Language infomationinformation.
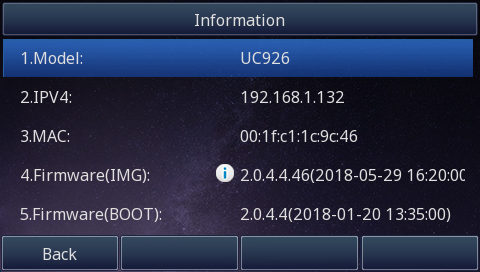
Press "Up" or "Down"to scroll through the list and view the specific information.
...
| 锚 | ||||
|---|---|---|---|---|
|
| 锚 | ||||
|---|---|---|---|---|
| ||||
| 锚 | _Auto-Provisioning your phone | _Auto-Provisioning your phone |
...
Provision the IP Phone via RPS is a convenience way.
...
|
| 锚 | ||||
|---|---|---|---|---|
|
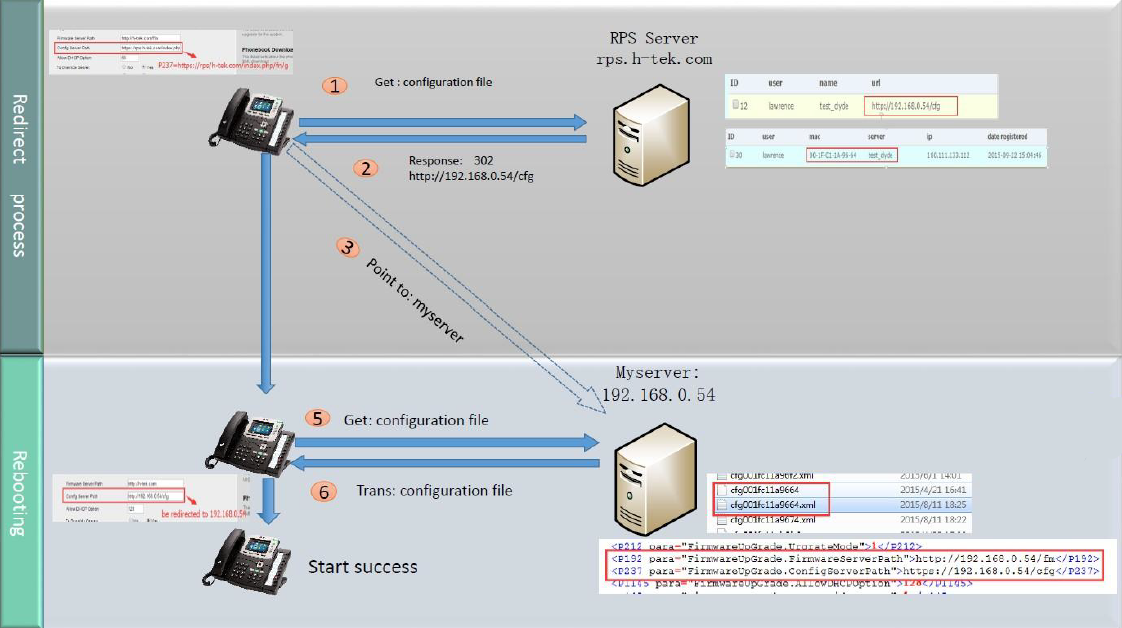
Auto Provision via RPS
Provision the IP Phone via RPS is a convenience way.
In this way, you need create a server on RPS that mapping to the provisioning URL of Netsapiens (like http://<Endpoints-FQDN>/cfg).
And then you need bind the MAC address of the phone with your server on RPS first. (If you don't have a RPS account, please contact your sales or your provider)
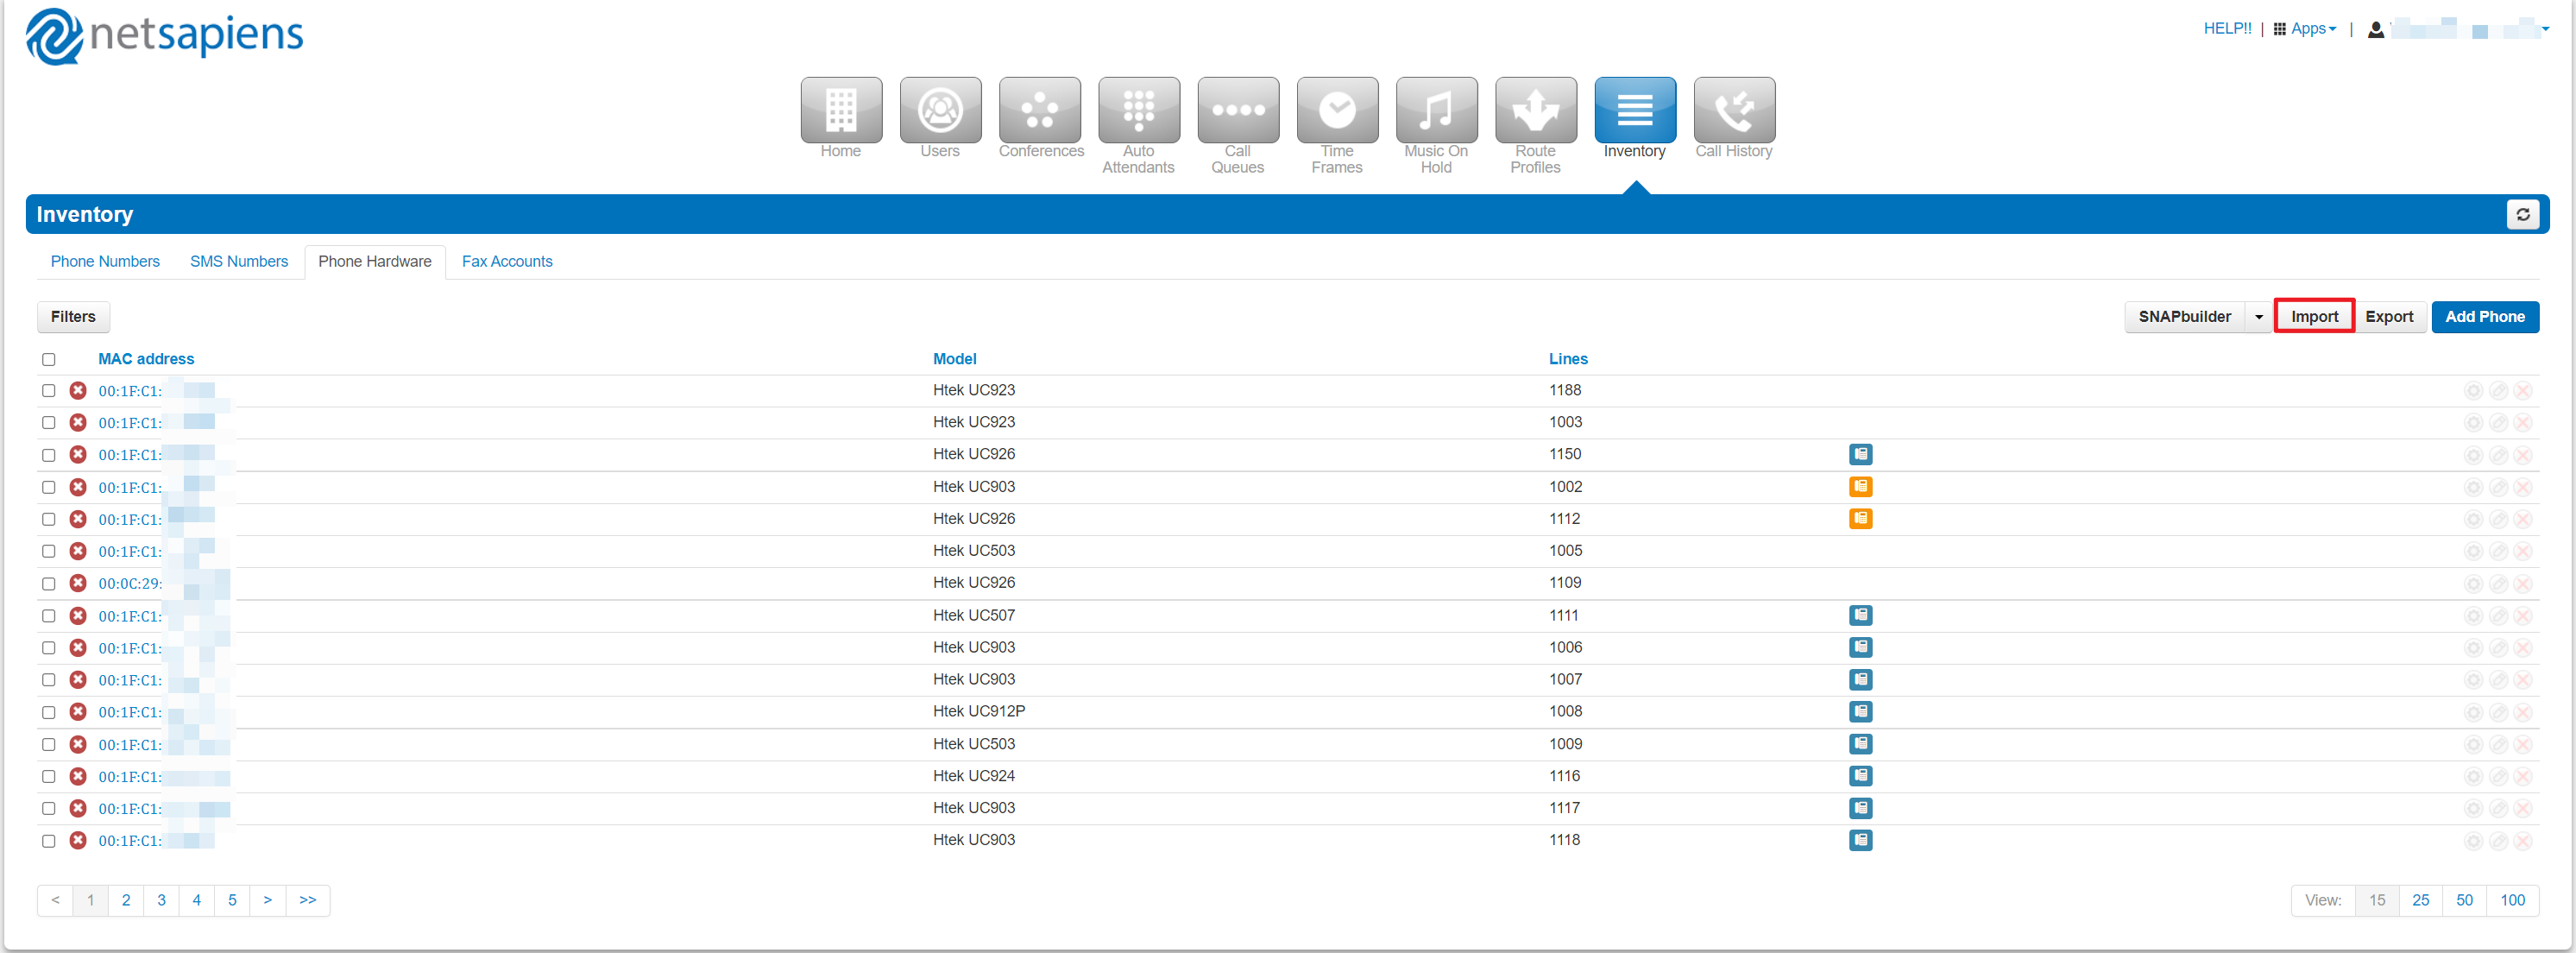
The last thing is add the phone to Netsapiens. You could add it one by one, but you also could add the phones by Import feature.
After that, when the IP Phone start up , default it will send 'Get' message to the RPS server, if the phone's MAC address is assigned on the RPS Server previously, the RPS server will send the preset URL of the configure server to IP Phone.
The work process of RPS show below. And more information about how to use RPS, please refer to these documents fm.htek.com/rs/rps.zip .
Auto Provision via DHCP Option 66
The most important way of Auto provision is DHCP option 66, which is mainly used in the situation where Htek IP Phone and NetSapiens platform can communicate with each other. The
An example of the NetSapiens platform's auto provision URL is
is http://alphandp.NetSapiens.com/cfg/, put this URL into you DHCP Sever's
option 66.Firmware path:http://alphandp.netsapiens.com/frms option 66.
Please refer to the following picture: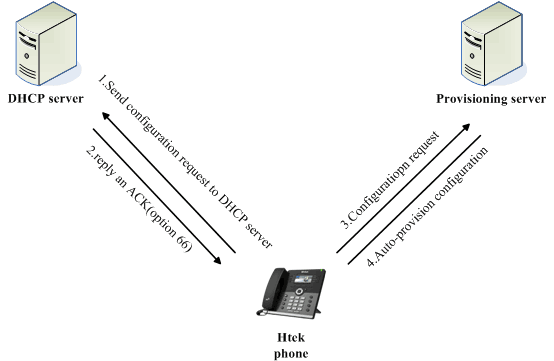
...
Red icon means that this extension register fail.
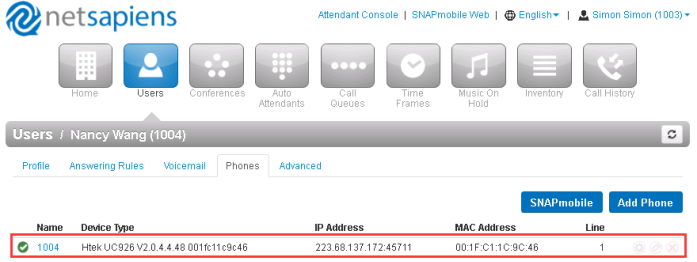
How to Edit a phone
1.From the Phone Hardware tab,Click a MAC address or Hover over a phone, and then click the icon at the far right of the Phone Numbers tab. For example:
...
5.You can also one-click configuration the BLF by clicking the Cascade Directory(Dynamic):
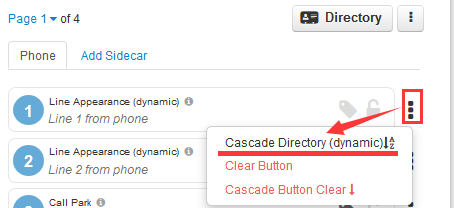
Note:
Local Contacts on the Netsapiens platform will be traversed to the BLF key.
Shared Contacts on the Netsapiens platform will be traversed to the Speed dial key.
Using the new configuration template for Htek IP Phones
...
5.Restart the phone, phone will get the new configuration from the NetSapiens platform.

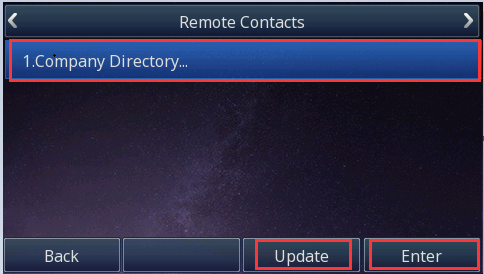
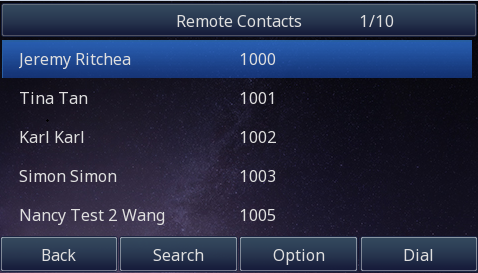
Auto provisioning the Remote PhoneBook for Htek IP Phone
...
4.Press the Update softkey, UC926 IP Phone will get the remote phonebook from NetSapiens platform, then you can see the company contacts.
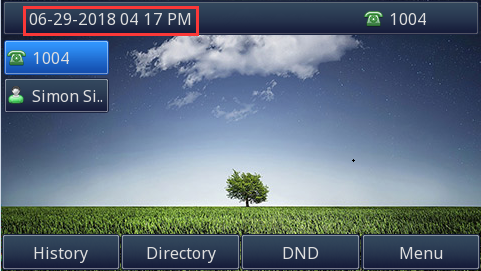
Use NetSapiens platform Feature
...
5.You will check the Date format and Time format on Htek IP Phone Idle status.
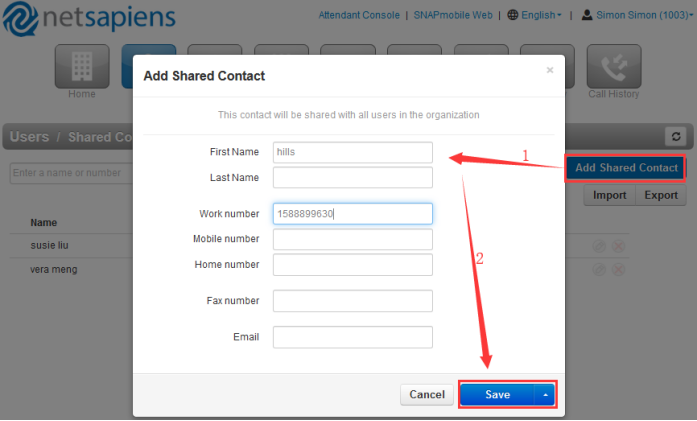
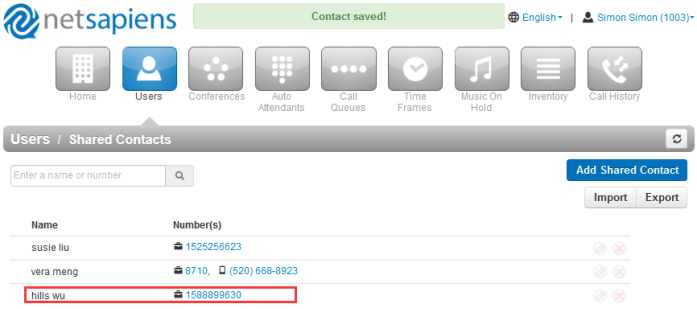
Contacts
By default, contacts contain all the extensions on NetSapiens platform. However, you can add contacts to enable easier access to everyone you need to reach.
...
3.Edit the contact information:
3.View contact:
How To Import contacts
...
1.Click “User”→click “Shared Contacts”→Click “Export” button:
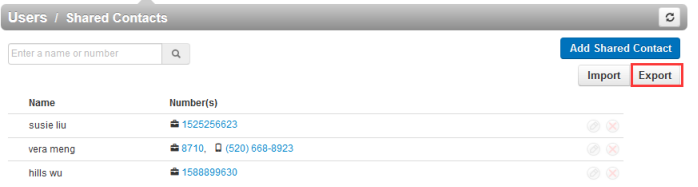
2.Export a format file, for example:Outlook CSV format
...
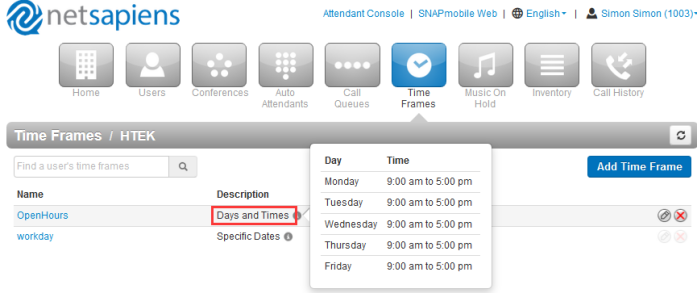
Hint: Moving the pointer over the blue text in the Description column shows the settings for that timeframe.
If you select Specific dates or ranges
Fields appear for entering dates or ranges,select a starting date and time from the pop-up calendar and select an ending date and time from the pop-up calendar.

To specify additional ranges, click the icon to display another row of fields, and then repeat steps 1 and 2 in the new fields. Repeat this step for each additional date or range you want to specify. To delete a date or range, click the icon next to the appropriate row.
...
2.Click the “Add Rule” button:
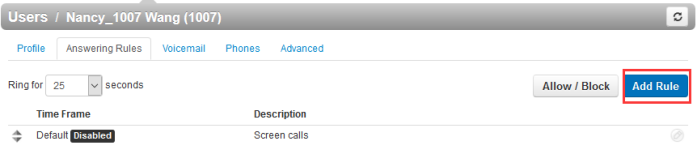
3.Select a time frame, you can use the default’s time frame.
...
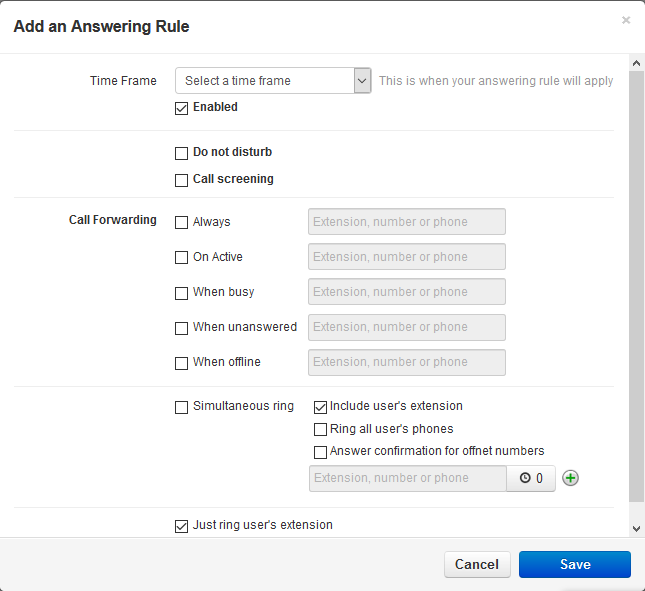
2.Enable the Call screening option:
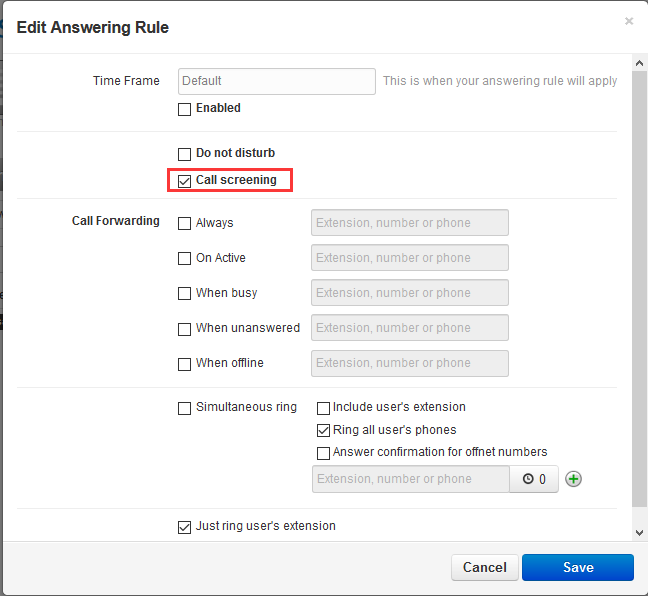
3.Click the save button to save the change.
...
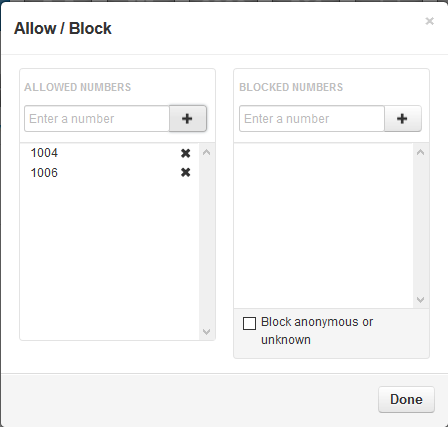
To remove a number, click the ![]() button next to that number.
button next to that number.
...
3.To block phone numbers, perform the following steps under BLOCKED NUMBERS:
...
3.You will see the the following interface:
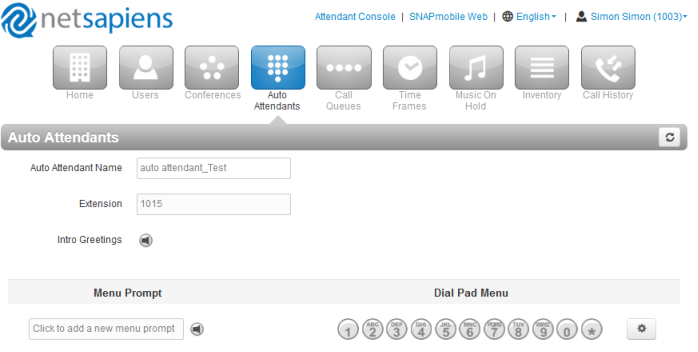
Auto Attendant Name:This is the auto attendant name you entered on the previous page. Use this field to change the name if desired.
...
5.Edit the menu prompt by clicking the options button.
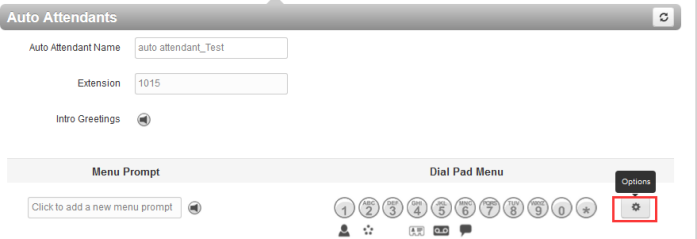
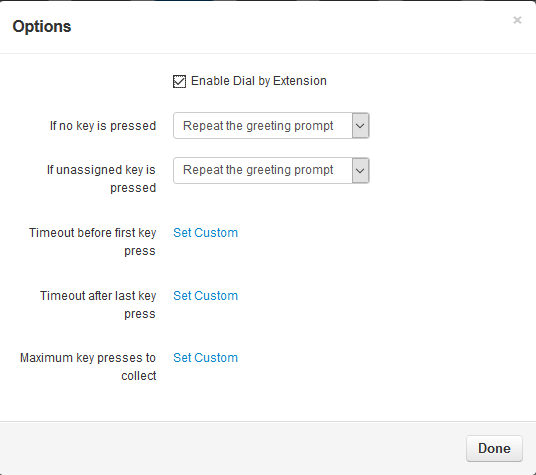
- Enable dial by extension = enable (check) or disable (uncheck) dial by extension.
- If no key is pressed = sets the default action if no key is pressed.
- If unassigned key is pressed = sets the action if an unassigned key is pressed.
...
6.Click Done when finished.
...
1.Click the “Edit Agent” icon

2.Add the agent:
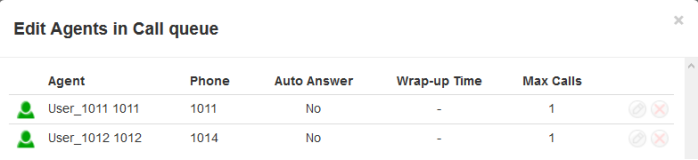
To set the auto Attendants
...
If you set the Email Address(es)(“Users” button→Select “Profile” tab→Change Account Security)?when the user has a voicemail ,the NetSapiens platform will send the message to your email address.
How To Use
When there is a message, the message![]() will flash green. Moreover, when you pick up the handset, or press Speaker key, you will hear some faster busy tone.
will flash green. Moreover, when you pick up the handset, or press Speaker key, you will hear some faster busy tone.
- 1005 dial 1004
- 1004 has no answer or reject this incoming call, then 1004 will be transfered to voicemail and leave a voicemail for 1004
- 1004 will receive this voicemail.
...
- Press the Transfer soft key during a call.
- Do one of the following:
- Enter the number you want to transfer the call to.
- Press the Directory soft key, and then select the desired group and search for the contact. - Press send or Dial soft key or “#”button to dial out the transferring call,when the phone which is transferred ringing and answer a call ,then press the transfer soft key to complete the transfer.
If you are using a handset, the transfer can be completed by hanging up the handset.
You can cancel the transfer before the call is connected by pressing the Cancel soft key.
There is some additional function of transfer
...
1.Click “Call Queue” button→Click the “Add call queue” button→Enter the name ,extension and select the “call park” type:
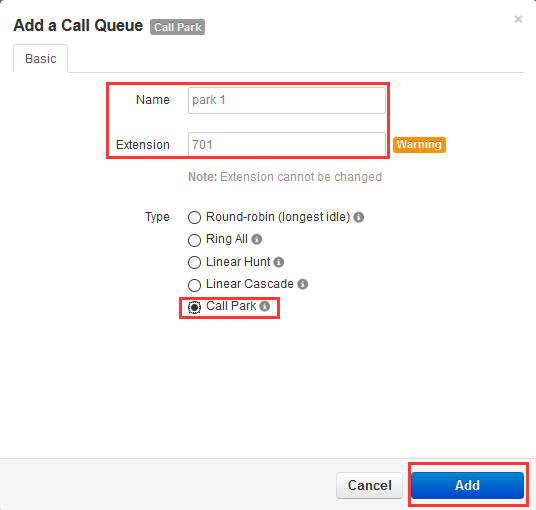
2.Click the “Add”button
How To Use
Static Call parking
...
- The BLF key’s light will solid green and icon will solid blue when monitored number is in idle status.
- The BLF key’s light will flashing red and icon will flashing yellow when monitored number has a incoming call.
- The BLF key’s light will steady red and icon will solid yellow when monitored number are talking.
...
Share line
Over View
Htek IP Phone supports SLA. This feature allows members of the SLA group to shared SIP lines and provides status monitoring (idle, active, progressing, hold) of the shared line. When there is an incoming call designated for the SLA group, all of the members of the group will be notified of an incoming call and will be able to answer the call from the phone with the SLA extension registered in the group.
All the users that belong to the same SLA group will be notified by visual indicator when a user seizes the line and places an outgoing call, and all the users of this group will not be able to seize the line until the line goes back to an idle state or when the call is placed on hold (with the exception of when multiple call appearances are enabled on the server side).
In the middle of the conversation, there are two types of hold: Public Hold and Private Hold. When a member of the group places the call on public hold, the other users of the SLA group will be notified of this by the red-flashing button and they will be able to resume the call from their phone by pressing the line button. However, if this call is placed on private-hold, no other member of the SLA group will be able to resume that call.
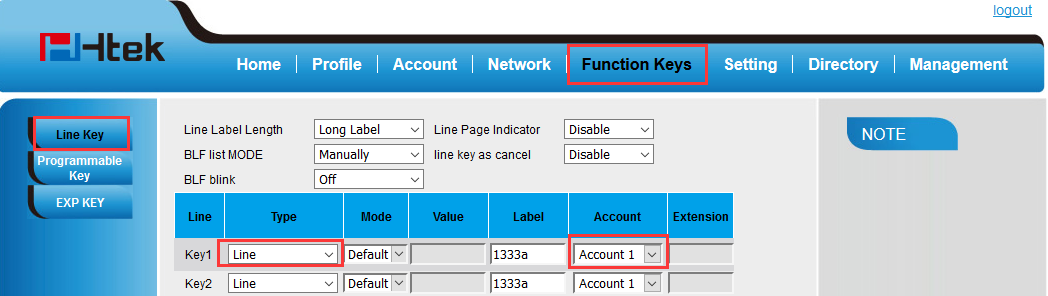
To enable shared call appearance, the user would need to register the shared line account on the phone. In addition, they would need to navigate to “Profile” -> “Advanced” on the webpage and set the “SIP Server Type” as Default, and configure the Line Key as “line” type with the desired account on webpage or LCD. If the user requires more shared call appearances, the user can configure multiple line keys (Function Keys->Line key) to be “line” type associated with the account.
This feature is very useful in the boss and secretary scenario. For example, the secretary can share the boss' extension number on her phone. When there is an incoming call to the extension number of the boss, both the phones of the boss and the secretary will ring simultaneously. Either the boss or the secretary can answer the call. Calls on shared line can be placed on hold or barged in.
...
Note: Line cannot be set to"Auto"
...
How To Use
- Restart the the three phones, three phones will get the corresponding configuration file.
- 1004 dial the 1333, three phones will ring simultaneously.
- When One of them answer this call, other members will back to Idle status, but the other members Line key light will stay red. About more SLA operations, you can refer to this table.
Line key LED Status | Description |
off | Idle status |
Stay green | a member of the SLA group in off-hook status |
Stay red | Other member of the SLA group’s led status when a member of the SLA group in off-hook status |
Blinked green every 500ms | a member of the SLA group in Private hold status. |
Stay red | Other member of the SLA group’s led status when a member of the SLA group in Private hold status |
Blinked green every 500ms | a member of the SLA group in public hold status |
Blinked red every 500ms | Other member of the SLA group’s led status when a member of the SLA group in public hold status |
Blinked green every 500ms | a member of the SLA group in progress status |
Stay red | On Other member of the SLA group’s led status when a member of the SLA group is in progressing status. |
Blinked red every 100ms | Alerting |
Stay green | a member of the SLA group in active status when there is an incoming call designated for the SLA group |
Stay red | Other member of the SLA group’s led status when a member of the SLA group in active status |
...
Hot Desking
Over View
Hotdesking is a feature which allows for multiple office workers on different shifts to use a single physical workstation or surface as opposed to each staff member having their own personal desk.
...
- For example: Press the Hot desk key on this 3000's phone.
- Server will let you enter the your call number and password, for example:2000.
- Enter the correct call number and password, Server will always forward to the 3000 when other people call 2000.
...
Intercom
Over View
Htek IP Phones provide an intercom feature that allows you to instantly connect to other phones within your office. Intercom functionality is ideal for announcing visitors or asking a quick question.
...
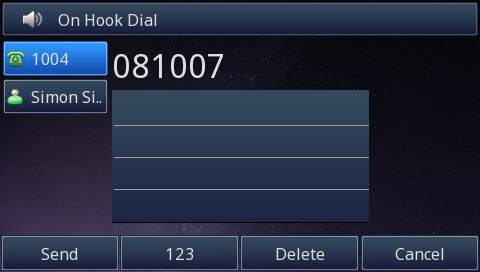
1.Dial 08ext. For example, to intercom extension 1007, dial 081007.(You can set a line key as Prefix,value is 08, label is Intercom)
...
...
Music On Hold
Over View
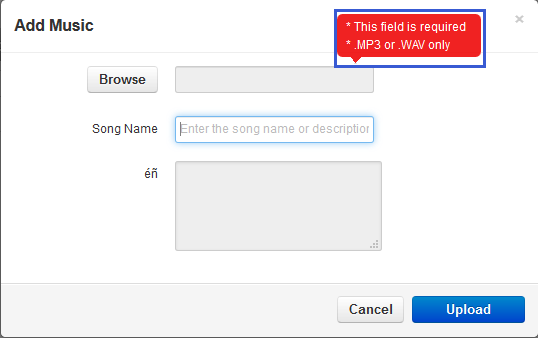
Music on Hold allows you to specify personal music on hold for your extension. You can configure music on hold files using the Music On Hold page.
...
3.After the file is uploaded, you can play it on your computer by clicking the icon to the left of the file on the Music On Hold page.
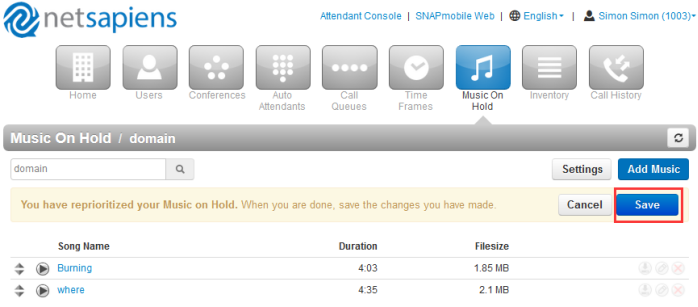
How to Changing the Order of Music On Hold Files
...
1.On the left side of the Music On Hold page, hover the mouse over the up/down arrows for the file you want to move.

2.Click Save button.
How to Edit Music On Hold File’s name
...
2.You can see the Call Center,Message,Contacts,Answering Rules,Time Frames,Phones,Music On Hold,Phones and Call History Pages.
As shown below:
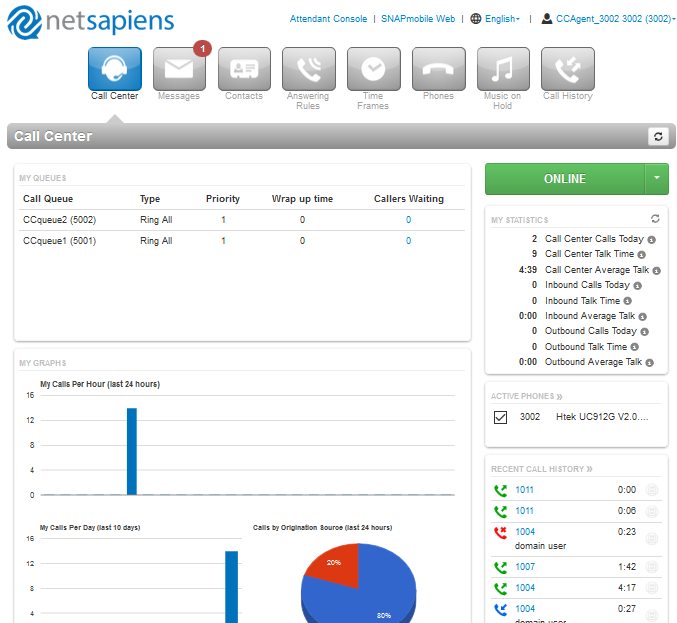
Call Center page:
My QUEUES: User’s Call queue.
...
3.Enter the target number:
...
4.Click the “Call” button, Caller Phone will auto answer this call:
...
5.Called phone can answer or reject this call on attendants console:

To answer a call from the attendants console
...
6. Phone A and Phone B will talk again.
...
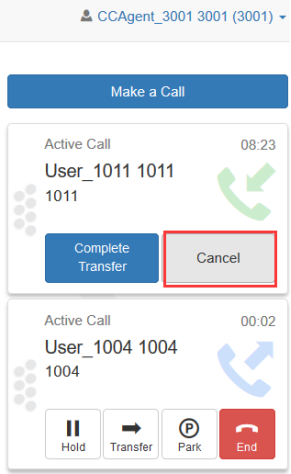
7. In step 7,Click the “Assisted Transfer” button, Phone will receive a incoming call during talking with B, Phone A answer this incoming call on phone interface,1004 will ring and answer. Phone A will talk with 1004.
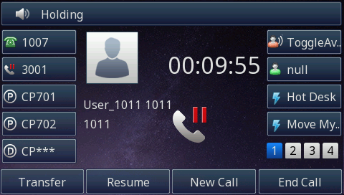
At the same time, Phone B will be held and play hold music. If Phone A cancel the attend transfer by clicking the “Cancel” during talking with 1004 on the attendants console, Phone A will back the first call,but you need to resume this first call by pressing the “Resume” softkey on phone interface:
![]()
To park a call (Static call park) from the attendants console
...
3.Choose a park from the below picture (for example:701), server will prompt: Your call has been parked at 701.
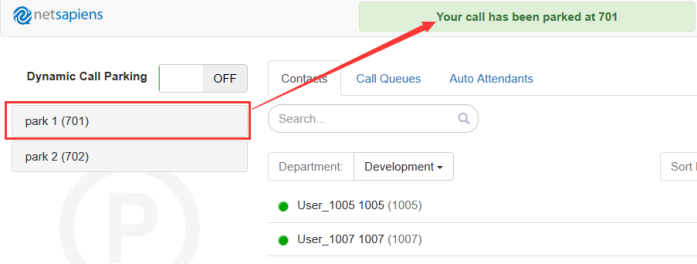
4.Phone A will back to idle interface. Phone B will be held and play hold music.
5.Other user can retrieve this park call.
To park a call (Dynamic call parking) from the attendants console
...
- Press Menu Settings →Advanced →Settings →Reset
The password of Advanced is provisioned by NetSapiens platform. - Press the Enter softkey or OK key
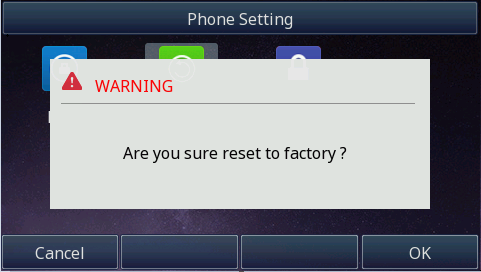
- Press OK softkey.
Note: Reset of your phone may take a few minutes. Do not power off until the phone has started up successful.The phone will be reset to factory settings successfully after startup.
...
| 锚 | ||||
|---|---|---|---|---|
|
| 锚 | ||||
|---|---|---|---|---|
|
This chapter provides general troubleshooting information to help you solve the problems you might encounter when using your phone. If you require additional information or assistance with your new phone, contact your system administrator.
Why is the LCD screen blank?
...