NetSapiens Configuring Guide
- Former user (Deleted)
- HTEK
Htek IP Phones Integrated with NetSapiens Platform Configuring Guide V1.0
About This Guide
Thank you for choosing the Htek IP phones, which are exquisitely designed to provide basic phone features plus advanced business features, such as Forward, Transfer, Network conference, share line and Enhanced Monitor Extension over IP network.
The purpose of this guide is to serve as a basic guidance for auto-provision with the NetSapiens Platform.
- NetSapiens SNAPsolution v39 is the minimum system version needed for HTEK provisioning.
- Htek Provisionable Devices on NetSapiens platform including:
UCV53, UCV52, UCV20, UCV20, UCV10, UC926U, UC926E, UC926, UC924W, UC924E, UC924, UC923U, UC923, UC921E, UC912, UC903, UC902, UC46 sidecar. - HTEK firmwares no older than 2.0.4.4.46 are recommended.
- For support, please send requests to the Htek Ticket System (http://www.htek.com/TicketingSystem/), or send email to support@htek.com, or contact Htek FAE team on Skype (skype ID: hanlong.fae).
In This Guide
Topics provided in this guide include:
- Chapter 1 NetSapiens Configuring Guide#_Getting Started
- Chapter 2 NetSapiens Configuring Guide#_Auto-Provisioning your phone
- Chapter 3 NetSapiens Configuring Guide#_Use Netsapiens platform Feature
- Chapter 4 NetSapiens Configuring Guide#_Resetting the phone
- Chapter 5 NetSapiens Configuring Guide#_Troubleshooting
Summary of Changes
- V1.0 (2018-06-19): Provide a basic guidance for auto-provision Htek IP phones with NetSapiens platform.
Getting Started
This chapter will show you the basic process of phone's start-up and instructions of the way to get the basic information of the phone. Topics include:
Phone Initialization
After your phone is powered on, the phone will boots up, complete the initialization and check firmware. Please refer to the three phases of the LCD display:


In the process of initializing, the phone will attempts to contact a DHCP server in your network to obtain valid IPv4 network settings (e.g., IP address, subnet mask, default gateway address and DNS address) by default.
Phone Status
After the phone comes up, you can view phone status on phone user interface (LCD) via the following ways:
- Press "OK" button twice.
- Press the following button one by one: "Menu" → "Status" → "information".
Available information of phone status includes:
- Network status (e.g., IPv4 status, IP mode, MAC address).
- Phone status (e.g., product name, firmware version, MAC address and device certificate status).
- Language information.
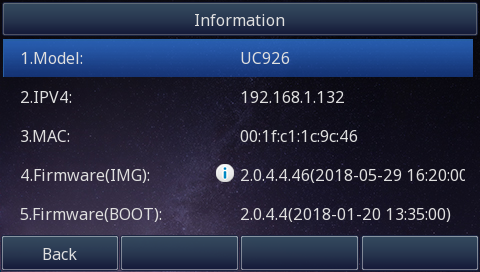
Press "Up" or "Down"to scroll through the list and view the specific information.
Auto-Provisioning your phone
Phone model mapping on Netsapiens
| Configuration Template on Netsapiens | Corresponding Phone Model |
|---|---|
| Htek UC902 | Htek UC902 |
| Htek UC902SP | |
| Htek UC902E | |
| Htek UC902G | |
| Htek UC903 | Htek UC903 |
| Htek UC912P | Htek UC912P |
| Htek UC912G | |
| Htek UC912E | |
| Htek UC923 | Htek UC923 |
| Htek UC923U | |
| Htek UC921E | Htek UC921E |
| Htek UC921 | |
| Htek UC921G | |
| Htek UC921U | |
| Htek UC924 | Htek UC924 |
| Htek UC924E | Htek UC924E |
| Htek UC924U | |
| Htek UC924W | |
| Htek UC926 | Htek UC926 |
| Htek UC926E | Htek UC926E |
| Htek UC926U | |
| Htek UCV10 | Htek UCV10(pro) |
| Htek UCV20 | Htek UCV20 |
| Htek UCV50 | Htek UCV50(pro) |
| Htek UCV52 | Htek UCV52(pro) |
| Htek UCV53 | Htek UCV53(pro) |
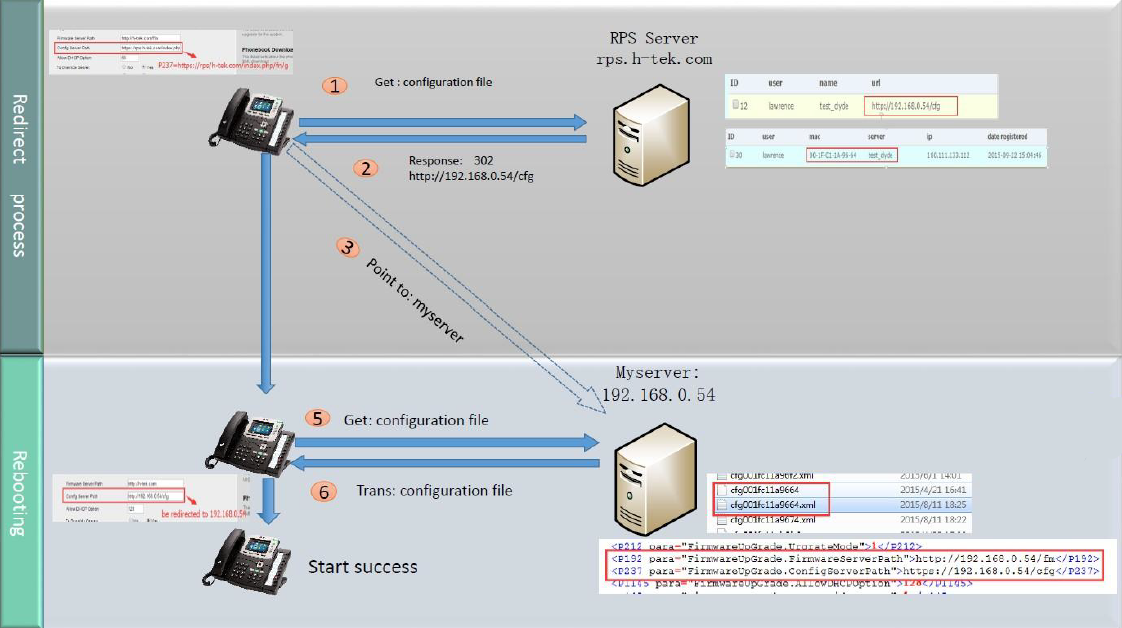
Auto Provision via RPS
Provision the IP Phone via RPS is a convenience way.
In this way, you need create a server on RPS that mapping to the provisioning URL of Netsapiens (like http://alphandp.NetSapiens.com/cfg/).
And then you need bind the MAC address of the phone with your server on RPS first. (If you don't have a RPS account, please contact your sales or your provider)
The last thing is add the phone to Netsapiens. You could add it one by one, but you also could add the phones by Import feature.
After that, when the IP Phone start up , default it will send 'Get' message to the RPS server, if the phone's MAC address is assigned on the RPS Server previously, the RPS server will send the preset URL of the configure server to IP Phone.
The work process of RPS show below. And more information about how to use RPS, please refer to these documents fm.htek.com/rs/rps.zip .
Auto Provision via DHCP Option 66
The most important way of Auto provision is DHCP option 66, which is mainly used in the situation where Htek IP Phone and NetSapiens platform can communicate with each other.
An example of the NetSapiens platform's auto provision URL is http://alphandp.NetSapiens.com/cfg/, put this URL into you DHCP Sever's option 66.
Please refer to the following picture: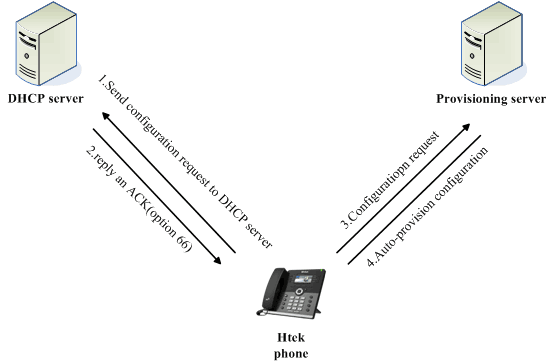
Operating Instructions
How to Add a phone
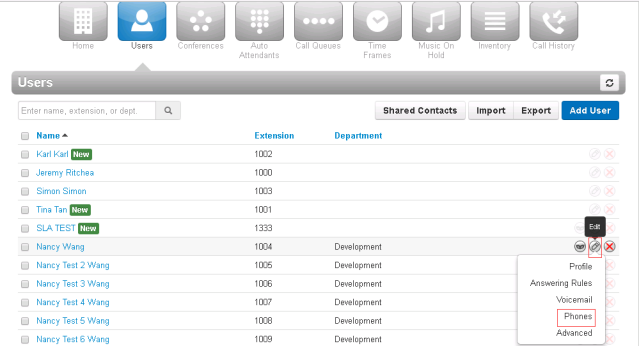
1.Add a User on NetSapiens platform.
2.Click the “Edit” button, choose the “Phones” option:
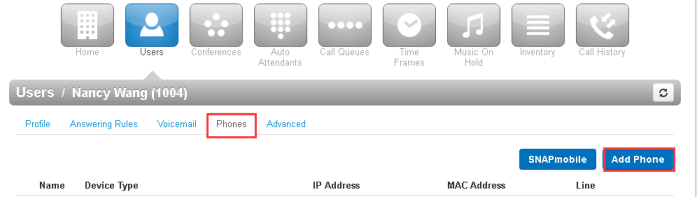
3.Add a phone and bind the UC926’s MAC address:
4.Select the Model, preferred Server and line number:
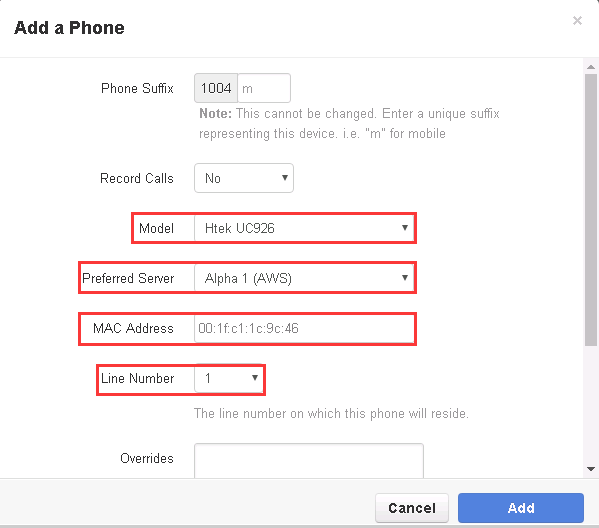
5.Click the “Add” Button to apply the change.
6.When you finish the configuration on the NetSapiens platform,then you can unplug the power and the phone will restart(Preconditions:IP Phone’s option 66 is open(Default is Open) and auto provision URL is configured on DHCP Option 66, then Htek IP Phone will get the configuration file successfully from NetSapiens platform.
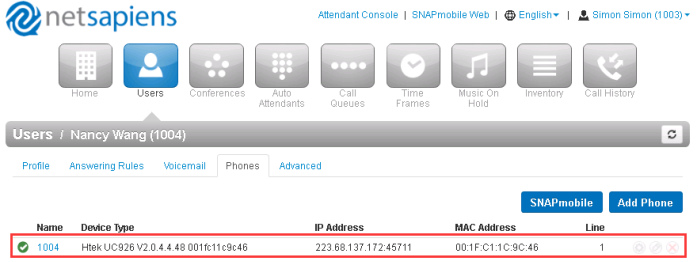
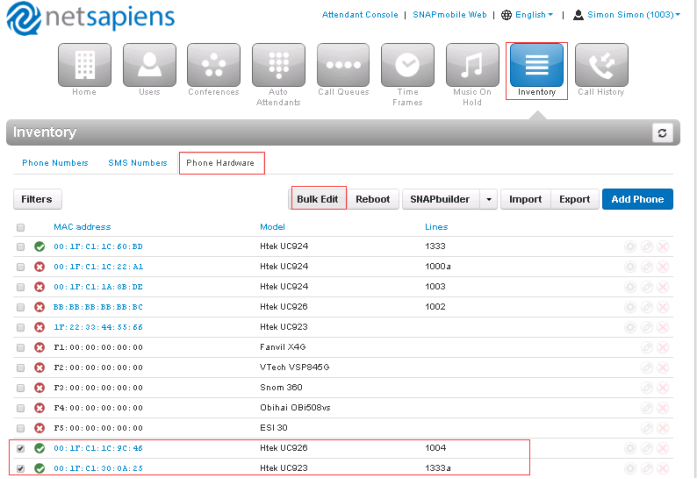
7.You will see the item on NetSapiens platform:
Green icon means that this extension register successful;
Red icon means that this extension register fail.
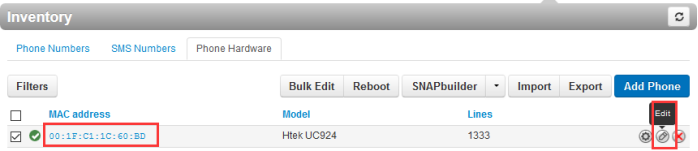
How to Edit a phone
1.From the Phone Hardware tab,Click a MAC address or Hover over a phone, and then click the icon at the far right of the Phone Numbers tab. For example:
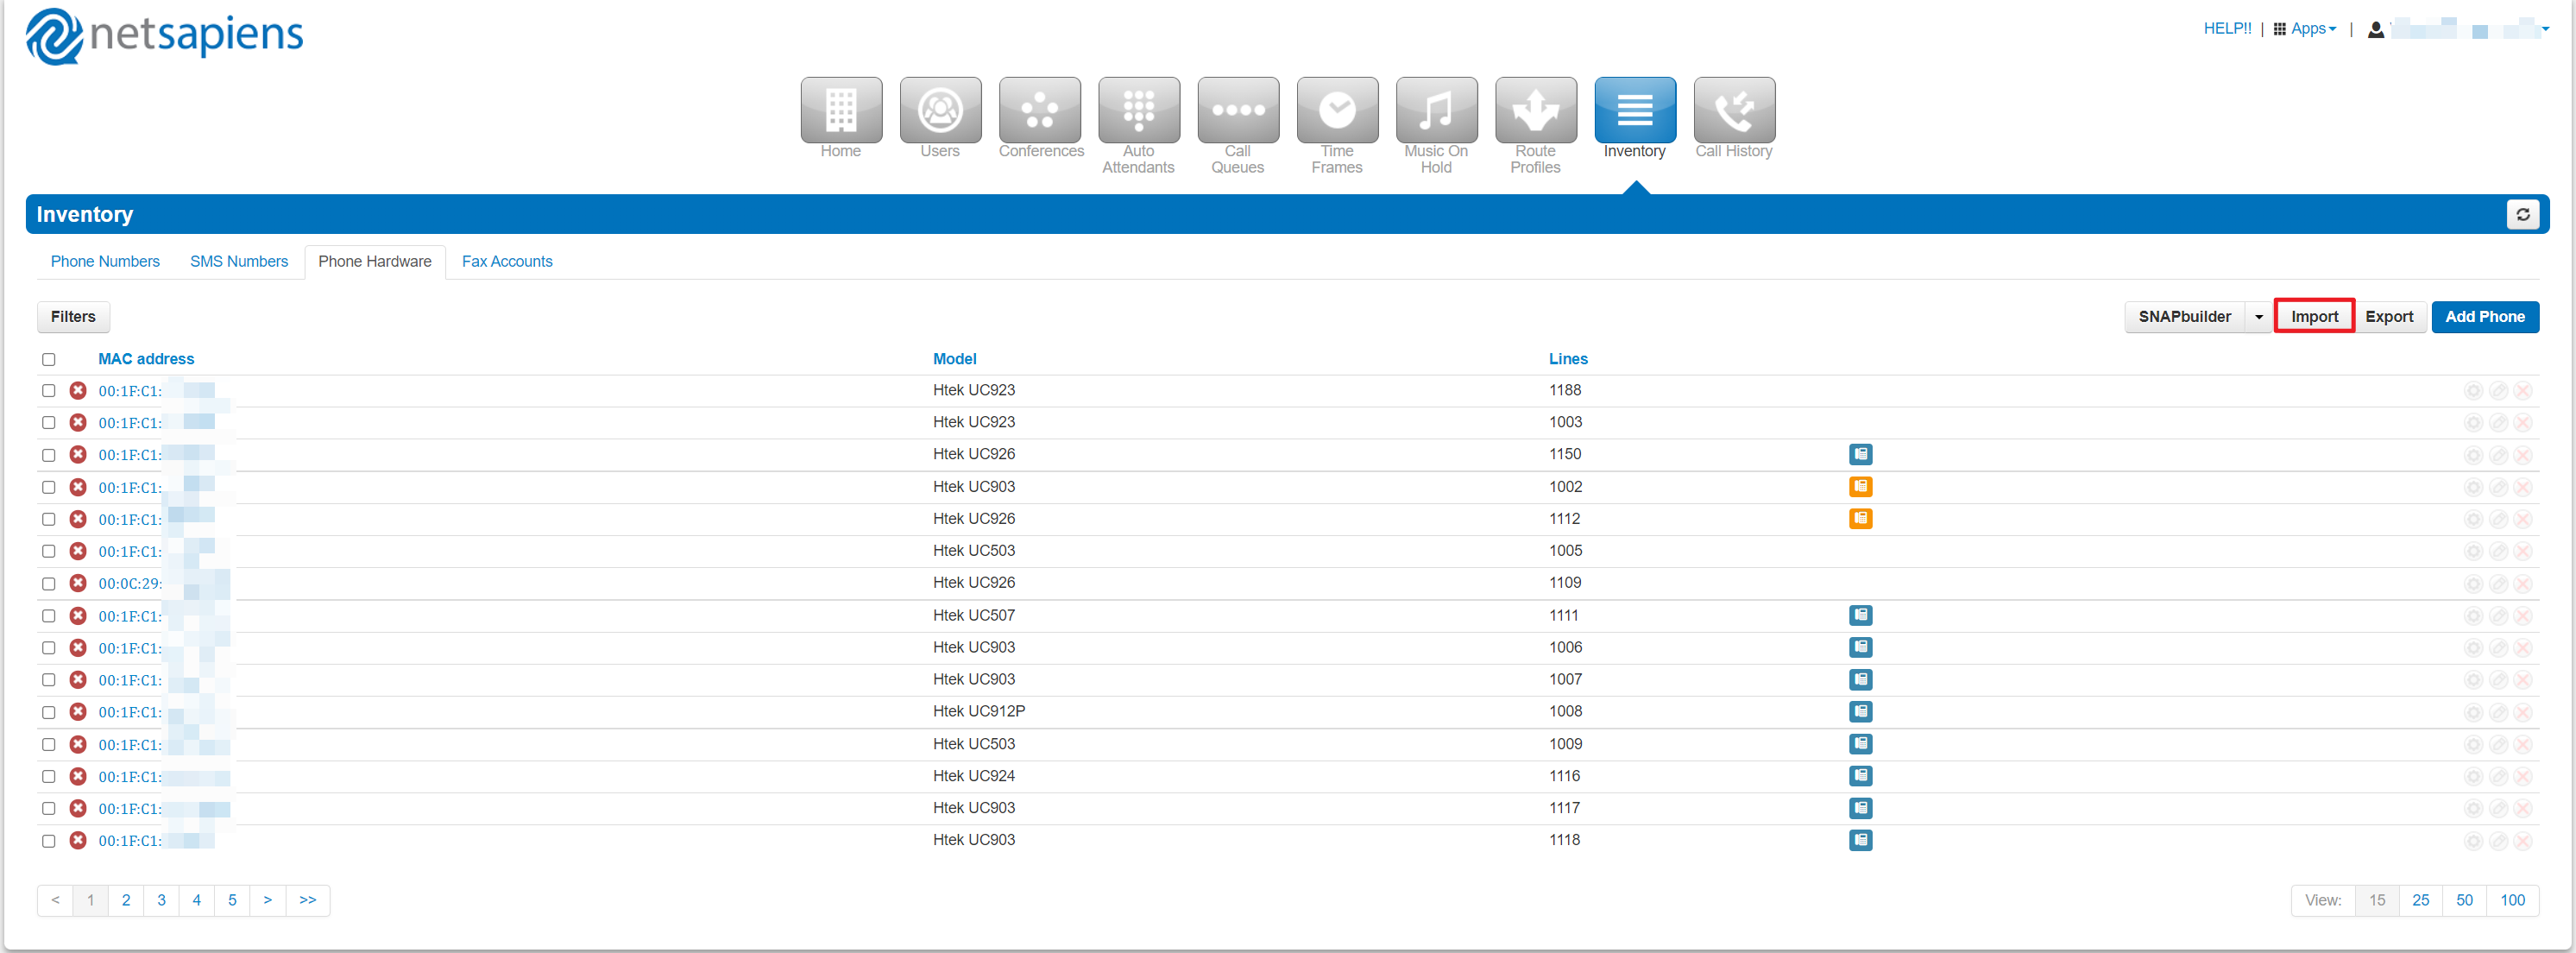
How to Filter, Import and Export Phone
The Phone Hardware tab also allows you to filter, export information about the phone hardware in NetSapiens platform.
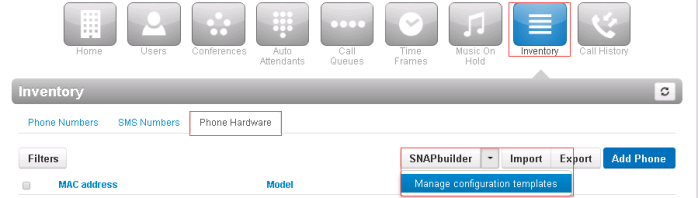
1.Click the “Inventory” button→ choose the “Phone Hardware” option:
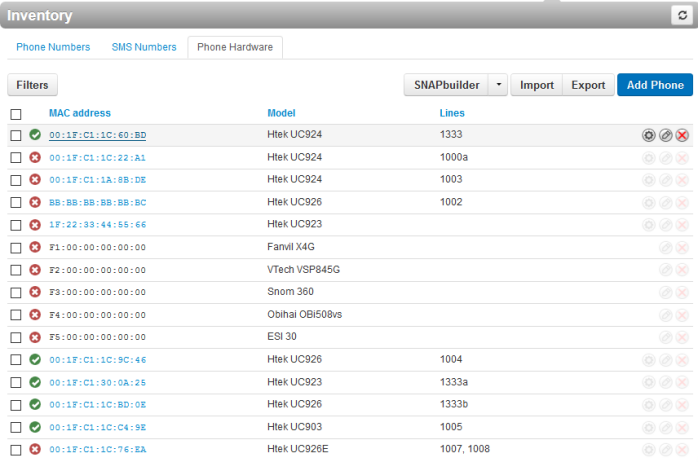
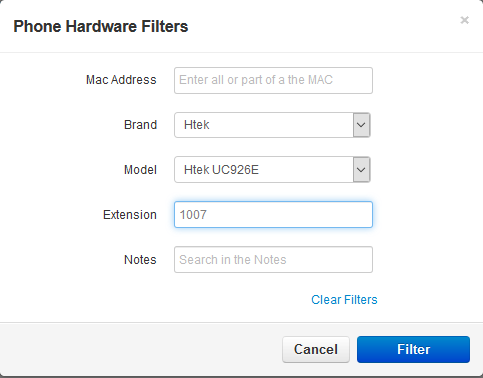
2.You can search a target phone according to the mac, Brand, model or extension and edit or manage the phone’s configure.
3.You can export these phone hardware.
![]()
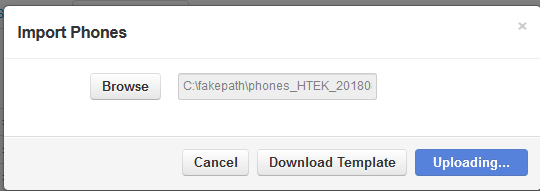
4.You can also batch import the phone if you don’t want to add phone one by one.
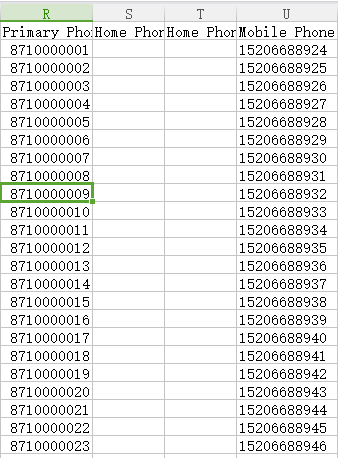
For example :The csv file content:

5.Import the csv file:
6.Edit and import the csv file:
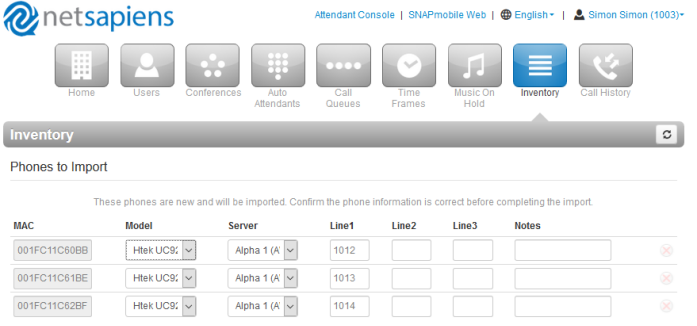
7.Check if these phones added successfully:
![]()
![]()
Management configuration template
Add a new configuration template
1.Click “Inventory”→“Phone Hardware→Select Management configuration template from the “SNAPBuilder” drop-down arrow:
2.Enter the Template name , description and select the Model on Add a new configuration template area, then click the “Add” button to add the new configuration template.

3.Edit the template for this new configuration template:
- You can click on phone’s button you would like to configure, you can drag and drop configurations to re-order their assignments
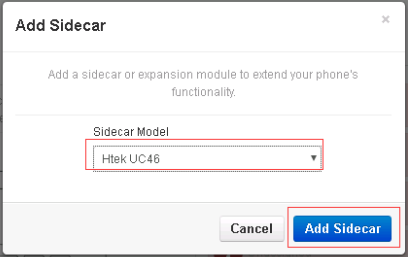
- You can also add a sidecar or expansion module to extend your phone’s functionally for the new configuration.
- You need to select the sidecar model to Htek UC46 when adding a sidecar, as following:
4.click on sidecar’s button you would like to configure, you can drag and drop configurations to re-order their assignments, as following:
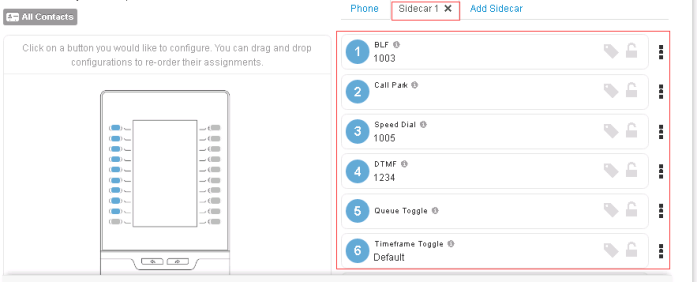
5.You can also one-click configuration the BLF by clicking the Cascade Directory(Dynamic):
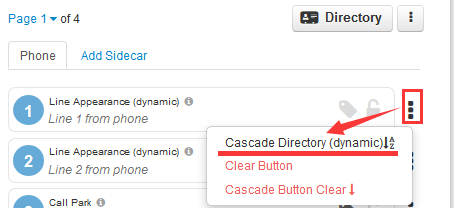
Note:
Local Contacts on the Netsapiens platform will be traversed to the BLF key.
Shared Contacts on the Netsapiens platform will be traversed to the Speed dial key.
Using the new configuration template for Htek IP Phones
1.Click Inventory → Phone Hardware →Select a or more phones which you have added→ click “Apply a configuration template to selected Devices” from the “SNAPBuilder” drop-down arrow :

2.Select the configuration template for the selected phones.
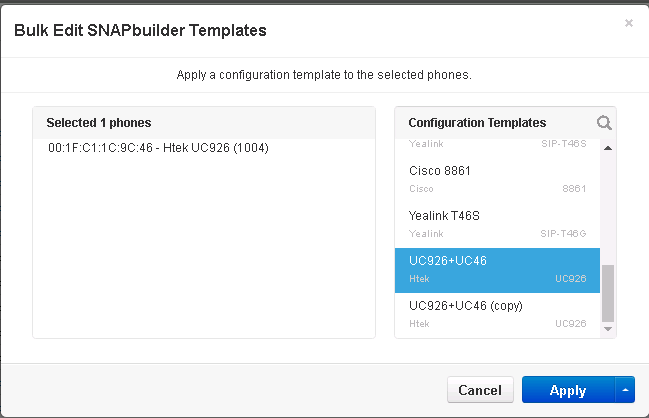
3.Click the “Apply” to finish the apply and Resync:

4.You will see the status on NetSapiens platform, as following:
![]()
5.Restart the phone, phone will get the new configuration from the NetSapiens platform.

Auto provisioning the Remote PhoneBook for Htek IP Phone
Over View
NetSapiens platform support the Remote phonebook for Htek IP Phone.
Remote phonebook’s URL is this:
http://alphandp.NetSapiens.com/cfg/$mac-directory.cfg
How to config
1.Click “Inventory”→ “Phone Hardware”→ Select a or more phones which you have added→ click the “Edit” button or “Bulk Edit” button:
2.Enable Directory for the selected phones:
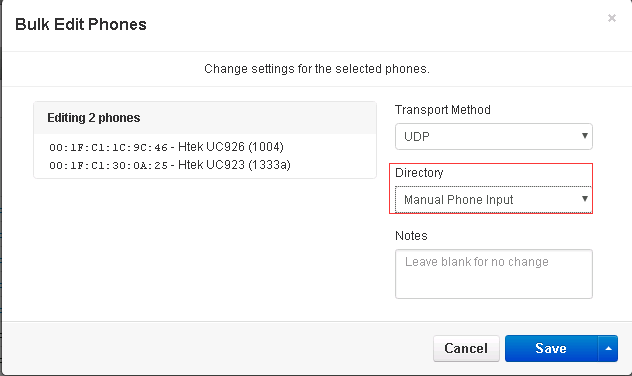
Note:
You can also set the Phone’s transport Method: UDP and TCP on this interface.
3.Click the “Save” button to save the change.
How to Use
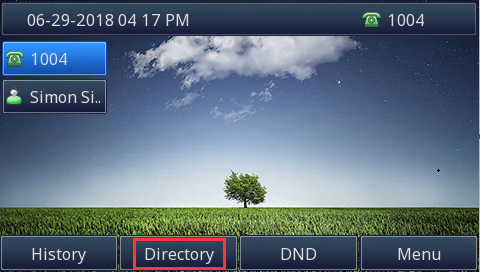
1.Restart the UC926 IP Phone which is provisioned.
2.UC926 IP Phone will get the new configuration file contain the remote phonebook URL
3.Press the Directory softkey on the UC926 IP Phone’s LCD interface:
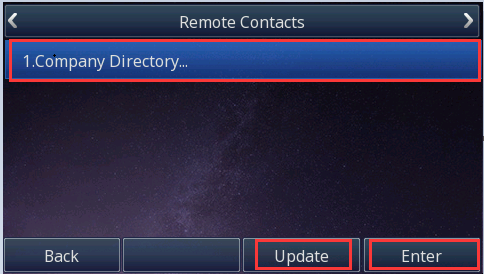
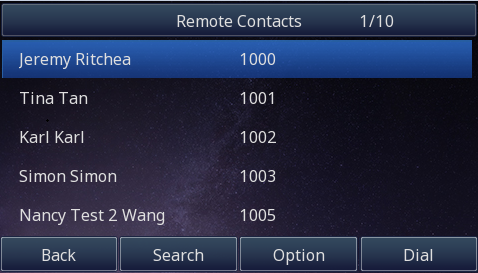
4.Press the Update softkey, UC926 IP Phone will get the remote phonebook from NetSapiens platform, then you can see the company contacts.
Use NetSapiens platform Feature
Manager Portal
This chapter provides the detail instructions and configurations for the following NetSapiens platform features:
- Time&Date
- Contacts
- Answer Rule and Time Frames
- Auto Attendants
- Call Queue
- Conference
- Voice Mail
- Call Transfer
- Call park
- Direct Call Pickup
- Do Not Disturb
- BLF
- Share line
- Intercom
- Music On Hold
- Hot desking
Time&Date
How To Config
To configure the TimeZone ,Date format and Time format via NetSapiens platform.
1.Click the “Users” button→Select a user→Click the “Edit” button, choose the “Profile” option

2.Click “Save” button to save the change.
3.Htek IP Phone will get the new configuration file from NetSapiens platform when re-provisioning and restarting the Htek IP Phone.
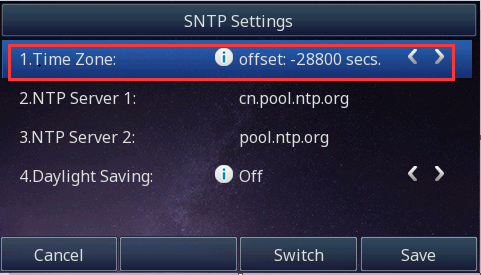
4.Please enter the Menu→Settings→Basic→Time&Date→SNTP Settings on Htek IP Phone LCD interface, you will check the Time zone.
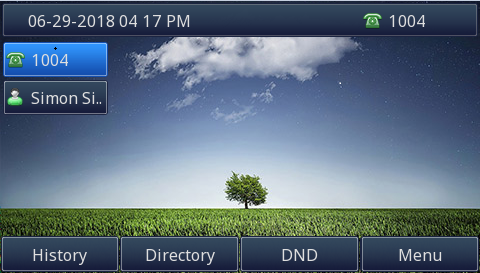
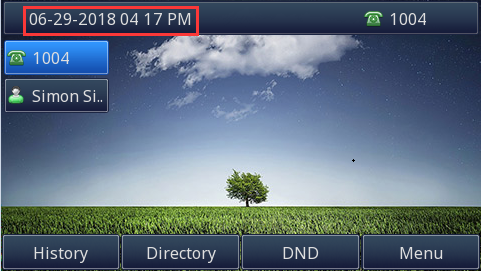
5.You will check the Date format and Time format on Htek IP Phone Idle status.
Contacts
By default, contacts contain all the extensions on NetSapiens platform. However, you can add contacts to enable easier access to everyone you need to reach.
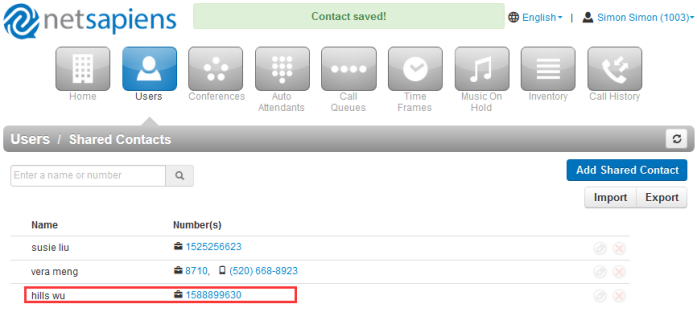
How To add shared contacts
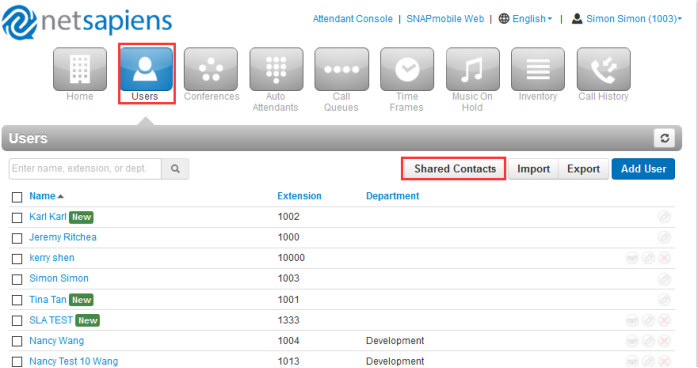
1.Click “User”→click “Shared Contacts”:
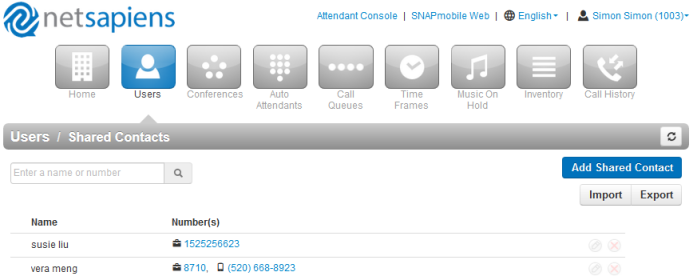
2.Click “Add Shared Contact”
3.Edit the contact information:

3.View contact:
How To Import contacts
The Add Contact button allows you to add a contact one at a time. These are for external contacts only. Your contact list will automatically update with your internal extensions.
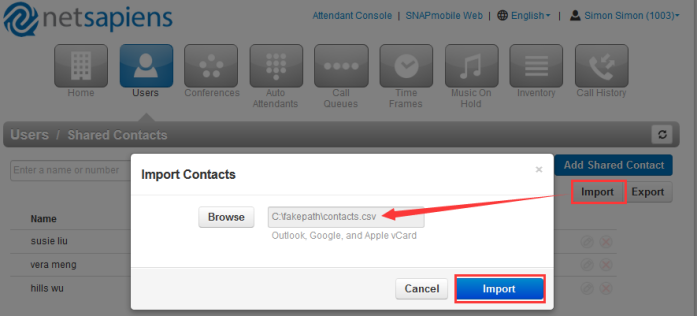
Import will allow you to select a file from your PC, the import can accept CSVs from Microsoft Outlook and Gmail as well as vCards.
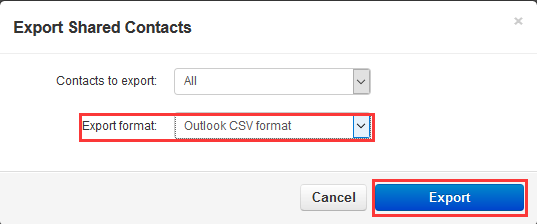
1.Click “User”→click “Shared Contacts”→Click “Export” button:
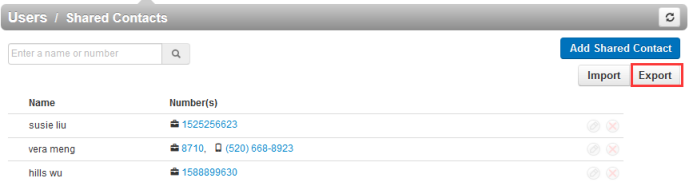
2.Export a format file, for example:Outlook CSV format
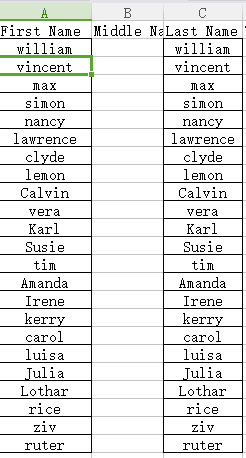
3.Open the CSV file by excel and Add contacts in batches according to the file’s format:
3.Import this CSV file you have prepared :
4.The imported contacts will appear on the Shared Contacts page:
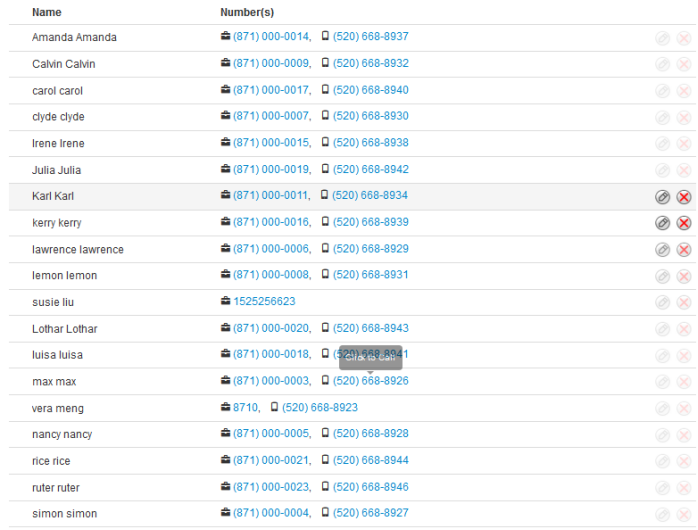
5.Click the number to call.

6.Edit the contact again by clicking edit button:

7.Delete the contacts from the shared contacts:

Answer Rule and Time Frames
Time Frames
Time frames allow you to control the scheduling of the system.
Three common time frames are:
- Open Hours (for example, M-F 9am-5pm)
- Holidays (Independence Day, Thanksgiving, New Year’s, and so on)
- Closed Hours (all other times)
Time frames can be both shared (system-wide and set by the administrator) or personal to your extension. You can add a time frame to your extension by clicking the Add Time Frame.
How To Config
To configure Time Frames via NetSapiens platform:
1.Click the “Time Frames” button→ click the “Add Time Frame” button.
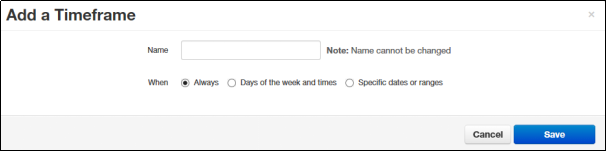
In the Name field, enter a name for this time frame.
Next to When, select the time period when the time frame will be applied:
Always : select this option if the time frame will always be applied.
Days of the week and times : select this option to select days and times when the time frame will be applied.
Specific dates or ranges : select this option to specify a specific date or range of dates.
If you select Days of the week and times
Options appear for selecting days and times when the time frame will be applied.
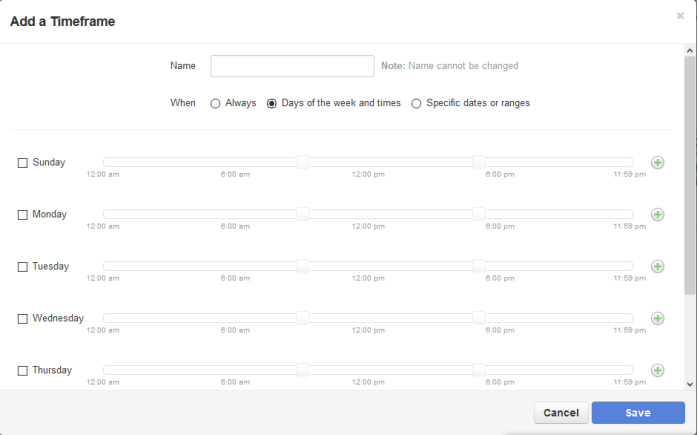
Using the check boxes next to the name of each day of the week, check the days when the time frame will be applied. A blue line to the right of checked day shows the default hours for this time frame (9:00 AM through 5:00 PM).
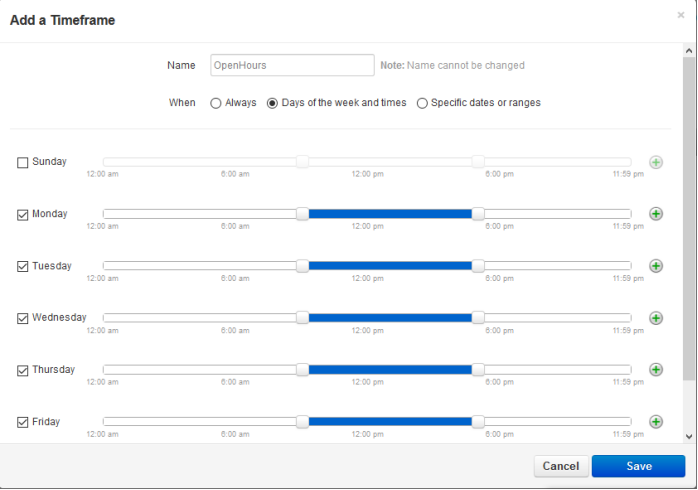
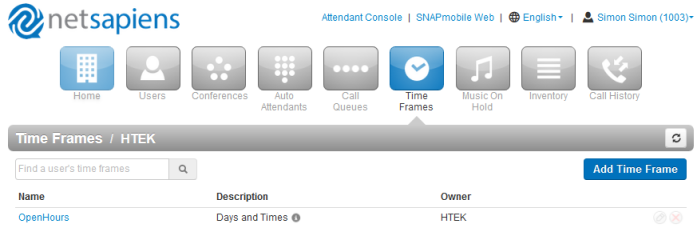
Click Save to save your selections. The time frame appears as a row on the Time Frames page.
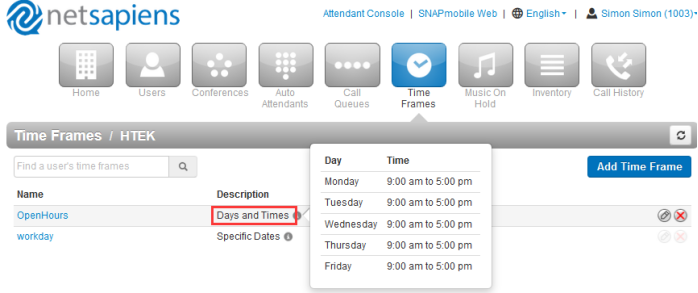
Hint: Moving the pointer over the blue text in the Description column shows the settings for that timeframe.
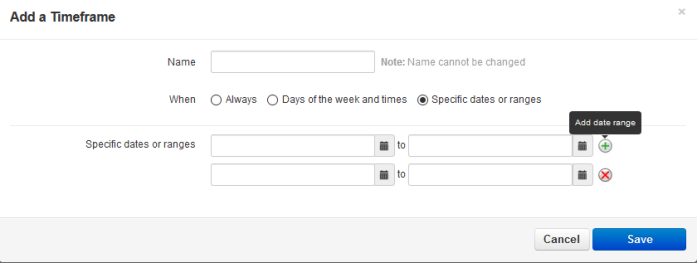
If you select Specific dates or ranges
Fields appear for entering dates or ranges,select a starting date and time from the pop-up calendar and select an ending date and time from the pop-up calendar.
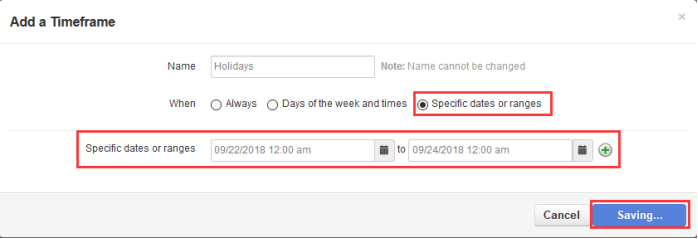
To specify additional ranges, click the icon to display another row of fields, and then repeat steps 1 and 2 in the new fields. Repeat this step for each additional date or range you want to specify. To delete a date or range, click the icon next to the appropriate row.
Answer Rule
Over view
After you set up your time frames, you can create different answering rules for your time frames.
At the top of the page is the ring timeout selection. This option specifies the number of seconds that your phones will ring or forwarding rule before going to voicemail (when available).
Note: The following introduction is best to enable this time frame.
How to Add
To configure add a answer rules via NetSapiens platform:
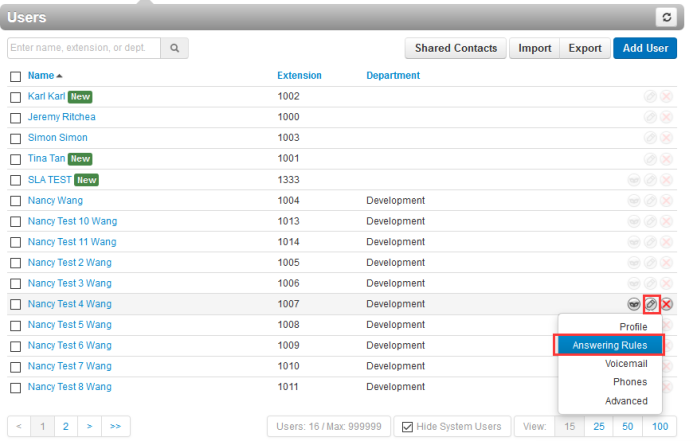
1.Click the “User” button→ click a target extension→click “Edit” icon and select the Answer Rules option:
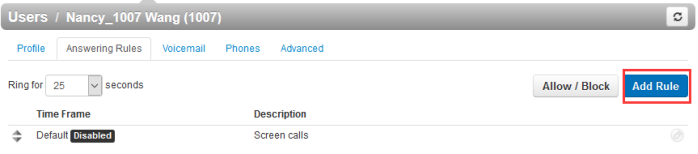
2.Click the “Add Rule” button:
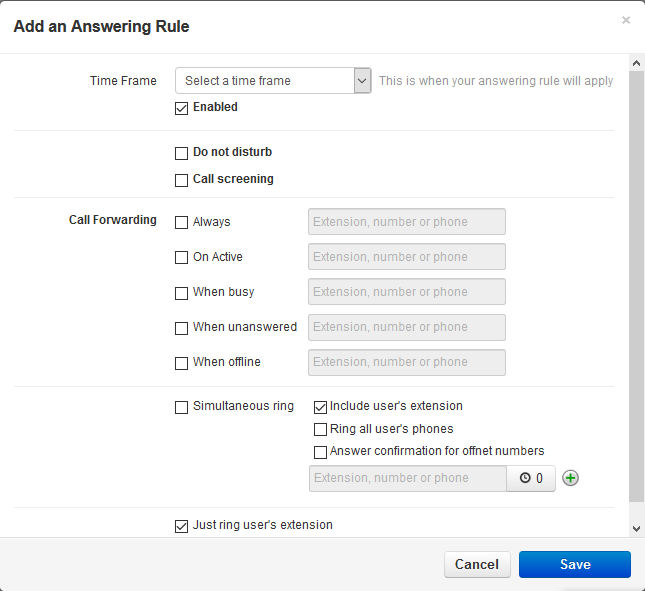
3.Select a time frame, you can use the default’s time frame.
4.When you enable the time frame, the answer rule will apply.
If you disable the time frame, the answer rule will be not apply.
Do Not Disturb
No phone rings, goes straight to voicemail if available when you enable this option.
Call screening
Over view
Prompts caller to say their name, lets you screen the call before accepting.
How to Config
1.Click the “User” button→ click a target extension→click “Edit” icon and select the Answer Rules option:
2.Enable the Call screening option:
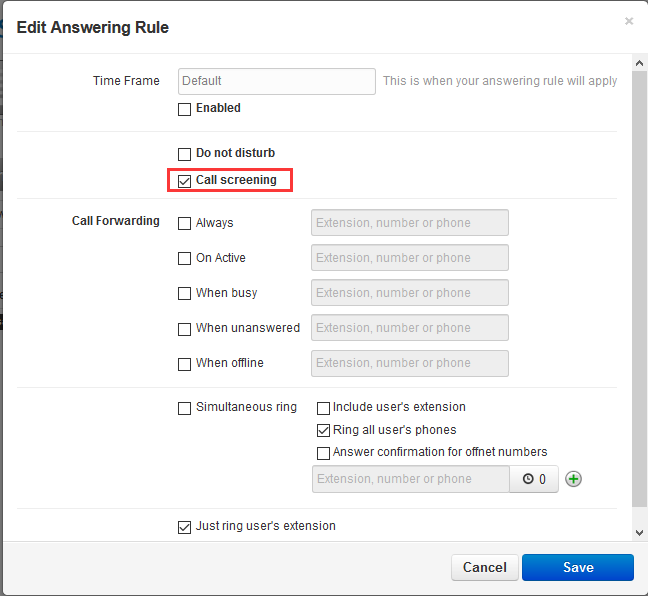
3.Click the save button to save the change.
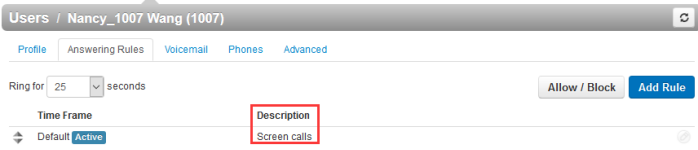
4.In the Description column will shows the Screen calls.
How to use
1.1004 dial 1007
2.Server will prompt 1004 to record your name
3.1007 will ring after 1004 finishing the recording name.
4.1007 answer, server will prompt 1007 to enter the follow menu option:
- press the “1” to reach this call,
- Press the “2” to send voicemail,
- Press the “7” to drop this call.
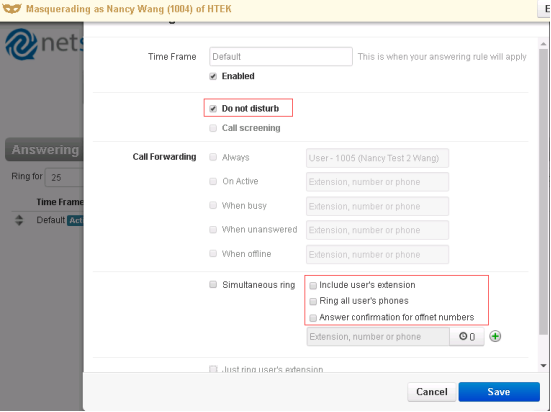
Call forwarding
Over view
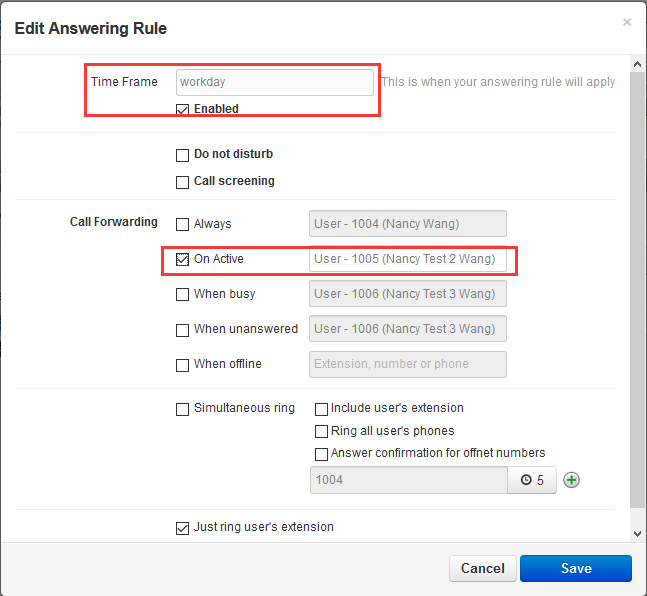
NetSapiens platform support different call forwarding rules(Always/On active/busy/unanswered/offline/Simultaneous ring). Make sure that you won’t miss all of your calls.
How to Config
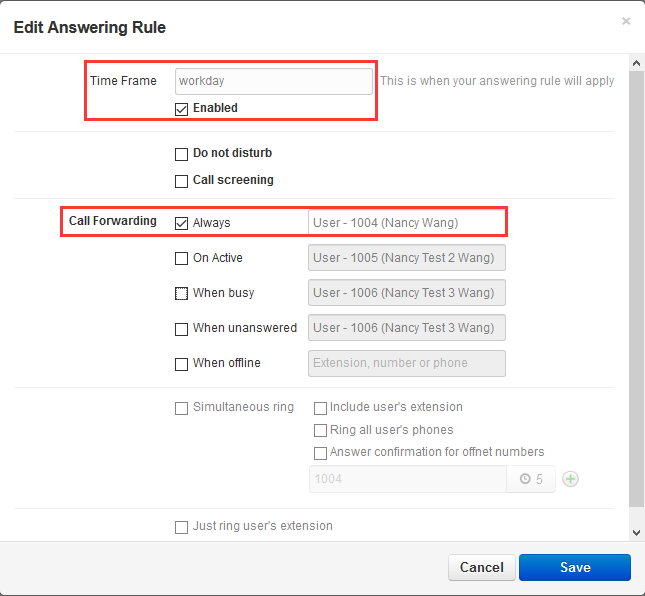
If you want to always forward all incoming call to other extension , you need to select the always For example:
If you want to forward an incoming call to other extension when you have a active call, you need to select the On active For example:
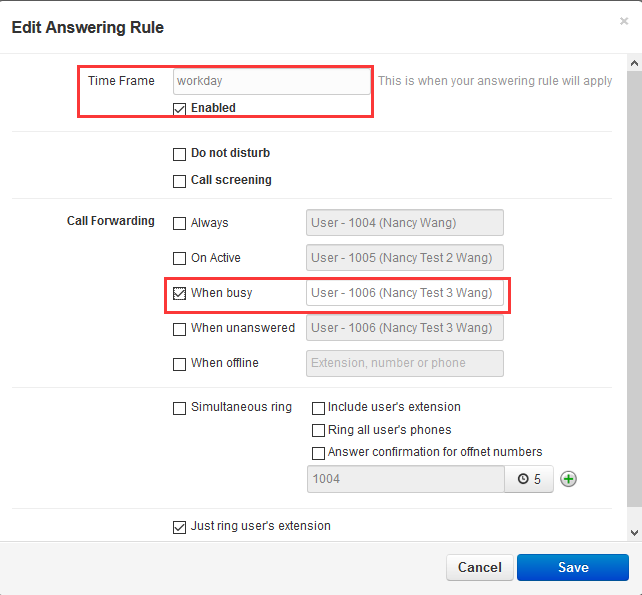
If you want to forward an incoming call to other extension when you are busy, you need to select the “When busy” For example:
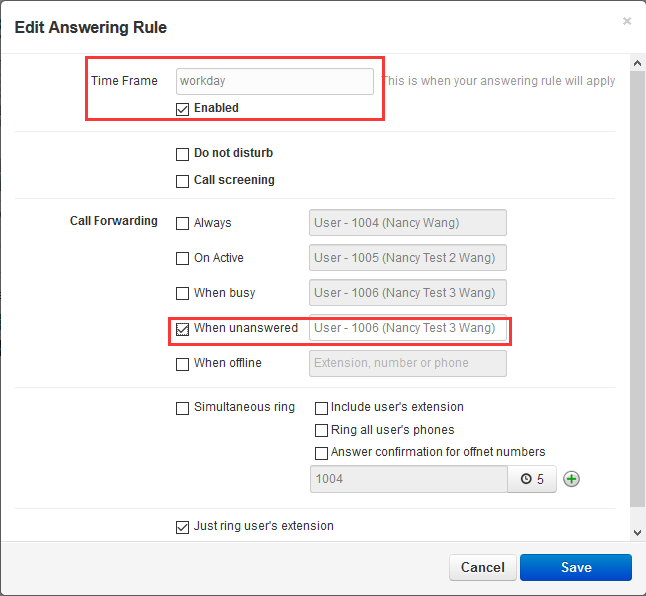
If you want to forward an incoming call to other extension when no answer or reject or on active, this incoming call can be forward to other extension, you need to select the “When unanswered” For example:
Note: Make sure the call waiting is closed if you want to forward an incoming call to other extension when you have a active call.
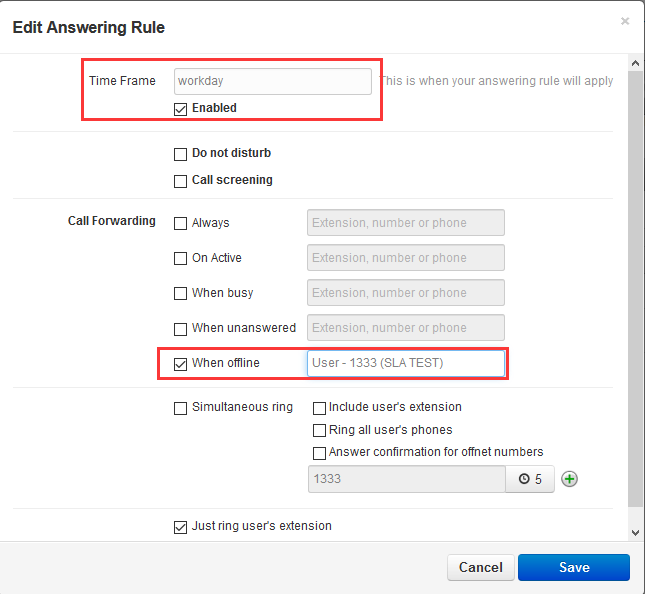
If you want to forward an incoming call to other extension when your extension offline(such as during a power outage), you need to select the “When offline” For example:
If you want to set Rings many phones at once for an incoming call,you need to set Simultaneous ring according to your need.
There are simultaneous ringing rules:
- Include the user’s extension.
- Ring all your user’s phones.(The premise is to add multiple extension)
- Answer confirmation for offnet numbers
You need to add a or more extension before using the Simultaneous ring feature:
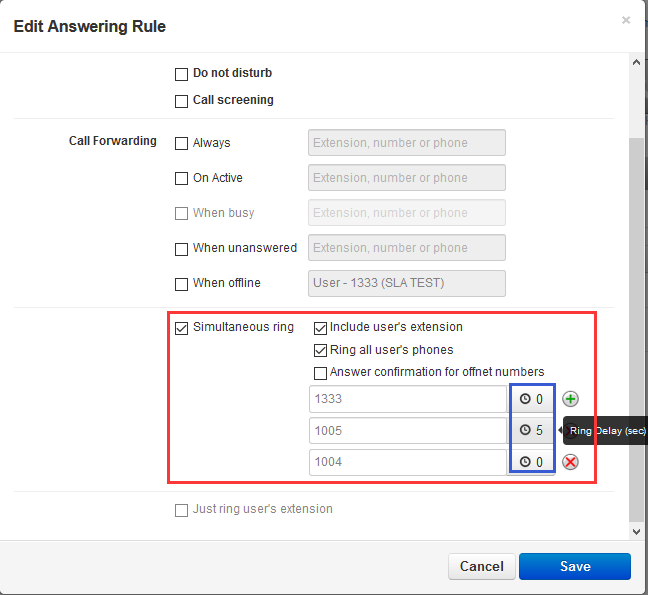
Note: Ring Delay:
5 means that 1005 will ring after 5 seconds delay.
0 means that 1333 and 1004 will ring immediately.
Just ring user’s extension:Rings just your phone.
Allow/ Block Callers
Over view
The Answering Rules page has an Allow/Block button that allows you to permit or block calls from certain numbers. Using this feature, you can block unwanted calls to your phone, as well as calls from anonymous and unwanted numbers. Allowed numbers bypass user Do Not Disturb and Call Screening rules to ring through immediately.
How to Config
1.From the Answering Rules page, click Allow/Block.
The Allow/Block page appears. This page has two lists, one for allowed phone numbers (on the left) and another for blocked phone numbers (on the right).
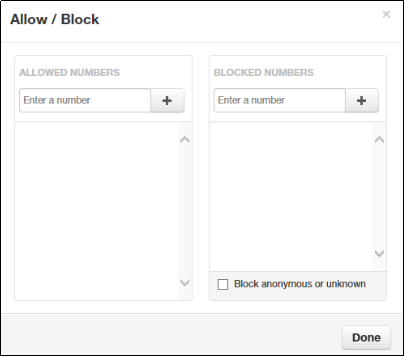
2.To allow phone numbers, perform the following steps under ALLOWED NUMBERS:
Click in the Enter a number field.
Enter the number you want to allow.
Click the ![]() button. The number appears in the ALLOWED NUMBERS list and a brief message tells you the allowed number was added.
button. The number appears in the ALLOWED NUMBERS list and a brief message tells you the allowed number was added.
To add more numbers, repeat step 2.
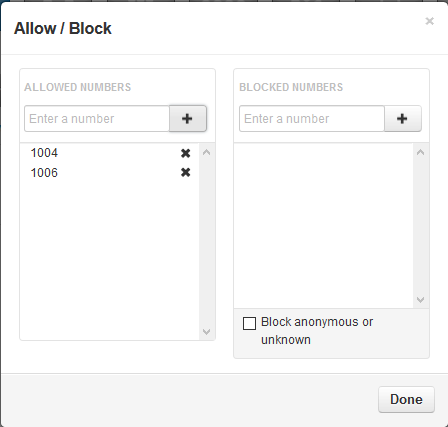
To remove a number, click the ![]() button next to that number.
button next to that number.
3.To block phone numbers, perform the following steps under BLOCKED NUMBERS:
Click in the Enter a number field.
Enter the number you want to block.
Click the ![]() button. The number appears in the BLOCKED NUMBERS list and a brief message tells you the blocked number was added.
button. The number appears in the BLOCKED NUMBERS list and a brief message tells you the blocked number was added.
To add more numbers, repeat step 3.
To remove a number, click the ![]() button next to that number.
button next to that number.
4.To block anonymous calls and calls from unknown numbers, check Block anonymous or unknown.

5.When you are finished, click Done.(???????????????403)
Auto Attendants
Over View
How to Config
To add auto attendants
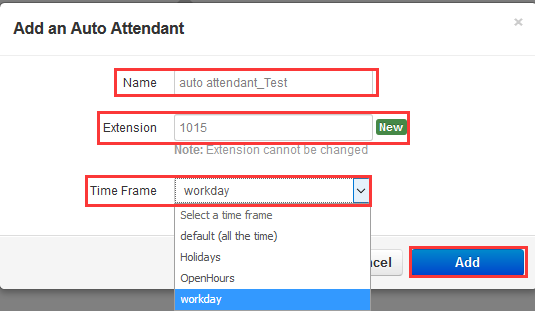
1.From the Auto Attendants page, click the Add Attendant button. The Add an Auto Attendant pop-up window appears.
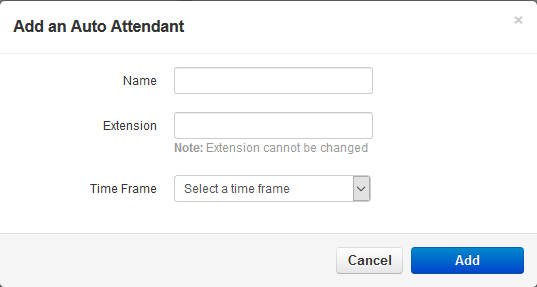
Name:Enter a name for this auto attendant. The name should allow you to differentiate this auto attendant from other auto attendants you configured.
Extension:Adding an auto attendant: select the extension used with this auto attendant.Editing an auto attendant: read-only field that shows the extension.
Time Frame:Select a time frame to which this answering rule will be applied. Choices shown are the ones previously configured using the procedure under “Adding Time Frames”.
2.Enter the information:
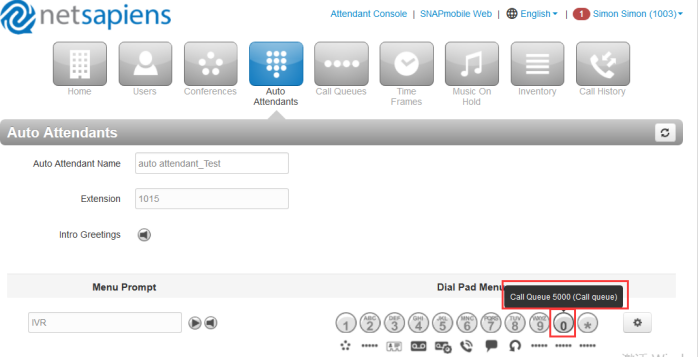
3.You will see the the following interface:
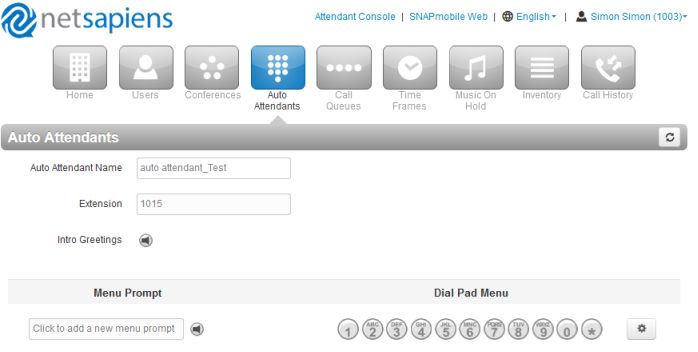
Auto Attendant Name:This is the auto attendant name you entered on the previous page. Use this field to change the name if desired.
Extension:Read-only field that shows the extension associated with this auto attendant that you entered on the previous page
Intro Greetings:Click the icon to display the Manage Greetings pop-up window and play, upload, record, or delete greetings.
Menu Prompt:Click in the text box or click the icon to upload or record a menu prompt.
Dial Pad Menu:Routes calls to one of a variety of resources when a caller selects that option. Click a number, and then select an application from the following pop-up:

- User = goes to a user (extension).
- Conference = goes to a conference bridge.
- Call Queue = goes to a call queue.
- Directory = goes to a dial by name directory.
- Voicemail = goes to a specific mailbox.
- Voicemail Management = allows outside staff to call in and retrieve voicemail.
- External Number = forwards to an external telephone number (for example, to send caller to on-call staff).
- Play Message = commonly used for hours and directions.
- Repeat Prompt = replays the menu of options to the caller.
- Add Tier = adds a submenu with a new greeting and set of options.
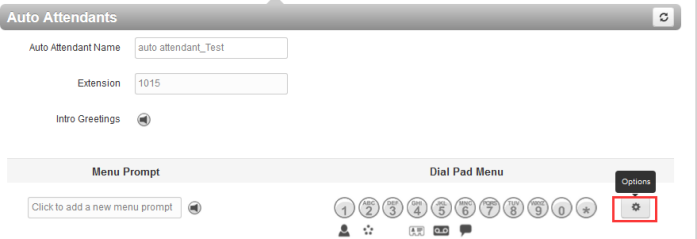
4.Click the save button.
5.Edit the menu prompt by clicking the options button.
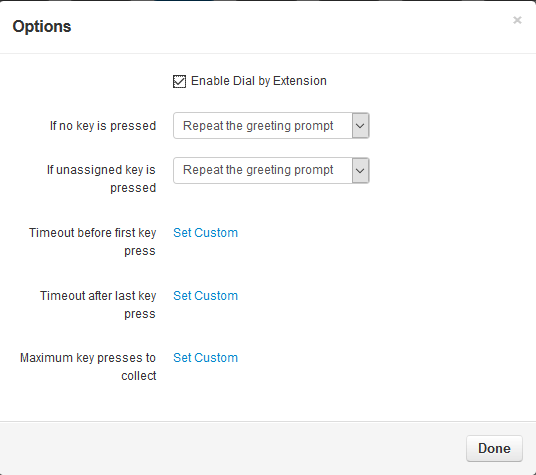
- Enable dial by extension = enable (check) or disable (uncheck) dial by extension.
- If no key is pressed = sets the default action if no key is pressed.
- If unassigned key is pressed = sets the action if an unassigned key is pressed.
6.Click Done when finished.
How to Use
1.Dial 1015
2.Netsapiens platform will play the intro greeting which have uploaded or recorded for the Auto Attendant.
3.Then enter the corresponding pad menu according to the Menu option prompt which have uploaded or recorded .
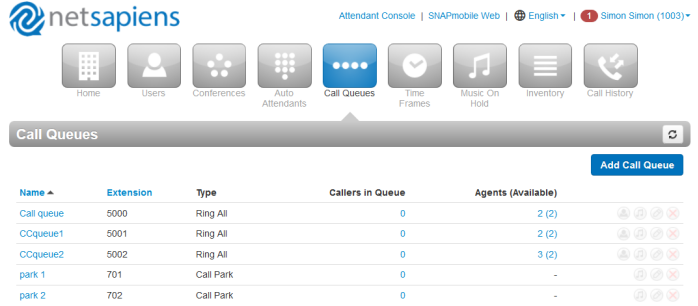
Call Queue
Over View
Call queues are used with Auto attendants
How To Config
To add a call queue
1.From the Call Queues page, click the Add Call Queue button. The Add a Call Queue pop-up window appears, with the Basic tab displayed.
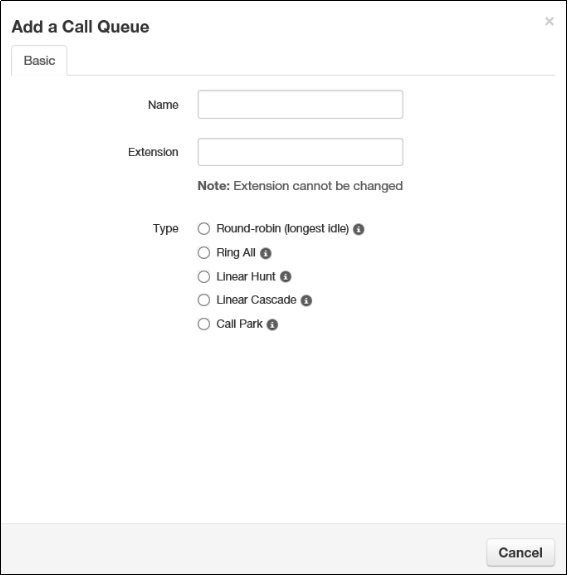
Name:Enter a name for this call queue. The name should allow you to differentiate this call queue from other call queues you configured.
Extension:Adding a call queue: Select an extension.
Editing a call queue: read-only field that shows the extension.
Type:Determines how calls are distributed. Choices are:
Round robin = routes callers to the agent that has been idle for the longest period of time. Then complete the remaining fields in the window.
Ring All = routes callers to all available agents at the same time. Then complete the remaining fields in the window.
Linear Hunt = routes callers to the available agents in a predefined order. The order is defined when editing the queue’s agents. Then complete the remaining fields in the window.
Linear Cascade = routes callers to groups of available agents in a predefined order. The order is defined when editing the queue’s agents . Then complete the remaining fields in the window.
Call Park = places callers on hold until the agent retrieves them..
Phone Number:Select the phone number
Record Calls:Select whether calls will be recorded (Yes) or not recorded (No) for this call queue.
Statistics:Select whether statistics will be recorded (Yes) or not recorded (No) for this call queue.
Message to Agent:Enter the message that will be sent to the agent (for example, “Here's a call from the emergency support queue.”)You configure this setting after adding the call queue.
There are many call queue:
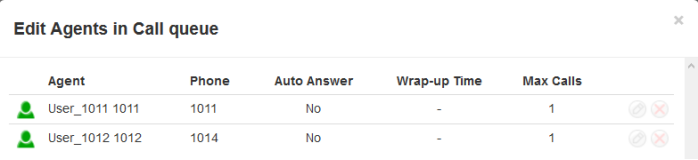
To add the agent for the call queue
1.Click the “Edit Agent” icon

2.Add the agent:
To set the auto Attendants
1.From the Auto Attendants page, Edit a auto attendants
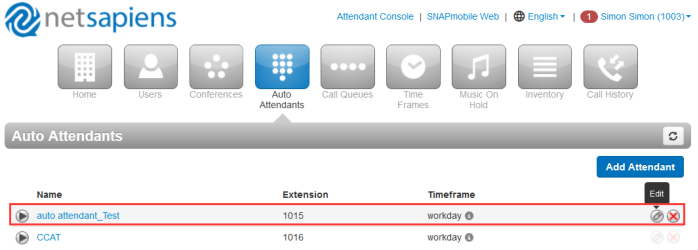
2.Configure a pad menu as call queue(For example:5000)
How To Use
1.Phone A Dial 1015
2.Netsapiens platform will play the intro greeting which have uploaded or recorded for the Auto Attendant.
3.Phone A press the 0 key according to the Menu option prompt which have uploaded or recorded .
4.1011 and 1014 will ring.
5.1011 answer this call, then Phone A will talk with 1011
Conference
Over view
There are two methods to set up conference: Network conference and Local conference.
Network conference: this conference can join in many members.
Local conference: It support up to 5 parties (including yourself) in a conference call,You can set up a conference call with other four parties.
How to config
To Add a conference:
The following procedure describes how to add conferences. When adding a conference, we recommend you require a leader to start the conference; otherwise, anyone with your participant code can use your bridge.
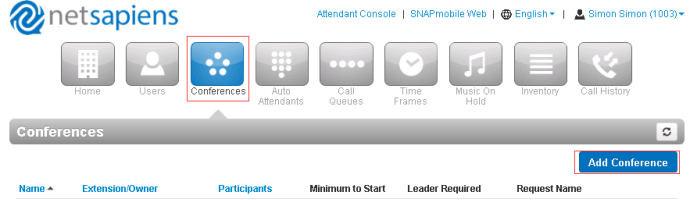
1.Click “conference” button→Click “Add conference” button
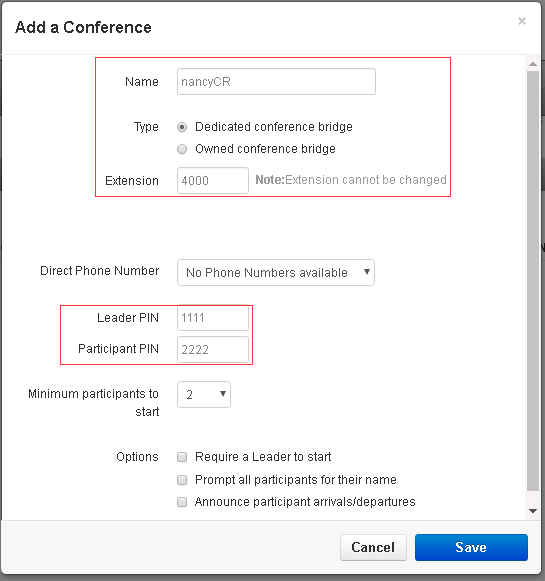
2.Enter the conference information:
Name:Enter a name for this bridge. The name should allow you to differentiate this bridge from other bridges you configured.
Type: conference type:
l Dedicated conference bridge :a shared bridge on its own dedicated extension.
l Owned conference bridge : a bridge associated to a user on the system (for example, the bridge for user 1004).
Extension:select the extension used to join this conference.
Editing a conference: read-only field that shows the extension.
Direct Phone Number:Select the phone number used to join the conference.
Owned bridges also have a direct dial field, which is the number internal users can dial to access the bridge.
Leader PIN:Enter the personal identification number (PIN) that the leader will use to authenticate access when joining the meeting. This PIN is private and should be known by internal staff only.
Participant PIN:Enter the PIN that participants will use to authenticate access when joining the meeting. Distribute this PIN to all guests of the meeting.
Minimum participants to start:Select the minimum number of participants that must attend the conference before it can start.
Require a Leader to start:when checked, the system requires a leader to start the conference. If unchecked, the conference call will start when the first participant joins, regardless of whether a leader is present
Prompt all participants for their name:when checked, the system prompts users for their name when they call in to the conference call
Announce participant arrivals/departures:when checked, the system either beeps or announces when a participant joins or leaves the conference
3.Click the “Save” button to save the change.
How to use
Network conference:
- A Dial conference number:4000.
- You will hear a tone asking for a PIN (Leader PIN).
- Enter the PIN and press the # key to end, Then server will play “You are now leader;please record your name after the tone, press the # you are finished”.
- Recording your name and press the # key to end,Then server will play “Thanks”.
- Second party also dial conference number , enter the PIN (Participant PIN) according the Voice prompts again to join in the conference, then the first and the second party will talk each other.
- The server will play “your name which you recorded have left the conference” when the your leave the conference.
Local conference:
- Place a call to the first party.
- When the first party answers the call, press the Conference soft key to place a new call. The active call is placed on hold.
- Enter the number of the second party and press “#”or the Send soft key.
- When the second party answers the call, press the Conference soft key again to join all parties in the conference.
- Press “split” button, then other two parties will be in hold state. then the active call press “new call” button and enter the number of the third party and press “#”or the Send soft key.
- When the third party answers the call, press the Conference soft key again to join all parties in the conference.
- Press “split” button, then other third parties will be in hold state. then the active call press “new call” button and enter the number of the fourth party and press “#”or the Send soft key.
- When the fourth party answers the call, press the Conference soft key again to join all parties in the conference.
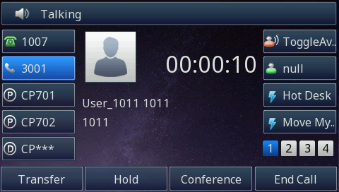
During the conference call, you can do the following actions:
- Press the “Hold“ soft key to place the conference on hold.
- Press the ”Split“ soft key to split the conference call into four individual calls on hold.
- Press to “mute” the conference call.
- Press the ”End Call“ soft key to drop the conference call.
Voice Mail
Over View
You can leave a voice mail when the receiver is busy or its inconvenient for them to answer the call. Follow the voice prompt from the system server to leave a voice mail, and then hang up.
When the Phone LCD interface prompts receiving new voice mail’s icon, the power indicator LED flashes red(Setting->Preference: Enable Voice Message Status) and the voice message button flashes green.
You can access yourself mailbox and also access another person’s mailbox
How To Config
To enable the voice mail via NetSapiens platform:
1.Click “Users” button→Select “Voicemail” tab→enable the voicemail:
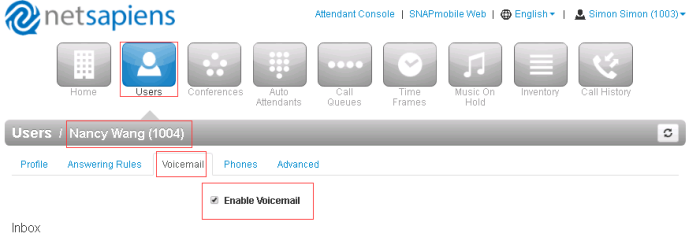
2.Click the “Save”button to save the change.
To set the voicemail PIN via NetSapiens platform:
1.Click “Users” button→Select “Profile” tab→set the PIN number:
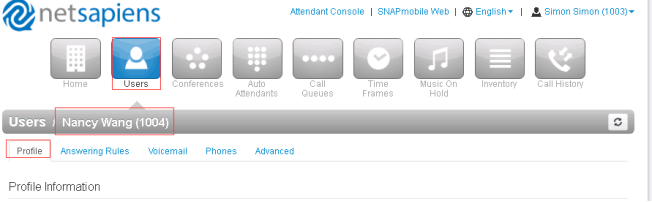
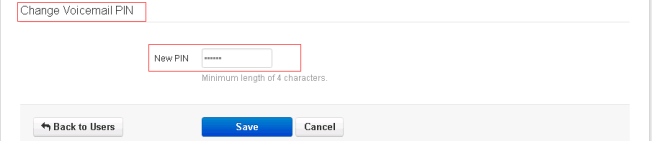
2.Click the “Save”button to save the change.
![]()
If you set the Email Address(es)(“Users” button→Select “Profile” tab→Change Account Security)?when the user has a voicemail ,the NetSapiens platform will send the message to your email address.
How To Use
When there is a message, the message![]() will flash green. Moreover, when you pick up the handset, or press Speaker key, you will hear some faster busy tone.
will flash green. Moreover, when you pick up the handset, or press Speaker key, you will hear some faster busy tone.
- 1005 dial 1004
- 1004 has no answer or reject this incoming call, then 1004 will be transfered to voicemail and leave a voicemail for 1004
- 1004 will receive this voicemail.
To access yourself mailbox:
- 1004 press the message button,5001 will dial out, this number is provisioned.you can check this via phone web interface(Account→Basic→Voice Mail UserID)
- Then 1004 enter the voicemail PIN number to listen this message according to the voice prompts.
To access another person’s mailbox:
- 1004 dial 5000 number,
- When prompted, enter the other person’s extension number
- Enter the voicemail PIN of the other person’s mailbox, followed by #.
Call Transfer
Over View
You can transfer a call to another extension in one of three ways:
Blind Transfer: Transfer a call directly to another party without consulting.
Semi-Attended Transfer: Transfer a call when the target phone is ringing.
Attended Transfer: Attended transfer allows you to speak to the transfer recipient prior to completing the transfer while the caller is on hold.
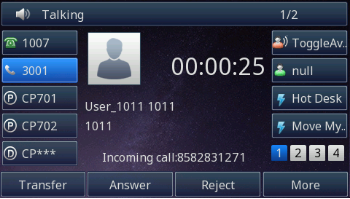
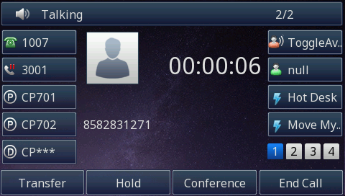
Voicemail Transfer: Voicemail transfer goes straight to the recipient’s voicemail box without ringing the recipient’s phone.
How To Use
To perform a blind transfer:
- Press the Transfer soft key during a call.
- Enter the extension number which you want to transfer the call to.
- Press the Transfer soft key to complete the transfer, then the call is connected to the number to which you are transferring.
To perform a voicemail transfer
Perform a blind transfer with a 03 prefix before the extension. For extension 111’s voicemail, for example, blind transfer to 03111.
To perform a semi-attended transfer:
- Press the Transfer soft key during a call.
- Do one of the following:
- Enter the number you want to transfer the call to.
- Press the Dir soft key, and then select the desired group and search for the contact - Press send soft key or “#”button to dial out the transferring call, when the phone which is transferred ringing and then press the transfer soft key to complete the transfer.
To perform an attended transfer:
- Press the Transfer soft key during a call.
- Do one of the following:
- Enter the number you want to transfer the call to.
- Press the Directory soft key, and then select the desired group and search for the contact. - Press send or Dial soft key or “#”button to dial out the transferring call,when the phone which is transferred ringing and answer a call ,then press the transfer soft key to complete the transfer.
If you are using a handset, the transfer can be completed by hanging up the handset.
You can cancel the transfer before the call is connected by pressing the Cancel soft key.
There is some additional function of transfer
1.Login phone webpage→Settings→Features→Transfer Settings. There are some additional settings of transfer. Please refer the following picture.
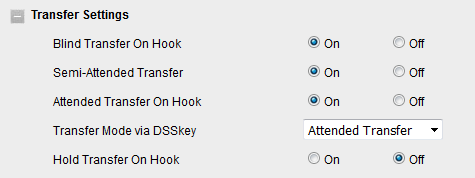
Blind Transfer On Hooks: If you have already complete the step 2 of blind transfer. Then you can transfer the call by on hook.
Attended Transfer On Hooks: If you have already complete the step 3 of attend transfer. Then you can transfer the call by on hook.
Transfer Mode via DSSkey ( DSSkey type must be BLF ): when two phones build a call, one phone which config the BLF can press the BLF line key to achieve the new call/Blind Transfer or Attended Transfer to another extension.
Call Park
Over View
On your phone system, hold is a local function. This means a call held on your phone cannot be picked up at another station. Park is a system-wide function. This means a call parked at one phone may be picked up by any phone.
How to Config
1.Click “Call Queue” button→Click the “Add call queue” button→Enter the name ,extension and select the “call park” type:
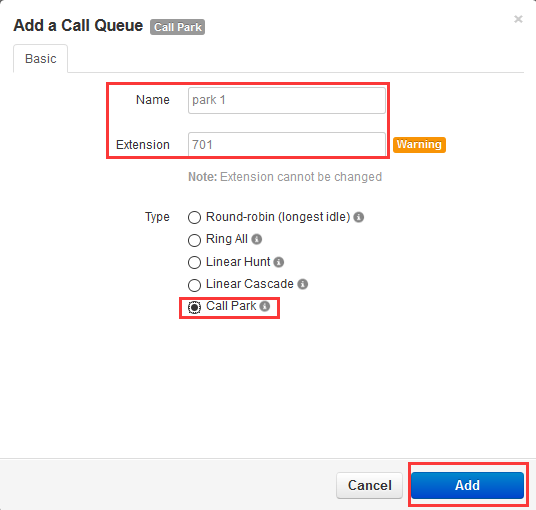
2.Click the “Add”button
How To Use
Static Call parking
1, Suppose Phone A and B were provisioned a Call park key with the same park extension.
2, Phone A make a call with phone C.A press Call park key. The call will be parked. And the Call park key of phone A and B will turn red.
3, B press the call park key, the parked call will be picked up. Now B have a call with C. And the Call park key of phone A and B will turn green.
Dynamic Call Parking
1.Suppose Phone A was provisioned a line key as DTMF: ***
2.Suppose Phone B was provisioned a line key as Call park:701(This call park key will turn green)
3.Press DTMF key which have configured on Phone A during talking. The system says, “The call is parked at 7xx.”
4.Phone B’s call park key will turn red.
5.Phone B press the Call park key to retrieve the parked call.
Directed Call Pickup
Directed call pickup allows you to answer a call ringing at another station.
How To Use
- Phone A configure a line key as BLF, for example: 1004 (You can provision this key via SNAP)
- Phone A configure the direct call pickup code (Web-Account-Direct Call Pickup Code:07)
- If 1004 is ringing, Phone A’s BLF will flash red, Press this BLF Key,Phone A will send the 071004 to pick up that call.
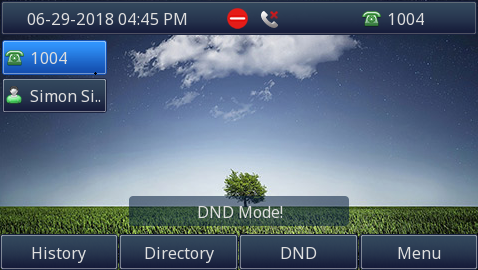
Do Not Disturb
Over View
You can use DND to reject incoming calls automatically on the phone. The message "n New Missed Call(s)" ("n" indicates the number of missed calls) will appear on the LCD screen, and callers will receive a busy message.
How to config and Use
Enable DND feature on NetSapiens platform
- Click the “Users” button→Select a user → click the “Masquerade” icon → click the “Answering Rules” button →You will enter the user’s masquerade interface.
- You can enable or disable the Do not disturb for the user. And you can set the call forwarding rules.
To enable DND on IP Phone’s LCD interface:
Press the DND soft key when the phone is idle. The icon on the status bar indicates that DND is enabled. Incoming calls will be rejected automatically and "n New Missed Call(s)" will prompt on the LCD screen.
BLF
Over View
You can use BLF to monitor a specific extension for status changes on the phone. The BLF key illuminates solid red when the specific externsion is in use. You can tap a BLF key to dial out the monitored phone number when the monitored extension is idle. You can also pick up calls that are received on the monitored extension.
How To Config
To configure BLF key via configuration template, you can refer to this Management configuration template
How To Use
When you complete the configuration:
- The BLF key’s light will solid green and icon will solid blue when monitored number is in idle status.
- The BLF key’s light will flashing red and icon will flashing yellow when monitored number has a incoming call.
- The BLF key’s light will steady red and icon will solid yellow when monitored number are talking.
Share line
Over View
Htek IP Phone supports SLA. This feature allows members of the SLA group to shared SIP lines and provides status monitoring (idle, active, progressing, hold) of the shared line. When there is an incoming call designated for the SLA group, all of the members of the group will be notified of an incoming call and will be able to answer the call from the phone with the SLA extension registered in the group.
All the users that belong to the same SLA group will be notified by visual indicator when a user seizes the line and places an outgoing call, and all the users of this group will not be able to seize the line until the line goes back to an idle state or when the call is placed on hold (with the exception of when multiple call appearances are enabled on the server side).
In the middle of the conversation, there are two types of hold: Public Hold and Private Hold. When a member of the group places the call on public hold, the other users of the SLA group will be notified of this by the red-flashing button and they will be able to resume the call from their phone by pressing the line button. However, if this call is placed on private-hold, no other member of the SLA group will be able to resume that call.
To enable shared call appearance, the user would need to register the shared line account on the phone. In addition, they would need to navigate to “Profile” -> “Advanced” on the webpage and set the “SIP Server Type” as Default, and configure the Line Key as “line” type with the desired account on webpage or LCD. If the user requires more shared call appearances, the user can configure multiple line keys (Function Keys->Line key) to be “line” type associated with the account.
This feature is very useful in the boss and secretary scenario. For example, the secretary can share the boss' extension number on her phone. When there is an incoming call to the extension number of the boss, both the phones of the boss and the secretary will ring simultaneously. Either the boss or the secretary can answer the call. Calls on shared line can be placed on hold or barged in.
How To Config
- Click “Users” button→Select a user→Click the “Edit” button→Enter the Phone’s tab
- Add a phone bind a MAC address
- You can add multiple phones bind multiple MAC addresses under this user interface.
- When you add the multiple phone, the user number is fix,you need to Enter a unique suffix representing this device.
For example: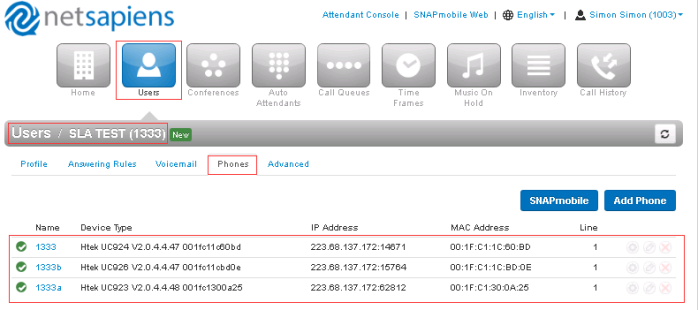
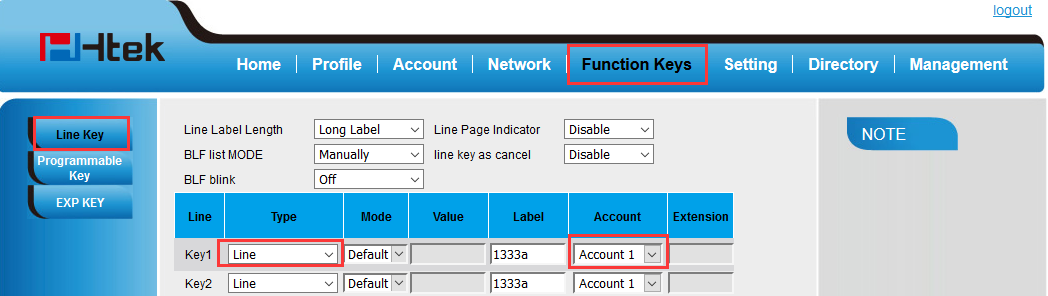
To enable share line on Phones web's interface:

To set the Line key on Phones web's interface or LCD's interface:
Note: Line cannot be set to"Auto"
How To Use
- Restart the the three phones, three phones will get the corresponding configuration file.
- 1004 dial the 1333, three phones will ring simultaneously.
- When One of them answer this call, other members will back to Idle status, but the other members Line key light will stay red. About more SLA operations, you can refer to this table.
Line key LED Status | Description |
off | Idle status |
Stay green | a member of the SLA group in off-hook status |
Stay red | Other member of the SLA group’s led status when a member of the SLA group in off-hook status |
Blinked green every 500ms | a member of the SLA group in Private hold status. |
Stay red | Other member of the SLA group’s led status when a member of the SLA group in Private hold status |
Blinked green every 500ms | a member of the SLA group in public hold status |
Blinked red every 500ms | Other member of the SLA group’s led status when a member of the SLA group in public hold status |
Blinked green every 500ms | a member of the SLA group in progress status |
Stay red | On Other member of the SLA group’s led status when a member of the SLA group is in progressing status. |
Blinked red every 100ms | Alerting |
Stay green | a member of the SLA group in active status when there is an incoming call designated for the SLA group |
Stay red | Other member of the SLA group’s led status when a member of the SLA group in active status |
Hot Desking
Over View
Hotdesking is a feature which allows for multiple office workers on different shifts to use a single physical workstation or surface as opposed to each staff member having their own personal desk.
Adding Hotdesking Users
- In the Manager Portal, navigate to the domain in which you are configuring the hotdesking feature.
- Click on Users > Add User and create a user that will be using the hotdesking feature.
- Assign the user to a User's Scope of Call Center Agent.
- Make sure that the button next toAdd Phone Extension is not checked.
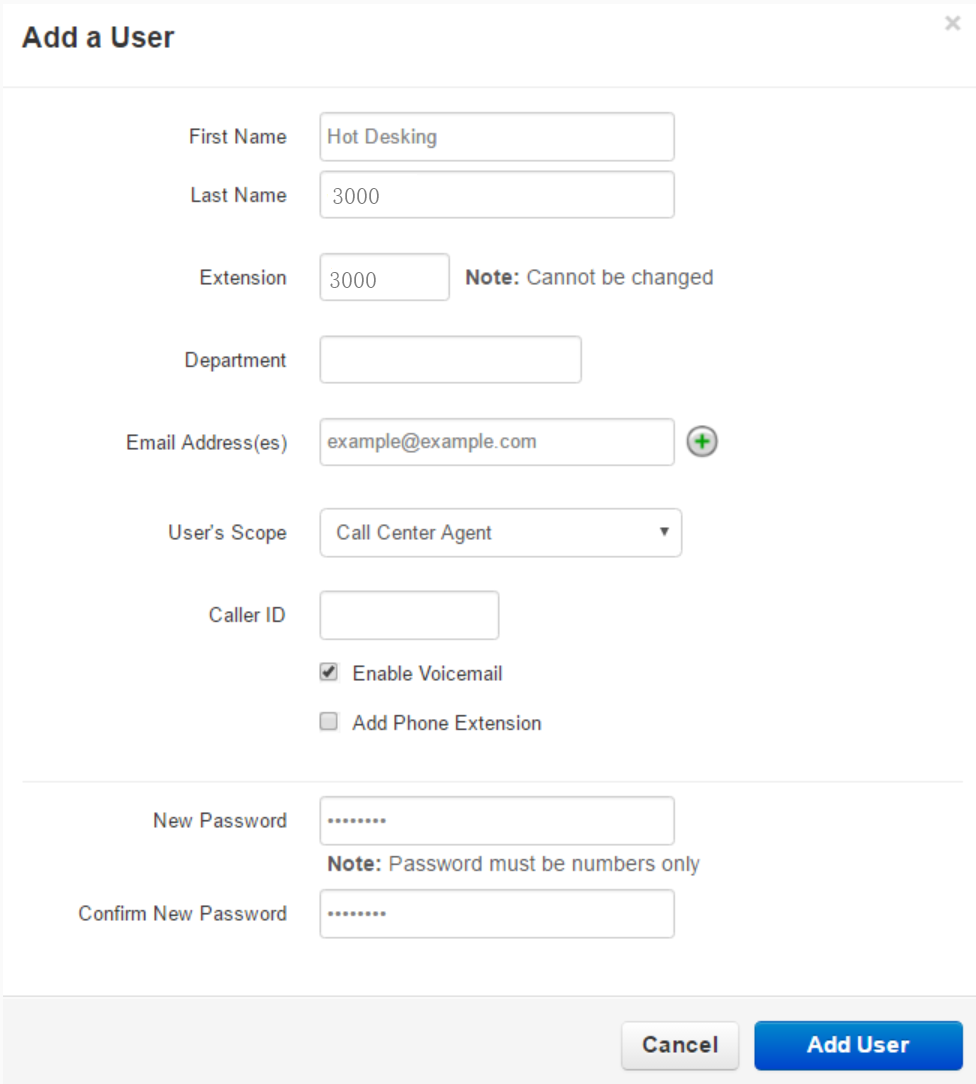
5.Click Add User to complete.
How to Configure a Hot Desk button
- Firstly, you must add target phone for the hot desking user
- Secondly, Login to the Manager Portal,Click “Inventory”→“Phone Hardware→Find the target phone and go to SNAPBuilder.
- Configuring a button as a hot desk:
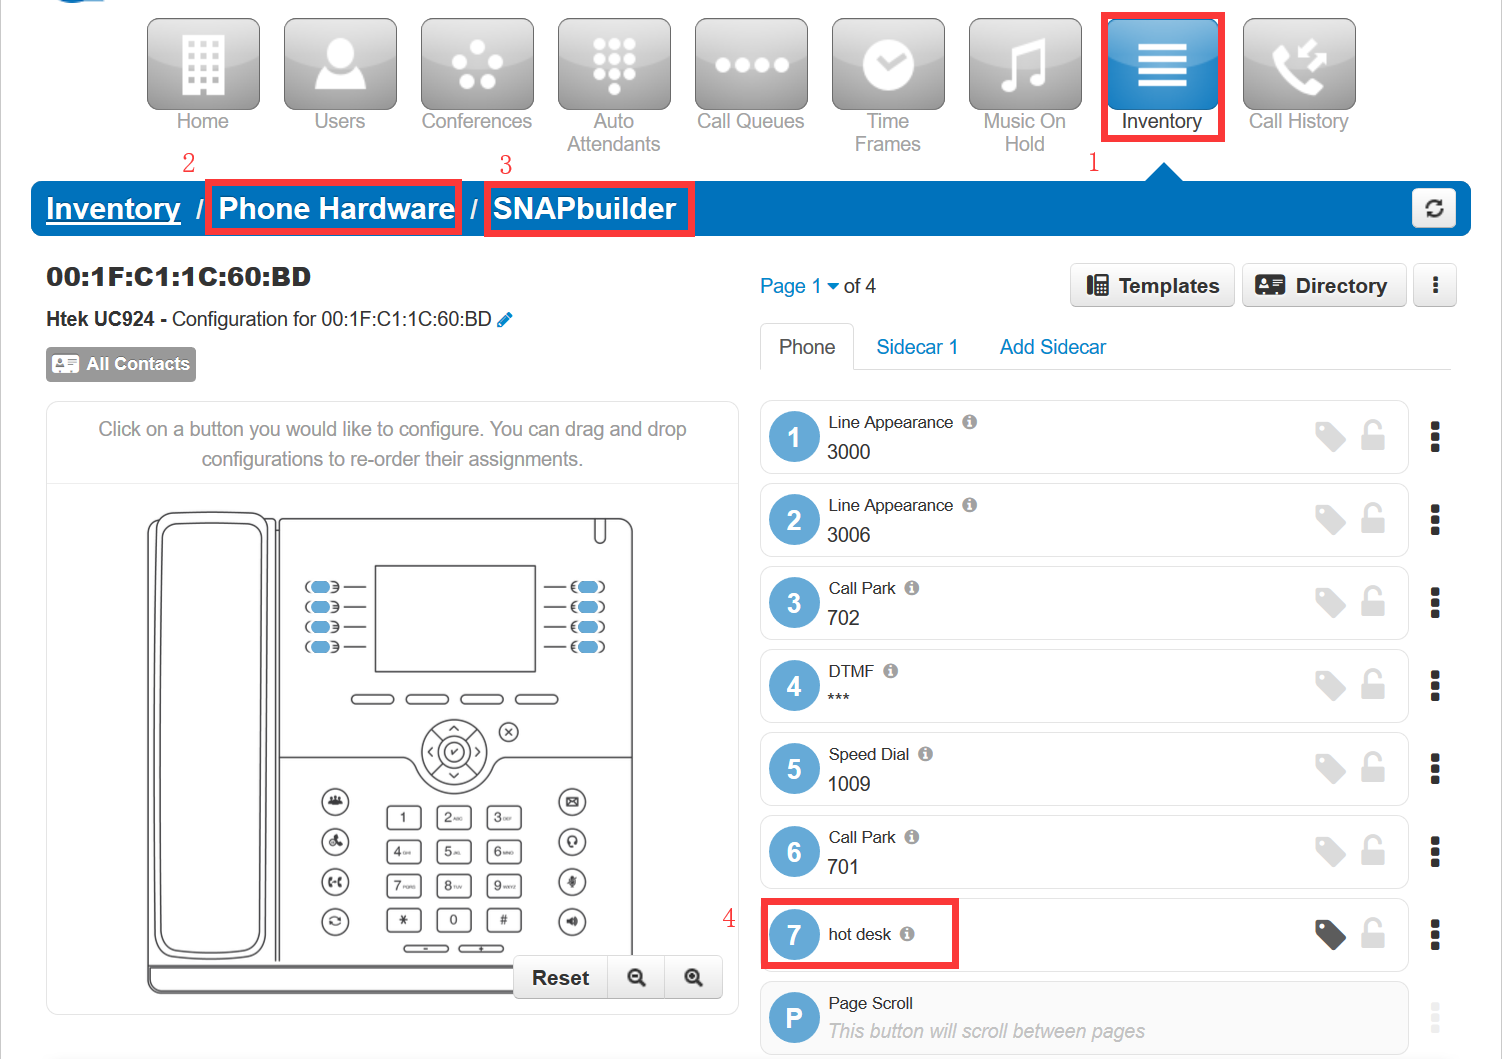
4.Click the "Save and Resync".Phone will get a new configuration file which contain hot desk button.
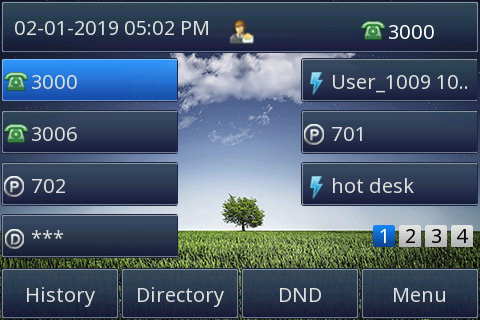
How to Use Hot desk function
- For example: Press the Hot desk key on this 3000's phone.
- Server will let you enter the your call number and password, for example:2000.
- Enter the correct call number and password, Server will always forward to the 3000 when other people call 2000.
Intercom
Over View
Htek IP Phones provide an intercom feature that allows you to instantly connect to other phones within your office. Intercom functionality is ideal for announcing visitors or asking a quick question.
When one phone intercoms another extension, it does not ring the other phone. Instead, the other phone will beep, and then its microphone and speaker turn on.
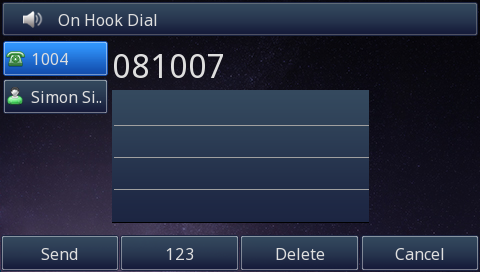
How To Use
1.Dial 08ext. For example, to intercom extension 1007, dial 081007.(You can set a line key as Prefix,value is 08, label is Intercom)

Music On Hold
Over View
Music on Hold allows you to specify personal music on hold for your extension. You can configure music on hold files using the Music On Hold page.
How to add music
To add Music via NetSapiens platform:
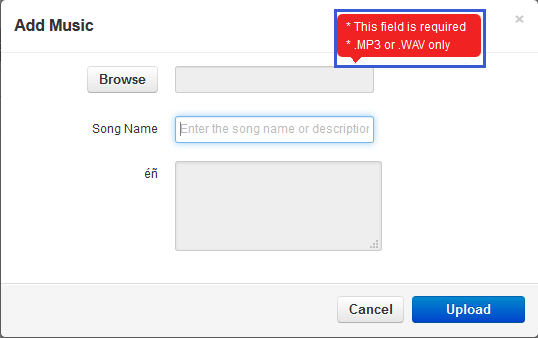
1.Click the “Music on Hold” button→ click the “Add music” button.
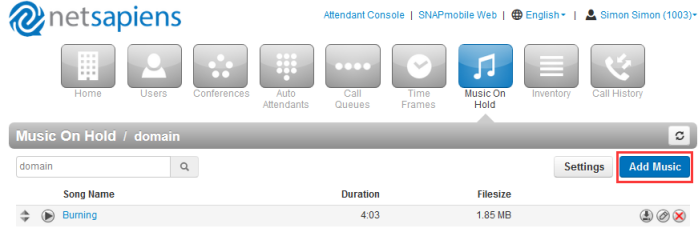
2.Choose .wav and .mp3 format’s file and upload.
3.After the file is uploaded, you can play it on your computer by clicking the icon to the left of the file on the Music On Hold page.
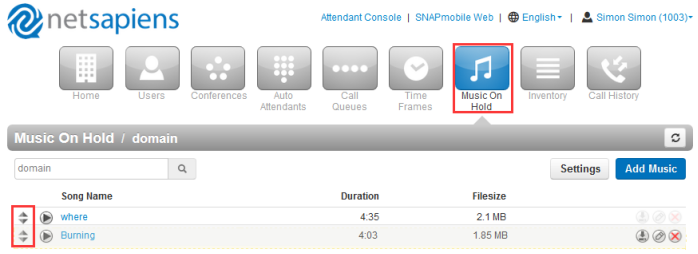
How to Changing the Order of Music On Hold Files
Music On Hold files play according to the order in which they appear in the Music On Hold page, starting with the top file on the page, if the randomization setting is not selected. To change the order in which files are played:
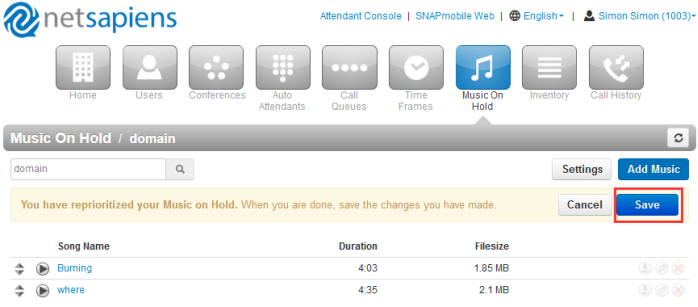
1.On the left side of the Music On Hold page, hover the mouse over the up/down arrows for the file you want to move.
2.Click Save button.
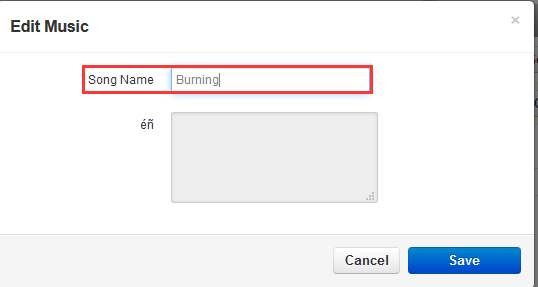
How to Edit Music On Hold File’s name
1.Click a file name or Hover over a file name, and then click the icon at the far right of the Music On Hold page. For example.
How to Delete Music On Hold Files
If you no longer need a Music On Hold file, you can delete it from the system.
1.From the Music On Hold page, hover over the file name, and then click the icon at the far right of the row. A confirmation prompt appears.
2.Click Yes to delete the file or No to retain it.
How to Adjust Music On Hold Settings
To adjust Music On Hold settings:
1.From the Music On Hold page, click the Settings button. A Music on Hold Settings pop-up window similar to the following shows the begin and end dates for the time frame.
Enable Music on Hold:Enable (check) or disable (uncheck) the Music On Hold feature.
Randomize Music on Hold:Play Music On Hold files in a random order (check) or according to their order on the Music On Hold page (uncheck)
Play introductory greeting:Play (check) or do not play (uncheck) an introductory greeting before playing the first Music On Hold file. If you check this check box, the New Greeting and Greeting Name fields appear for uploading or recording a greeting. Greetings must be in MP3 or WAV format:
To upload a greeting file:
(1) Next to New Greeting, click Upload.
(2) Use the Browse button to select the file.
(3) In the Greeting Name field, enter a name for the greeting.
(4) Click Save.
To record a greeting:
(1) Next to New Greeting, click Record.
(2) In the Call me at field, enter the number to call (either an extension or a telephone number such as your cell phone).
(3) In the Greeting Name field, enter a name for the greeting.
(4) Click Call. Your phone will be called. At the prompt, record the new greeting, and then press # when you finish your recording.
2.Click Save.
User Portal
User Scope contain Basic User and Call Center Agent, So you can enter the user portal via the different user. You can set the user scope by manager portal->Users->Select a Target extension->Profile.
This chapter provides the detail instructions and configurations for the following NetSapiens platform Attendants Console:
- Basic User’s Portal
- Call Center Agent’s Portal
- Attendants Console
Basic User’s Portal
1.Login the Basic User’s Portal(Username:extension_number@HTEK, Password: The password you set when you created the user)
2.You can see the Home,Message,Contacts,Answering Rules,Time Frames,Phones,Music On Hold,Phones and Call History Pages.
As shown below:
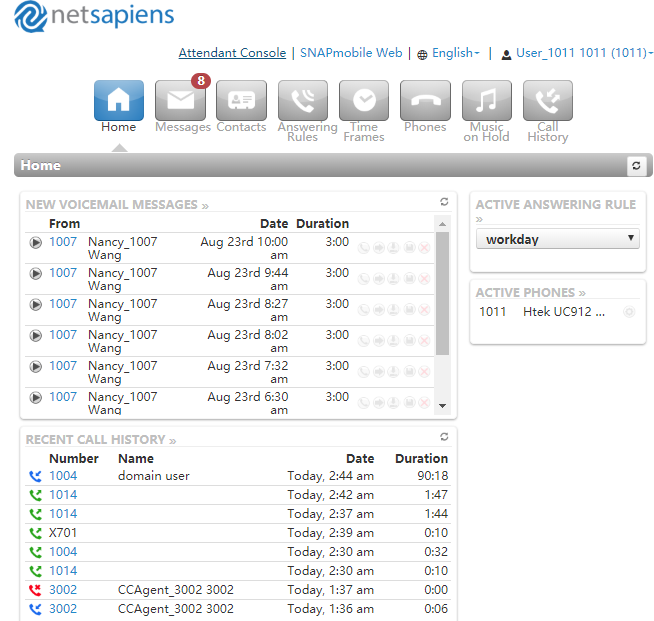
Home page:
New voicemail messages: It contains that new voicemail messages, you can select the target message to play,forward,download,Save and delete the message.
Active Answering Rules: Show current usage’s answering rule, you can see the begin and end time and date.
Active Phones:Current phone in use.It contains that Phone’s model, version and Mac address.
Recent Call History:It contains the recent call history(Missed call,inbound call,outbound call)
Call Center Agent’s Portal(User Portal)
1.Login the Call Center Agent’s Portal(Username:extension_number@HTEK, Password: The password you set when you created the user)
2.You can see the Call Center,Message,Contacts,Answering Rules,Time Frames,Phones,Music On Hold,Phones and Call History Pages.
As shown below:

Call Center page:
My QUEUES: User’s Call queue.
Agent’s status: Agents are able to indicate the reasons for their availability/unavailability - Logged In, Lunch, Break, Meeting, Web and Other.
My STATISTCTS:It contains that Call Center Calls Today,Call Center Talk Time,Call Center Average Talk,Inbound Calls Today,Inbound Talk Time,Inbound Average Talk,Outbound Calls Today,Outbound Talk Time,Outbound Average Talk
Active Phones:Current phone in use.It contains that Phone’s model, version and Mac address.
My Graphs:It contains that My Calls Per Hour (last 24 hours),My Calls Per Day (last 10 days) and Calls by Origination Source (last 24 hours).
Recent Call History:It contains the recent call history(Missed call,inbound call,outbound call)
Attendants Console
On attendants console, you can make a call, transfer a call, hold a call, park a call and so on.
To make a call from the attendants console
1.Click the Attendants console button, enter the Attendants console page
2.Click the “make a call” button
3.Enter the target number:
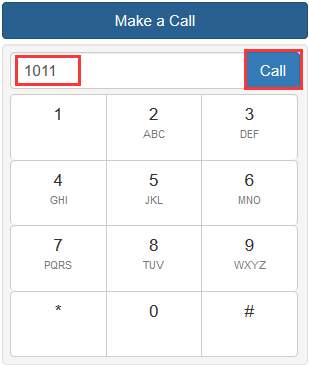
4.Click the “Call” button, Caller Phone will auto answer this call:
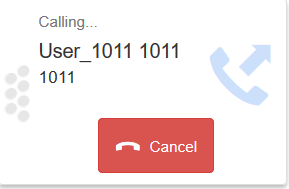
![]()
5.Called phone can answer or reject this call on attendants console:
To answer a call from the attendants console
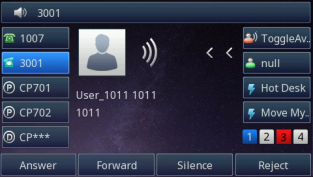
1.Phone B call Phone A
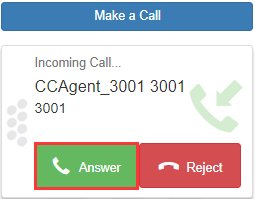
2.Phone A receive this call
3.Phone A click the “Answer” button to answer this call on attendants console:

![]()
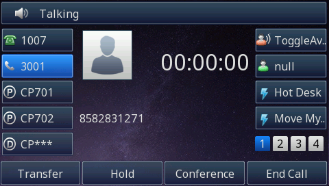
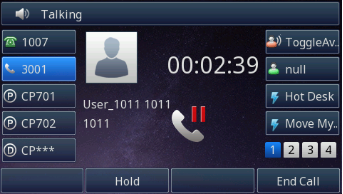
4.Phone A will talk with Phone B:

![]()

To Hold/Resume a call from the attendants console
1.Phone A will talk with Phone B
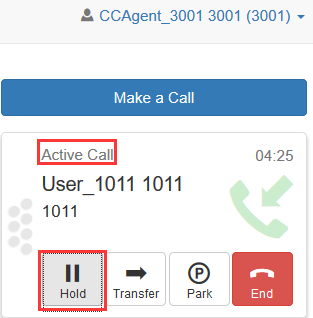
2.You can click the “Hold” button when phone A is talking on attendants console:
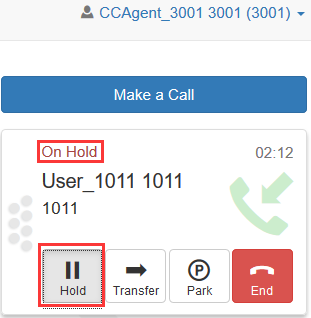
![]()
3.You can click the “Hold” button again to resume this call:
![]()

To reject a call from the attendants console
1.Phone B call Phone A
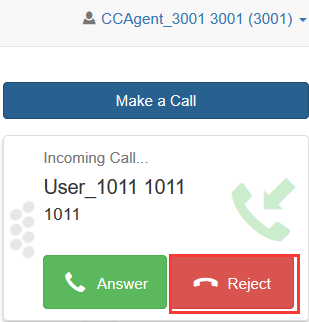
2.Phone A click the “Reject” button to reject this call on attendants console:

![]()
4.Phone A will back to idle interface, Phone B can leave a message to Phone A(when available).
![]()
To End a call from the attendants console
1.Phone B call Phone A
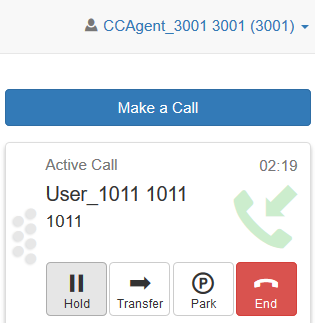
2.Phone A click the “Answer” button to answer this call on attendants console:
3.Phone A talk with Phone B:

![]()

4.Phone A click the “End” button to end this call on attendants console.Phone A will back to idle interface:
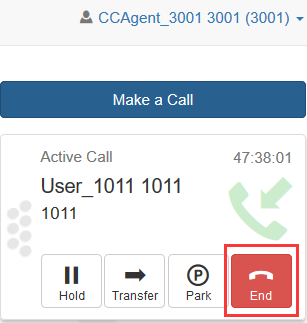
![]()
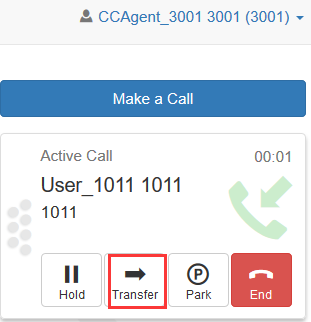
To Blind transfer a call from the attendants console
1.You can click the Transfer button when phone A is talking

2.Server prompt?
![]()
3.Choose a target contact from the below picture (for example:1004):

4.Server prompt this windows:
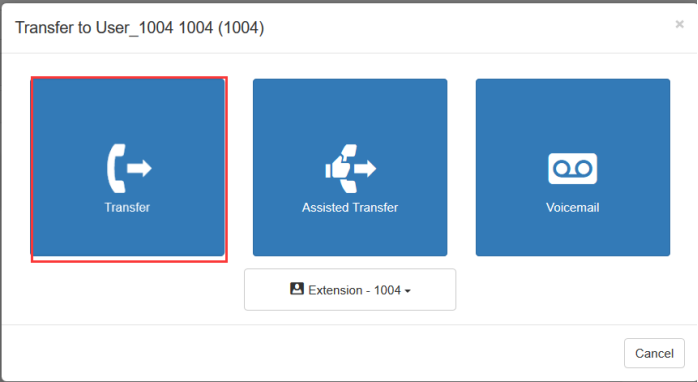
5.Click the “Transfer” button, this call will blind transfer to 1004 successfully. Phone A will back to idle interface.
At the same time,1004 will ring, Phone B play hold music.
To attend transfer a call from the attendants console
1.You can click the Transfer button when phone A is talking

2.Server prompt?
![]()
3.Choose a target contact from the below picture (for example:1004):

4.Server prompt this windows:

5.Click the “Assisted Transfer” button, Phone will receive a incoming call during talking with B, Phone A answer this incoming call on phone interface,1004 will ring. At the same time, Phone B will be held and play hold music.
6.1004 answer the call.Phone A will talk with 1004
7.Phone A click the “Complete Transfer” on attendants console to complete attend transfer. Phone A will back to idle interface.

![]()

To Blind transfer a call to voice mail from the attendants console
1.You can click the Transfer button when phone A is talking
2.Server prompt?
![]()
3.Choose a target contact from the below picture (for example:1004):

4.Server prompt this windows:
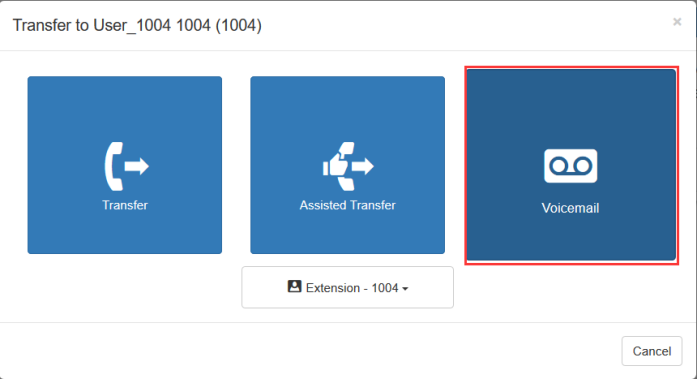
5.Click the “Voicemail” button, Phone will Blind transfer this call to 1004’s voice mail. At the same time, Phone A will back to idle interface.
To Cancel transfer from the attendants console
1.You can click the Transfer button when phone A is talking

2.Server prompt?
![]()
3.Choose a target contact from the below picture (for example:1004):

4.Server prompt this windows:
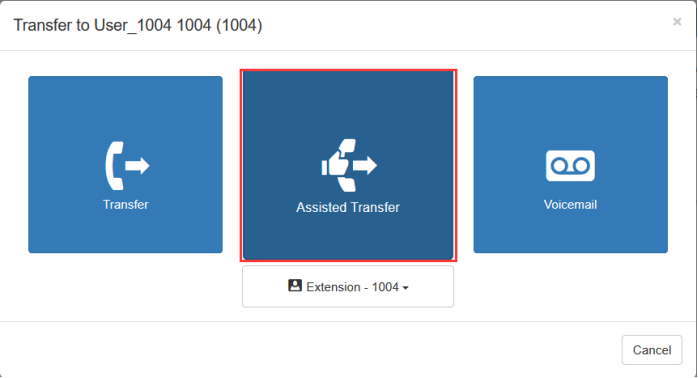
5.Click the “Assisted Transfer” button, Phone will receive a incoming call during talking with B. At the same time, Phone A can cancel the attend transfer by clicking the “Cancel” on the attendants console:
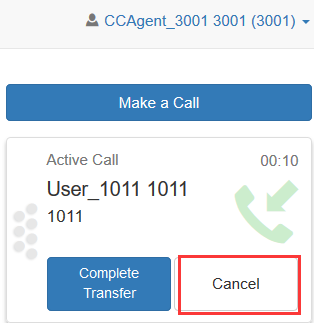
6. Phone A and Phone B will talk again.
7. In step 7,Click the “Assisted Transfer” button, Phone will receive a incoming call during talking with B, Phone A answer this incoming call on phone interface,1004 will ring and answer. Phone A will talk with 1004.
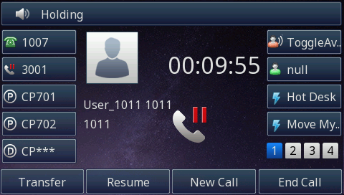
At the same time, Phone B will be held and play hold music. If Phone A cancel the attend transfer by clicking the “Cancel” during talking with 1004 on the attendants console, Phone A will back the first call,but you need to resume this first call by pressing the “Resume” softkey on phone interface:
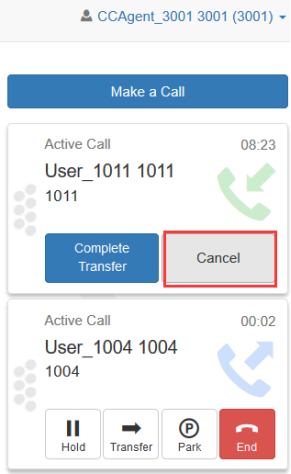
![]()
To park a call (Static call park) from the attendants console
Premise:Set the call park slot (For example: 701 and 702)and Disable the Dynamic call parking feature on attendants console:

1.You can click the “Park” button when phone A is talking

2.Server prompt?
![]()
3.Choose a park from the below picture (for example:701), server will prompt: Your call has been parked at 701.
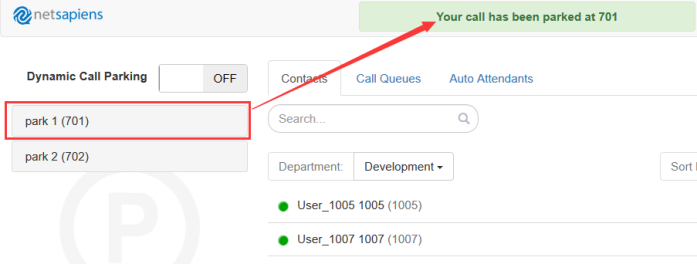
4.Phone A will back to idle interface. Phone B will be held and play hold music.
5.Other user can retrieve this park call.
To park a call (Dynamic call parking) from the attendants console
Premise:Set the call park slot (For example: 701 and 702) and Enable the Dynamic call parking feature on attendants console:

1.You can click the “Park” button when phone A is talking.

2.Server prompt?
![]()
3.You can retrieve this call again or Blind transfer this call to other contact or voicemail.
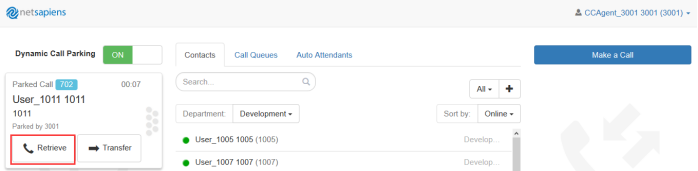
- If you retrieve this park call. Phone A will auto answer and talk with phone B again.
- If you Transfer this park call to other contacts(for example:1004), Phone B will be held and 1004 will ring.Phone A will back to idle interface.
- If you transfer this park call to voice mail and select the target contact(for example:1004), then Phone B will leave a message to 1004. Phone A will back to idle interface.
Upgrade Firmware
If you define the access URL of firmware in the configuration file, the IP phone will download the firmware from the provisioning server. You can manually upgrade firmware if the IP phone does not download the firmware from the provisioning server. But the recommendation is to upgrade firmware through the provisioning server.
How To Config
To upload the target firmware on netsapiens platform
1.Upload the firmware to Files & Firmwares section of the Endpoints Admin UI without renaming the file.
1. Launch a browser, go to the Htek Wiki website Netsapiens Firmware, and download the firmware zip file .
2. After the firmware file is downloaded, unzip it.
3. Locate the unzipped folder, which will be a file full of firmware named similarly to fw920M.rom. for example, we will load fw926.rom and fw920M.rom files for the UC926.
4. In the Endpoints module, go to System > Files and Firmwares, and then click Upload File.

5. Complete the fields.
6. Click Start File Upload and wait for the upload to complete.
Note:
- You need to upload these corresponding firmware file for target model.
For example: Model is UC926,You need to upload the fw926.rom and fw920M.rom to provision server.
- Just only upload the fw900Mrom and fw920M.rom files once.
| Model | Firmware file |
|---|---|
| UC902 | fw902.rom fw900M.rom |
| UC903 | fw903.rom fw900M.rom |
| UC912 | fw912.rom fw900.rom |
| UC912G | fw912G.rom fw900M.rom |
| UC912E | fw912E.rom fw900M.rom |
| UC923 | fw923.rom fw920M.rom |
| UC924 | fw924.rom fw920M.rom |
| UC924E | fw924E.rom fw920M.com |
| UC926 | fw926.rom fw920M.com |
| UC926E | fw926E.rom fw920M.rom |
7.Add a default/override like P192="http://<endpoints-fqdn>/frm"
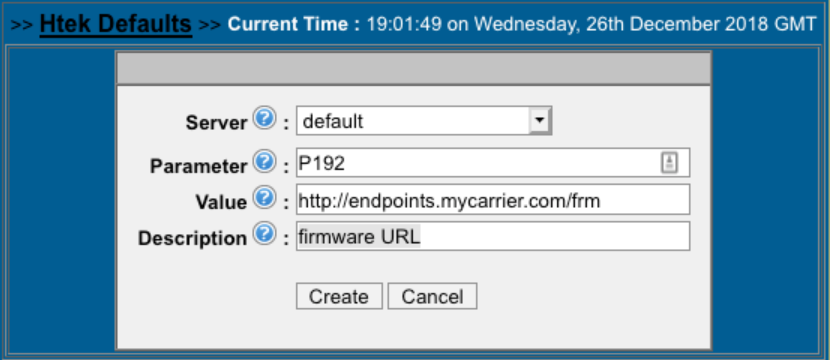
8.Re-provision the Htek Phone,Phone will get the new configuration and upgrade the firmware from the http://<endpoints-fqdn>/frm.
To upload the target firmware by manually on phone webpage
1.Login the target phone's webpage
2.Click "Management"→ "Upgrade",Choose the target firmware file. for example: You can choose the fw926E.rom or fw920M.rom files for UC926E model. (Note:If you upload the fw926E.rom file fail by manually, Please upload the fw920M.rom file again.)
Resetting the phone
Reset the phone to factory configurations after you have tried all troubles-
Hooting suggestions but do not solve the problem. You need to note that all customized settings will be overwritten after reset.
To reset the phone via phone LCD interface:
- Press Menu Settings →Advanced →Settings →Reset
The password of Advanced is provisioned by NetSapiens platform. - Press the Enter softkey or OK key
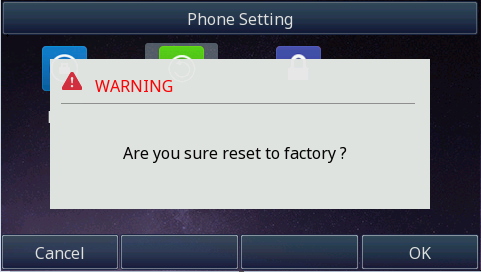
- Press OK softkey.
Note: Reset of your phone may take a few minutes. Do not power off until the phone has started up successful.The phone will be reset to factory settings successfully after startup.
Troubleshooting
This chapter provides general troubleshooting information to help you solve the problems you might encounter when using your phone. If you require additional information or assistance with your new phone, contact your system administrator.
Why is the LCD screen blank?
- Ensure that the phone is properly plugged into a functional AC outlet.
- Ensure that the phone is plugged into a socket controlled by a switch that is on.
- If the phone is plugged into a power strip, try to plug it directly into a wall out let instead.
- If the phone is powered from POE, ensure that you use a POE-compliant switch or hub.
Why does the phone display "Network unavailable"?
- Ensure that the Ethernet cable is plugged into the Internet port on the phone and the Ethernet cable is not loose.
- Ensure that the switch or hub in your network is operational.
Why doesn't the phone display time and date correctly?
Check if you have configured the phone to obtain the time and date from the SNTP server automatically. If the phone fails to connect to the SNTP server, you need to configure the time and date manually.
Why the phone can't upgrading by NetSapiens platform successful?
- Please check that NetSapiens platform whether exist the file.
- check whether Htek phone and NetSapiens platform network can communicate with each other.