Htek IP Phones Integrated with NetSapiens Platform Configuring Guide V1.0
目录
| 锚 | ||||
|---|---|---|---|---|
|
| 锚 | ||||
|---|---|---|---|---|
|
Thank you for choosing the Htek IP phones, which are exquisitely designed to provide basic phone features plus advanced business features, such as Forward, Transfer,Network conference, share line and Enhanced Monitor Extension over IP network.
The purpose of this guide is to serve as a basic guidance for auto-provision
With the NetSapiens Platform.
...
| 锚 | ||||
|---|---|---|---|---|
|
| 锚 | ||||
|---|---|---|---|---|
|
Topics provided in this guide include:
...
| 锚 | ||||
|---|---|---|---|---|
|
| 锚 | ||||
|---|---|---|---|---|
|
- V1.0 (2018-06-19): Provide a basic guidance for auto-provision Htek IP phones with NetSapiens platform.
...
| 锚 | ||||
|---|---|---|---|---|
|
| 锚 | ||||
|---|---|---|---|---|
|
This chapter will show you the basic process of phone's start-up and instructions of the way to get the basic information of the phone. Topics include:
...
| 锚 | ||||
|---|---|---|---|---|
|
| 锚 | ||||
|---|---|---|---|---|
|
After your phone is powered on, the phone will boots up, complete the initialization and check firmware. Please refer to the three phases of the LCD display:


In the process of initializing, the phone will attempts to contact a DHCP server in your network to obtain valid IPv4 network settings (e.g., IP address, subnet mask, default gateway address and DNS address) by default.
...
| 锚 | ||||
|---|---|---|---|---|
|
| 锚 | ||||
|---|---|---|---|---|
|
After the phone comes up, you can view phone status on phone user interface (LCD) via the following ways:
...
| 锚 | ||||
|---|---|---|---|---|
|
| 锚 | ||||
|---|---|---|---|---|
|
| 锚 | ||||
|---|---|---|---|---|
|
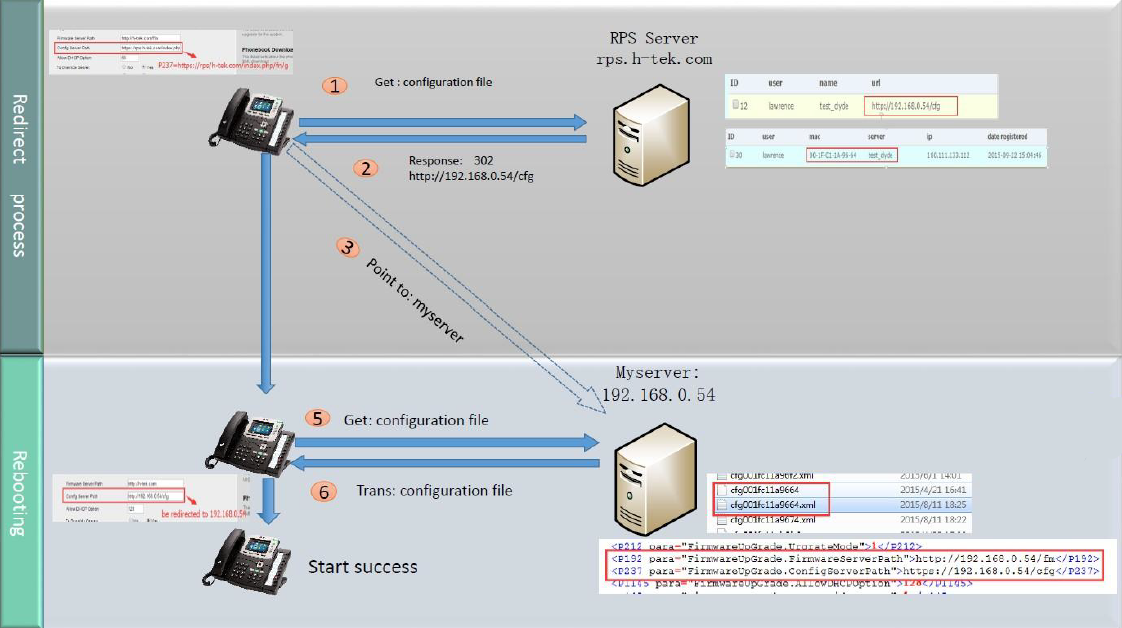
Auto Provision via RPS
Provision the IP Phone via RPS is a convenience way.
When the IP Phone start up , default it will send 'Get' message to the RPS server, if the phone's MAC address is assigned on the RPS Server previously, the RPS server will send the preset URL of the configure server to IP Phone.
The work process of RPS show below. And more information about how to use RPS, please refer to these documents fm.htek.com/rs/rps.zip .
Auto Provision via DHCP Option 66
The most important way of Auto provision is DHCP option 66, which is mainly used in the situation where Htek IP Phone and NetSapiens platform can communicate with each other.
The NetSapiens platform's auto provision URL is
http://alphandp.NetSapiens.com/cfg/, put this URL into you DHCP Sever's
option 66.
...
- Time&Date
- Contacts
- Answer Rule and Time Frames
- Auto Attendants
- Call Queue
- Conference
- Voice Mail
- Call Transfer
- Call park
- Direct Call Pickup
- Do Not Disturb
- BLF
- Share line
- Intercom
- Music On Hold
- Hot desking
Time&Date
How To Config
To configure the TimeZone ,Date format and Time format via NetSapiens platform.
...
Line key LED Status | Description |
off | Idle status |
Stay green | a member of the SLA group in off-hook status |
Stay red | Other member of the SLA group’s led status when a member of the SLA group in off-hook status |
Blinked green every 500ms | a member of the SLA group in Private hold status. |
Stay red | Other member of the SLA group’s led status when a member of the SLA group in Private hold status |
Blinked green every 500ms | a member of the SLA group in public hold status |
Blinked red every 500ms | Other member of the SLA group’s led status when a member of the SLA group in public hold status |
Blinked green every 500ms | a member of the SLA group in progress status |
Stay red | On Other member of the SLA group’s led status when a member of the SLA group is in progressing status. |
Blinked red every 100ms | Alerting |
Stay green | a member of the SLA group in active status when there is an incoming call designated for the SLA group |
Stay red | Other member of the SLA group’s led status when a member of the SLA group in active status |
...
status. | |
Blinked red every 100ms | Alerting |
Stay green | a member of the SLA group in active status when there is an incoming call designated for the SLA group |
Stay red | Other member of the SLA group’s led status when a member of the SLA group in active status |
Hot Desking
Over View
Hotdesking is a feature which allows for multiple office workers on different shifts to use a single physical workstation or surface as opposed to each staff member having their own personal desk.
Adding Hotdesking Users
- In the Manager Portal, navigate to the domain in which you are configuring the hotdesking feature.
- Click on Users > Add User and create a user that will be using the hotdesking feature.
- Assign the user to a User's Scope of Call Center Agent.
- Make sure that the button next toAdd Phone Extension is not checked.

5.Click Add User to complete.
How to Configure a Hot Desk button
- Firstly, you must add target phone for the hot desking user
- Secondly, Login to the Manager Portal,Click “Inventory”→“Phone Hardware→Find the target phone and go to SNAPBuilder.
- Configuring a button as a hot desk:

4.Click the "Save and Resync".Phone will get a new configuration file which contain hot desk button.

How to Use Hot desk function
- For example: Press the Hot desk key on this 3000's phone.
- Server will let you enter the your call number and password, for example:2000.
- Enter the correct call number and password, Server will always forward to the 3000 when other people call 2000.
Intercom
Over View
Htek IP Phones provide an intercom feature that allows you to instantly connect to other phones within your office. Intercom functionality is ideal for announcing visitors or asking a quick question.
...
Music On Hold
Over View
Music on Hold allows you to specify personal music on hold for your extension. You can configure music on hold files using the Music On Hold page.
...
1. Launch a browser, go to the Htek Wiki website netsapiens Netsapiens Firmware, and download the firmware zip file .
...
- Press Menu Settings →Advanced →Settings →Reset
The password of Advanced is provisioned by NetSapiens platform. - Press the Enter softkey or OK key
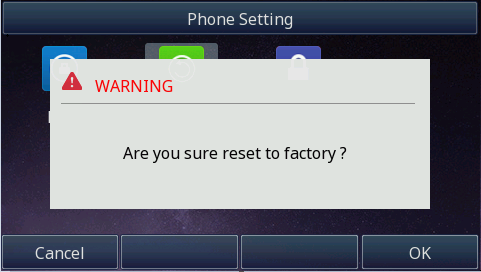
- Press OK softkey.
Note: Reset of your phone may take a few minutes. Do not power off until the phone has started up successful.The phone will be reset to factory settings successfully after startup.
...
| 锚 | ||||
|---|---|---|---|---|
|
| 锚 | ||||
|---|---|---|---|---|
|
This chapter provides general troubleshooting information to help you solve the problems you might encounter when using your phone. If you require additional information or assistance with your new phone, contact your system administrator.
Why is the LCD screen blank?
...