About This Guide
Thank you for choosing the Htek IP phones, which are exquisitely designed to provide basic phone features plus advanced business features, such as Call Park, Call Pickup, Intercom and Enhanced Monitor Extension over IP network. The purpose of this guide is to serve as a basic guidance for auto- provision. Htek IP phones with PortaOne platform including:
Htek 9 Series: UC902P, UC903, UC912P, UC923, UC924, UC926.
Note: The configuration process outlined in this guide applies to Htek SIP IP phones running Firmware version 2.0.4.4.53 or later. The configuration process described in this guide take the Htek UC924 as an example.
In This Guide
Topics provided in this guide include:
Summary of Changes
- V1.0 (2018-06-19): Provide a basic guidance for auto-provision Htek IP phones with PortaOne.
Getting Started
This chapter will show you the basic process of phone's start-up and instructions of the way to get the basic information of the phone. Topics include:
Phone Initialization
When the phone is powered on, it will start the boot process, including initializing the phone and checking the firmware version. Please refer to the three phases of the LCD display:


With the factory setting unchanged, the phone will attempt to contact the DHCP server in the network for valid IPv4 configurations during initialization(e.g., IP address, subnet mask, default gateway address and DNS address).
Phone Status
After the phone turned on, you can check the status on phone's user interface (LCD) via the following ways:
...
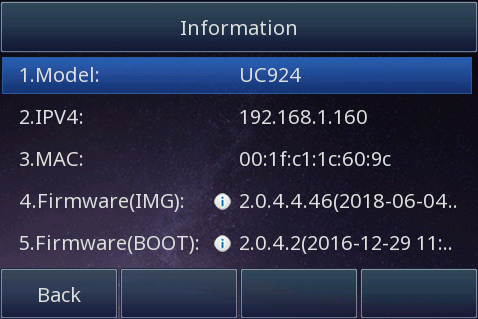
Press Up or Down arrow key to scroll through the list.
The Auto provision feature can configure your phone conveniently.
The following chapter will provide :
- Introduction
- Auto Provision via RPS
- Auto Provision via DHCP Option 66
- Manually Configure IP Phones
Introduction
Over View
Auto provision feature simplifies the configuration procedure of the supported IP phones.
...
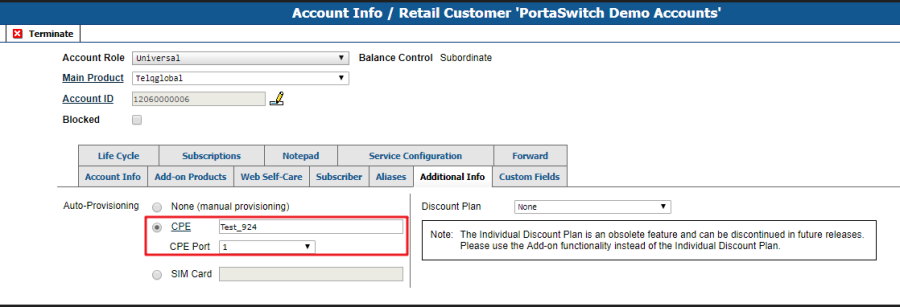
a. Search the account.

b. Click the Account Info tab.
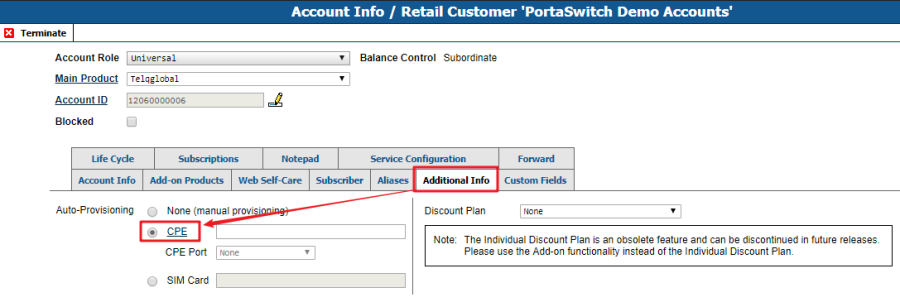
c. Click the hyperlink CPE and choose the CPE Inventory.
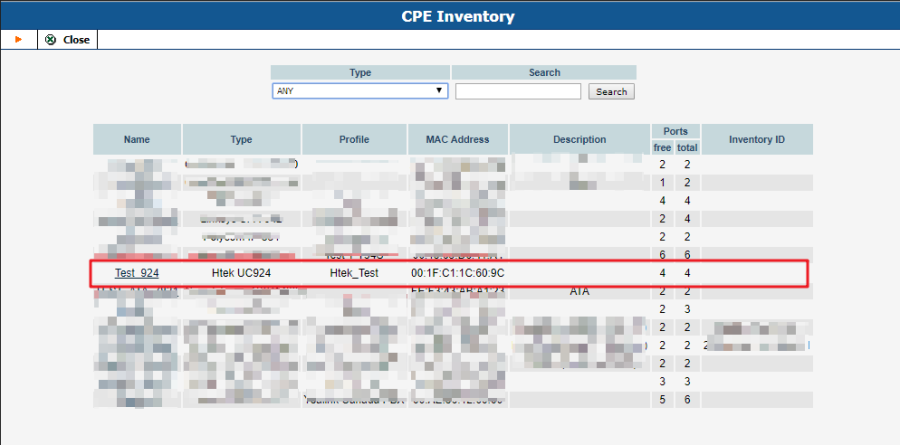
NOTE: The Select CPE dialog box shows a list of phones that have not been used before in other accounts, or phones with available (unused) ports.
After the automated script creates a new configuration file, it will place it on the provisioning server. The file generation process runs every hour (or every time you update a specific IP device profile).
All device configuration files are stored in /porta_var /<Server_IP> /tftp on the PortaBilling web server, in subdirectories with a name identical to the environment ID (i_env): 1, 2, 3, and so on.
If you don't know about it, please contact your provider or administrator.
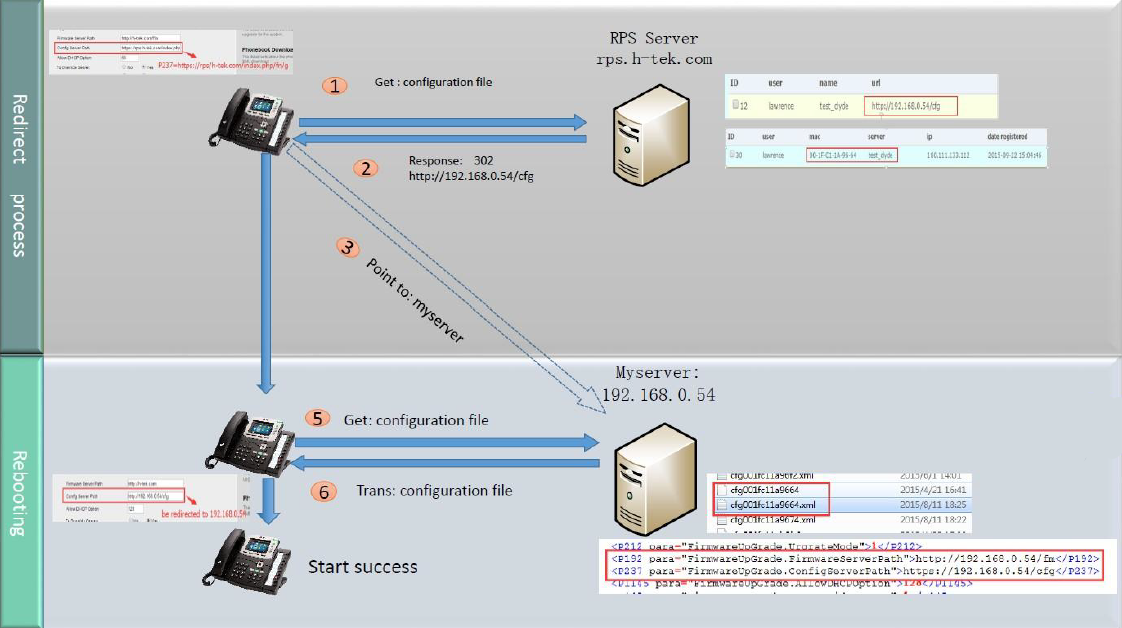
Auto Provision via RPS
Provision the IP Phone via RPS is a convenience way.
When the IP Phone start up , default it will send 'Get' message to the RPS server, if the phone's MAC address is assigned on the RPS Server previously, the RPS server will send the preset URL of the configure server to IP Phone.
The work process of RPS show below. And more information about how to use RPS, please refer to these documents fm.htek.com/rs/rps.zip .
Auto Provision via DHCP Option 66
Overview
If you need to deploy a large number of IP phones at once, we also provide an implementable method: DHCP Option 66.
When an IP phone is connected to the network, the DHCP server will assign an IP address to it. In the packet sent from the DHCP server to the IP phone, we assign option 66 to the packge, which is a URL to a specific provisioning server, so it can direct the IP phone to get configuration from the server pointed to by the URL.
...
Take Dual DHCP Server for an example.
https://sourceforge.net/projects/dhcp-dns-server/files/latest/download
1. Create CPE Profile and CPE Inventory as guided above.
2. Add 66="URL" in DHCP config file DualServer.ini GLOBAL_OPTIONS field, e.g. 66="http://demo.portaone.com/3".

3. After that, power on the IP phone and the phone will automatically get the configuration from the specific server.
This content show the lasted way to configure the IP Phone if the Auto-Provision can't work anyway.
...
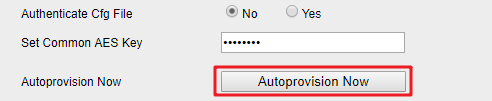
Now you just need wait for a while, the IP Phone will automatically get the configuration from the configure server.
Use PortaOne Integrated Feature
Feature List
This chapter provides the detail instructions and configurations for the following PortaOne integrated features:
- Call Transfer
- Call Forwarding
- Conference
- Screening
- Call Return
- Call Parking
- Recording
- Paging/Intercom calls
- BLF
- Auto Attendant
- Call Queues
- Multiple Pickup Groups
- Service Announcements via Media Server
- SIP Identity
Call Transfer
Over View
Unlike some other PBXs, PortaSIP will intercept the
REFER message and process it entirely on the PortaSwitch side to
make sure the call is authorized.
If the call is unauthorized, PortaSwitch will return the call to the original parties.
You can transfer a call to another extension by two ways:
Blind Transfer: Transfer a call directly to another party without consulting.
Attended Transfer: Transfer a call with
prior consultation.
...
| 锚 |
|---|
| _Toc509318739 |
|---|
| _Toc509318739 |
|---|
|
Call Forwarding| 锚 |
|---|
| _Toc509318740 |
|---|
| _Toc509318740 |
|---|
|
Over View
...
1. In Account Info page? Service Configuration? Incoming Calls?Call Forwarding.
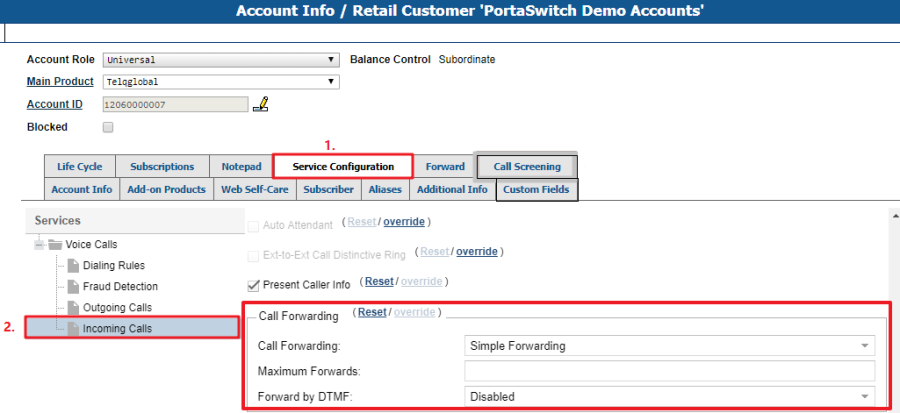
Simple Forwarding is unconditional forwarding to a single phone number, pre-defined by the user.
Follow-me allows you to specify multiple destinations for call forwarding, each of which is active in its own time period. You can also specify that multiple numbers be tried one after another, or that they all ring at the same time, or that they are tried, percentagewise, depending on the total number of incoming calls.
Forward to SIP URI allows you to specify not only a destination phone number but also an IP address for calls to be forwarded to. This is useful when calls have to be routed directly to an external SIP proxy.
Advanced Forwarding adds a few extra options to those available in Follow-me mode, and also allows you to route calls to SIP URI. It thus represents a super-set of all call forwarding capabilities.
2. After
Call Forwarding is enabled, the
Forward tab appears.
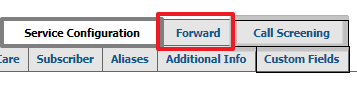
You can configure the forward target on here.
And after that, the incoming call will be forwarded by your forward rules.
Conference| 锚 |
|---|
| _Toc509318744 |
|---|
| _Toc509318744 |
|---|
|
Over View
...
- Press the Hold soft key to place the conference on hold
- Press the Split soft key to split the conference into four individual calls, and these calls are all on hold.
- Press the End Call soft key to drop the conference call.
Call Screening
| 锚 |
|---|
| _Toc509318747 |
|---|
| _Toc509318747 |
|---|
|
Over View
...
| 锚 |
|---|
| _Toc509318749 |
|---|
| _Toc509318749 |
|---|
|
Call Return| 锚 |
|---|
| _Toc509318750 |
|---|
| _Toc509318750 |
|---|
|
Over View
...
| 锚 |
|---|
| _Toc509318757 |
|---|
| _Toc509318757 |
|---|
|
Call Parking
| 锚 |
|---|
| _Toc509318758 |
|---|
| _Toc509318758 |
|---|
|
Over View
...
| 锚 |
|---|
| _Toc509318753 |
|---|
| _Toc509318753 |
|---|
|
RecordingOver View
Users of voice calls services on PortaSwitch® can record conversations to
be played back later.
...
1. Record
Automatically
Service Configuration -> Voice Calls -> Call Recording -> Feature Status.
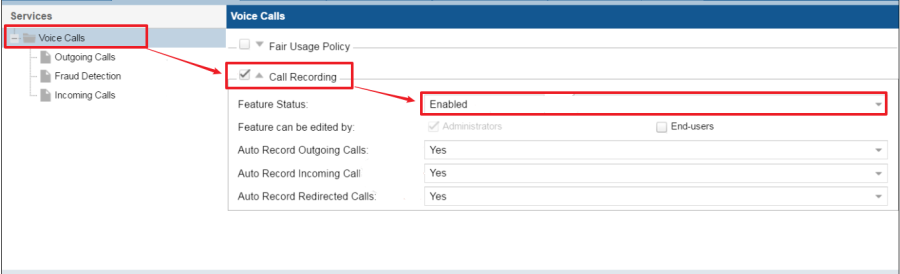
Server will automatically record the calls according to the preset rules.
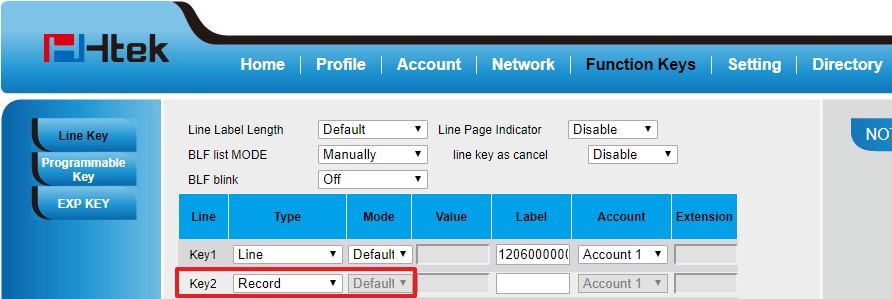
2. Record on Demand
This method has no configuration requirements on the server but need a Line Key preset as
Record.
After that you can record the calls you need by pressing the
Record Key.
On the WEB GUI -> Function Keys -> Line Key -> configure a key as Record.
BLF
| 锚 |
|---|
| _Toc509318754 |
|---|
| _Toc509318754 |
|---|
|
Over View
...
Auto Attendant| 锚 |
|---|
| _Toc509318762 |
|---|
| _Toc509318762 |
|---|
|
Over View
...
| 锚 |
|---|
| _Block_Last_Caller |
|---|
| _Block_Last_Caller |
|---|
|
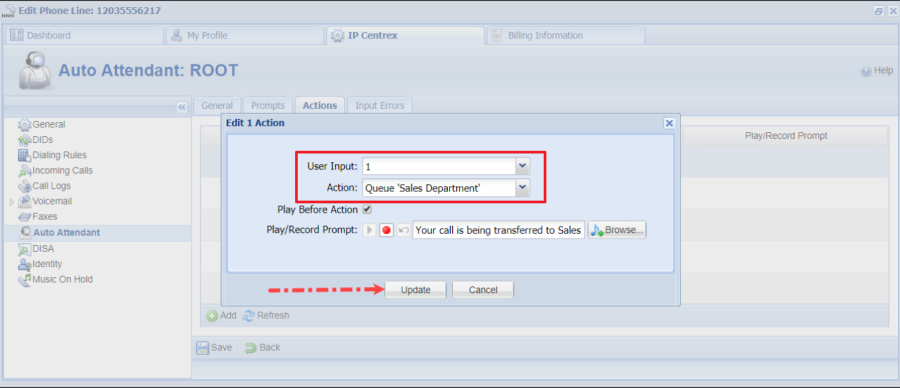
Call QueuesOver View
Combine this feature with Auto Attendant allows you provide a "call center" functionality.
...
On Custom Self-care Interface, add a new Call Queue.
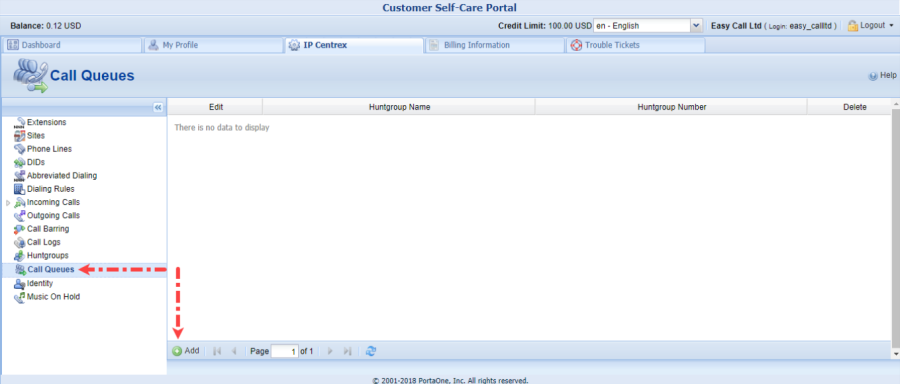
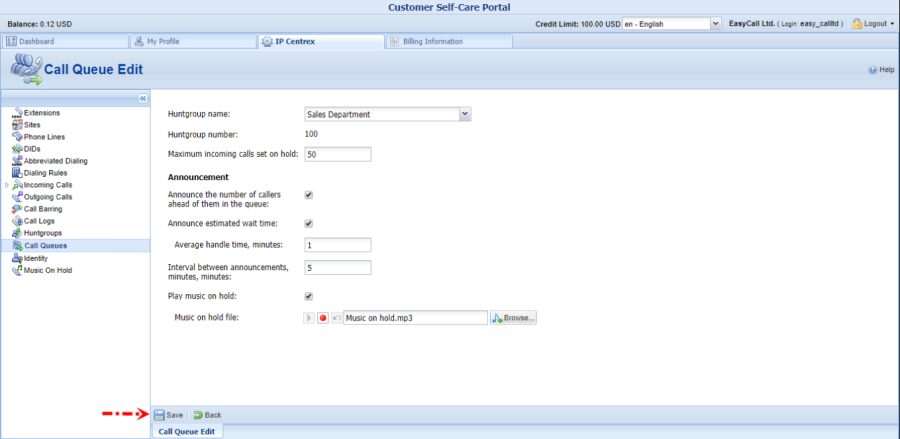
The call arrive to this queue will be transferred to the corresponding huntgroup. And then, you need to configure the Auto Attendant so that it can send calls that arrive to the extension to the call queue.
More details please refer to Call Queues.
Multiple Pickup GroupsOver View
...
| 锚 |
|---|
| _Toc509318768 |
|---|
| _Toc509318768 |
|---|
|
TroubleshootingThis chapter provides general troubleshooting information to help you solve the problems you might encounter when using your phone. If you require additional information or assistance with your new phone, contact your system administrator.
...