PortaOne Configuring Guide
- stephen
About This Guide
Thank you for choosing the Htek IP phones, which are exquisitely designed to provide basic phone features plus advanced business features, such as Call Park, Call Pickup, Intercom and Enhanced Monitor Extension over IP network. The purpose of this guide is to serve as a basic guidance for auto- provision. Htek IP phones with PortaOne platform including:
Htek 9 Series: UC902P, UC903, UC912P, UC923, UC924, UC926.
Note: The configuration process outlined in this guide applies to Htek SIP IP phones running Firmware version 2.0.4.4.53 or later. The configuration process described in this guide take the Htek UC924 as an example.
In This Guide
Topics provided in this guide include:
Summary of Changes
- V1.0 (2018-06-19): Provide a basic guidance for auto-provision Htek IP phones with PortaOne.
Getting Started
This chapter will show you the basic process of phone's start-up and instructions of the way to get the basic information of the phone. Topics include:
Phone Initialization
When the phone is powered on, it will start the boot process, including initializing the phone and checking the firmware version. Please refer to the three phases of the LCD display:


With the factory setting unchanged, the phone will attempt to contact the DHCP server in the network for valid IPv4 configurations during initialization(e.g., IP address, subnet mask, default gateway address and DNS address).
Phone Status
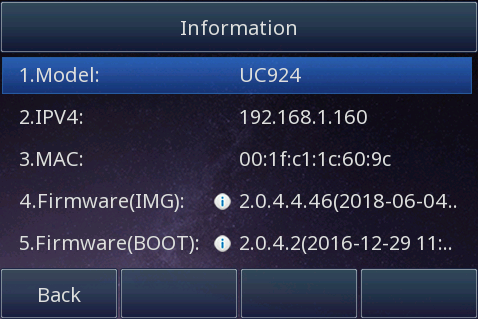
After the phone turned on, you can check the status on phone's user interface (LCD) via the following ways:
- Press OK button twice.
- Or press the following button one by one: Menu ? Status ? Information.
Available information of phone status includes:
- Network status (e.g., IPv4 status, IP mode, MAC address).
- Phone status (e.g. product name, firmware version, MAC address and device certificate status).
- Language information.
Press Up or Down arrow key to scroll through the list.
Configure your phone with PortaOne Platform
The Auto provision feature can configure your phone conveniently.
The following chapter will provide :
- 3473907tion
- Auto Provision via RPS
- 3473907 Provision via DHCP Option 66
- Manually Configure IP Phones
Introduction
Over View
Auto provision feature simplifies the configuration procedure of the supported IP phones.
Operating Instructions
- Login PortaBilling web page.
- Create a CPE Profile.
a. In the Networking section of the PortaBilling main page, choose CPE Profiles.
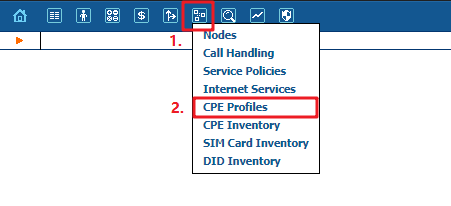
b. On the CPE Profiles page, click the Add icon.

c. Fill in the CPE profile information fields.
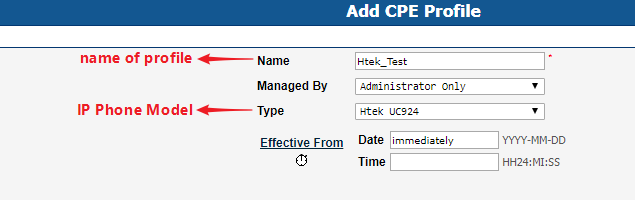
d. click Save, then you will be redirected to the Edit CPE Profile.
e. Edit CPE Profile. This page is like the web page of Htek IP Phone. You can set the default configuration file. And it will be storaged in PortaBilling web server.
- Create a CPE Inventory
a. In the Networking section of the PortaBilling main page, choose CPE Inventory.
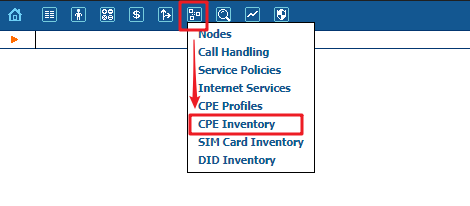
b. On the CPE Inventory page, click the Add icon.
c. Fill the Add CPE information fields.
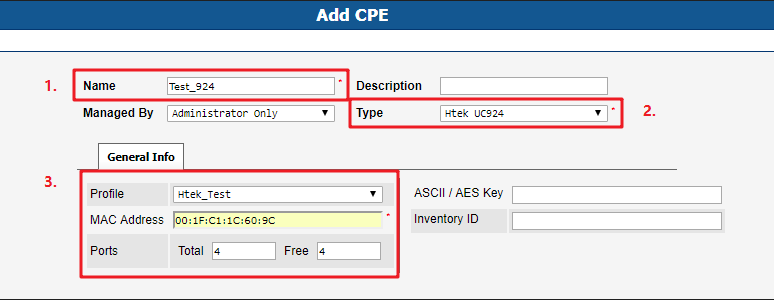
d. Click Save & Close.
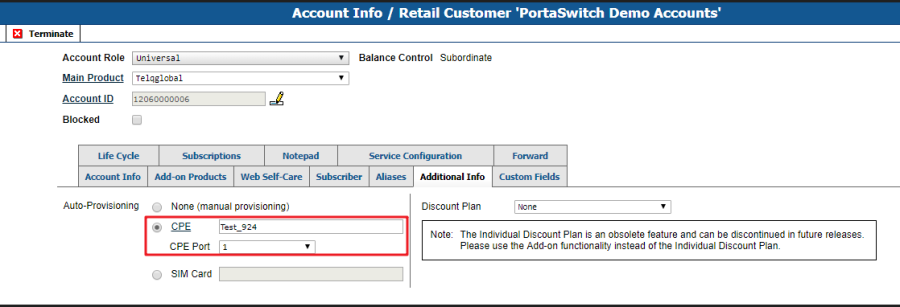
- Open the Account Info
a. Search the account.

b. Click the Account Info tab.
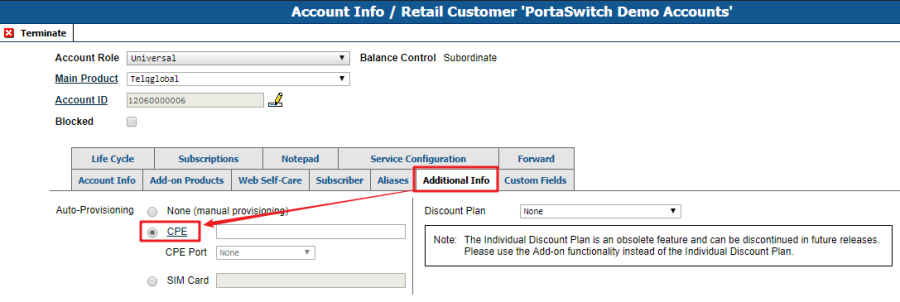
c. Click the hyperlink CPE and choose the CPE Inventory.
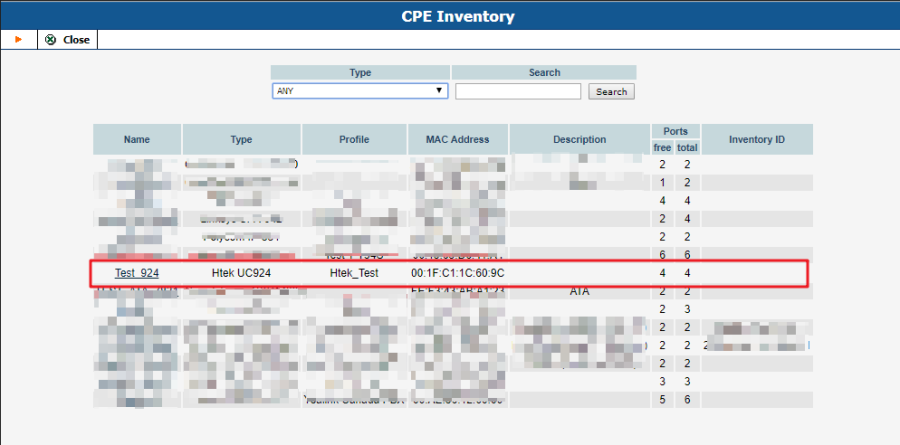
NOTE: The Select CPE dialog box shows a list of phones that have not been used before in other accounts, or phones with available (unused) ports.
After the automated script creates a new configuration file, it will place it on the provisioning server. The file generation process runs every hour (or every time you update a specific IP device profile).
All device configuration files are stored in /porta_var /<Server_IP> /tftp on the PortaBilling web server, in subdirectories with a name identical to the environment ID (i_env): 1, 2, 3, and so on.
If you don't know about it, please contact your provider or administrator.
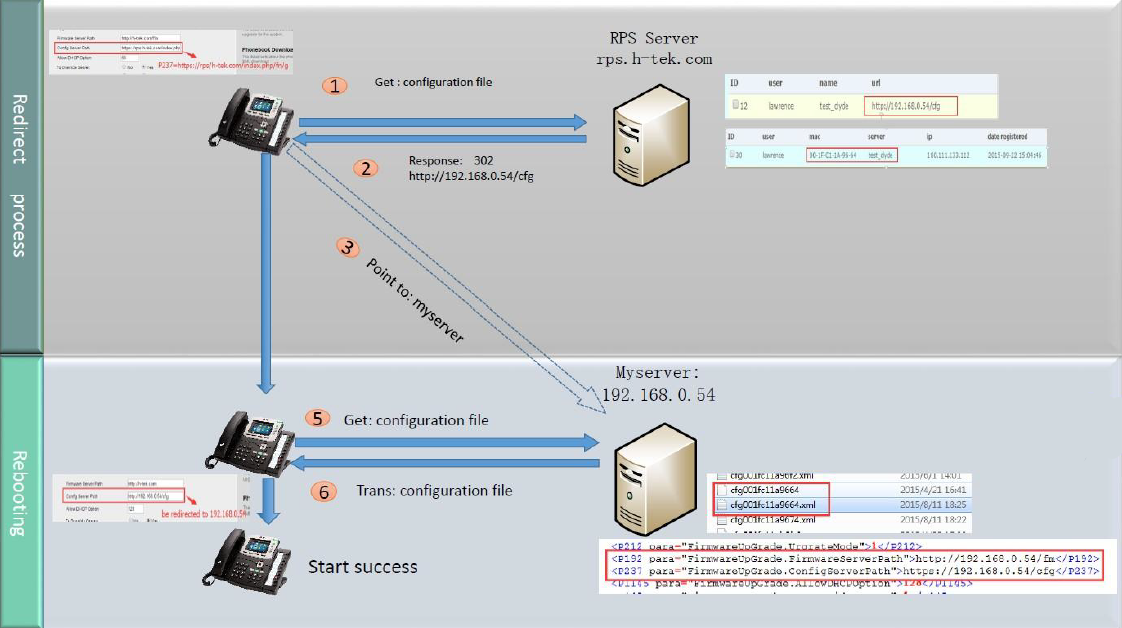
3473907 Provision via RPS
Provision the IP Phone via RPS is a convenience way.
When the IP Phone start up , default it will send 'Get' message to the RPS server, if the phone's MAC address is assigned on the RPS Server previously, the RPS server will send the preset URL of the configure server to IP Phone.
The work process of RPS show below. And more information about how to use RPS, please refer to these documents fm.htek.com/rs/rps.zip .
3473907 Provision via DHCP Option 66
Overview
If you need to deploy a large number of IP phones at once, we also provide an implementable method: DHCP Option 66.
When an IP phone is connected to the network, the DHCP server will assign an IP address to it. In the packet sent from the DHCP server to the IP phone, we assign option 66 to the packge, which is a URL to a specific provisioning server, so it can direct the IP phone to get configuration from the server pointed to by the URL.
How to Configure
Take Dual DHCP Server for an example.
https://sourceforge.net/projects/dhcp-dns-server/files/latest/download
1. Create CPE Profile and CPE Inventory as guided above.
2. Add 66="URL" in DHCP config file DualServer.ini GLOBAL_OPTIONS field, e.g. 66="http://demo.portaone.com/3".

3. After that, power on the IP phone and the phone will automatically get the configuration from the specific server.
Manually configure the IP Phone
This content show the lasted way to configure the IP Phone if the Auto-Provision can't work anyway.
1. Login the IP Phone's web page by enter the phone's IP address in the browser's Address field. ( the default username and password are admin )
2. Click Management ? Auto Provision, then fill the configure path in the Config Server Path field.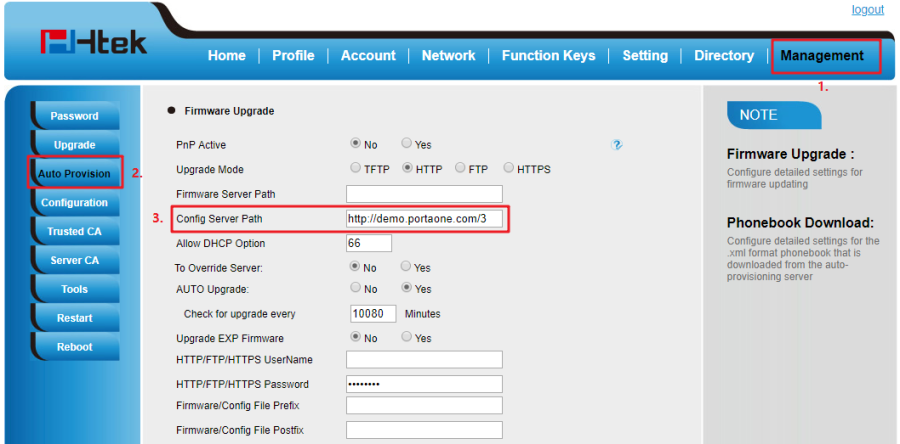
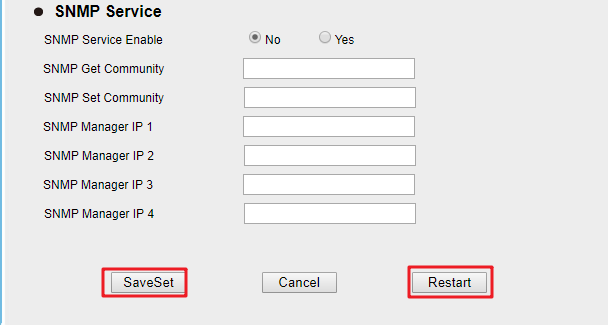
3. Click SaveSet, then click Autoprovision Now or Restart.
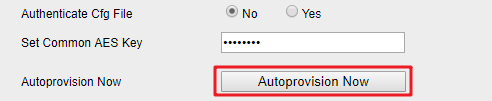
Now you just need wait for a while, the IP Phone will automatically get the configuration from the configure server.

Use PortaOne Integrated Feature
Feature List
This chapter provides the detail instructions and configurations for the following PortaOne integrated features:
- Call 3473907
- Call Forwarding
- Conference
- 3473907
- Call Return
- Call 3473907
- Recording
- Paging/Intercom calls
- BLF
- 3473907 Attendant
- 3473907 Queues
- 3473907 Pickup Groups
- Service Announcements via Media Server
- SIP Identity
Call Transfer
Over View
Unlike some other PBXs, PortaSIP will intercept the REFER message and process it entirely on the PortaSwitch side to make sure the call is authorized. If the call is unauthorized, PortaSwitch will return the call to the original parties.
You can transfer a call to another extension by two ways:
Blind Transfer: Transfer a call directly to another party without consulting.
Attended Transfer: Transfer a call with prior consultation.
How to Use
- Blind Transfer
- When A is talking with B , A wants to transfer the call to C , so A presses Transfer soft key.
- A enters the target extension number(C).
- A presses Transfer soft key again , then C will be ringing and your phone will back to idle , the call is transfered to B and C.
- Attended transfer
- When A is talking with B , A wants to transfer the call to C , so A presses Transfer soft key.
- A enters the target extension number(C).
- A press Send.
- Wait for C to answer the call and consulting with C if he want receive the call from B.
- If C agrees to answer the call , A presses Transfer again and the call is transferred to B and C. Otherwise, C hangup the call, and the call returns to A and B.
Additional function of transfer
Login phone webpage->Settings->Features->Transfer Settings. There are some additional settings of transfer. Please refer the following picture.
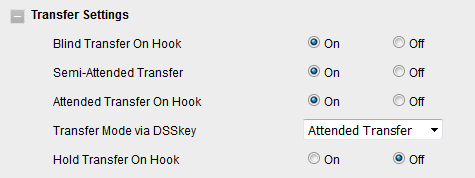
- Blind(Attended) Transfer On Hooks
If you have already enter the targer number , the transfer will be completed in the form of Blind Transfer even if you hang up directly.
This means that the action of on-hook replaces pressing the action of press the transfer softkey again . And the same with Attended Transfer On Hook.
- Transfer Mode via DSSkey
This feature allows you to complete the transfer in one click.
For an example , set the Line Key as BLF or Transfer , the Value is target number C. And set Transfer Mode via DSSkey as Blind Transfer .
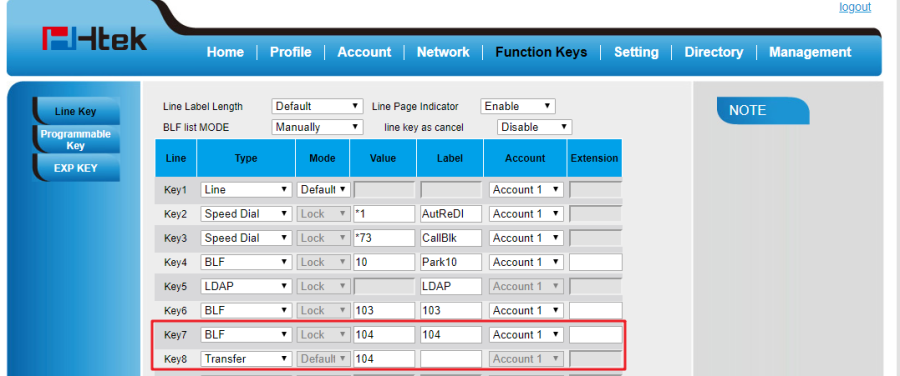
When you are talking with B, press the BLF key (listening to C) , the call will Blind Transfer to C directly.
Call Forwarding
Over View
Call Forwarding feature should be preset on PortaBilling. you can select a specific mode from the Forward Mode menu on the Call Features tab.
How To Configure
1. In Account Info page? Service Configuration? Incoming Calls?Call Forwarding.
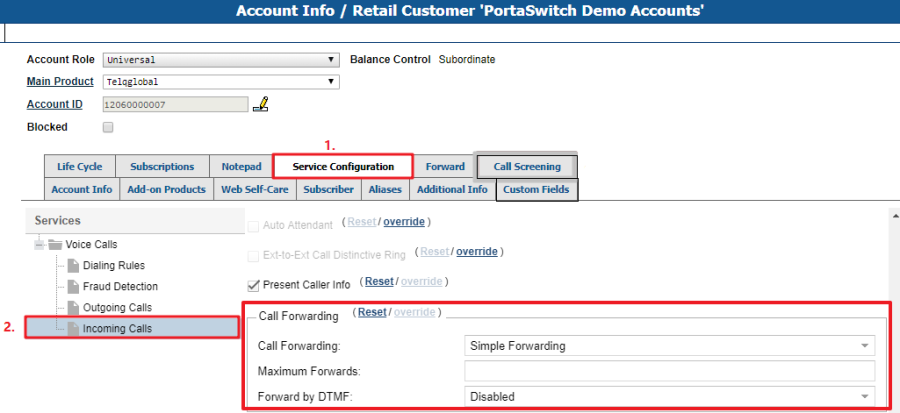
Simple Forwarding is unconditional forwarding to a single phone number, pre-defined by the user.
Follow-me allows you to specify multiple destinations for call forwarding, each of which is active in its own time period. You can also specify that multiple numbers be tried one after another, or that they all ring at the same time, or that they are tried, percentagewise, depending on the total number of incoming calls.
Forward to SIP URI allows you to specify not only a destination phone number but also an IP address for calls to be forwarded to. This is useful when calls have to be routed directly to an external SIP proxy.
Advanced Forwarding adds a few extra options to those available in Follow-me mode, and also allows you to route calls to SIP URI. It thus represents a super-set of all call forwarding capabilities.
2. After Call Forwarding is enabled, the Forward tab appears.
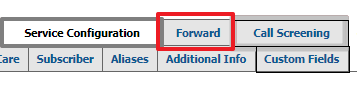
You can configure the forward target on here.
And after that, the incoming call will be forwarded by your forward rules.
Conference
Over View
You can create a conference with other extensions. And the maximum number of participants is 5.
How to Use
To creat a conference
- Place a call to the first participant.
- When the call established, press the Conference soft key to place a new call. And the active call is placed on hold.
- Enter the number of the second party and press # or the Send soft key
- When the second participant answered, repeat step 2 until all the participants are joined the conference.
During the conference, you can do the following actions
- Press the Hold soft key to place the conference on hold
- Press the Split soft key to split the conference into four individual calls, and these calls are all on hold.
- Press the End Call soft key to drop the conference call.
Call Screening
Over View
Sometimes incoming calls need to be treated differently: calls from your
boss or secretary should reach you on your cell phone even during the
weekend, while other calls can just go to voicemail. Calls in the evening
hours should go straight to your cell phone (there is no point in ringing
your IP phone while you are not in the office), while calls from your exgirlfriend should always go to voicemail.
How to Configure
In Account Info page? Service Configuration? Incoming Calls? Call Screening.
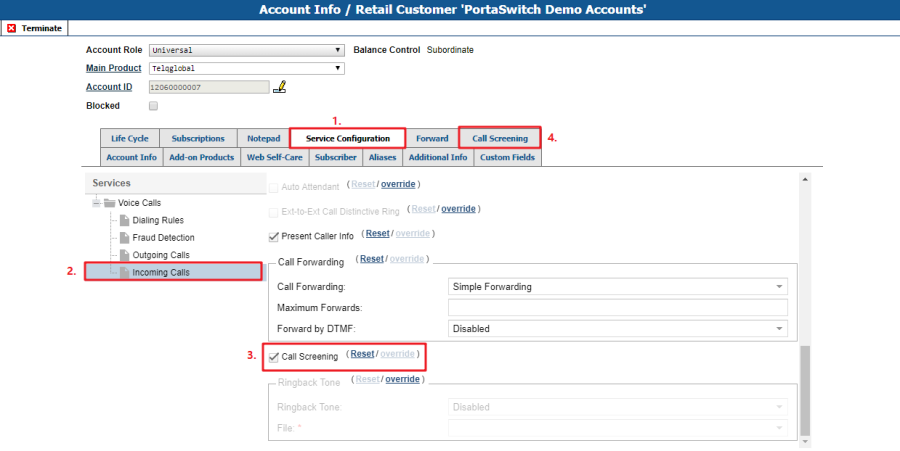
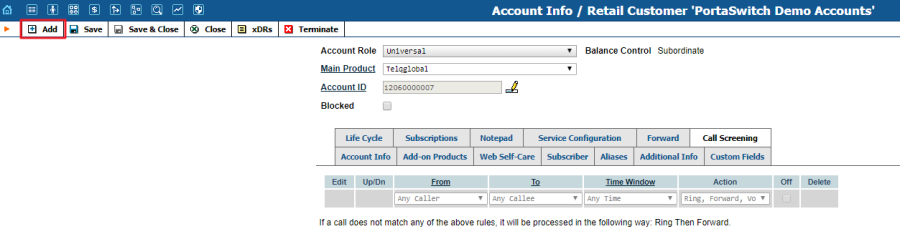
After Call Screening is enabled, the Call Screening tab appears.
Click on Add to add a screening rule.
A rule may contain only some of these limitations (e.g. time), in which case the others will contain a wildcard (e.g. calls from any phone number, or made to any of your DID numbers).
Each rule provides instructions about exactly how a call should be processed. It contains a sequence of one or more of the following actions:
Reject – Simply drop the call without answering it.
Ring – Ring on the current IP phone.
Forward – Redirect to the numbers defined in the call forward / follow-me settings.
Voicemail – Connect the call to this phone's voice mailbox.
When assigning an action to a rule, you will be offered a list containing all
the possible combinations based on the currently available features for
this account. For instance, the Forward option will be present only if the
call forwarding service is currently enabled for the account.
Call Return
Over View
This featurn allows you to make a call to the last party or number that called you, regardless of whether you answered the original call or knows the caller's identity.
How to Use
- Login Web GUI -> Function Keys -> Line Key, configure a Line as Call Return.
- When you missed a call, press the Call Return Key, then the call will automatically dial the party or number.
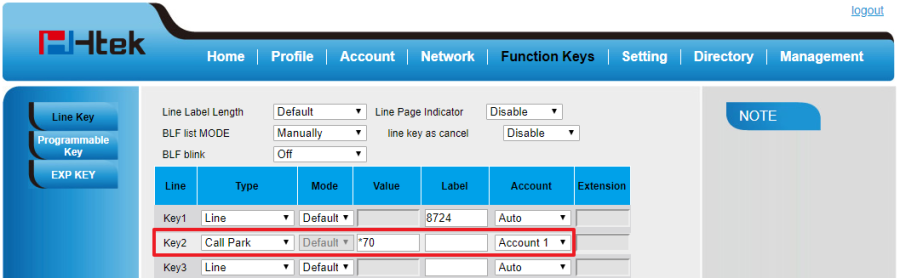
Call Parking
Over View
The Call Park feature allows to park a call (the call will be automatically placed on hold) then retrieve the parked call from another phone by dialing the Call Park location number.
How to Configure
1. Enable Call park feature on PortaBilling Customers page
- Log in PortaBilling WEB GUI -> Customers -> Service Configuration -> IP Lines ? IP Phone Template.

- Edit Service Codes.
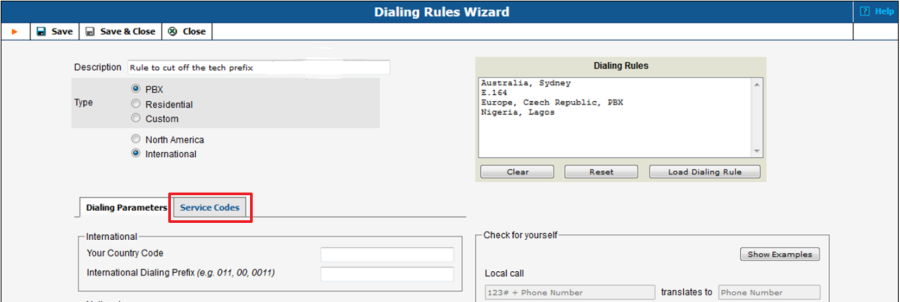
- The default Call Park code is *70 and the Retrieval code is *71.
How to Use
- Randomly Call Park
- Press
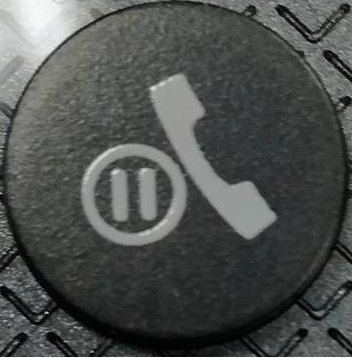 or Hold softkey during an active call. The call will be put on hold.
 - Press New Call or Transfer softkey( only Attended Transfer ).
- After that, dials Call Park code *70
If you'd like, you can configure a Line Key to do the same thing.
- Directed Call Park
- Press or Hold softkey during an active call. The call will be put on hold.
- Press New Call softkey, then dial Park extension number and press # or Send softkey to park the call
Recording
Over View
Users of voice calls services on PortaSwitch® can record conversations to
be played back later.
How to Configure
1. Record Automatically
Service Configuration -> Voice Calls -> Call Recording -> Feature Status.
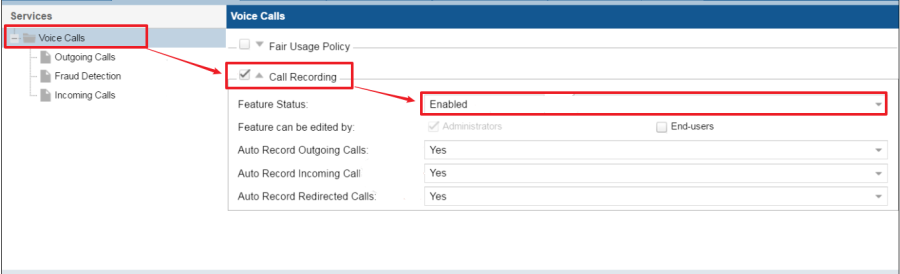
Server will automatically record the calls according to the preset rules.
2. Record on Demand
This method has no configuration requirements on the server but need a Line Key preset as Record. After that you can record the calls you need by pressing the Record Key.
On the WEB GUI -> Function Keys -> Line Key -> configure a key as Record.

BLF
Over View
You can use BLF (Busy Lamp Field) to monitor the status change of a specific extension. By pressing the corresponding BLF key when the extension is free, you can also make a call to the extension which is being monitored.
How to Configure
1. configure via phone WEB GUI
1.1 Log in Htek phone WEB GUI ? Function Keys ? Line Key.

1.2 Choose BLF from the drop-down list, then fill in the extension in the entry Value.
1.3 Click on SaveSet.
2. configure via PortaBilling WEB GUI
- You can preconfigure BLF when you create CPE profile, the WEB GUI is similar with the IP Phone's.
How to Use
- When monitored number is in idle status, the BLF key's light will be solid green and icon will solid blue.
- When monitored number has a incoming call, the BLF key's light will flashing red and icon will flashing yellow.
- When monitored number are talking, the BLF key's light will flashing red and Icon will solid yellow.
Auto Attendant
Over View
The Media Server's auto attendant is composed of a set of menus. When a caller dials the system, auto attendant will answer(connect) the call and proceed to the ROOT menu. And then the user's input will be matched with the corresponding menu items, and the action associated with this item will be performed.
How to Configure
1. Log in Customer Self-care Interface
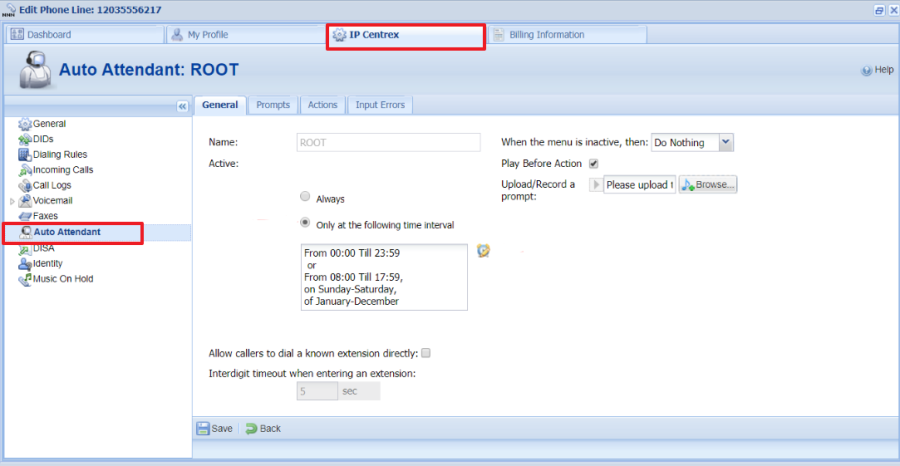
On this page, you can set the time to activate the Attendant. Also, you can select how calls will be processed when the ROOT menu is inactive.
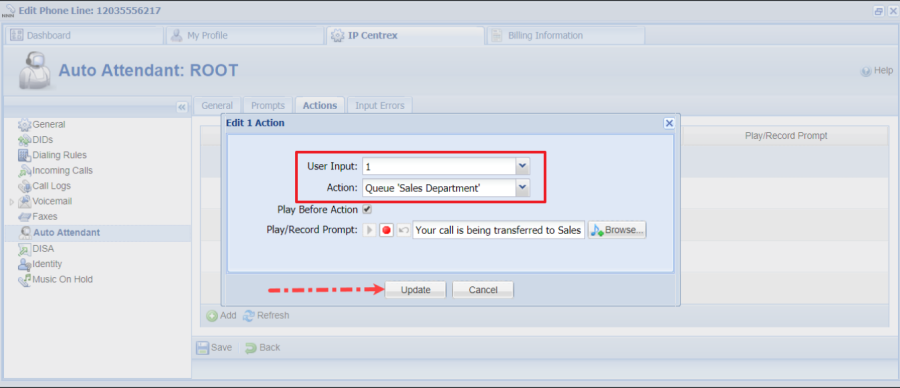
2. Assign Actions to Events
On Actions tag, click on Add.
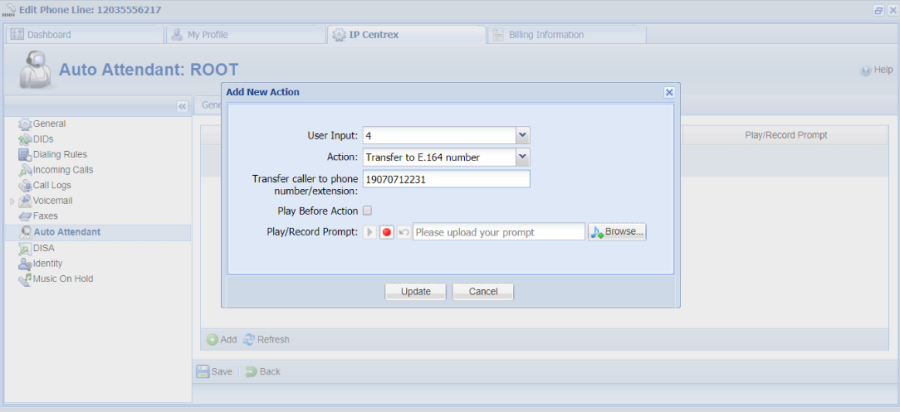
User Input:
- 0-9, #, *{} – User selection on telephone keypad.
- No input – Do not dial any key. When selected, the Timeout option appears. It defines the maximum number of seconds the system waits until a user dials a key. If the system receives no key during this interval, it performs the defined action.
- Fax – Transmits the fax CNG tone.
Action:
- Do Nothing – Performs no action. You can use this action to cancel the action that was previously used for the current user's input.
- Dial-by-name directly – Launches this company's dial-by-name directory. This allows a caller to look up a person by using the first three letters of their extension name.
- Transfer – Transfers the call to a given telephone number or extension. The phone number should be entered in the same format as the customer would use to dial it from an IP phone in his IP Centrex environment; for example, to transfer a call to extension 123, simply enter 123.
- Transfer to E.164 Number – Transfers the call to a given number. The number should be specified in E.164 format: the country code, followed by the area code, and then the number (e.g. 19070712231 for Canada).
- Transfer to Voicemail – Switches to voicemail mode. This should be designated as an action for the "Fax" event, in order to allow storage of received faxes.
- Prompt for extension # – You will hear the prompt to enter the extension number. You can specify the maximum allowed number of digits in an extension (Max Size).
- Dial extension directly – Transfers a call to an extension number entered by the caller. The extension number should start with the same digit as the "Dial extension directly" option. To prevent abuse (e.g. someone attempting to enter a long-distance number via this process), you can specify the maximum allowed number of digits for the extension (Max digits for extension number).
- Disconnect call– This disconnects a call. You can use this action to play a prompt and disconnect a call when the menu is inactive or when the caller presses / does not press a key. Note that if you do not enable the Play Before Action option for this action, the system will immediately disconnect a call.
- Queue "Name" – Transfers the user to the selected queue. You can only select the call queue if you have previously configured it.
- Menu "Name"– Transfers the user to the selected menu. You can only select the menu if you have previously configured it.
How to Use
When the Auto Attendant is active, the calls to you will be answered by Attendant. More details please refer to Configuring the Auto Attendant Functionality.
Call Queues
Over View
Combine this feature with Auto Attendant allows you provide a "call center" functionality.
How to Configure
On Custom Self-care Interface, add a new Call Queue.
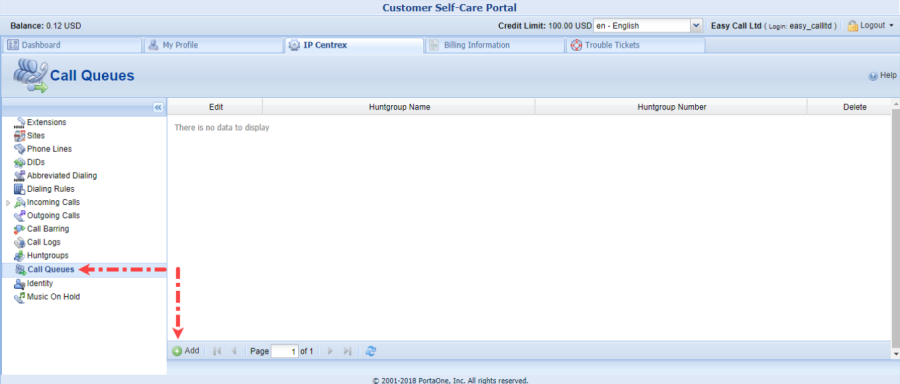
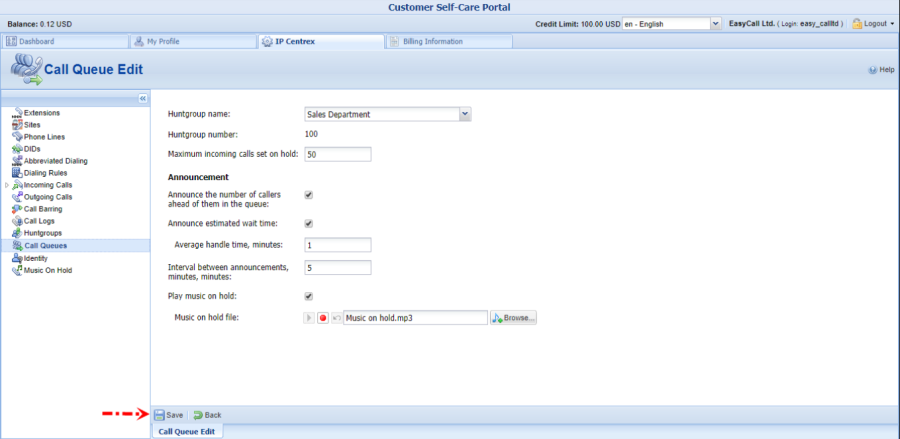
The call arrive to this queue will be transferred to the corresponding huntgroup. And then, you need to configure the Auto Attendant so that it can send calls that arrive to the extension to the call queue.
More details please refer to Call Queues.
Multiple Pickup Groups
Over View
For large companies with many employees it may be necessary to control who can pick up certain calls in order to maintain company protocol and authority.
How to Configure
End users configure call pickup within huntgroups on their self-care interfaces. The end user defines a group pickup prefix, enables the Call Pickup Allowed option for the required huntgroups, and assigns a primary group for each extension.
Assigning a primary group allows extension owners to pick up calls within that group by merely dialing the group pickup prefix. Note that an extension can only be assigned one primary group
How To Use
1. Directed Call Pickup
- Scenario 1. B is assigned to primary hunt group 12500, and C is in another hunt group 10264
- Scenario 2. B is in hunt group 12500, and C is in another hunt group 10264, both of them are non-primary group members
- A calls 12500, then B rings
- C dials *<prefix>extension_number
- C will connect with A
2. Semi-directed Call Pickup
- Scenario 1. B is assigned to primary hunt group 12500, and C is a member of it
- Scenario 2. B and C are non-primary group members of 12500
- A calls 12500, then C rings
- B dials *<prefix> (in scenario 2, B will dials *<prefix>12500)
- B will connect with A
3. Non-directed Call Pickup
- Scenario 1. B is assigned to primary hunt group 12500, and A is non-primary group members of it
- Scenario 2. A and B are non-primary group members of 12500
- C calls 12500, then A rings
- B dials *<prefix>
- B will connect with C
Troubleshooting
This chapter provides general troubleshooting information to help you solve the problems you might encounter when using your phone. If you require additional information or assistance with your new phone, contact your system administrator.
Why is the LCD screen blank?
- Ensure that the phone is properly plugged into a functional AC outlet.
- Ensure that the phone is plugged into a socket controlled by a switch that is on.
- If the phone is plugged into a power strip, try to plug it directly into a wall out let instead.
- If the phone is powered from POE, ensure that you use a POE-compliant switch or hub.
Why does the phone display "Network unavailable"?
- Ensure that the Ethernet cable is plugged into the Internet port on the phone and the Ethernet cable is not loose.
- Ensure that the switch or hub in your network is operational.
Why doesn't the phone display time and date correctly?
Check if you have configured the phone to obtain the time and date from the SNTP server automatically. If the phone fails to connect to the SNTP server, you need to configure the time and date manually.
Why the phone can't auto-configuration successful?
1. Make sure you enter the correct URL especially the environment ID (i_env).
2. If all the information is correct, you can wait for a few minutes because the server needs some time to generate the configuration file.