Htek IP Phones Integrated with Xorcom PBX Configuring GuideV1.0
| 锚 |
|---|
| _About_This_Guide |
|---|
| _About_This_Guide |
|---|
|
About This Guide
Thank you for choosing the Htek IP phones, which are exquisitely designed to provide basic phone features plus advanced business features, such as Forward, Transfer,Network conference,and Enhanced Monitor Extension over IP network.
The purpose of this guide is to serve as a basic guidance for auto-provision
With the Xorcom PBX.
...
| 锚 |
|---|
| _In_This_Guide |
|---|
| _In_This_Guide |
|---|
|
In This Guide
Topics provided in this guide include:
...
| 锚 |
|---|
| _Summary_of_Changes |
|---|
| _Summary_of_Changes |
|---|
|
Summary of Changes
- V1.0 (2018-12-14): Provide a basic guidance for auto-provision Htek IP phones with Xorcom PBX.
...
| 锚 |
|---|
| _Getting Started |
|---|
| _Getting Started |
|---|
|
Getting Started
This chapter will show you the basic process of phone's start-up and instructions of the way to get the basic information of the phone. Topics include:
...
| 锚 |
|---|
| _Phone_Initialization |
|---|
| _Phone_Initialization |
|---|
|
Phone Initialization
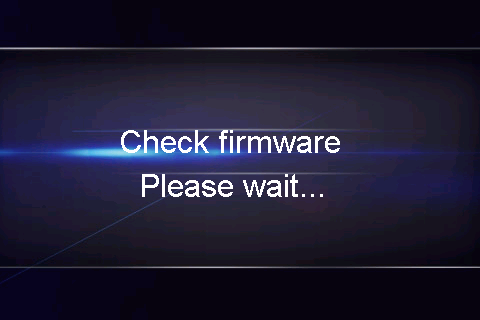
After your phone is powered on, the phone will boots up, complete the initialization and check firmware. Please refer to the three phases of the LCD display:


In the process of initializing, the phone will attempts to contact a DHCP server in your network to obtain valid IPv4 network settings (e.g., IP address, subnet mask, default gateway address and DNS address) by default.
...
| 锚 |
|---|
| _Phone_Status |
|---|
| _Phone_Status |
|---|
|
Phone Status
After the phone comes up, you can view phone status on phone user interface (LCD) via the following ways:
...
| 锚 |
|---|
| _Auto-Provisioning_your_phone |
|---|
| _Auto-Provisioning_your_phone |
|---|
|
| 锚 |
|---|
| _Auto-Provisioning your phone |
|---|
| _Auto-Provisioning your phone |
|---|
|
Auto-Provisioning your phone
The way of provision with Xorcom PBX is Provisioning via Plug and play (Local LAN), which is mainly used in the situation where Htek Target phonend Xorcom PBX are in same subnet. This chapter provides the following instructions of auto-provisioning with Xorcom PBX and show you how to edit the custom provision template on Xorcom PBX. Topics include:
Auto Provision via RPS
Provision the IP Phone via RPS is a convenience way.
When the IP Phone start up , default it will send 'Get' message to the RPS server, if the phone's MAC address is assigned on the RPS Server previously, the RPS server will send the preset URL of the configure server to IP Phone.
...
This chapter provides the detail instructions and configurations for the following Xorcom PBX features:
...
| 锚 |
|---|
| _Call_Forward |
|---|
| _Call_Forward |
|---|
|
| 锚 |
|---|
| _BasicNetworkSetting |
|---|
| _BasicNetworkSetting |
|---|
|
| 锚 |
|---|
| _Call Forward |
|---|
| _Call Forward |
|---|
|
Time&Date
How To Config
...
Hot Desking
Over view
...
| 锚 |
|---|
| _Do Not Disturb |
|---|
| _Do Not Disturb |
|---|
|
Do Not Disturb
Over view
...
| 锚 |
|---|
| _Call forwarding |
|---|
| _Call forwarding |
|---|
|
Call forwarding
Over view
...
| 锚 |
|---|
| _Call Completion |
|---|
| _Call Completion |
|---|
|
Call Completion
Call completion allows a caller to let the system automatically alert him when a called party becomes available, after a previous call to that party failed for some reason. You can use the On/Off switch (together with a time group) to determine whether to receive such notifications.
...
Conference
Over view
...
Voice Mail
Over View
...
| 锚 |
|---|
| _Voicemail broadcast Groups |
|---|
| _Voicemail broadcast Groups |
|---|
|
Voicemail broadcast Groups
Over View
...
| 锚 |
|---|
| _Call Transfer |
|---|
| _Call Transfer |
|---|
|
Call Transfer
Over View
...
| 锚 |
|---|
| _Do_Not_Disturb |
|---|
| _Do_Not_Disturb |
|---|
|
| 锚 |
|---|
| _Toc313801154 |
|---|
| _Toc313801154 |
|---|
|
| 锚 |
|---|
| _Toc363566313 |
|---|
| _Toc363566313 |
|---|
|
Call Park
Over View
...
| 锚 |
|---|
| _Directed Call Pickup |
|---|
| _Directed Call Pickup |
|---|
|
| 锚 |
|---|
| _Direct Pickup |
|---|
| _Direct Pickup |
|---|
|
Direct Pickup
Over view
Directed call pickup allows you to answer a call ringing at another station,Generally used with the BLF function.
...
| 锚 |
|---|
| _Pickup Group |
|---|
| _Pickup Group |
|---|
|
Pickup Group
Over View
...
BLF
Over View
...
| 锚 |
|---|
| _Paging & Intercom |
|---|
| _Paging & Intercom |
|---|
|
Paging & Intercom
Over View
...
| 锚 |
|---|
| _Speed Dialing |
|---|
| _Speed Dialing |
|---|
|
Speed Dialing
Over View
...
Call Center
Ring Group
...
Lock Phone
Over View
...
1.Target phone dial the *75, enter the feature password ("PBX"→"Extension"→"Extension"→"General")according to the voice prompt.
-Server will prompt "phone locked" if the feature password is correct.
-Then the target phone can't make a call,but the target can receive the incoming call.
2.Target phone dial the *75 again, enter the feature password ("PBX"→"Extension"→"Extension"→"General")according to the voice prompt.
-Server will prompt "phone unlocked" if the feature password is correct.
-Then the target phone can make and receive any call.
Upgrade Firmware
If you define the access URL of firmware in the configuration file, the IP phone will download the firmware from the provisioning server. You can manually upgrade firmware if the IP phone does not download the firmware from the provisioning server. But the recommendation is to upgrade firmware through the provisioning server.
To set the access URL of firmware on Complete PBX
1.Login the Complete PBX
2.Click "SETTINGS"→"Endpoint Manager" →"Template":
3.Select target template → the Advanced settings→FirmwareUpGrade and set the "P192/para/FirmwareUpGrade.FirmwareServerPath"
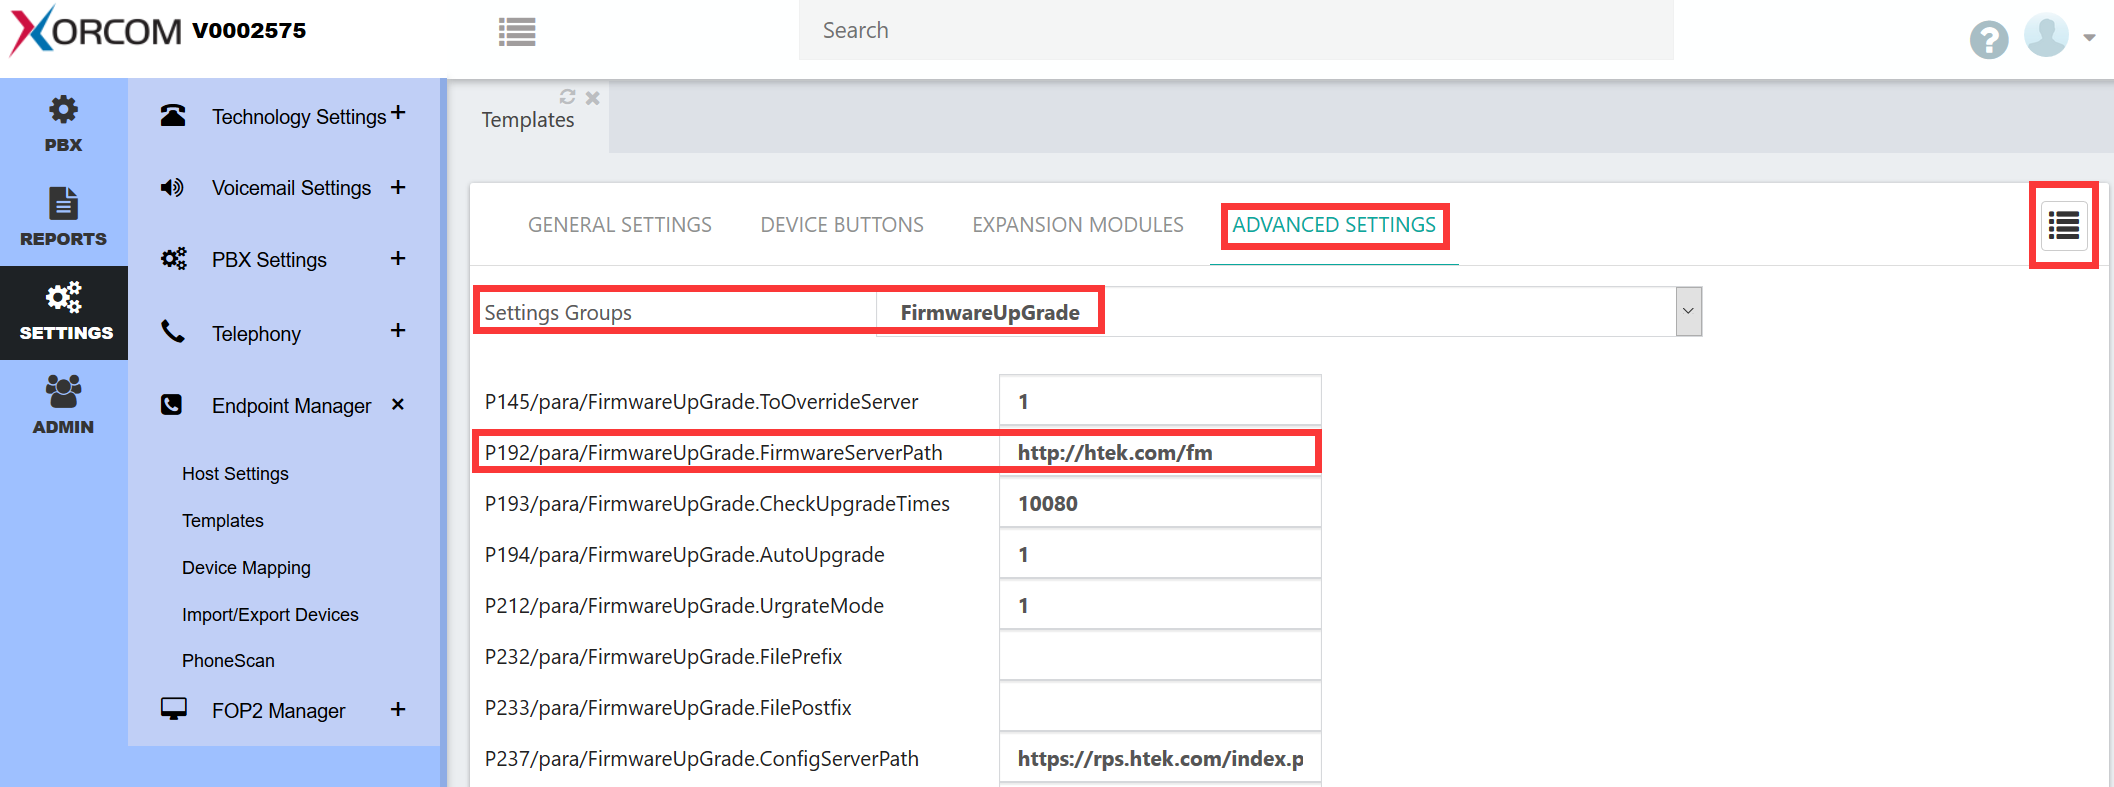 Image Added
4.Phone get the configuration file which contain the access URL of firmware from complate PBX via PNP, then phone will check and upgrade the firmware from http://htek.com/fm
To upload the target firmware by manually on phone webpage
1.Login the target phone's webpage
2.Click "Management"→ "Upgrade",Choose the target firmware file according to "Please choose the upgrade file:fwxxx.rom" prompt.
| 锚 |
|---|
| _Resetting the phone |
|---|
| _Resetting the phone |
|---|
|
Resetting the phone
...
Reset the phone to factory configurations after you have tried all troubles-
Hooting suggestions but do not solve the problem. You need to note that all customized settings will be overwritten after reset.
To reset the phone via phone LCD interface:
1.Press Menu Settings →Advanced →Settings →Reset
The password of Advanced is provisioned by Xorcom PBX.
2.Press the Enter softkey or OK key.
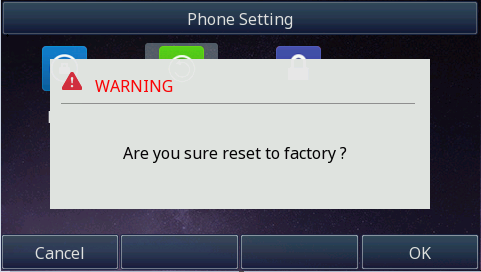
3.Press OK softkey.
Note: Reset of your phone may take a few minutes. Do not power off until the phone has started up successful.The phone will be reset to factory settings successfully after startup.
...
| 锚 |
|---|
| _Troubleshooting |
|---|
| _Troubleshooting |
|---|
|
Troubleshooting
This chapter provides general troubleshooting information to help you solve the problems you might encounter when using your phone. If you require additional information or assistance with your new phone, contact your system administrator.
Why is the LCD screen blank?
1.Ensure that the phone is properly plugged into a functional AC outlet.
2.Ensure that the phone is plugged into a socket controlled by a switch that is on.
3.If the phone is plugged into a power strip, try to plug it directly into a wall out let instead.
4.If the phone is powered from POE, ensure that you use a POE-compliant switch or hub.
Why does the phone display "Network unavailable"?
1.Ensure that the Ethernet cable is plugged into the Internet port on the Target phonend the Ethernet cable is not loose.
2.Ensure that the switch or hub in your network is operational.
Why doesn't the phone display time and date correctly?
Check if you have configured the phone to obtain the time and date from the SNTP server automatically. If the phone fails to connect to the SNTP server, you need to configure the time and date manually.