Xorcom Configuring Guide
- Former user (Deleted)
- HTEK_admin (Unlicensed)
Htek IP Phones Integrated with Xorcom PBX Configuring GuideV1.0
About This Guide
Thank you for choosing the Htek IP phones, which are exquisitely designed to provide basic phone features plus advanced business features, such as Forward, Transfer,Network conference,and Enhanced Monitor Extension over IP network.
The purpose of this guide is to serve as a basic guidance for auto-provision
With the Xorcom PBX.
- Xorcom PBX Version 5.0.55 is the minimum system version needed for HTEK provisioning.
- Htek Provisionable Devices on Xorcom PBX including:
UC8XX:UC802,UC802P,UC803,UC803P,UC804,UC804T,UC806,UC806P,
UC840,UC840P,UC842,UC842P,UC860,UC860P
UC9XX:UC926E, UC924, UC923, UC912G, UC903, UC902.
- Htek firmwares no older than 2.0.4.6.11 are recommended.
- For support, please send requests to the Htek Ticket System (http://www.htek.com/TicketingSystem/), or send email to support@htek.com, or contact Htek FAE team on Skype (skype ID: hanlong.fae).
In This Guide
Topics provided in this guide include:
- Chapter 1 Getting Started
- Chapter 2 Auto-provisioning your Phone
- Chapter 3 Use Xorcom Integrated Features
- Chapter 4 Resetting your phone
- Chapter 5 Troubleshooting
Summary of Changes
- V1.0 (2018-12-14): Provide a basic guidance for auto-provision Htek IP phones with Xorcom PBX.
Getting Started
This chapter will show you the basic process of phone's start-up and instructions of the way to get the basic information of the phone. Topics include:
Phone Initialization
After your phone is powered on, the phone will boots up, complete the initialization and check firmware. Please refer to the three phases of the LCD display:


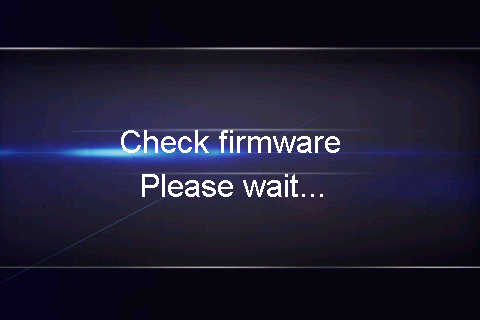
In the process of initializing, the phone will attempts to contact a DHCP server in your network to obtain valid IPv4 network settings (e.g., IP address, subnet mask, default gateway address and DNS address) by default.
Phone Status
After the phone comes up, you can view phone status on phone user interface (LCD) via the following ways:
- Press "OK" button twice.
- Press the following button one by one: "Menu" → "Status" → "information".
Available information of phone status includes:
- Network status (e.g., IPv4 status, IP mode, MAC address).
- Phone status (e.g., product name, firmware version, MAC address and
- device certificate status).
- Language infomation.
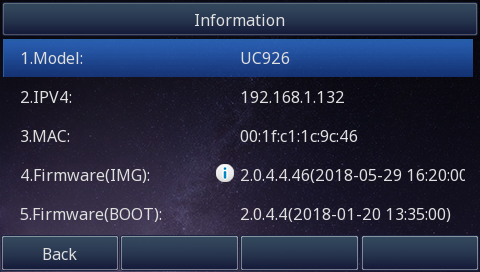
- Press "Up" or "Down"to scroll through the list and view the specific information.
Auto-Provisioning your phone
The way of provision with Xorcom PBX is Provisioning via Plug and play (Local LAN), which is mainly used in the situation where Htek Target phonend Xorcom PBX are in same subnet. This chapter provides the following instructions of auto-provisioning with Xorcom PBX and show you how to edit the custom provision template on Xorcom PBX. Topics include:
Auto Provision via RPS
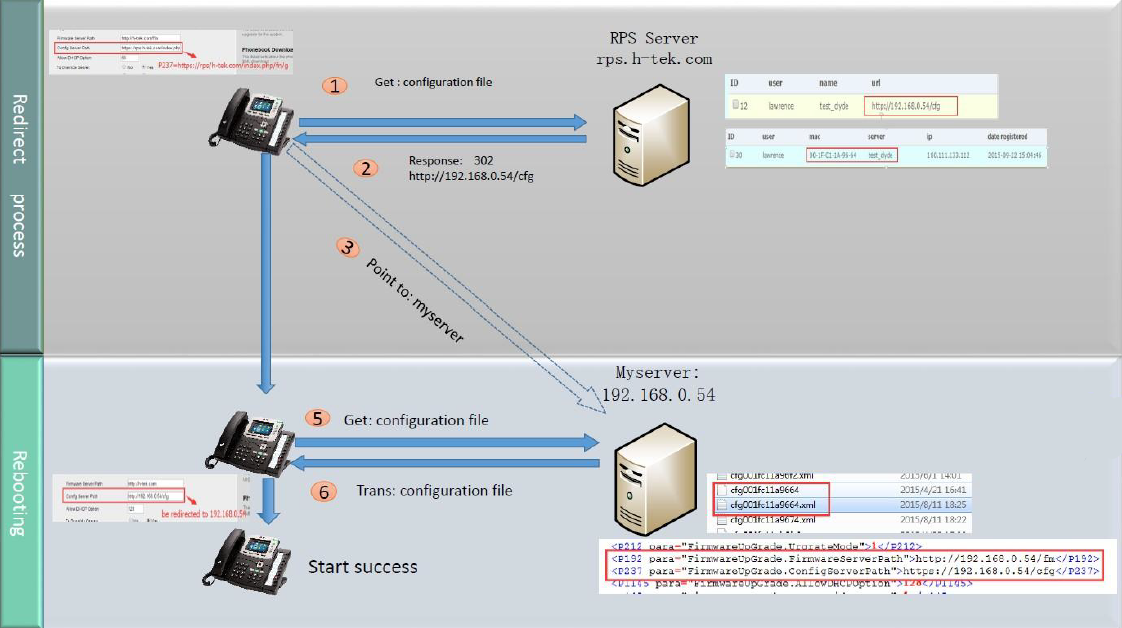
Provision the IP Phone via RPS is a convenience way.
When the IP Phone start up , default it will send 'Get' message to the RPS server, if the phone's MAC address is assigned on the RPS Server previously, the RPS server will send the preset URL of the configure server to IP Phone.
The work process of RPS show below. And more information about how to use RPS, please refer to these documents fm.htek.com/rs/rps.zip .
Provisioning via Plug and play
Over View
If the Xorcom PBX runs on the default sip port 5060 and that the IP phones resides on the same local LAN subnet as Xorcom PBX. Then, Provisioning via Plug and play is a good choice to provision your phones.
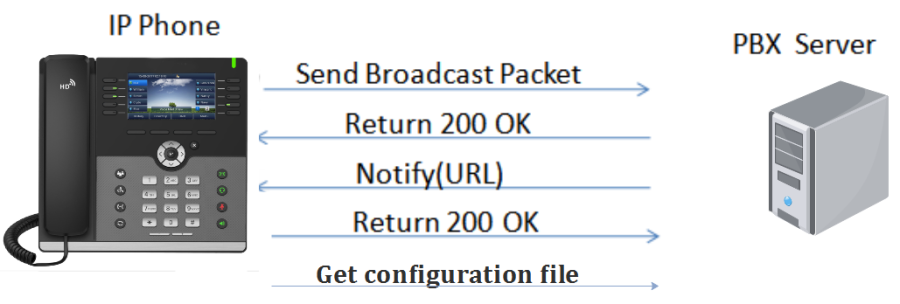
1.After saving the configuration for a phone on Xorcom PBX,Phone will send the Broadcast packet when Phone power on and connecting the network ,PBX Server will return 200 ok message.
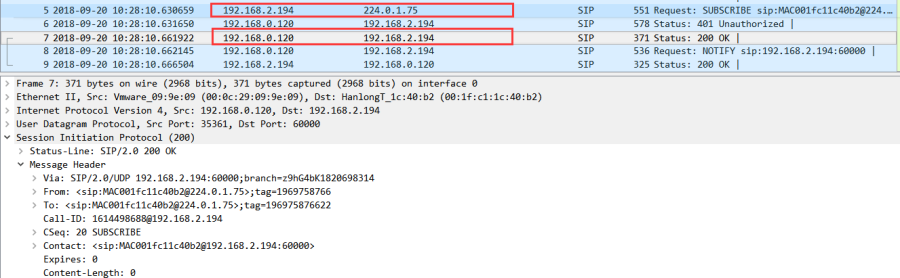
2.Then PBX Server will send the Notify message with URL to phone,The phone receives it and replies 200 OK.
The configuration file URL is http://192.168.0.120/xepm-provision/mac.cfg

Operating Instructions
How to Add a phone
1.Login the Xorcom PBX
2.Click "SETTINGS"→"Endpoint Manager" →"Device Mapping":
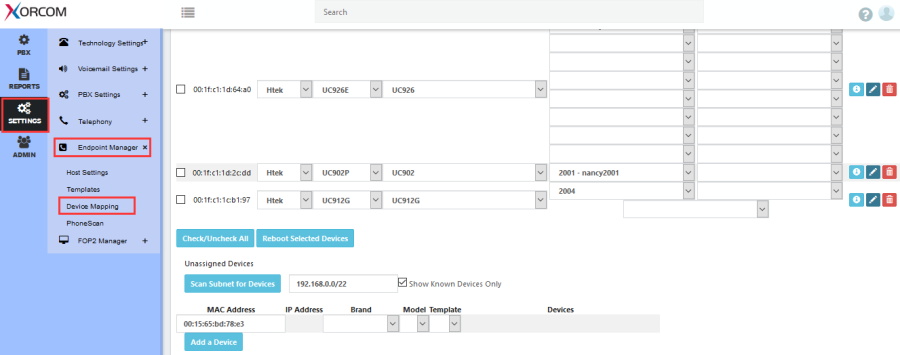
- If you Target phone is powered on,You can Click the "Scan Subnet for Device" after enter the IP address to scan this target phone.

- If your target phone is powered off, you can Click the "Add a Device" to add the target phone manually.

3.Select the Brand, Model ,Template(You can refer to the Management configuration template) and Devices for the Target Phone:
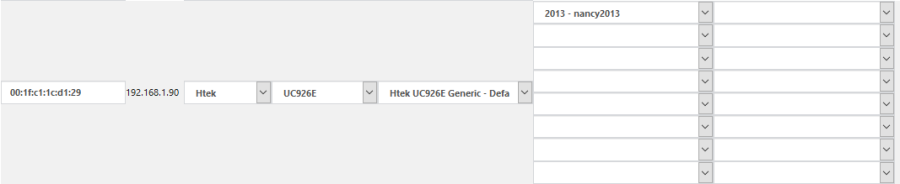
4.Click the "Save" button to save the setting.
5.When you finish the configuration on the Xorcom PBX,then you can unplug the power and the phone will restart(Preconditions:IP Phone's PNP is open(Default is Open) , then Htek IP Phone will get the configuration file successfully from Xorcom PBX.
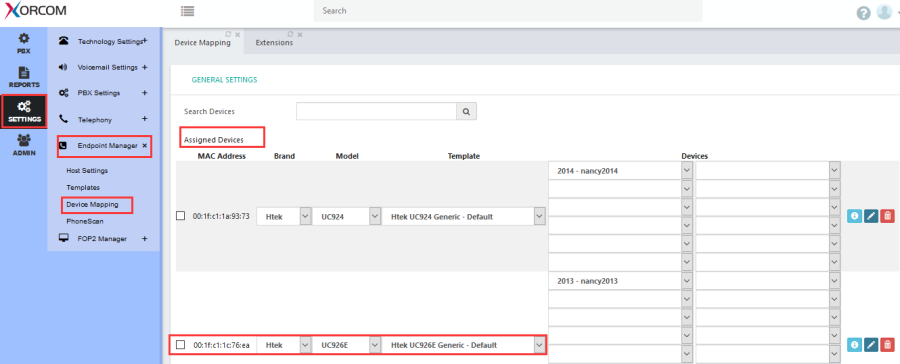
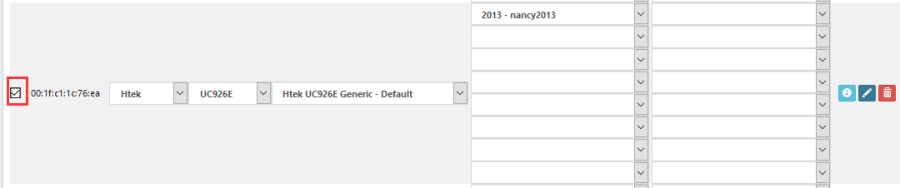
6.You will find the target phone show the "Assigned Devices " area on Xorcom PBX:
How to Edit the Phone
Edit the other Configure (Device button,expansion modules,advanced settings)
1.Login the Complete PBX
2.Click "SETTINGS"→"Endpoint Manager" →"Device Mapping":
3.Select the Target phone.
4.Click the "Edit" icon.

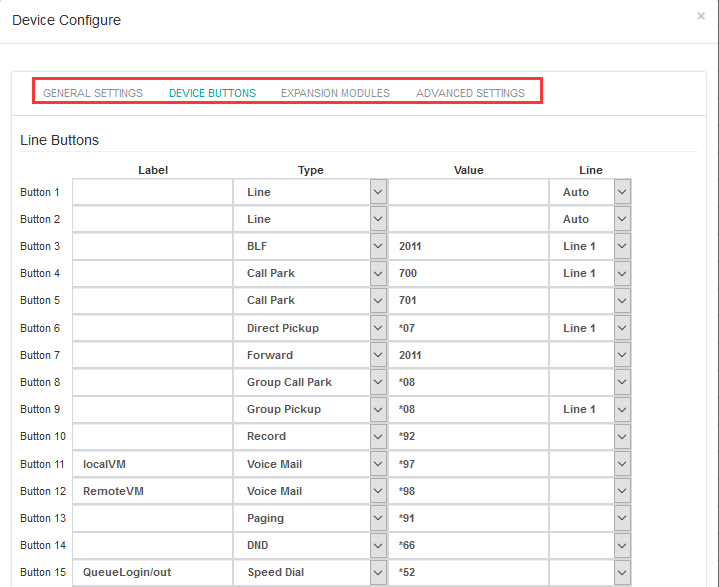
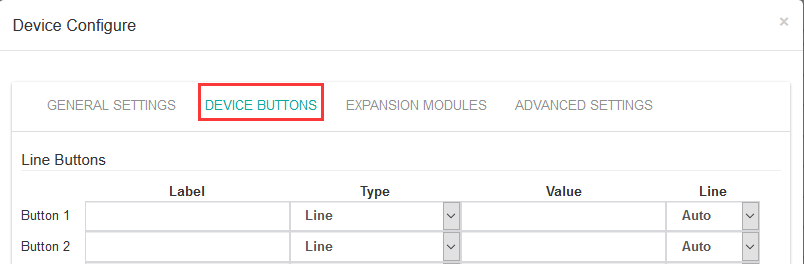
For example: Device Buttons:
How to Re-provision the Phone
You need to reprovision the target phone on complete PBX
1.Login the Complete PBX
2.Click "SETTINGS"→"Endpoint Manager" →"Device Mapping":
3.Select the Target Target phonefter editing.
4.Click the "Reboot Selected Devices" Button.
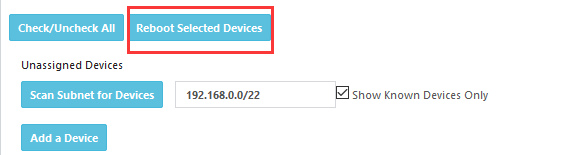
5.Target phone will reboot and get the new configuration file:
2.You can search a target Target phoneccording to the mac,Brand,model or extension and edit or manage the phone's configure.
Management configuration template
Add a new configuration template
1.Login the Complete PBX
2.Click "SETTINGS"→"Endpoint Manager" →"Template":
3.Set the general settings, Devices buttons, expansion modules and advanced settings :
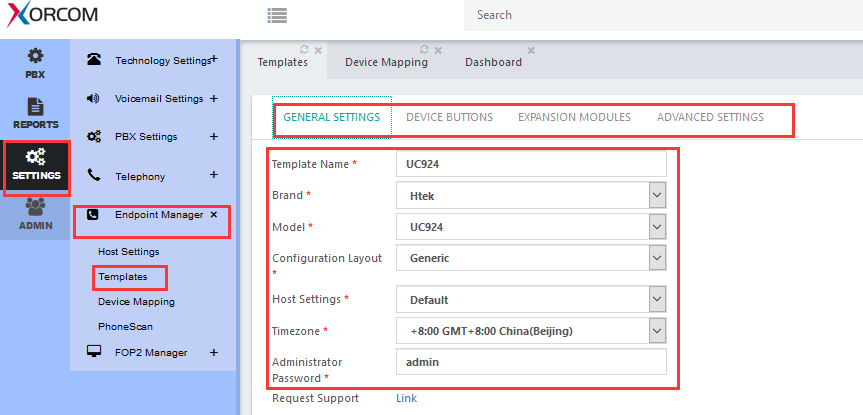
4.Click the "Save" button to save the settings.
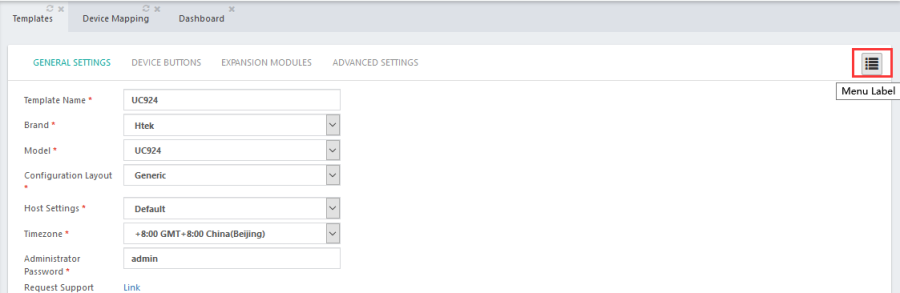
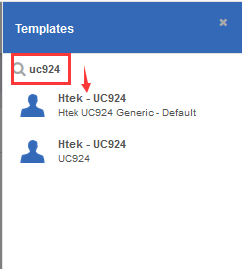
5.You can also edit the edit an existing template by click this icon and search the existing template name:
Auto provisioning the Remote PhoneBook for IP Phone
Over View
Xorcom PBX support the Remote phonebook for IP Phone.Xorcom PBX can Import multiple phonebooks, IP Phone can support get five phonebooks.
How to Import multiple Remote phonebook :
1.Login the Complete PBX
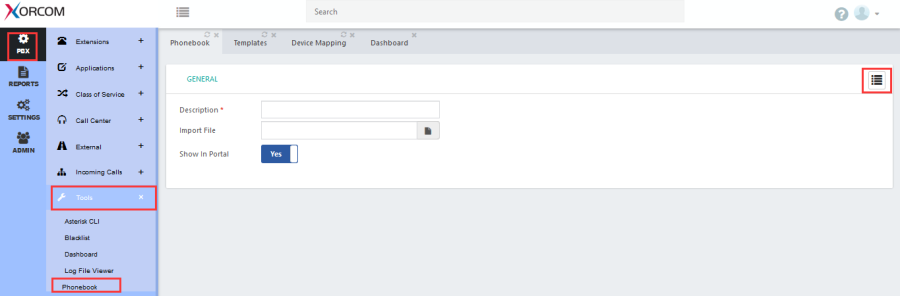
2.Click "SETTINGS"→"Tools" →"Phonebook":
3.Enter the name
4.Select the CSV file:
Note:
You can get the phonebook template from "SETTINGS"→"Tools" →"Phonebook"→Select a phonebook:


5.Click the "Save" button to import the phonebook.csv
6.You will see test phonebook.
How to get the Remote phonebook's URL :
1.Login the Complete PBX
2.Click "SETTINGS"→"Tools" →"Phonebook":
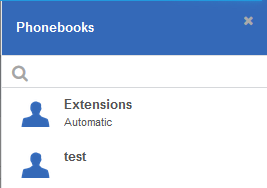
3. Click the icon in the upper right corner:
4.You will see the phonebooks:
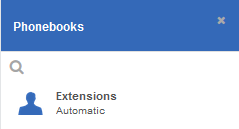
5.Click the Extensions Automatic:
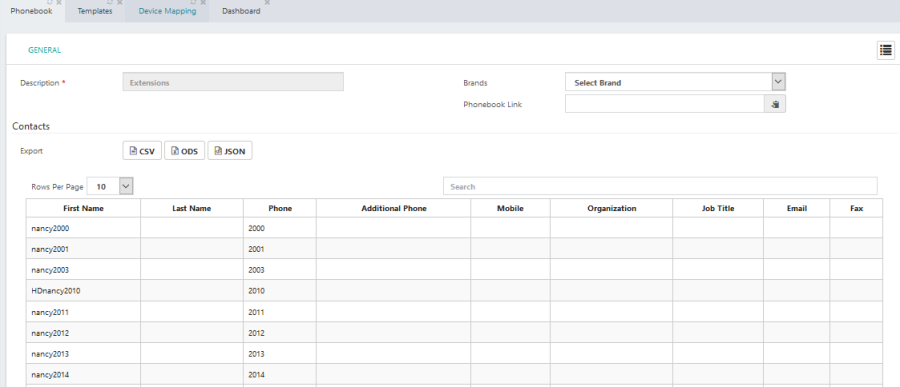
6.Select the Brands, for example:xorcom, The URL is http://192.168.0.132/phonebooks/7a8cf4b158a269d5dd840921d6de0eca/phonebook.xml

How to configure the phonebook URL to Template.
1.Select the target template from "SETTINGS"→"Endpoint Manager" →"Template":
2.Click the Advanced setting, select the Setting Groups→RemotePhoneBook;
3.Copy the phonebook link to the "P4401/para/RemotePhoneBook1.Url", Enter the name in "P3312/para/RemotePhoneBook2.Name".
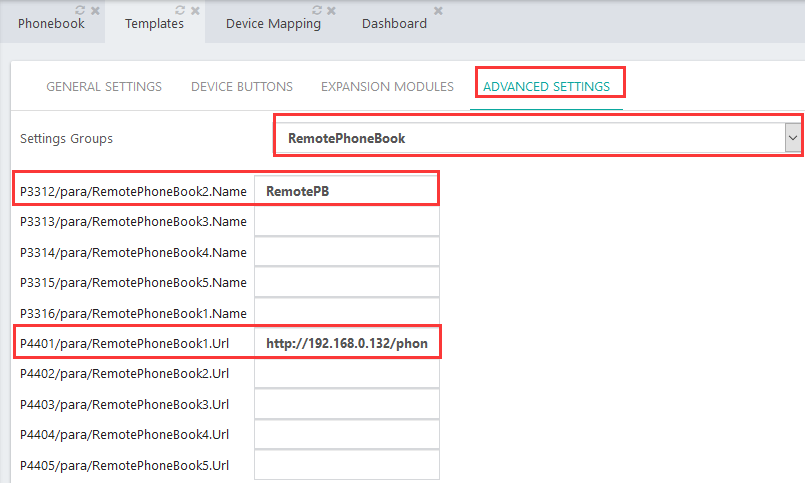
4.Re-provision the target phone, phone will get the Phonebook.
![]()
How To Use
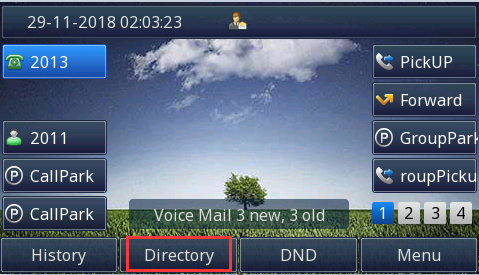
1.Press the Directory softkey on the UC926E IP Phone's LCD interface:
2.Press the Right navigation key to switch to Remote Contacts interface,then Press the Update softkey, UC926 IP Phone will loading the remote phonebook from Xorcom PBX.
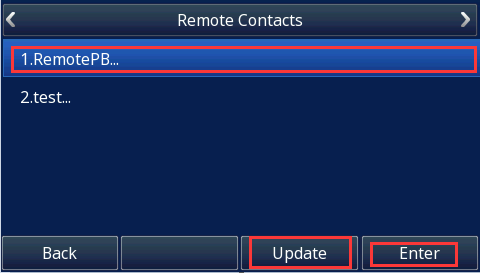
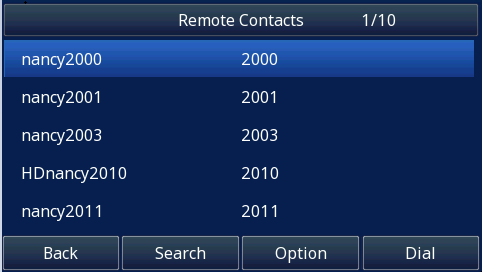
3.Then Press the Enter softkey, you can see the RemotePB's contacts.
Use Xorcom PBX Feature
This chapter provides the detail instructions and configurations for the following Xorcom PBX features:
- Time&Date
Hot Desking
- Call forwarding
- Call Completion
Conference
Voice Mail
Voicemail broadcast Groups
Call Transfer
Call park
Direct Pickup
BLF
Paging&Intercom
Time&Date
How To Config
To configure the TimeZone via Xorcom PBX.
1.Login the Complete PBX
2.Click "SETTINGS"→"Endpoint Manager" →"Device Mapping"
3.Select the target phone on the Assigned Devices area
4.Click the "edit"button to open the setting interface:
5.Configure the Time zone on GENERAL SETTINGS tab:
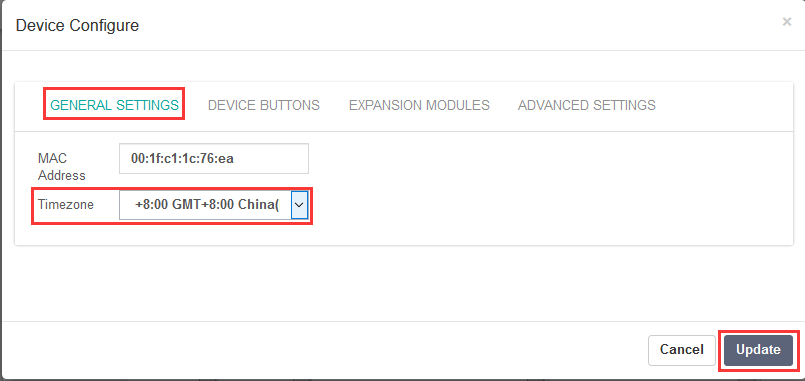
6.Re-provision the target phone, phone will get the +8 BeiJing time.
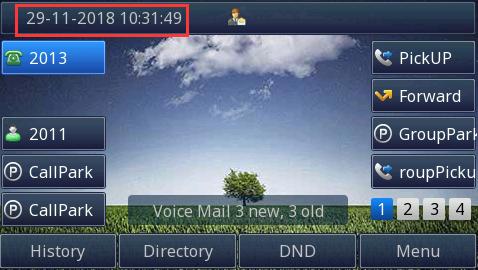
How to use
1.Please enter the Menu→Settings→Basic→Time&Date→SNTP Settings on Htek IP Phone LCD interface, you will check the Time zone.

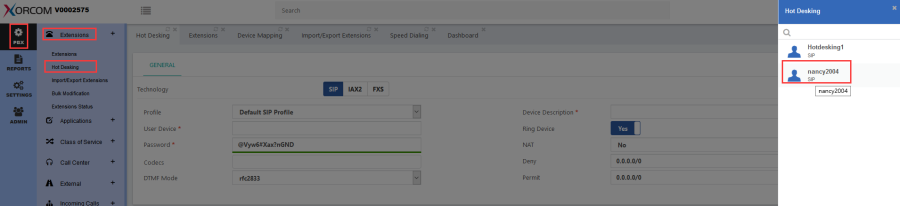
Hot Desking
Over view
The Hot Desking dialog creates accounts for devices without the need of having an extension number. A Hot Desking device is associated with an extension that previously had to be created in the extensions dialog with technology option "None", i.e.without being associated with any device. A Hot Desking device can be associated with an extension by dialing the hot desking feature code(*80), the extension number,and the extension password. To remove the association, you only need to key in the hot desking feature code (*80).
How to config
1.Login the Complete PBX
2.Create a extension from "PBX"→"Extension"→"Extension":
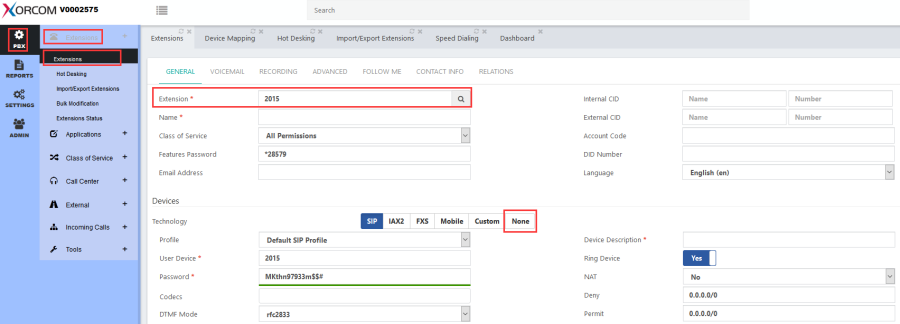
3.Select the "NONE" in the technology option.
4.Click the "Save" button.
4.This extension will be shown in "PBX"→"Extension"→"Hot Desking":
How To Use
1.Re-provision the target phone, phone will get the new configuration.
2.Target phone dial *80 or press the speed dial key(value is *80),Server will prompt you to enter your extension number and password.if your extension number and password are correct, server will prompt "Device successfully logged in." then your target phone can dial and receive any call.
3.Target phone dial *80 again, server will prompt you to enter your extension number, then server will prompt "the device will be successfully removed". Then the target phone will not be able to dial and receive any call.
Do Not Disturb
Over view
You can use DND to reject incoming calls automatically on the phone. The message "n New Missed Call(s)" ("n" indicates the number of missed calls) will appear on the LCD screen, and callers will receive a busy message.
How to config
To configure the DND parameter via Xorcom PBX.
1.Login the Complete PBX
2.Obtain the DND feature code *66 from "PBX" "Application"→ "Feature codes"→ "Do not Disturb"(Note: Do not Disturb:Enable )
![]()
2.Click "SETTINGS"→"Endpoint Manager" →"Device Mapping"
3.Select the target phone on the Assigned Devices area
4.Click the "edit"button to open the setting interface:
5.Search the DND the from setting groups on ADVANCED SETTINGS tab:
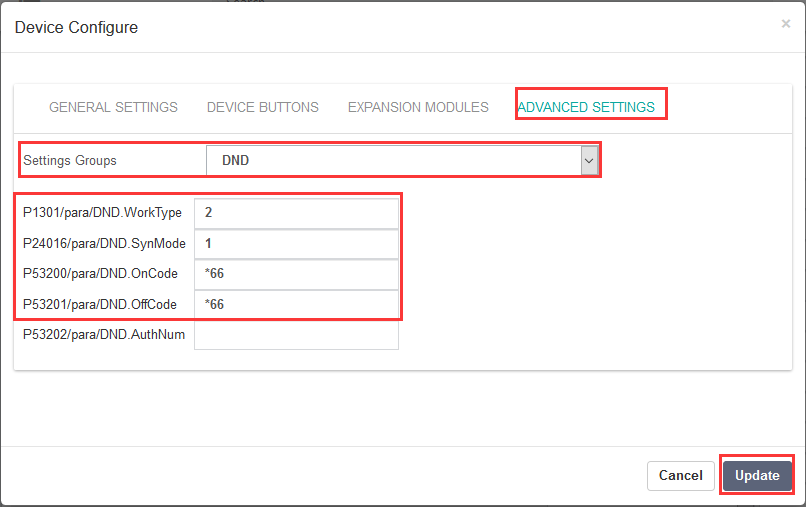
6.Click the "Update" button.
7.Re-provision the target phone, phone will get the new configuration.
How to Use
1.Check the DND parameter on target phone's web interface:
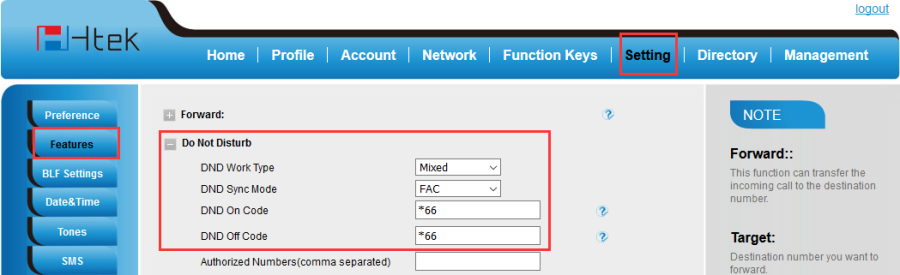
DND work type: Local,Server and Mixed
Local:if you choose local type, the phone will not receive calls when you turn on DND,you can see the DND icon on Phone's LCD idle interface.
Server:
- If you choose Server type and then server will assign related code to phone, The phone will send an invite packet with DND code to the server when we press DND key and the server will return 200 ok,then the phone will not receive calls.DND icon will shown on LCD idle interface.
- If you open DND on PBX, PBX will send the notify message with DND=true,Phone will return the 200 ok message and DND icon will shown on LCD idle interface.But complete PBX has not support this ways.
Mixed: If you choose Mixed, it will use server mode preferentially.
2.Press the DND softkey on phone's LCD idle interface, DND icon will shown at the top of the LCD Interface(Phone send invite message to server and server will enable DND):
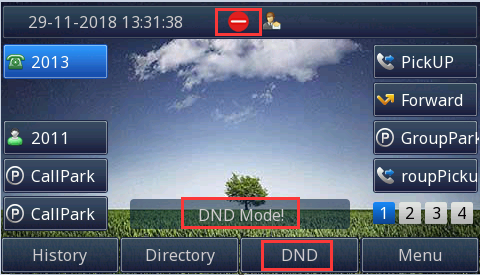
3.Press the DND softkey again on phone's LCD idle interface, DND icon and DND text will disappear(Phone send invite message to server and server will disable DND).
Note:
The DND operation on the phone will be synchronized to the Xorcom PBX.
Call forwarding
Over view
Xorcom PBX support different call forwarding rules(Immediately/busy/unanswered). Make sure that you won't miss all of your calls.
Call Forward Immediately
Always forward all incoming call to other extension.
How to Config
How to set Call Forward Immediately
1.Login the Complete PBX
2.Obtain the Call Forward Immediately feature code *58 from "PBX" "Application"→ "Feature codes"→ "Call Forward Immediately"
![]()
2.Click "SETTINGS"→"Endpoint Manager" →"Device Mapping"
3.Select the target phone on the Assigned Devices area
4.Click the "edit"button to open the setting interface:
5.Set a button on DEVICE BUTTONS tab:
![]()
6.Click the "Update" button.
7.Re-provision the target phone, phone will get the new configuration.
How to Use
1.Press the 21 line key(Call Forward Immediately) on target phone
2.Phone will send out *58, enter the target number according to the voice prompts.
3.The Call Forward Immediately is activated. The target phone's all incoming call will forward to the target number.
4.Phone press the 21 line key(Call Forward Immediately) again.Server will play "Call Forward Immediately is deactiveted", the target phone will received all incoming call.
Call Forward Busy
If you want to forward an incoming call to other extension when no answer or reject or on active, this incoming call can be forward to other extension, you need to use this feature.
Note: Make sure the call waiting is closed if you want to forward an incoming call to other extension when you have a active call.
How to Config
1.Login the Complete PBX
2.Obtain the Call Forward Busy feature code *62 from "PBX" "Application"→ "Feature codes"→ "Call Forward Busy (Toggle)"
![]()
2.Click "SETTINGS"→"Endpoint Manager" →"Device Mapping"
3.Select the target phone on the Assigned Devices area
4.Click the "edit"button to open the setting interface:
5.Set a button on DEVICE BUTTONS tab:
![]()
6.Click the "Update" button.
7.Re-provision the target phone, phone will get the new configuration.
How to Use
1.Press the 22 line key(Call Forward Busy (Toggle)) on target phone
2.Phone will send out *62, enter the target number according to the voice prompts.
3.The Call Forward busy is activated. The target phone's incoming call will forward to the target number when target phone is busy.
4.Phone press the 22 line key(Call Forward Busy (Toggle)) again.Server will play "Call Forward Busy is deactiveted", the target phone will not forward to the target number when target phone is busy.
Call Forward on No Answer
If the target phone has no answer an incoming call ,this incoming call can be forward to other extension, you need to use this feature.
How to Config
1.Login the Complete PBX
2.Obtain the Call Forward on No Answer feature code *64 from "PBX" "Application"→ "Feature codes"→ "Call Forward on No Answer (Toggle)"
![]()
2.Click "SETTINGS"→"Endpoint Manager" →"Device Mapping"
3.Select the target phone on the Assigned Devices area
4.Click the "edit"button to open the setting interface:
5.Set a button on DEVICE BUTTONS tab:
![]()
6.Click the "Update" button.
7.Re-provision the target phone, phone will get the new configuration.
How to Use
1.Press the 23 line key(Call Forward on No Answer (Toggle)) on target phone
2.Phone will send out *64, enter the target number according to the voice prompts.
3.The Call Forward busy is activated. The target phone's incoming call will forward to the target number when target phone has no answer.
4.Phone press the 23 line key(Call Forward on No Answer (Toggle)) again.Server will play "Call Forward On No Answer is deactiveted", the target phone will not forward to the target number when target phone has no answer.
Call Completion
Call completion allows a caller to let the system automatically alert him when a called party becomes available, after a previous call to that party failed for some reason. You can use the On/Off switch (together with a time group) to determine whether to receive such notifications.
How to Config
1.Login the Complete PBX
2.Obtain the Call completion feature code *40 from "PBX" "Application"→ "Feature codes"→ "Call completion"
![]()
2.Click "SETTINGS"→"Endpoint Manager" →"Device Mapping"
3.Select the target phone on the Assigned Devices area
4.Click the "edit"button to open the setting interface:
5.Set a button on DEVICE BUTTONS tab:
![]()
6.Click the "Update" button.
7.Re-provision the target phone, phone will get the new configuration.
How to Use
1.Press the 19 line key(Call completion) on target phone
2.Target Phone will send out *40, Server will play the "Call completion is activated".
3."Other phone" call the Target phone when Target phone has a active call,Server will play "Extension is currently busy, for call complete, Please dial 5 ".
4. "Other phone" press the 5 according the voice prompts,Server will play "Activated".
5.Target phone end the call, Server will send invite to "Other phone"
6."Other phone" answer this call, Server will send invite to Target phone, Target Target phonenswer this call ,then "Other phone" will talk with Target phone
Note :
- Target phone must close the call waiting(web interface→Setting→Feature→Call waiting)
- Target phone's extension must close the voice mail on complete PBX (PBX→Extension→Extension→VOICE MAIL)
Conference
Over view
There are two methods to set up conference: Network conference and Local conference.
Network conference: this conference can join in many members.
Local conference: It support up to 5 parties (including yourself) in a conference call,You can set up a conference call with other four parties.
How to config
To Add a conference:
The following procedure describes how to add conferences. When adding a conference, we recommend you require a leader to start the conference; otherwise, anyone with your participant code can use your bridge.
1.Click "PBX" button→Click "Applications"→Click "Conference"
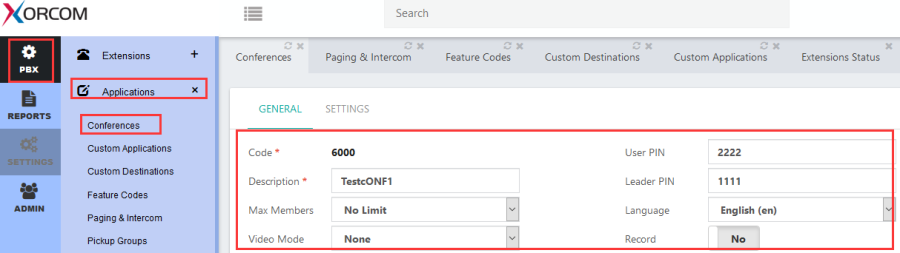
2.Enter the conference information:
Code:number to Call to reach this service.
This is a number that internal endpoints can Call to reach the conference. Like ring groups,this can be thought of as the extension number of the Conference.
Descriptions: a free-text description for identify the conference
Max Members:this option limits the number of participants for a single conference to a specific number. After the limit is reached,the conference will be locked until someone leaves. Note however that an Admin user will always be allowed to join the conference regardless if this limit is reached or not.:
User PIN:a numeric pass code that is used to enter the conference. If a PIN is entered in this field,no one can join the conference room without entering the PIN.
Leader PIN:functions in a similar manner to the User PIN. The Admin PIN is used in conjunction with the Wait Admin option explained later in this chapter,in order to identify the administrator or leader of the conference.The Admin PIN and User PIN should not be set to the same value,otherwise the system will not be able to determine whether the participant should be treated as an Admin or as an ordinary participant.
Record:when set to Yes,records the conference call starting when the first user enters the room,and ending when the last user exits the room.
Join Announcement:defines a message that can be played to participants when they join the conference.
Music on Hold:the Music on Hold class to use for the conference.
Announce User Count:used for announcing the participant count to all members of the conference. If set to any value,then the announcement is only played when the number of participants is greater than the set number. Available options are:
- Yes
- No(default)
- A number, which will cause the user count to be announced only after the number of participants exceeds the user-defined number.
Music on Hold When Empty:when the field is set to Yes,Music on Hold will be played if there is only one caller in the conference room,or if the conference has not started yet (because the Leader has not arrived). If the field is set to No,no sound will be played.
User Count:when the field is set to Yes,the number of users currently in the conference room will be announced to each caller before they are bridged into the conference.
Announce Join/Leave:when the field is set to Yes,the conference will prompt each user to identify themselves with a name when entering the conference. After the name is recorded,it will be played when the user enters or exits the conference.Announce Only User,determines whether the Only User Announcement should be played when the first user enters an empty conference.
Wait for Leader:when the field is set to Yes,the conference will not begin until the conference leader joins the conference room. The leader is identified by the Leader PIN. If other callers join the conference room before the leader does,
They Will Hear on-Hold Music or silence until the conference begins. What they hear depends on the MoH When Empty setting explained Earlier In This section. If The Field is set to No,the callers will be bridged into the conference as Soon As they call the conference number.
Start Muted:when the field is set to Yes,all users joining the conference are initially muted.This setting does not apply to the conference leader.
Drop Silence:this option drops what Asterisk detects as silence from entering into the bridge. Enabling this option will drastically improve performance and help remove the buildup of background noise from the Conference. This option is highly recommended for large conferences due to its performance enhancement.
Quiet:when the field is set to Yes,user introductions,entrance and exit announcements are not played. There are some prompts,such as the prompt to enter a PIN number that will still be played regardless of how the field is set.
Kick Users:when the field is set to Yes,all remaining users in the conference will be kicked out after the last conference leader user leaves the conference.
Talk Detection:indicates whether or not notifications of when a participant begins and ends talking should be sent out as an event to Asterisk Manager Interface (AMI).The following codes can be dialed by all participants during the course of a conference:
- *1–toggles Mute setting for the user. When Mute is enabled,anything the user says is not transmitted to the rest of conference members. If the conference is being recorded,anything said by the muted user is not included in the recording.
- *4-decreases receive volume. The user can key in this option to decrease the volume that they are hearing. This does not affect what any other conference members hear. If a user is finding other conference members too loud,they can key in *4 a few times to make the Conference quieter for themselves.
- *5-increases receive volume.The user can key in this option to increase the volume that they are hearing. This does not affect what any other conference members hear. If a user is having trouble hearing other members of the Conference,they can key in *5 a few times to make the Conference louder For themselves.
- *6-decreases transmit volume. The user can key in this option to decrease the volume that they are transmitting to the rest of the conference members. When this option is used,the user will sound quieter to all other conference members. If a user is much louder than the other members of a conference room,they can key in *6 few times to make their transmit volume quieter.
- *7-increases transmit volume. The user can tap this option to increase the volumethattheyaretransmittingtotherestoftheconferencemembers. When this option is used,the user will sound louder to all other conference members. If the conference members are having trouble hearing a particular user,that user can key in *7 a few times to make their transmit volume louder.
- *8–user can key in this code to leave the Conference.
In addition, the admin has access to additional codes:
- *2 - toggles the conference lock. When a conference is locked, no more callers may join. A locked conference must be unlocked to all any new users to join. This option is only available to the conference leader. This option is not available if the conference does not have an admin PIN configured or the leader has joined the Conference as a user instead of an admin.
- *3 - ejects from the conference room the last user who joined the conference. The user will hear a message informing them that they have been ejected from the conference and that their call will be terminated. Note that if a conference is subsequently unlocked, the user may rejoin. The best way to remove an abusive conference user is to eject them and then immediately lock the conference. This option is not available if the conference does not have an admin PIN configured or the leader has joined the conference as a user instead of an admin.
3.Click the "Save" button to save the change.
How to use
Network conference:
- A Dial conference number:6000.
- You will hear a tone asking for a PIN (Leader PIN).
- Enter the PIN and press the # key to end, Then server will play "You are now leader;please record your name after the tone, press the # you are finished".
- Recording your name and press the # key to end,Then server will play "Thanks".
- Second party also dial conference number , enter the PIN (Participant PIN) according the Voice prompts again to join in the conference, then the first and the second party will talk each other.
- The server will play "your name which you recorded have left the conference" when the your leave the conference.
Local conference:
- Place a call to the first party.
- When the first party answers the call, press the Conference soft key to place a new call. The active call is placed on hold.
- Enter the number of the second party and press "#"or the Send soft key.
- When the second party answers the call, press the Conference soft key again to join all parties in the conference.
- Press "split" button, then other two parties will be in hold state. then the active call press "new call" button and enter the number of the third party and press "#"or the Send soft key.
- When the third party answers the call, press the Conference soft key again to join all parties in the conference.
- Press "split" button, then other third parties will be in hold state. then the active call press "new call" button and enter the number of the fourth party and press "#"or the Send soft key.
- When the fourth party answers the call, press the Conference soft key again to join all parties in the conference.
During the conference call, you can do the following actions: - Press the "Hold" soft key to place the conference on hold. - Press the "Split" soft key to split the conference call into four individual calls on hold. - Press to "mute" the conference call. - Press the "End Call" soft key to drop the conference call.
Voice Mail
Over View
You can leave a voice mail when the receiver is busy or its inconvenient for them to answer the call. Follow the voice prompt from the system server to leave a voice mail, and then hang up.
When the Phone LCD interface prompts receiving new voice mail's icon, the power indicator LED flashes red(Setting→Preference: Enable Voice Message Status) and the voice message button flashes green.
You can access yourself mailbox and also access another person's mailbox
How To Config
To enable the voice mail via Complete PBX:
1.Login the Complete PBX
2.Click "PBX"→"Extension" →"Extension"
3.Select the Target Extension
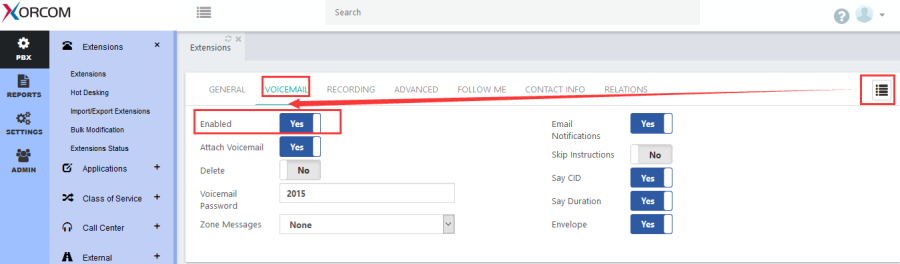
4.Click the VOICE MAIL tab
5.Open the Enabled button.
To obtain the voice mail feature code via Complete PBX:
1.Click "PBX" "Application"→ "Feature codes"→ "Direct Voicemail"
![]()
2.Click "SETTINGS"→"Endpoint Manager" →"Device Mapping"
3.Select the target phone on the Assigned Devices area
4.Click the "edit"button to open the setting interface:
5.Set a button on ADVANCED tab:
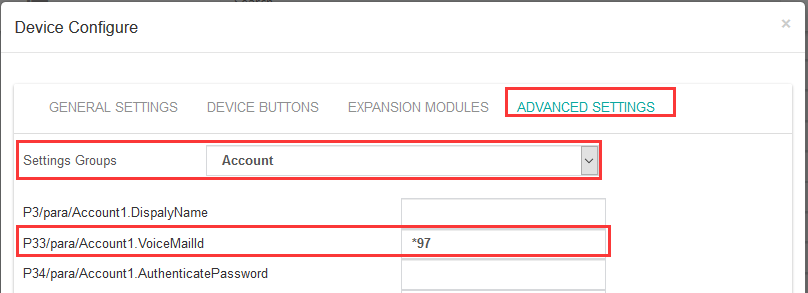
6.Click the "Update" button.
7.Re-provision the target phone, phone will get the new configuration.
How To Use
When there is a message, the message ![]() will flash green. Moreover, when you pick up the handset, or press Speaker key, you will hear some faster busy tone.
will flash green. Moreover, when you pick up the handset, or press Speaker key, you will hear some faster busy tone.
- 1005 dial 1004
- 1004 has no answer or reject this incoming call, then 1004 will be transfered to voicemail and leave a voicemail for 1004
- 1004 will receive this voicemail.
To access yourself mailbox:
- 1004 press the message button,*97 will dial out, this number is provisioned.you can check this via phone web interface(Account→Basic→Voice Mail UserID)
- Then 1004 enter the voicemail PIN number to listen this message according to the voice prompts.
To access another person's mailbox:
- 1004 dial *98 number("PBX" "Application"→ "Feature codes"→ "Direct Voicemail"→Remote Voicemail)
- When prompted, enter the other person's extension number.
- Enter the voicemail PIN of the other person's mailbox, followed by #.
Voicemail broadcast Groups
Over View
Broadcast a voicemail to multiple extensions.
How To Config
1.Login the Complete PBX
2.Click "PBX"→"Application" →"Voicemail broadcast Groups"
3.Create a code:3001 , select the target extension and set the Password:
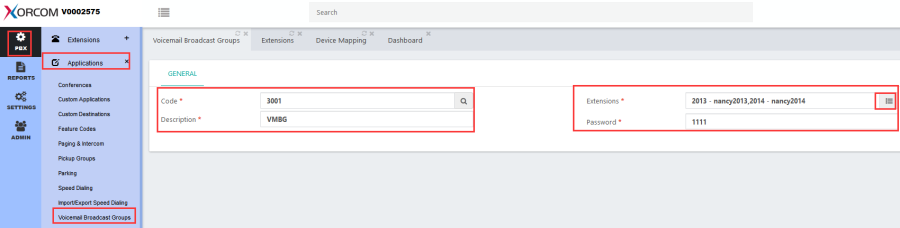
4.Click the "Save" button.
How To Use
1.Target phone dial the 3001, Server will prompt to enter the password.
If the password is correct, Target phone will leave a voice mail.
2.2013 and 2014 will receive the Broadcast voice mail.
Call Transfer
Over View
You can transfer a call to another extension in one of three ways:
Blind Transfer: Transfer a call directly to another party without consulting.
Semi-Attended Transfer: Transfer a call when the target phone is ringing.
Attended Transfer: Attended transfer allows you to speak to the transfer recipient prior to completing the transfer while the caller is on hold.
Voicemail Transfer: Voicemail transfer goes straight to the recipient's voicemail box without ringing the recipient's phone.
How To Use
To perform a blind transfer:
- Press the Transfer soft key during a call.
- Enter the extension number which you want to transfer the call to.
- Press the Transfer soft key to complete the transfer, then the call is connected to the number to which you are transferring.
To perform a semi-attended transfer:
- Press the Transfer soft key during a call.
- Do one of the following: - Enter the number you want to transfer the call to. - Press the Dir soft key, and then select the desired group and search for the contact
- Press send soft key or "#"button to dial out the transferring call, when the phone which is transferred ringing and then press the transfer soft key to complete the transfer.
To perform an attended transfer:
- Press the Transfer soft key during a call.
- Do one of the following: - Enter the number you want to transfer the call to. - Press the Directory soft key, and then select the desired group and search for the contact.
- Press send or Dial soft key or "#"button to dial out the transferring call,when the phone which is transferred ringing and answer a call ,then press the transfer soft key to complete the transfer. If you are using a handset, the transfer can be completed by hanging up the handset. You can cancel the transfer before the call is connected by pressing the Cancel soft key.
There is some additional function of transfer
- Login phone webpage→Settings→Features→Transfer Settings. There are some additional settings of transfer. Please refer the following picture.
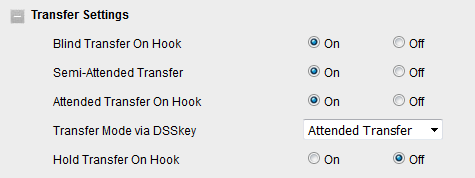
Blind Transfer On Hooks: If you have already complete the step 2 of blind transfer. Then you can transfer the call by on hook.
Attended Transfer On Hooks: If you have already complete the step 3 of attend transfer. Then you can transfer the call by on hook.
Transfer Mode via DSSkey ( DSSkey type must be BLF ): when two phones build a call, one phone which config the BLF can press the BLF line key to achieve the new call/Blind Transfer or Attended Transfer to another extension.
Call Park
Over View
On your phone system, hold is a local function. This means a call held on your phone cannot be picked up at another station. Park is a system-wide function. This means a call parked at one phone may be picked up by any phone.
How To Config
1.Login the Complete PBX
2.Add the parking number 700 from "PBX"→"Application"→ "Parking":
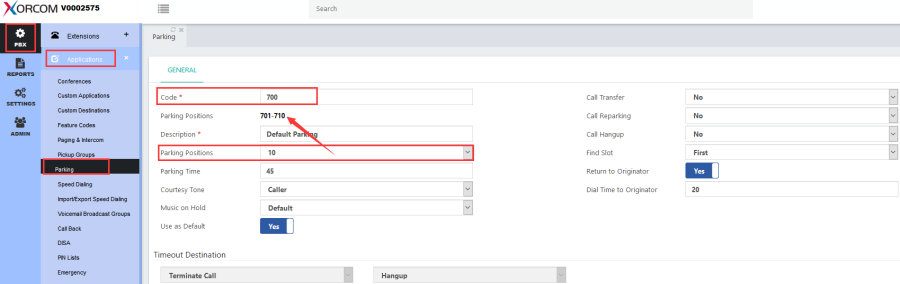
Code:number to call in order to reach the parking service.Description, a free-text name to identify the park.
Parking Positions:controls the range of parking slots to be allocated.
Parking Time:length of time (in seconds) that a call can be parked before being returned to the person who originally parked the call.
Courtesy Tone:to whom to play the courtesy tone while waiting for someone to pick up the parked call. Options are:
- No one
- Caller
- Callee
- Both
Music on Hold:this is the Music on Hold to use for music on the parked channel.
Use as Default: when set to Yes, indicates that this parking lot should be the system-wide default parking lot.
Call Transfer: this is a toggle to enable or disable DTMF-based transfers when picking up a parked call.
Call Reparking:this is a toggle to enable or disable DTMF-based parking when picking up a parked call.
Call Hangup:this is a toggle to enable or disable DTMF-based hang up when picking up a parked call.
Find Slot:sets the method for selecting parking spaces when a new call is parked. Options are:
- First: use the lowest numbered available parking space
- Next:use the next available parking space after the most recently used space.
Return to Originator:setting this option configures the behavior of call parking when the parked call times out.
Dial Time to Originator:when a parked call times out,this is of the length of time (in seconds)to call the person who originally parked the call.
Timeout Destination Section
Select Module:select the dialog to be used when a parked call times out.
Select Destination:destination for a parked called that has timed out.
2.Set the parking positions
3.Click the "Save" button, the parking number will created successfully.
4.Click "SETTINGS"→"Endpoint Manager" →"Device Mapping"
5.Select the target phone on the Assigned Devices area
6.Click the "edit"button to open the setting interface:
7.Set a button on DEVICE BUTTONS tab:

8.Click the "Update" button.
9.Re-provision the target phone, phone will get the new configuration.
How To Use
Static Call parking
1, Suppose Target phone and B were provisioned a Call park key with the same park extension.
2, Target phone make a call with phone C.A press Call park key 701,The call will be parked. And the Call park key of Target phone and B will turn red.
3, B press the call park key 701, the parked call will be picked up. Now B have a call with C. And the Call park key of Target phone and B will turn green.
Dynamic Call Parking
1.Suppose Target phone was provisioned a line key as call park: 700
2.Suppose Phone B was provisioned a line key as Call park:701(This call park key will turn green)
3.Press call park key which have configured on Target phone during talking.
4.Phone B's call park key will turn red.
5.Phone B press the Call park key to retrieve the parked call.
Direct Pickup
Over view
Directed call pickup allows you to answer a call ringing at another station,Generally used with the BLF function.
How To Config
1.Login the Complete PBX
2.Obtain the Direct Pickup feature code *07 from "PBX" "Application"→ "Feature codes"→ "Direct Pickup"
![]()
3.Click "SETTINGS"→"Endpoint Manager" →"Device Mapping"
4.Select the target phone on the Assigned Devices area
5.Click the "edit"button to open the setting interface:
6.Set a button on DEVICE BUTTONS tab:
![]()
![]()
7.Set the Direct pickup code on ADVANCED SETTINGS:

8.Click the "Save" button.
9.Re-provision the target phone, phone will get the new configuration.
How To Use
Direct Pickup feature:
1.Target phone's line key 6 is Direct Pickup key *07+B's number
2.Phone C call Phone B
3.Target phone press the line key 6, Target phone will direct Pickup successfully. Target phone will talk with Phone C.
BLF pickup feature:
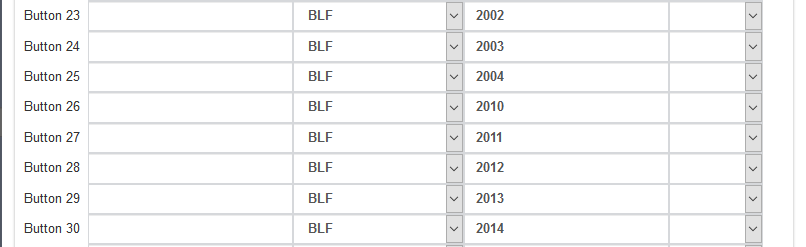
1.Target phone's BLF will flash red when 2002 has an incoming call.
2.Target phone press the Line key 23(BLF key) ,Target phone will send the *072002 to pick up this call.
Pickup Group
Over View
Capture a call that is ringing at any other extension in your pickup group. To use this feature is necessary to create, and belong to, a pickup group. Feature must be enabled in the Feature Category associated with the extension.
How To Config
1.Login the Complete PBX
2.Obtain the Pickup group feature code *08 from "PBX" "Application"→ "Feature codes"→ "Direct Pickup"
![]()
3.Click "SETTINGS"→"Endpoint Manager" →"Device Mapping"
4.Select the target phone on the Assigned Devices area
5.Click the "edit"button to open the setting interface:
6.Set a button on DEVICE BUTTONS tab:
![]()
7.Click the "Save" button.
8.Re-provision the target phone, phone will get the new configuration.
9.Add a pickup group from PBX→Application→Pickup Group:
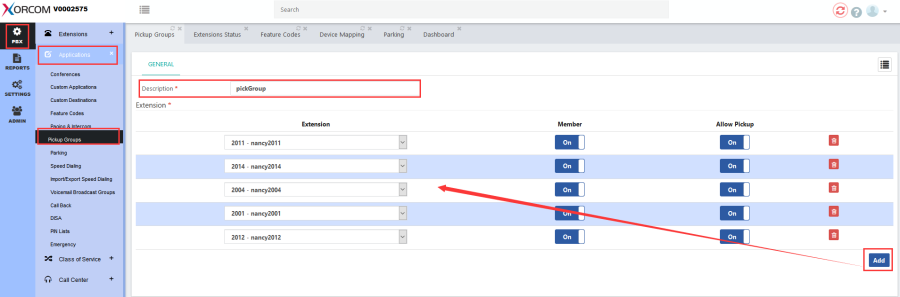
Extension:any extension that you want to make a member of the group.
Member:when On,indicates that the extension is a member of the pickup group.You can temporarily remove members from the group by changing this status to Off.
Allow Pickup:when enabled,indicates that the extension can pick up calls that are directed to the group.
10.Click the "Save" button and "reload" icon to apply.
How To Use
1.Target phone's line key 9 is Group Pickup key *08. Target phone's number is 2013
2.2011 call 2014,2014 is ringing.
3.Target phone press the line key 9 during 2014 ringing, Target phone will pickup group successfully. Target phone will talk with 2014.
BLF
Over View
You can use BLF to monitor a specific extension for status changes on the phone. The BLF key illuminates solid red when the specific extension is in use. You can tap a BLF key to dial out the monitored phone number when the monitored extension is idle. You can also pick up calls that are received on the monitored extension.
How To Config
1.Login the Complete PBX
2.Click "SETTINGS"→"Endpoint Manager" →"Device Mapping"
3.Select the target phone on the Assigned Devices area
4.Click the "edit"button to open the setting interface:
5.Set a button on DEVICE BUTTONS tab:
6.Click the "Update" button.
7.Re-provision the target phone, phone will get the new configuration.
How To Use
When you complete the configuration:
- The BLF key's light will solid green and icon will solid blue when monitored number is in idle status.
- The BLF key's light will flashing red and icon will flashing yellow when monitored number has a incoming call.
- The BLF key's light will steady red and icon will solid yellow when monitored number are talking.
Paging & Intercom
Over View
This dialog creates groups to which users can to send a message by dialing a single number. It can also be used to create an intercom between extensions.In both cases,the endpoint (telephone) must be capable of supporting this functionality.
How To Config
1.Login the Complete PBX
2.Add the paging number 5000 and add extension to this paging group from "PBX"→"Application"→ "Paging&Intercom":
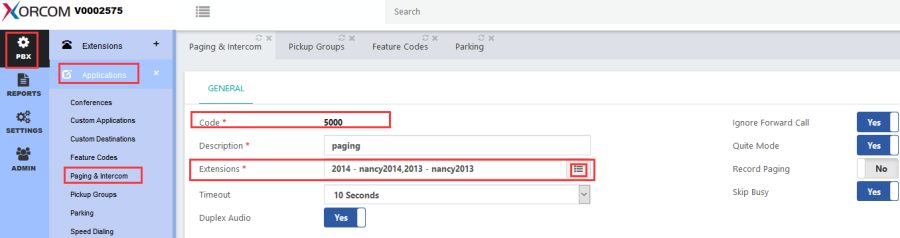
Code:{*}number to input in order to reach the page or intercom group.
Description:{*}short description to identify the page or intercom group.
Extensions:{*}list of the extensions that belong to the page or intercom group.
Timeout:specifies the length of time that the system will attempt to connect a call. After this duration,any paging or intercom calls that have not been answered will be hung up by the system.
Duplex Audio:sometimes referred to as talkback paging.The use of this option implies that the equipment that receives the page has the ability to transmit audio back at the same time as it is receiving audio. Generally,you would not want to use this unless you had a specific need for it.
Ignore Forward Call:ignore attempts to forward the call.In other words,how to behave when paging an extension that has call forwarding enabled.
Quiet Mode:just broadcast to the extension,without playing a beep to caller at the beginning of the page call.
Record Paging:record the page message in a file.
Skip Busy:dials a channel only if the device state is NOT_INUSE.This option may not be have as expected on an endpoint (telephone) that supports multiple lines.
3.Click the "Save" button and "reload" icon to apply.
How To Use
1.Target phone call 5000
2.2014 and 2013 will answer automatically.
Note:
IP Phone must be open this function: Allow Auto Answer By Call-Info;
Default is enable;
Web path is:Profile→Advanced.
Speed Dialing
Over View
This feature permits fast dialing of frequently used numbers,or to simplify dialing by substituting short codes to call long numbers.
How To Config
1.Login the Complete PBX
2.Add a speed dial code 1 from "PBX"→"Application"→ "Speed Dialing":
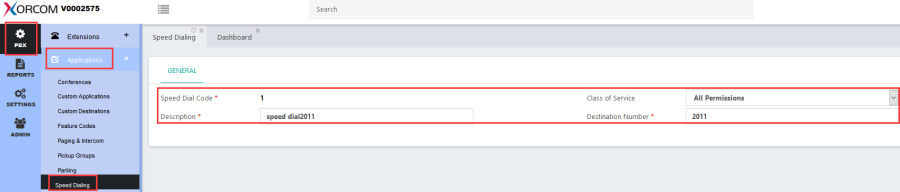
3.Enter the destination number:2011
4.Click the "Save" button and "reload" icon to apply.
How To Use
1.Phone dial 1
2.2011 will ringing.
Call Center
Ring Group
How To Config
1.Login the Complete PBX
2.Create a ring group code :8000 from "PBX"→"Call Center"→ "Ring Group":
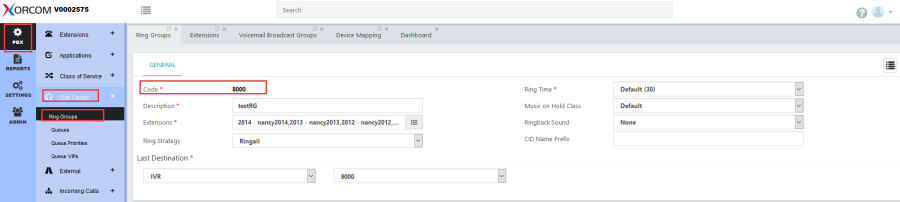
3.Select the extension for the ring group.
4.Click the "Save" button.
How To Use
1.Target phone dial 8000
2.The members of ring group will ring.
3.One of the member answer this call, then Target phone will talk with this member. Other member will exit.
Call queue
Over View
ACD (Automatic Call Distributor) allocates the incoming calls,in the order of arrival,to the first available call center agent. The system answers each call immediately and,if necessary,holds it in a queue until it can be directed to the next available call center agent. Balancing the workload among call center agents ensures that each caller receives prompt and professional service.
How To Config
1.Login the Complete PBX
2.Create a call queue code :4000 from "PBX"→"Call Center"→ "Queues":
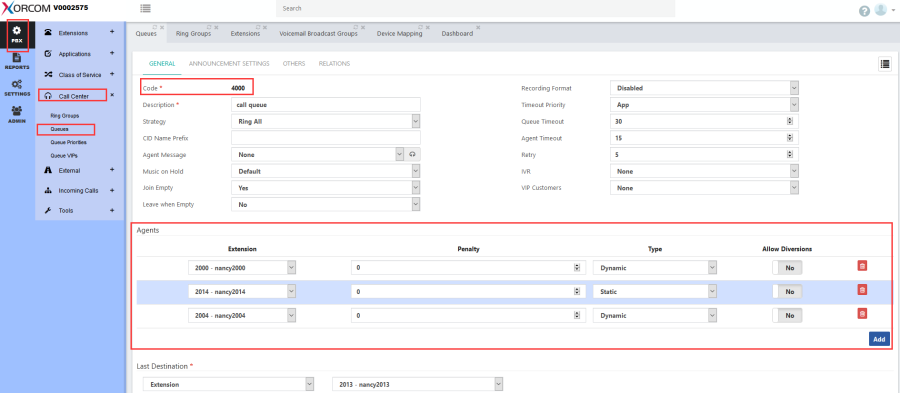
3.Add the extension for the 4000 queue group.
4.Click the "Save" button to apply.
How To Use
Queue Login/Logout
The agent can log in and choose whether to receive calls from the call queue.
1.Target phone dial *52 , press the "1" to Log in or press the "2" to log out according to the voice prompt.
-If target phone log in the queue, then the target phone will receive this queue's call
-If target phone log out the queue, then the target phone will not receive this queue's call
Pause Queue(Toggle)
Allows you pause (or unpause) all queues. But you must log in the queue
1.Target phone dial the *53 ,press the "1" to pause or press the "2" to unpause according to the voice prompt.
-If you pause the queue, you will not receive this queue's call
-If you unpause the queue, you will receive this queue's call
Pause Queue Agent(Toggle)
Pause a specified queue number (if an extension belongs to multiple queue groups, it can be implemented by Pause Queue Agent (Toggle) feature code *51)
1.Target phone dial *51, enter the target queue number,Server will prompt " The agent is now paused".
-Then the target phone will not receive this queue's call
2.Target phone dial *51 again, enter the target queue number,Server will prompt " The agent is now available".
-Then the target phone will receive this queue's call.
Barge into Call
Allows user to barge into an existing call.For improved security, this feature code is disabled by default(PBX→Application→Feature code→Call center→Barge into Call:Enable)
1.Extension 2013 and 2014 are talking
2.Target phone dial *54,then enter the monitor extension number(for example:2013) according to the voice prompt.
3.Then target phone will barge into this call.
Lock Phone
Over View
Toggle to lock, or unlock, the current extension. Before you can make a call from an extension that has been locked, you will be prompted to enter the Features Password associated with the extension. In order to unlock the phone, you will be prompted to enter the Features Password for the extension. Feature must be enabled in the Feature Category associated with the extension.
How To Config
1.Login the Complete PBX
2.Obtain the lock phone code :*75 from "PBX"→"Application"→ "Feature codes":
![]()
How To Use
1.Target phone dial the *75, enter the feature password ("PBX"→"Extension"→"Extension"→"General")according to the voice prompt.
-Server will prompt "phone locked" if the feature password is correct.
-Then the target phone can't make a call,but the target can receive the incoming call.
2.Target phone dial the *75 again, enter the feature password ("PBX"→"Extension"→"Extension"→"General")according to the voice prompt.
-Server will prompt "phone unlocked" if the feature password is correct.
-Then the target phone can make and receive any call.
Upgrade Firmware
If you define the access URL of firmware in the configuration file, the IP phone will download the firmware from the provisioning server. You can manually upgrade firmware if the IP phone does not download the firmware from the provisioning server. But the recommendation is to upgrade firmware through the provisioning server.
To set the access URL of firmware on Complete PBX
1.Login the Complete PBX
2.Click "SETTINGS"→"Endpoint Manager" →"Template":
3.Select target template → the Advanced settings→FirmwareUpGrade and set the "P192/para/FirmwareUpGrade.FirmwareServerPath"

4.Phone get the configuration file which contain the access URL of firmware from complate PBX via PNP, then phone will check and upgrade the firmware from http://htek.com/fm
To upload the target firmware by manually on phone webpage
1.Login the target phone's webpage
2.Click "Management"→ "Upgrade",Choose the target firmware file according to "Please choose the upgrade file:fwxxx.rom" prompt.
Resetting the phone
Reset the phone to factory configurations after you have tried all troubles-
Hooting suggestions but do not solve the problem. You need to note that all customized settings will be overwritten after reset.
To reset the phone via phone LCD interface:
1.Press Menu Settings →Advanced →Settings →Reset
The password of Advanced is provisioned by Xorcom PBX.
2.Press the Enter softkey or OK key.
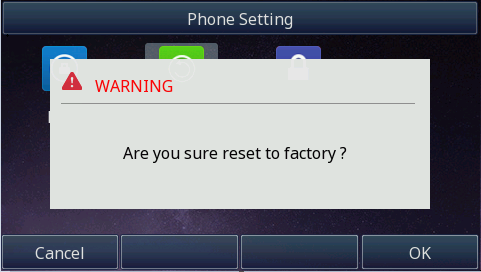
3.Press OK softkey.
Note: Reset of your phone may take a few minutes. Do not power off until the phone has started up successful.The phone will be reset to factory settings successfully after startup.
Troubleshooting
This chapter provides general troubleshooting information to help you solve the problems you might encounter when using your phone. If you require additional information or assistance with your new phone, contact your system administrator.
Why is the LCD screen blank?
1.Ensure that the phone is properly plugged into a functional AC outlet.
2.Ensure that the phone is plugged into a socket controlled by a switch that is on.
3.If the phone is plugged into a power strip, try to plug it directly into a wall out let instead.
4.If the phone is powered from POE, ensure that you use a POE-compliant switch or hub.
Why does the phone display "Network unavailable"?
1.Ensure that the Ethernet cable is plugged into the Internet port on the Target phonend the Ethernet cable is not loose.
2.Ensure that the switch or hub in your network is operational.
Why doesn't the phone display time and date correctly?
Check if you have configured the phone to obtain the time and date from the SNTP server automatically. If the phone fails to connect to the SNTP server, you need to configure the time and date manually.