FreePBX Configuring Guide
- Former user (Deleted)
- HTEK
- HTEK_admin (Unlicensed)
- Former user (Deleted)
About This Guide
Thank you for choosing the Htek IP phones, which are exquisitely designed to provide basic phone features plus advanced business features, such as Call Park, Call Pickup, Intercom and Enhanced Monitor Extension over IP network.
The purpose of this guide is to serve as a basic guidance for auto-provisioning. Htek IP phones with FreePBX, including:
Htek 8 Series: UC862,UC860,UC842,UC840,UC806,UC804, UC803, UC802.
Htek 9 Series: UC926, UC924, UC923,UC903,UC902.
Note: The configuration process outlined in this guide applies to Htek SIP IP phones running.
Firmware version x.0.4.4 or later and FreePBX running version V13 or later. The configuration process described in this guide take the Htek UC926 as an example.
In This Guide
Topics provided in this guide include:
- Chapter 1 Getting Started
- Chapter 2 Auto-provisioning your Phone
- Chapter 3 Use FreePBX Integrated Features
- Chapter 4 Upgarding Firmware and Resetting your phone
- Chapter 5 Troubleshooting
Summary of Changes
- V1.0 (2018-06-28): Provide a basic guidance for auto-provisioning Htek IP phones with FreePBX system .
Getting Started
This chapter will show you the basic process of phone's start-up and instructions of the way to get the basic information of the phone. Topics include:
Phone Initialization
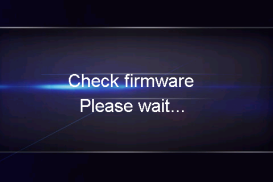
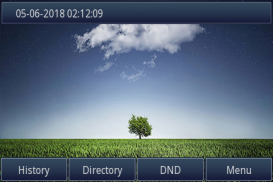
After your phone is powered on, the phone will boots up, complete the initialization and check firmware. Please refer to the three phases of the LCD display:

In the process of initializing, the phone will attempts to contact a DHCP server in your network to obtain valid IPv4 network settings (e.g., IP address, subnet mask, default gateway address and DNS address) by default.
Phone Status
After the phone comes up, you can view phone status on phone user interface (LCD) via the following ways:
1. Press "OK" button twice.
2. Press the following button one by one: "Menu" -> "Status" -> "information".
Available information of phone status includes:
1. Network status (e.g., IPv4 status, IP mode, MAC address).
2. Phone status (e.g., product name, firmware version, MAC address and device certificate status).
3. Language infomation.

Press "Up" or "Down" to scroll through the list and view the specific information.
Auto-Provisioning your phone
Provisioning via DHCP Option 66,which is mainly used in the situation where Htek phone and FreePBX are in same subnet.
This chapter provides the following instructions of auto-provisioning with FreePBX and show you how to edit the custom provision template on FreePBX. Topics include:
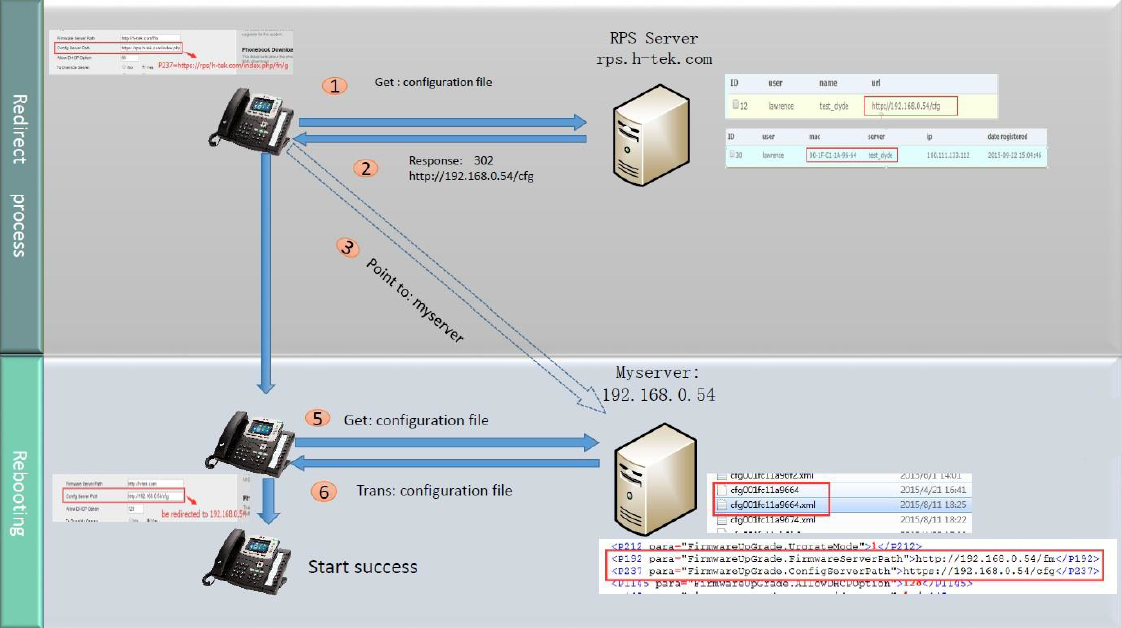
Provision via RPS
Provision the IP Phone via RPS is a convenience way.
When the IP Phone start up , default it will send 'Get' message to the RPS server, if the phone's MAC address is assigned on the RPS Server previously, the RPS server will send the preset URL of the configure server to IP Phone.
The work process of RPS show below. And more information about how to use RPS, please refer to these documents fm.htek.com/rs/rps.zip .
Provisioning via DHCP Option 66
Over View
If your network will not have IP connectivity to the Internet, you can use the "Option 66" feature built inside your company DHCP server to auto-provision your Htek phones.
This requires the IT administrator to insert the IP address/FQDN of the FreePBX server into the company router, under the "Option 66" parameter of the DHCP settings. This procedure is required only once,this procedure is beneficial for mass deployments.
Examples of valid URIs, showing the URL with port would be:
http://HTTP Username:HTTP Password:83(http://192.168.0.8:83)
https://HTTP(s) Username:HTTP(s) Password:1443(https://192.168.0.8:1443)
(Note: http username & password could found in FreePBX server Admin > Provisioning Protocols.)
After the phone powers on and retrieves an IP Address from the DHCP server, 'Option 66' will send the location details of the FreePBX server, which is recognized by the phone.
If your phone don't turn on the button of DHCP Option 66,login in the phone's webpage,
Click on Management->Auto Provision,Allow DHCP Option :66 and To Override Server set to Yes.(Note that the factory default value of the phone Option 66 is on.)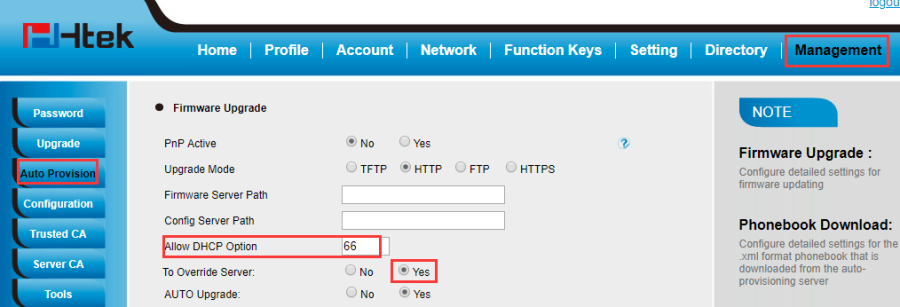
This is common in typical small office routers. If your router's DHCP server support "Option 66".Then, Provisioning via DHCP Option 66 is a good choice to provision your phones. 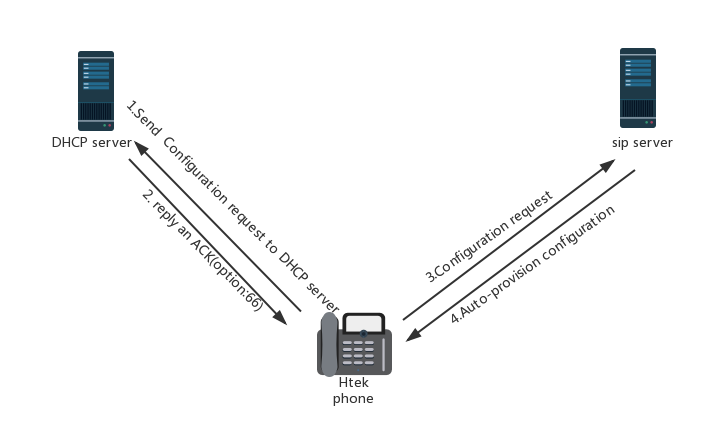
Operating Instructions
Obtain End-Point-Manager IP Address
In order for EPM to be able to commiunicate with the phone(s),it must be configured with the same IP address as your FreePBX server.
You can obtain the IP Address of EPM within the EPM Global Settings:
1. Log into your PBX GUI.
2. Under the Settings section, choose EndPoint Manager.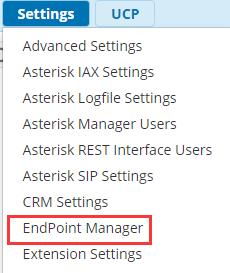
3. Navigate to the Global Settings section of EPM from the right nav bar.
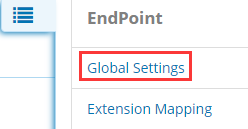
4. Define the Internal IP Address or FQDN that phones will connect to when local to the PBX.
![]()
5. Also take note what port you have HTTP Provisioning setup on as that port needs to be accessible for your phone to receive its configurations. 
6. Press the Save Global button.
![]()
Create a proper template
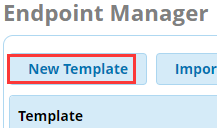
1. In the right nav menu, under Brands, click on Htek.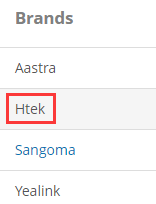
2. Click on the New Template button at the top to create a new template.
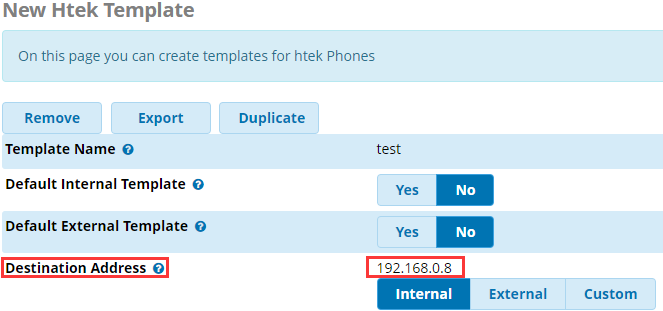
3. Give the template a Name. For the Destination Address, choose either the Internal or External option. This will pull in the IP address that you entered in the Global Settings section earlier.
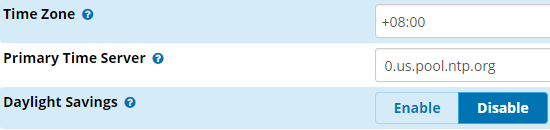
4. Define your Time Zone and if you want Daylight Savings time mode to be enabled.
5. Define what Provision Server Protocol you want to use to have your phones receive their config files:
• TFTP should be used when phones are local to the PBX, as it's easy to use and requires no setup.
• HTTP should be used for local or remote phones and is easy to use and required no other setup. The default HTTP port used for phone configs is port 83 but may be different on your PBX. You can view the port
that is currently setup for HTTP in the Global Settings section we just went through above.
![]()
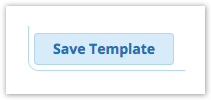
6. Press the Save Template button when done.
Configuring Buttons on your Phone
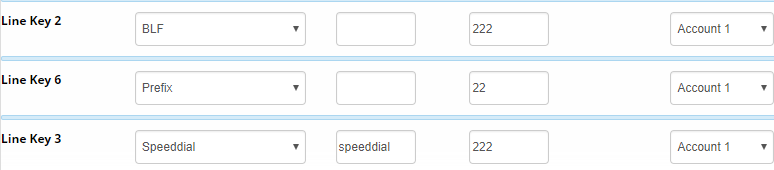
Line Key Types
Line keys can be set up in EndPoint Manager with the following options.
Configuring Line Buttons
1. Go into EndPoint Manager in your PBX and choose the Htek brand in the menu.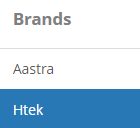
2. Click on the template in EndPoint Manager that you want to change a button for.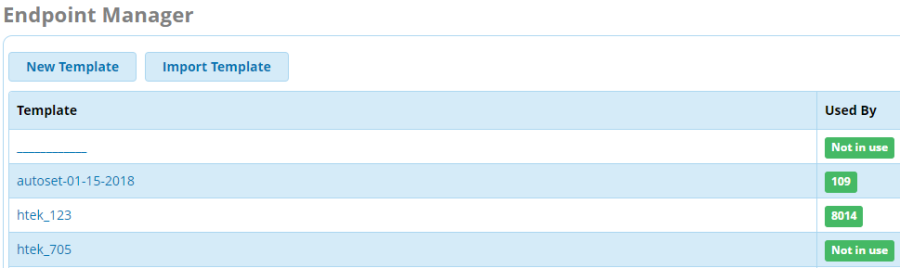
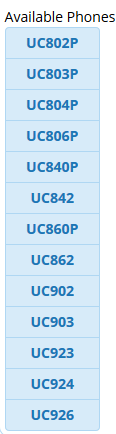
3. Scroll to Available Phones below and select the relevant template that you wanted.
4. Select a model number you want to add manage buttons for.
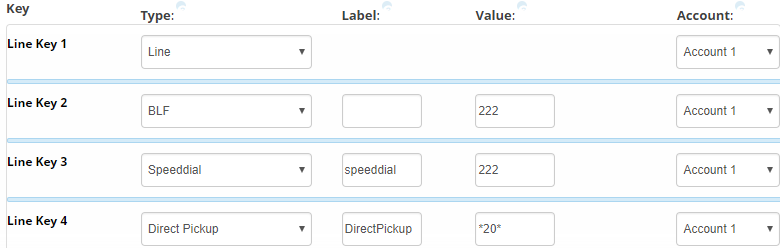
5. Make your Line Key button changes.
6. Save the Model using the Save Model button.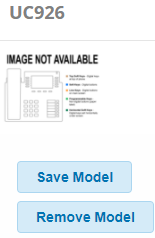
7. You now need to update the phone configuration file. Choose an option and click the Apply button. The three options at the bottom of the template are:
• Save- This will only save your changes into the PBX database. It will not write out new config files for the phones that are using this template as mapped in the Extension Mapping section of End Point Manager. 
• Save and Rebuild Config(s)- This will save your changes to the PBX Database and also write out new config files for the phones that are using this template as mapped in the Extension Mapping section of End Point
Manager. The phones do not retrieve the updates.

• Save, Rebuild Config(s) and Update Phones- This will save changes into the PBX database, write out new config files for the phones, and also immediately update any phones that are mapped to use this template and
currently registered to the PBX. This may cause the phones to reboot.

8. You can optionally change the label name for any button type except Line. The Label is the name that will be shown on your phone screen for that button.
• When choosing the Line type, the label name will be whatever you defined in the Line Label section of the phone Template Settings. The default is to show the extension number of the device. You can change this to
show the name instead, or both name and extension number.
9. You can also drag the button to be in a different spot. Left click on the button and while holding down your left mouse drag the button to a different spot and release it. In our example we will drag Button 6 up toward the
top to make it button 3 on the phone. The button number will not change until you save the model.
Logging in with your Phone
Automatic Configuration process
1. When the phone contacts your PBX it will communicate with the End-Point-Manager (EPM) module inside.
2. EPM will detect any Htek phone that is requesting configuration and if the MAC Address has already been setup in EPM Extension Mapping it will use the configuration for that phone.
3. The factory default password of the phone is 'admin' however after connecting to FreePBX the password will become the admin password that is defined in the Global Settings of EPM which by default is 222222. (This password can be changed under the 'Global' settings of End Point Manager). The admin password can also be used as the login password for the phone if you do not know your voicemail password or do not have voicemail setup for your extension.
4. Below is a screenshot of what the phone will display upon initial configuration.
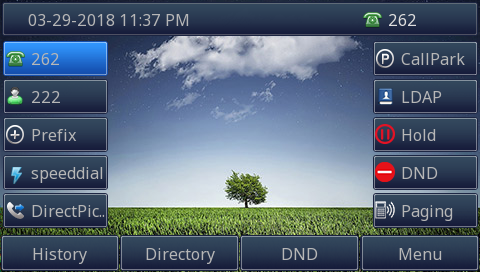
Note: The above 262 and other settings are just an example . Your phone will display the extension number that the user logged in with.
Edit custom provision template
Over View
Maybe you are not satisfied with the default configuration of auto-provision. Each Htek phone setting provisioned by FreePBX is connect with a P number of Htek template file on FreePBX. We can modify the value of the p number in template so that to change the configuration which is provisioned by FreePBX.
The following part "Operating Instructions" will show you how to modify the template by an example.
Operating Instructions
For example, we can refer to the following steps to change the default ringtone to ring 5.
Step 1, Find out which P number do you want to change and what value do you want to change to for the P number by the browser(e.g. firefox).
1. Login phone's webpage -> setting -> Preference -> ringtones.
2. Right click the drop-down box and chose the "Check the elements" item.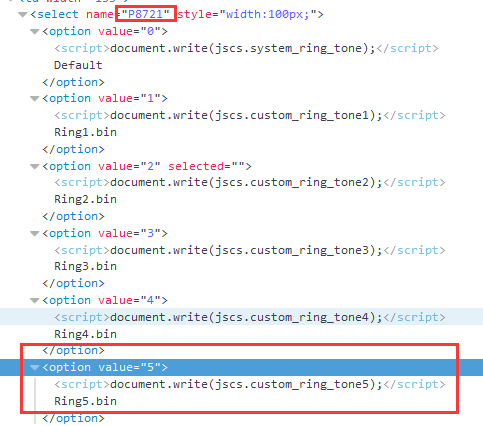
Now, You know the P number of setting ringtone is P8721, and the value 5 mean ring5.
Tips : You also can refer to our another document "parameters list".
Step 2, Find out the P number in the template and modify its value.
1. Login FreePBX→Setting→Endpoint Manager→Advanced→Basefile Edit.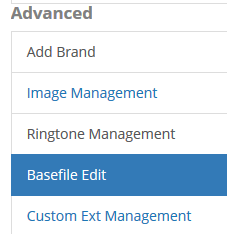
2. You will see the brand and template,click on the name of the template you want to edit. And choose which number to edit. 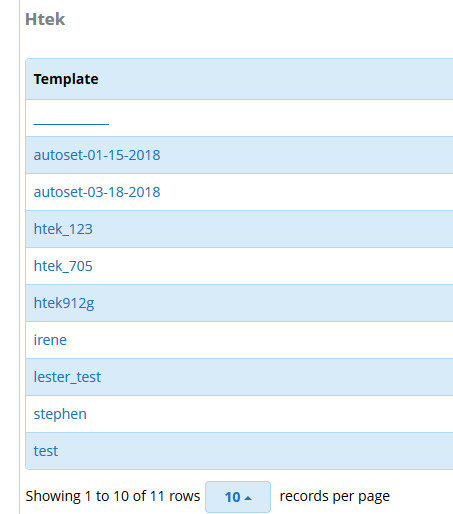
3. Location the P1872 in the template by "Ctrl + F". And modify the value to what you want.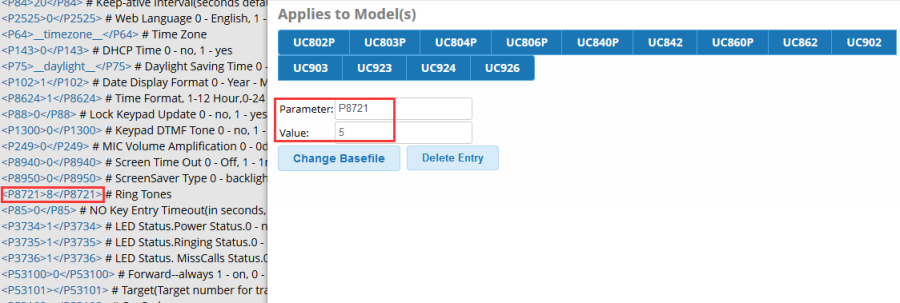
4. If you can't find it in the template. You can add this item in the "Custom parameters" area.
5. Click "Save" button.
Step 3, After modify the template successful, just need you rebuild config(s) and update phones.
Use FreePBX Integrated Feature
This chapter provides the detail instructions and configurations for the following FreePBX integrated features:
- Basic Setting
- Call_Forward
- Call_Transfer
- Do Not Disturb
- Call Park
- Voice Mail
- BLF
- Conferences
- IVR
- Pickup
- Queue
- Call Waiting
Basic Setting
Over View
This chapter introduces the necessary configuration of account registration and common optional configuration. Topics include:
Account Register
Time&Date
Basic Network Setting
Account Register
Step 1: Log into your PBX GUI.
Step 2: Applications → Extensions,click the"+Add Extension" button.![]()
Step 3: In the Add Extension drop-down box, select the device type Add New Chan_SIP Extension to add extensions(You can choose any type that you want).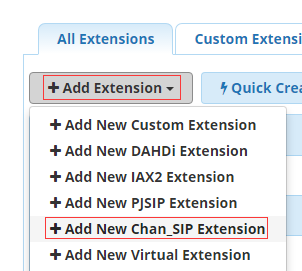
Step 4: The basic settings of extensions as shown below, where User Extension refers to the extension number of the user , Display Name refers to the extension user name, secret refers to the SIP login password, the setting is completed, click the Submit button and then click this icon ![]() to save.
to save.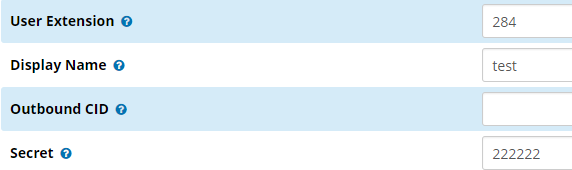
Step 5:Repeat step1-step4 can add multiple extension numbers, such as 285,286,287 ...
Time&Date
To configure the NTP server via FreePBX
The chapter Edit_custom_provision will show you how to edit custom provision template, you can refer to the chapter at first.
1. The P number of NTP server is P30, The value type is string.
2. Locate the P number in the template and change the value of this setting. 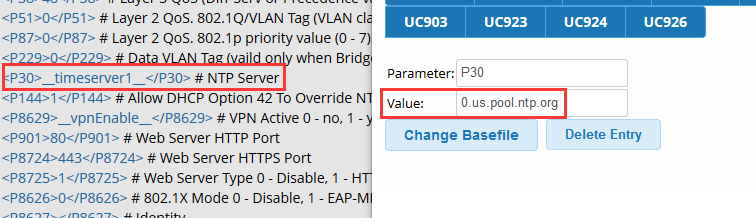
3. Click Save button and re-provision the phone.
4. Enter in the phone's LCD->Menu->Setting->Basic Setting->Time&Date->SNTP Setting.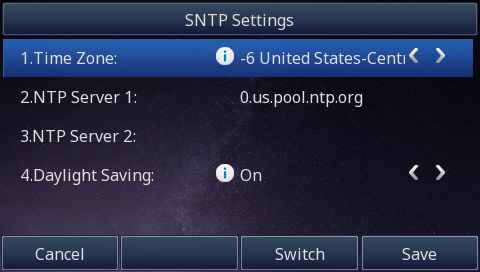
Basic Network Setting
Log in FreePBX Management Console->Admin->FreePBX server Admin->Network Settings.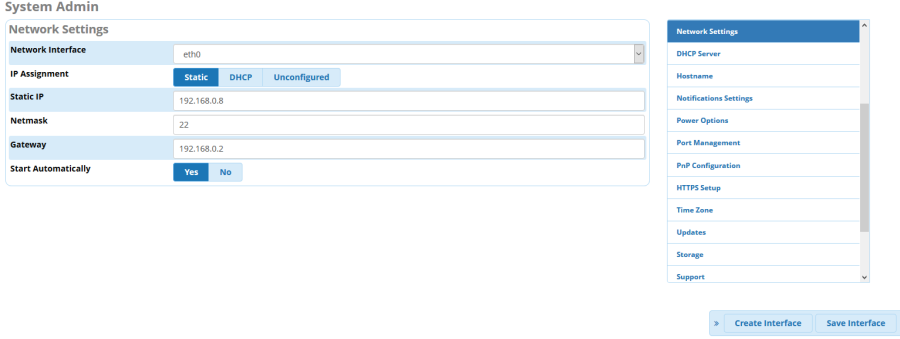
You can choose ip assignment Static/DHCP and configure the setting.
Call Forward
Over View
Call forward refers to the call forwarding, that is, the called party can not answer the phone for some reason (for example, busy, shutdown, not in the service area, etc.), and the non-called touch callback behavior. In the network is divided into busy transfer, shutdown is not in the service area and long time should not be transferred, unconditional transfer of three.
1. call forward have 3 users:
- A: Calling mobile subscriber side.
- B: Served mobile subscriber side.
- C: Forwarded-to mobile subscriber side.
2. The whole process is:
• Prerequisites: B Set the call to C side.
• A calls B.
• Satisfy one of the three conditions for call forwarding and B transfer the call to C.
• A and C make a call.
How To Config
Log in FreePBX Management Console->Admin->Feature codes->Callforward.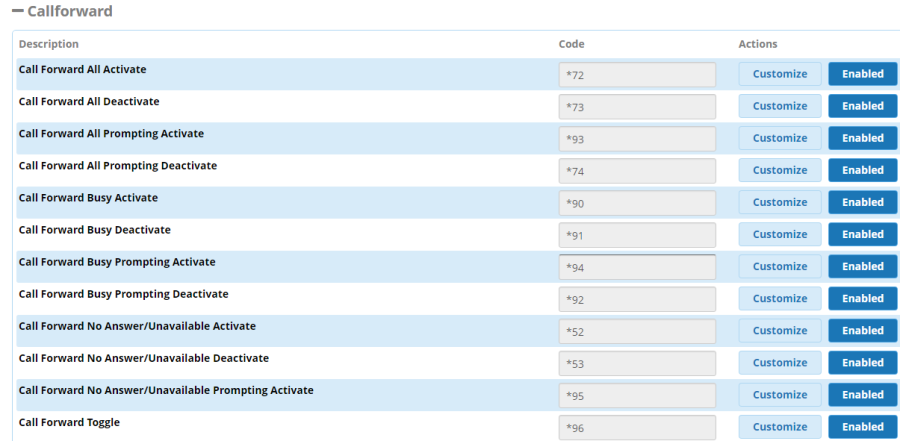
Log in phone's webpage->Setting->Features->Do Not Disturd->DND Work Type,You can choose Local?Server?Mixed DND Work Type.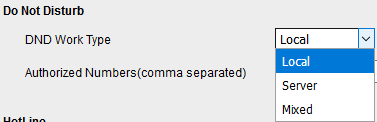
Local: Global variable, all registered accounts will execute this forward function.
Server: Only the account with *72+forward number will have this forward function.
Mixed: If the phone configure the forward function both local and server,the priority is Server>Local when phone have a incoming call.
How To Use
Local: Log in phone's webpage->Setting->Features->Forward.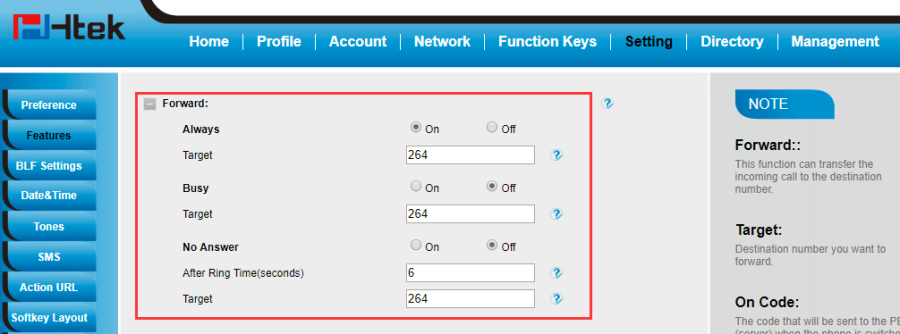
1. Always Call Forwarding
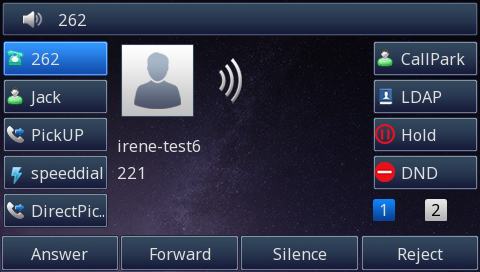
a. There are three IP phones 262, 263, 264. And 262 set Always Call Forwarding to 264.
b. 263 call 262.
c. The call will be forwarded to 264 immediately, and 264 will received the call.
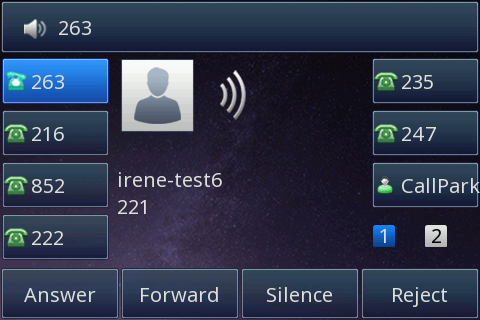
2. Busy Call Forwarding
a. There are three IP phones 262, 263, 264. And 262 set Busy Call Forwarding to 264.
b. If 262 is in idle, and 263 call 262, 262 will ring.
c. If 262 is in busy (e.g. 262 is talking with another extension or 262 rejects the call from 263), the call will be forwarded to 264, and 264 will received the call.
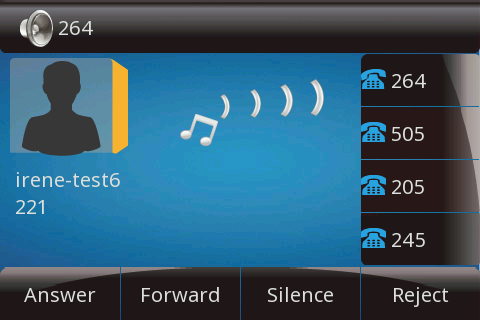
3. No Answer Call Forwarding
a. There are three IP phones 262, 263, 264. And 262 set No Answer Call Forwarding to 264.
b. 263 call 262.
c. 262 will ring, but if there is no one to answer, the call will be forwarded to 264 as soon as the No Answer Timeout configured on the called extension (262) expires.
Server: According to the code above to configure the phone.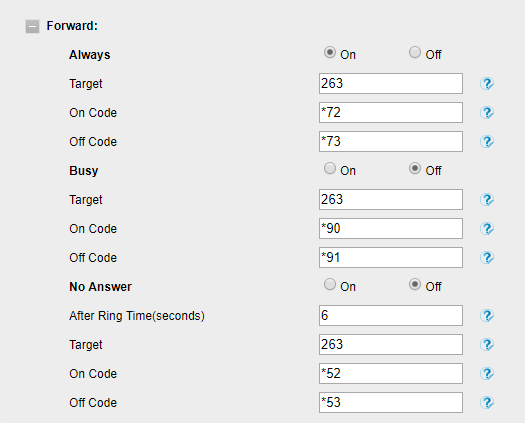
1. Call forward all activate/deactivate:
The phone A input *72+extension C, Whenever phone B call extension A, this call will be forwarded to extension C. Finally enter * 73 to cancel always forward.
2. Call forward busy activate/deactivate:
Phone A dials * 90 and dials extensionB # according to the voice prompt of the phone, so that call forward on busy extensionA-> extensionB is established. When extension C dials phone A, if phone A is in DND or rejecting when dialing , The call will go to phone B. Finally, enter * 91 #, you can cancel the call forward function.
3. Call forward no answer/unavailable activate/deactivate:
Phone A dials * 52 and enters extensionB # as prompted. When Phone A does not answer or there is no signal, you can go to Phone B directly. Finally, enter * 53 #, you can cancel the call forward function.
Call Transfer
Over View
You can transfer a call to another extension in one of three ways:
Blind Transfer:Transfer a call directly to another party without consulting.
Semi-Attended Transfer: Transfer a call when the target phone is ringing.
Attended Transfer:Transfer a call with prior consulting.
How to Use
1. Blind Transfer
a. When you (262) are in calling with 263, you want to transfer the call to 264, press the Transfer soft key.
b. Enter the target extension number (264).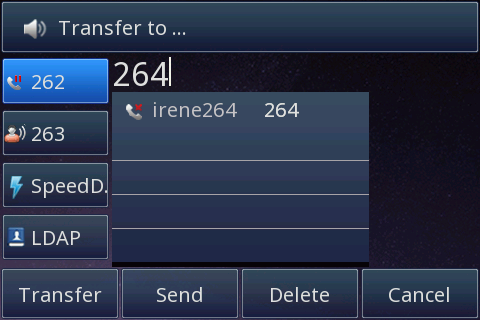
c. Press the Transfer soft key again, then 264 will be ringing and your phone will back to idle, the call is transferred to 263 and 264.
2. Semi-Attended Transfer
a. When you (262) are in calling with 263, you want to transfer the call to 264, press the Transfer soft key.
b. Enter the target extension number (264).
c. Don't press Transfer but press Send.
d. The target phone will be ringing, and before he answered, press Transfer.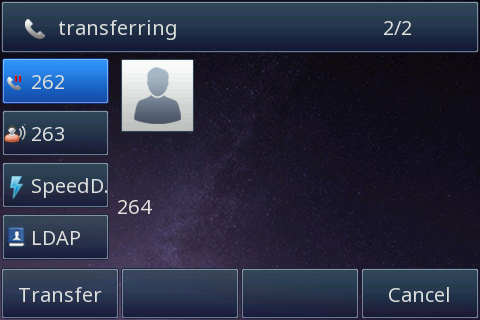
3. Attended Transfer
a. When you (262) are in calling with 263, you want to transfer the call to 264, press the Transfer soft key.
b. Enter the target extension number (264).
c. Press Send.
d. Wait for 264 answered, and tell him that you want to transfer a call to him.
e. Finally, press Transfer.
TIP: You can cancel the transfer before the call is connected by pressing the Cancel soft key.
Additional Function of Transfer
Login phone webpage->Settings->Features->Transfer Settings. There are some additional settings of transfer. Please refer the following picture.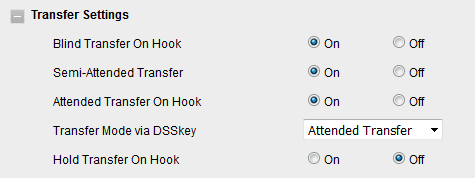
1. Blind Transfer On Hooks
If you have already enter the target number, the transfer will be completed in the form of Blind Transfer even if you hang up directly.
This means that the on-hook action replaces pressing the Transfer soft key again. And the Semi-Attended and Attended Transfer On Hook are the same.
2. Transfer Mode via DSSkey (DSSkey type must be BLF)
This feature allows you to complete the transfer in one click.
For an example, set the Line Key as BLF or Transfer, the Value is target number 264. And the Transfer Mode via DSSkey is Blind Transfer.
When you are calling with 263(e.g.), press the BLF key (listening to 264), the call will Blind Transfer to 264 directly.
Do Not Disturb
Over View
If you do not want to have a phone to bother you, you can set do not disturb mode.
How To Config
Log in FreePBX->Admin->Feature codes->Do not disturb.
Log in phone's webpage->Setting->Features->Do Not Disturd->DND Work Type.
You can choose Local?Server?Mixed type.
Local: Global variable, all registered accounts will execute this DND function.
Server: Only the account with *72+forward number will have this DND function.
Mixed: If the phone configure the DND function both local and server,the priority is Server>Local when phone have a incoming call.
How To Use
Local:You can press the DND softkey, or configure a programmable key on your phone, then press the key to enable/disable the function.
On the right side of the screen is the function key configured in the IP Phone Template, and the bottom of the screen is the soft key of the phone itself, they can all realize the function of DND.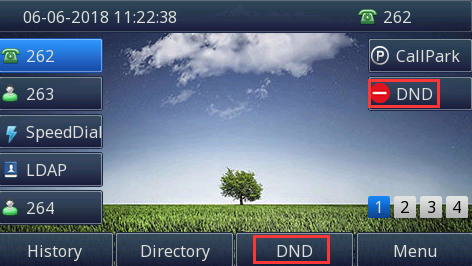
Press the DND softkey or programmable key, DND function is enabled.

click again to disable the DND function.
Server:According to the code above to configure the phone
1. DND Activate: Phone A dials * 78 # after the voice prompt donotdisturb activate, When another phone B calls the phone A, the extension A is not on the found
2. DND Deactivate: Phone A dials * 79 after the voice prompt donotdisturb deactivate,Cancel DND, other phones can dial the phone A normally
3. DND Toggle: Phone A dials * 76 to toggle the current setting status from DND activate-> DND deactivate, or DND deactivate->DND activate.
Call Park
Over View
You can use call park feature to park a call, and then retrieve the parked call from another phone. Htek IP phone supports call park Feature. For call park feature, the server will automatically hunt for the first available orbit in the call park orbits and parks the call there. The call park orbits should be predefined. You can park an active call by pressing the park call key (if configured) on the phone. And you also can retrieve the parked call by pressing a (retrieve) parked call key or dialing the retrieve access code.
How To Config
Check the Call Park setting in FreePBX system.
1. FreePBX -> Applications -> Parking.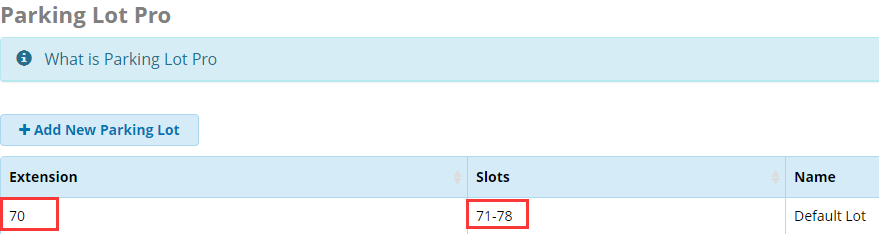
From the parking of FreePBX,we know the value of parking spaces to fill 70, that is, B equipment linekey value fill 70.C device value fill in the range of 71-78 just fill in one of the values on it, fill in here is 71.
2. Configuration
A(264)
B(262)
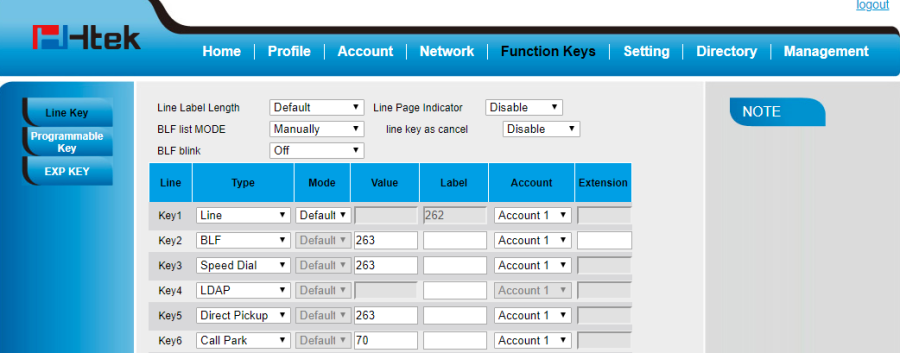
a. Log in PBX GUI,Setting->EndPoint Manager->Brands->Htek.
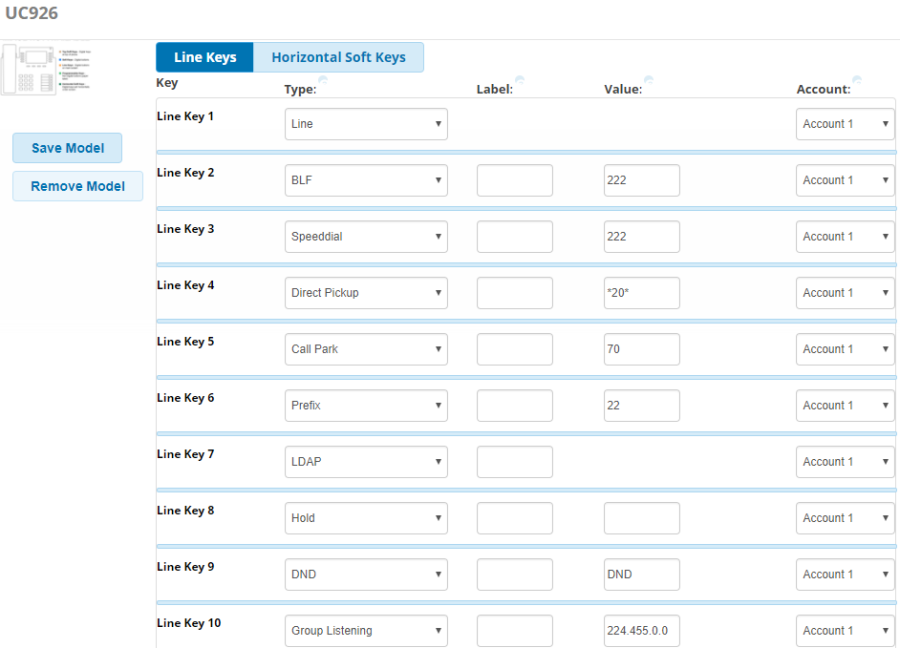
Choose the template that you have created,and click the model UC926 to configure the Call Park key, then click the save model to save the configuration.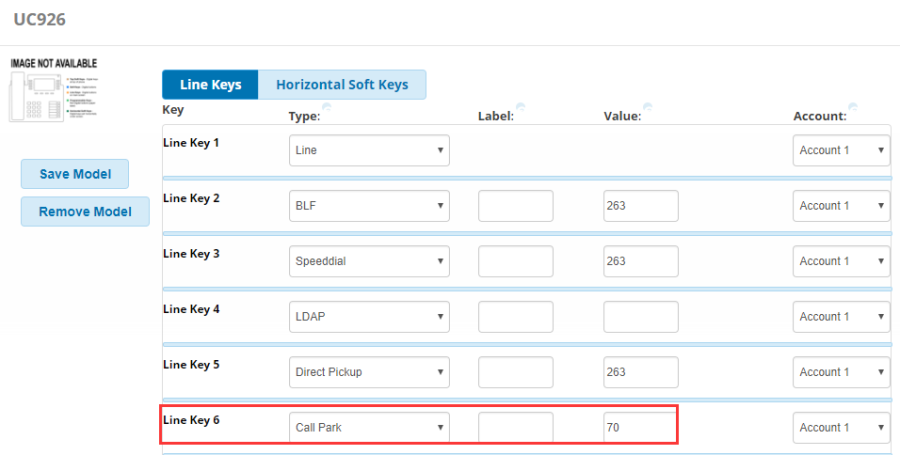
b. Apply the Save,Rebuild Config(s) and update Phones. login in phone's webpage->Function Keys->Line Key.
![]()
C(263)
Configure Call Park key as phone B,the value is set to 71.
How To Use
1. A call B, B answer,B semi-attend transfer to 70 or Press the call park key.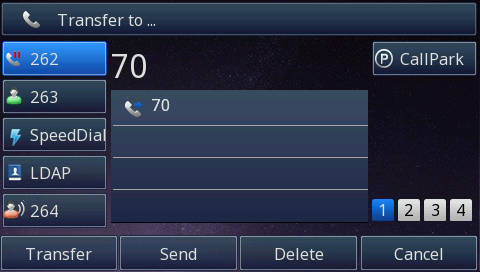
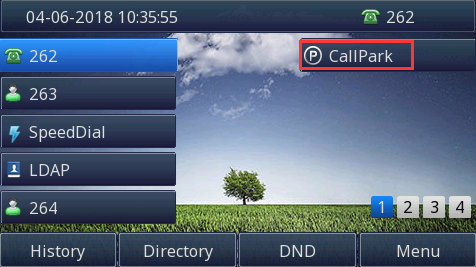
2. A will be hold,C LCD screen flashing light is steady red, click Call Park key, C and A to talk. 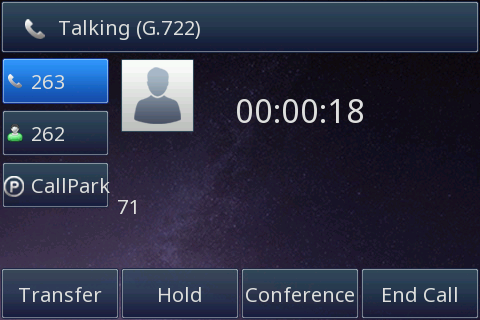
Voice Mail
Over View
E-mail that can deliver sound Voice inbox access code. This number is dialed to access extension voice inbox (extension PIN required)
How To Config
Login FreePBX→ Applications→ Extensions, click the extension that you want to make the voicemail to be enabled.
Turn on the 262 voice mail function and set the password to 262.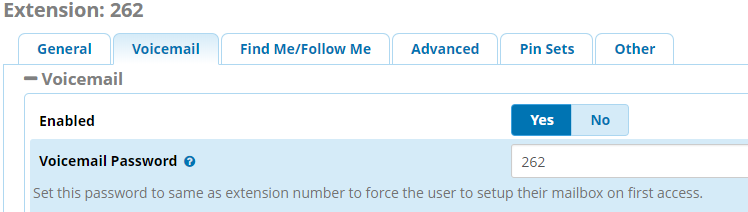
The picture shows FreePBX voice mail code.
How To Use
My Voicemail: B login in phone's webpage->Function Keys->Line Key.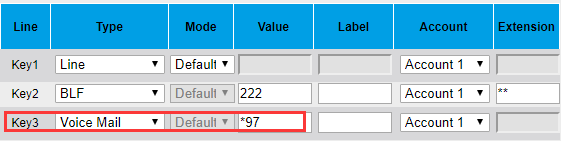
1. A (267) Make a call to B (262), B to reject, or No answer A Phones have voice prompts You can leave a message after a beep. (Note that the general message to be more than 10 seconds).
2. After the voice message is finished, the phone's mail button on the B phone will display a green flashing light. At this time, dial * 97 to listen to voice messages, delete voice messages, and save voice messages according to the voice prompts.
Dial Voicemail: B login in phone's webpage->Function Keys->Line Key. 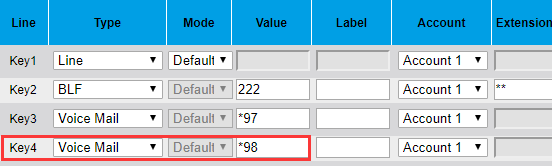
1. B (262) Make a call to A (267), A to reject, or No answer B Phones have voice prompts You can leave a message after a beep. (Note that the general message to be more than 10 seconds).
2. After the voice message is finished, the phone's mail button on the B phone will display a green flashing light. At this time, B dial * 98 to listen to voice messages, Input what mailbox you want to login,such as the extension A ,and then enter the password(The precondition is that you know the password of A). You can listen to A's voicemail?delete voice messages, and save voice messages according to the voice prompts.
BLF
Over View
BLF ("Busy Lamp Field") buttons allow you to monitor the state of another user and of certain feature codes. If you set up a BLF to another extension, the light next to the line button will be lit when that extension is on a call. If the extension is receiving an inbound ringing call, the light will flash.
How To Config
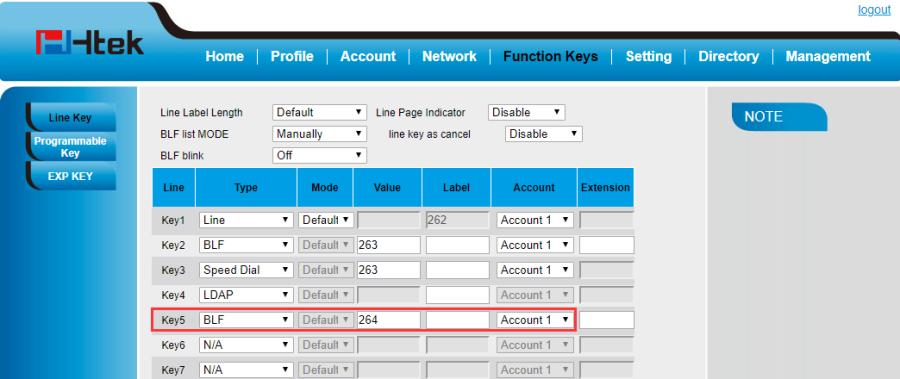
Setting up a BLF Button via PBX
1. Go into Endpoint Manager in FreePBX and choose the Htek brand in the menu,and click on the template in Endpoint Manager that you want to change a button for.
2. Scroll down the your first available Line Key that is not used,from the drop-down.
menu of button Types,select BLF.
3. Give the button a name(Label) that will be displayed on the phone's line key,and define the extension number as the Value you want to monitor. 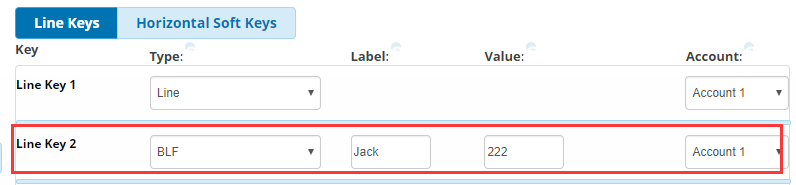
4. Save the Model using the Save Model button.
5. You now need to update the phone configuration file. The three options at the bottom of the template are:

Save Template- This will only save your changes into the PBX database. It will not write out new config files for the phones that are using this template as mapped in the Extension Mapping section of End Point Manager.
Save and Rebuild Configs- This will save your changes to the PBX Database and will also write out new config files for the phones that are using this template as mapped in the Extension Mapping section of End Point Manager. The phones will need to be rebooted in order to retrieve the changes.
Save, Rebuild Config(s)and Update Phones- This will do both the "Save Template" and the "and Rebuild Configs" options above, and it will also immediately update any phones that are mapped to use this template and currently registered to the PBX, with no need to reboot the phones.
Setting up a BLF Button via webpage
1. Login to phone web administration interface.
2. Open a new browser window and enter your phone IP address in order to access the phone web administration interface login screen.
3. Login to phone web administration interface with your username and password. Please note, factory default login details are username: admin and password:222222.
4. Click on Function Keys.
5. Configure 1 to 36 DSS Keys from the list.
6. Type: Select BLF.
7. Value: Enter user extension.
8. Click on SaveSet button to save changes.
How To Use
1. When the monitored number is in idle status, the BLF key light and the icon will be solid green.
2. When monitored number has an incoming call, the BLF key light will be flashing red and the icon will be solid red.
3. When monitored number are talking, the BLF key light and Icon will be solid red.
Conferences
Over View
Conferences allow two or more participants to communicate with each other at the same time using voice
How To Config
Log in FreePBX->Applications->conferences->Add.
1. Click +Add.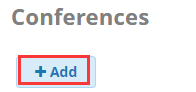
2.Fill in conference Number and conference name, And set the appropriate password. 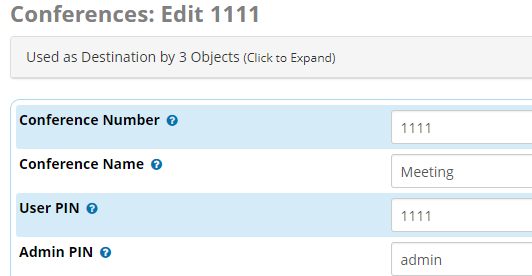
3. There are some settings below, you can edit according to demand (for example, I set up only allows up to five people to make a conference call).
How To Use
when any IP phone want to participate in this meeting,then it can dial the conference number(1111) and conference PIN(1111).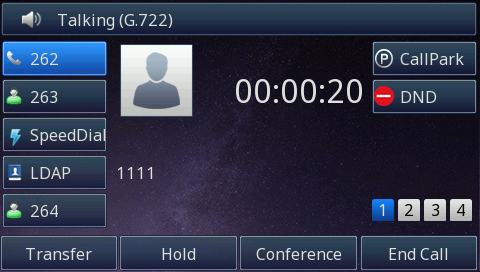
IVR
Over View
IVR (Interactive Voice Response) is an interactive voice response. You only need to call the service center to listen to the mobile entertainment products according to the operating instructions, and can also play relevant information according to the user input.
IVR business technology threshold is actually quite low. The SP applies for the access number resources to the operator, purchases the corresponding voice platform device and the operator's voice gateway for signaling / voice relay connection, sets up its own service system (hard-soft scheme is very mature), and creates own voice After the business process, you can carry out IVR business.
How To Config
Log in FreePBX->Applications->IVR.
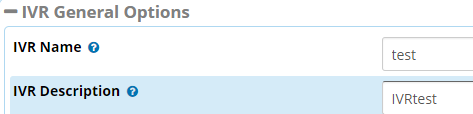
1. Click ADD IVR.
2. Fill in IVR related information such as username and description.
3. The most important step, when the phone voice prompts when press0-9 will show what function, where we need to set the various options according to their needs.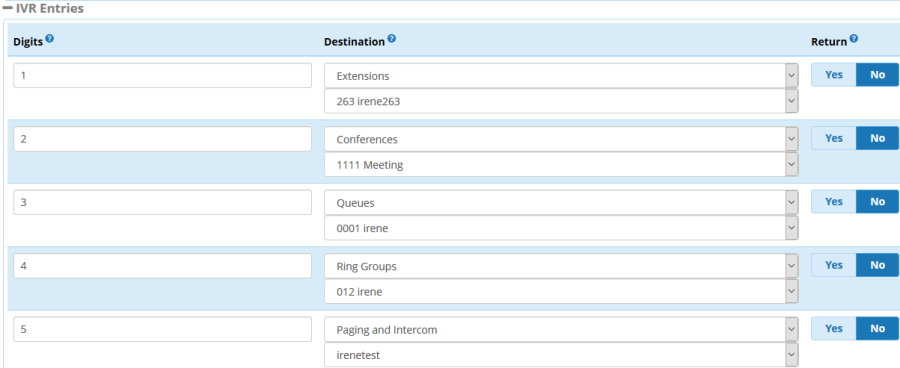
4. Click on Application->Extensions,select the extension that you want to turn on IVR(e.g:262) Click on the Advanced menu tab at the top.
5. Scroll down the Optional Destinations ,No Answer and Busy choose IVR. 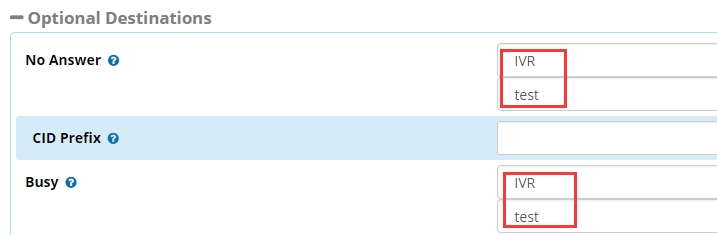
6. Save the setting by clicking the Submit button.
How To Use
When other phone dials the phone to be tested, the IVR function can be performed if the phone is busy or not available, and input the corresponding number to perform the corresponding function.
Pickup
Over View
When phone A is busy or not available, phone B dials A, and phone C can choose up the phone(**numberA).
How To Config
A(263)
B(264)
C(262)
a. Log in PBX GUI,Setting->EndPoint Manager->Brands->Htek.
Choose the template that you have created,and click the model UC926 to configure the Direct Pickup key.,then click the save model to save the configuration.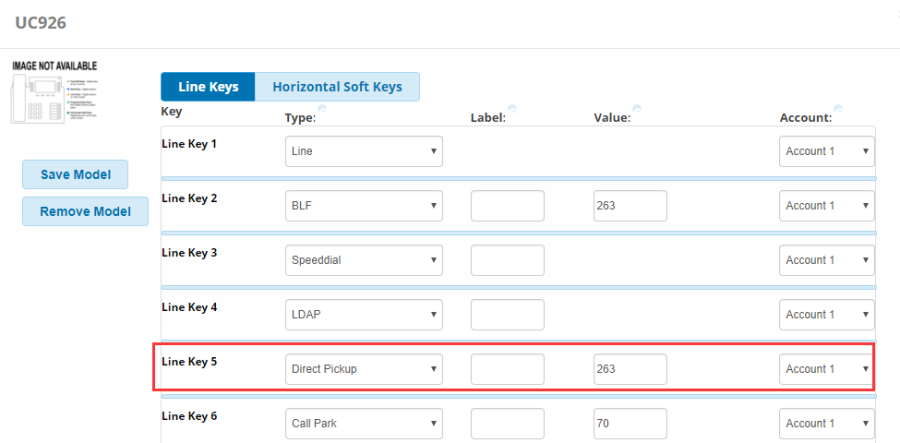
b. Apply the Save,Rebuild Config(s) and update Phones. ![]()
Login in phone's webpage->Account->Basic,Direct Call Pickup Code was configured the value '**'.![]()
Login in phone's webpage->Function Keys->Line Key. 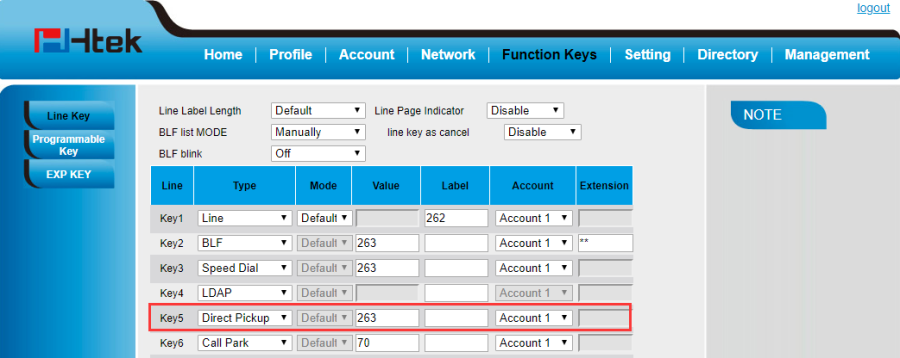
How To Use
Phone B calls phone A, BLF light of C flashes red, Then C click pickup line key.The C and A establish a call.
Queue
Over View
They will enable you to deal with your calls more efficiently and your customers will be held in a queue, listening music on hold and receiving information messages about aproximate wait time and/or their position in queue depending on the settings you choose to apply to your PBXware queue environment.
How To Config
Log in FreePBX->Applications->Queues.
1. Click Add Queue,enter queue number,queue name and queue agents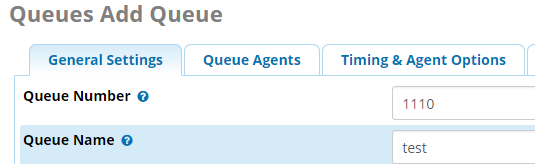
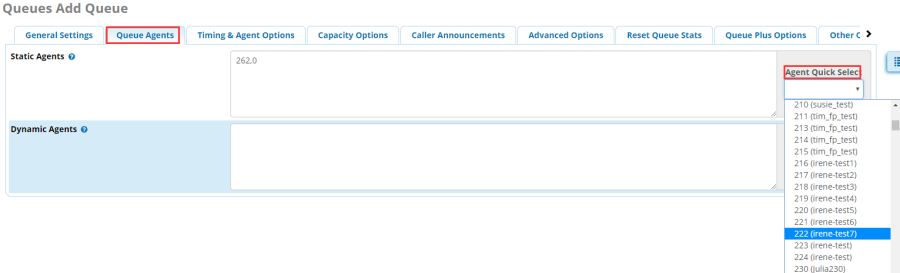
2. Scroll to Fail Over Destination below and select the extension number if queue 1110 unanswered. 
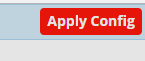
3. Click on the Submit button to save the setting. And click on the Apply Config button. ![]()
How To Use
After dialing 1110 on any phone, the phone will have a hold ring and all the 1110 Queue Agents calls will ring.After one of the phones in the queue answers, other phones stop ringing.
Call Waiting
Over View
If call waiting is enabled for your extension on the PBX, your Htek Phone will receive additional calls if you are already on the phone.
Call Waiting is enabled by default for new extensions created on your PBX(Advanced->Extension Options).![]()
If call waiting is enabled, and another call comes in while you are already on a call, you will hear a beep. You can optionally turn off this audio notification of incoming calls from your End Point Manager template, but still visually see the additional incoming calls on your phone screen.
How To Config
Log in FreePBX->Admin->Feature codes.
How To Use
The phone A dials *70,call waiting activated when A and B make a call.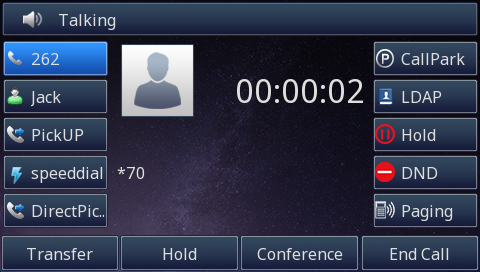
The phone A dials *70,call waiting activated,When A and B is talking, a new incoming call will be displayed below.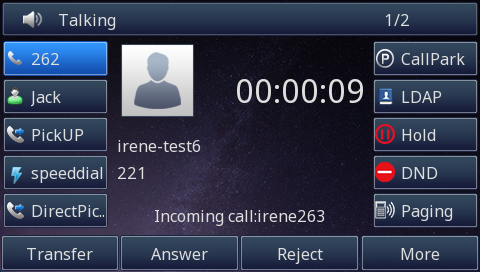
Click the up and down arrow keys to answer the call.
The phone A dials *71,call waiting deactivate.
Paging
Over View
When a paging group is added, the phone in the group will answer automatically when the phone A (221) dials the paging group number.
How To Config
Log in FreePBX->Application->Paging and Intercom.
1. Click Add Page Group button to add page group.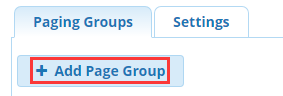
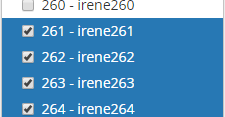
2. Enter Paging Extension,Group Description and Device List.
How To Use
1. When any one phone (such as 221) dial 454.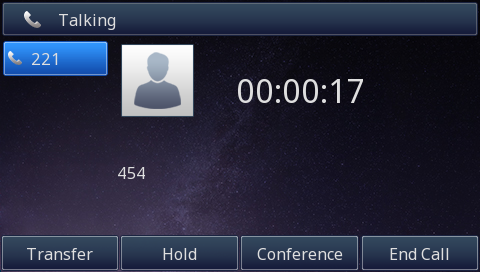
2. All the phones in the group answer the call at the same time.
3. The handset answering the call can only hear the sound but can not speak to other handsets, or you can choose to hang up.
When the caller hangs up, the page ends.
Intercom
Over View
Intercom system
How To Config and Use
Log in FreePBX->Admin->Feture codes.
1. Find intercom code.

2. phone A(262)dials *54 voice prompt intercom enable, Log in phone B's webpage->Function Key.
![]()
Phone B(263) press the Intercom key or dials *80+extensionA,phone A will answer automatically and the two parties can talk to each other.
3. Phone A(262)dials *55 voice prompt intercom disable, At this time the phone B (263) press the Intercom key or dial * 80+extensionA,the vocie prompt intercom for extension A (262) is disable.The phone was beeping for no answer on the phone.
Ring Groups
Over View
When creating a Ring Group, phone dials the ring group's number,all the number of the Ring Group will be ringing,when a number of ring group answer the call,other phones will stop ringing and go back to idle status.
How To Config
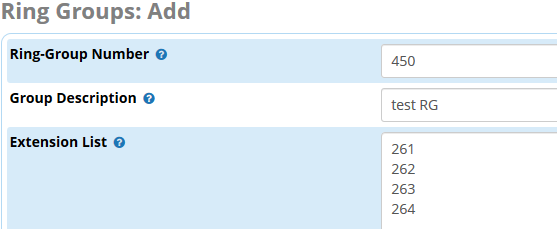
Log in FreePBX->Application->Ring Groups.
1. Click Add Ring Group button to add ring group.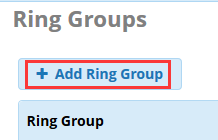
2. Enter Ring-Group Number.Group Description,Extension List and Destination if no answer.

How To Use
1. When any one phone (such as 221) dial 450,all the Ring-Group Number will be ringing,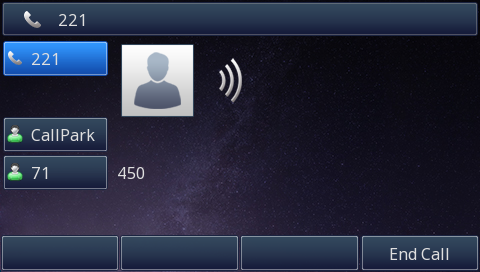
2. All the phones in the group answer the call at the same time.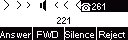
3. A number of the Ring Group answering the call can taik with the caller each other, other phones only hear the sound but can not speak to other handsets, or you can choose to hang up.
When the caller hangs up, the page ends.
Upgrading Firmware and resetting the phone
This part is to serve as a basic guidance for upgrading firmware and resetting the phone.
Upgrading Firmware
To upgrade firmware via FreePBX
1. Login FreePBX →Setting → EndPoint Manager → Advanced → Firmware Management.
2. Chose the Device Brand which you want to upgrading firmware. The phone must be Provisioned by FreePBX before. In our example,we are going to set up Htek firmware.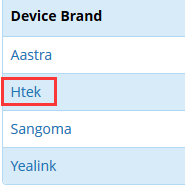
3. You will see a list of available firmware versions on the left side.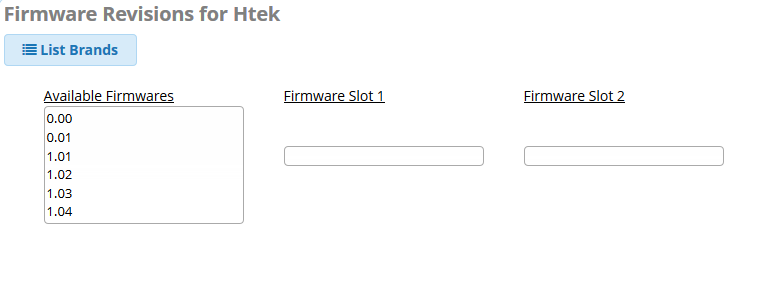
4. You will need to install firmware into at least one firmware slot. Drag a firmware version from the Available Firmwares list into Firmware Slot 1 or Firmware Slot 2.Below you will see we dragged version 1.04 into slot 1, and version 1.03 into slot 2. Version 1.04 consists of different firmware versions for each model of phone listed below the slot number. In slot 1, we see the firmware for the UC926 phone would be 2.0.4.2.11.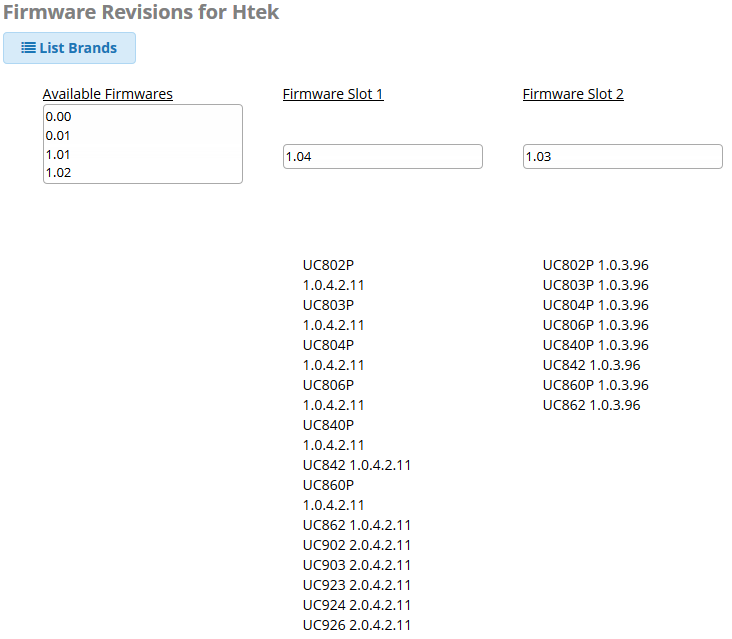
Note: You can remove existing firmware from a slot by dragging it back to the Available Firmwares list. This will allow you to install a different firmware version in that slot.
Then Press the submit button at the bottom of the page.
5. Once you have installed the firmware, you can go into any of your templates and choose which firmware that template should use for the devices that are mapped to your template.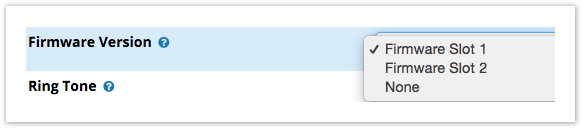
Installing Custom Firmware
1. If you would like to install your own custom firmware for a phone you can drag version 0.00 into slot 1 or 2. This will reserve that slot for your custom firmware by following the same step above for Installing Firmware. 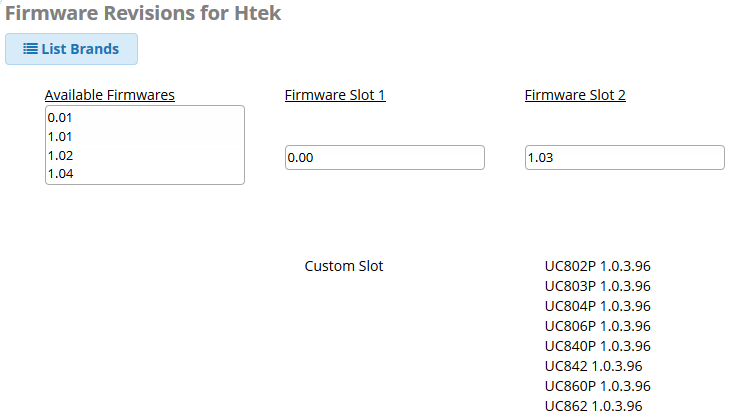
2. SSH to your PBX and navigate to /tftpboot/brand/slot and put your firmware in place. Replace /brand with the brand of your phone such as htek and replace /slot with 1 or 2 for slot 1 or slot 2.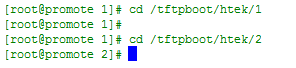
Resetting the phone
Reset the phone to factory configurations after you have tried all troubleshooting suggestions but do not solve the problem. You need to note that all customized settings will be overwritten after reset.
To reset the phone via phone user interface (LCD):
1. Press Menu -> Settings -> Advanced -> Settings -> Reset.
The password of Advanced is provisioned by FreePBX.
2. Press the Enter soft key or OK key.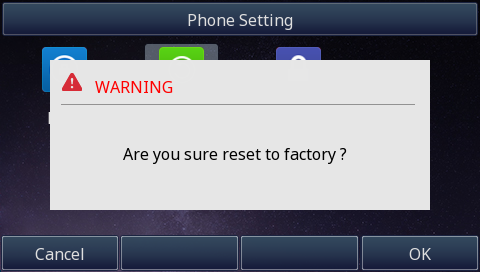
3. Press OK soft key.
Note: Reset of your phone may take a few minutes. Do not power off until the phone has started up successful.The phone will be reset to factory settings sucessfully after startup.
Troubleshooting
This chapter provides general troubleshooting information to help you solve the problems you might encounter when using your phone. If you require additional information or assistance with your new phone, contact your FreePBX server administrator.
Why is the LCD screen blank?
- Ensure that the phone is properly plugged into a functional AC outlet.
- Ensure that the phone is plugged into a socket controlled by a switch that is on.
- If the phone is plugged into a power strip, try to plug it directly into a wall outlet instead.
- If the phone is powered from PoE, ensure that you use a PoE-compliant switch or hub.
Why does the phone display "Network unavailable"?
- Ensure that the Ethernet cable is plugged into the Internet port on the phone and the Ethernet cable is not loose.
- Ensure that the switch or hub in your network is operational.
Why doesn't the phone display time and date correctly?
Check if you have configured the phone to obtain the time and date from the SNTP server automatically. If the phone fails to connect to the SNTP server, you need to configure the time and date manually.
Why the phone can't upgrading by FreePBX successful?
1. Please check that whether the version of the phone is the latest version on the FreePBX.
2. Locate the folder where holds the Htek firmware on FreePBX. And check whether there is firmware files in the folder.