Yeastar Configuring Guide
- HTEK_admin (Unlicensed)
About This Guide
Thank you for choosing the Htek IP phones, which are exquisitely designed to provide basic phone features plus advanced business features, such as Call Park, Call Pickup, Intercom and Enhanced Monitor Extension over IP network.
The purpose of this guide is to serve as a basic guidance for provisioning Htek IP phones with Yeastar phone system, including:
Htek 8 Series:
UC802, UC802T, UC803, UC804, UC804T, UC804G, UC806, UC806T, UC806G, UC840, UC842, UC860, UC862;
Htek 9 Series:
UC902, UC903, UC912, UC912G, UC923, UC924, UC924E, UC926, UC926E.
Note: The configuration process outlined in this guide applies to Htek IP phones running firmware version x.0.4.2.23 or later and Yeastar S100 phone system running version 30.5.0.8 or later.
In This Guide
Topics provided in this guide include:
Summary of Changes
- V1.0(2017-10-16): Provide a basic guidance for provisioning Htek IP phones with Yeastar phone system.
Getting Started
This chapter will show you the basic process of phone's start-up and instructions of the way to get the basic information of the phone. Topics include:
Phone Initialization
After your phone is powered on, the phone will boot up, complete the initialization and check firmware. Please refer to the three phases of the LCD display:

![]()

![]()

In the process of initializing, the phone will attempt to contact a DHCP server in your network to obtain valid IPv4 network settings (e.g., IP address, subnet mask, default gateway address and DNS address) by default.
Phone Status
After the phone comes up, you can view phone status on phone user interface (LCD) via the following ways:
- Press "OK" button twice.
- Press the following button one by one: Menu→Status→Information.
Available information of phone status includes:
- Network status (e.g., IPv4 status, IP mode, MAC address).
- Phone status (e.g., product name, firmware version, MAC address and device certificate status).
- Language information.
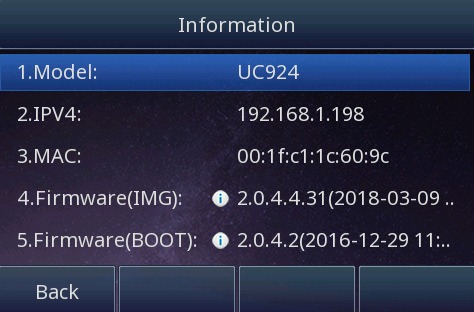
Press "Up" or "Down" to scroll through the list and view the specific information.
Auto-Provisioning your phone
The way of provision with Yeastar phone system is Provisioning via Plug and play (Local LAN), which is mainly used in the situation where Htek phone and Yeastar phone system are in same subnet.
This chapter provides the following instructions of auto-provisioning with Yeastar phone system and show you how to edit the custom provision template on Yeastar. Topics include:
Provisioning via Plug and play (Local LAN)
Over View
If the Yeastar Phone System runs on the default sip port 5060 and that the IP phones resides on the same local LAN subnet as Yeastar. Then, Provisioning via Plug and play is a good choice to provision your phones.
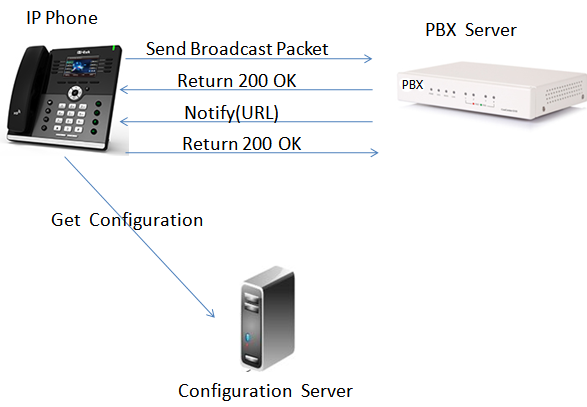 1. After saving the configuration and rebooting the phone in the "Auto-provisioning", the sip server sends notify message with reboot event. The phone receives it and replies 200 OK.
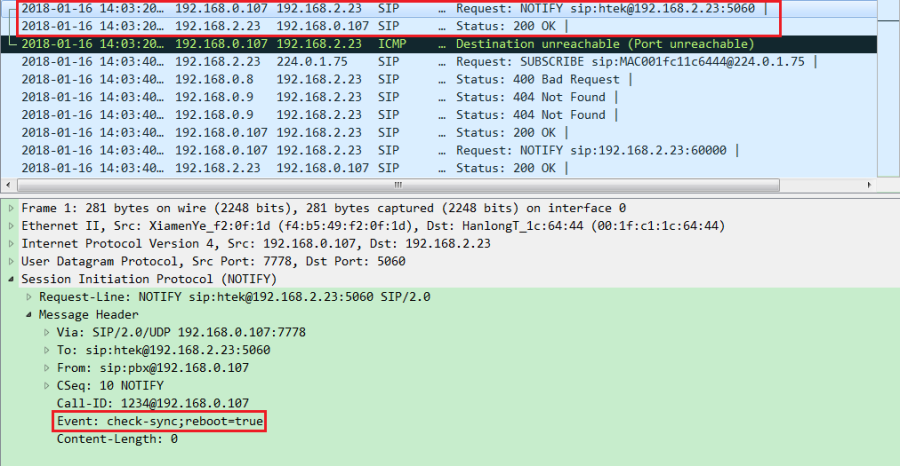 2. Then the phone will send multicast package to network equipment with its MAC address. The sip server receives it and replies 200 OK.
 3. Sip server sends notify message with its URL.
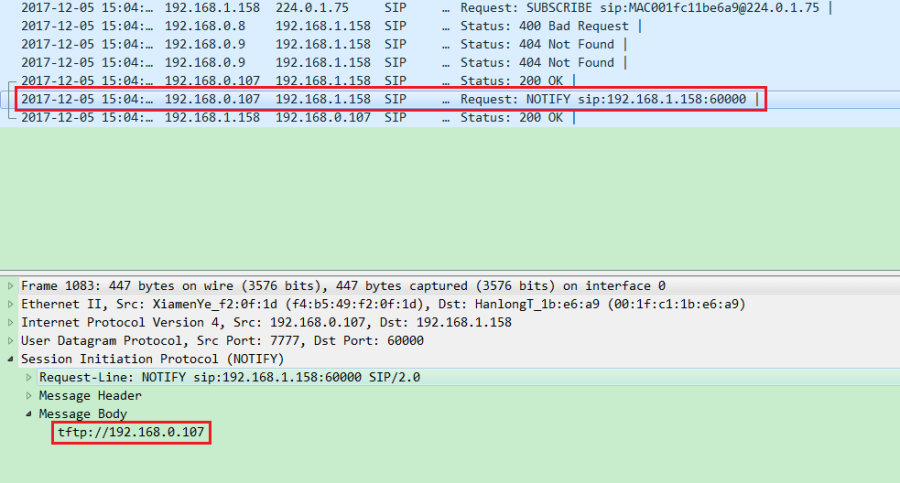 4. The phone replies 200 OK.
5. The phone will get the config files from the URL that notify message contains in the following order:
factory00xx.bin→cfg00xx.xml→cfgxxx (xxx is phone's MAC address)→cfgxxx.xml(xxx is phone's MAC address)→fwxxx.rom(xxx is phone's model)→phonebook/htek.xml
Preconditions
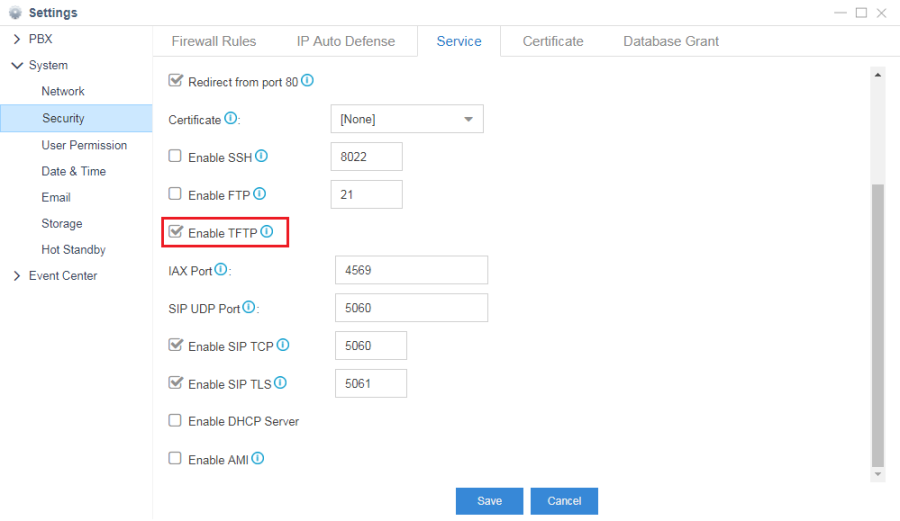
1. Yeastar S100: Settings→System→Security→Service→Enable TFTP.
 2. Enter the webserver of the phone: Management→Auto Provision→Firmware Upgrade→PnP Active: Yes(default).

Operating Instructions
1. Plug the phone into the network.
2. The phone will send a multicast message across the LAN. This will be picked up by Yeastar Phone System.
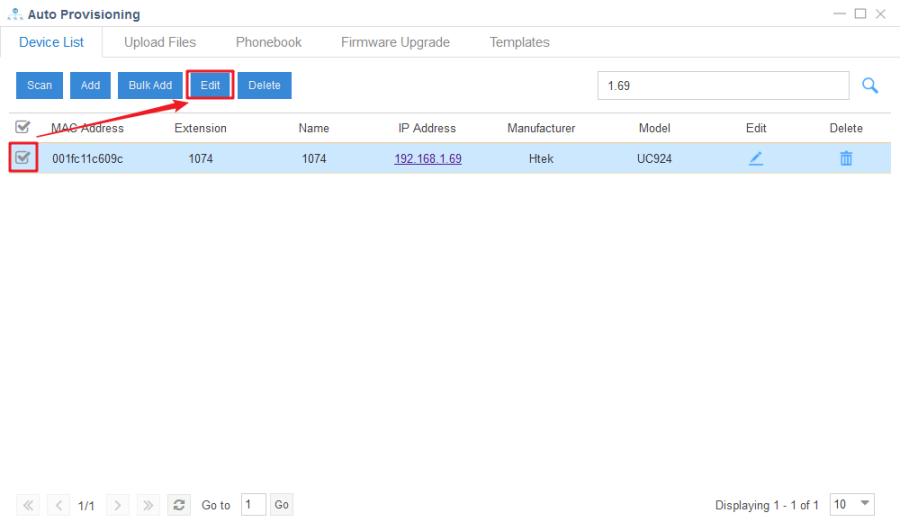
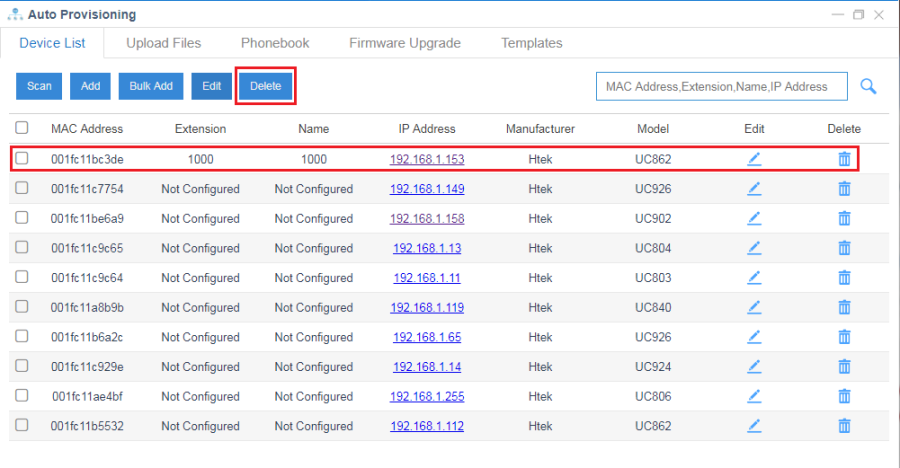
3. Enter "Auto-provisioning", and then click "Scan", the phone will show up in the "Device List".
 4. Click "Add", and you can add a phone.
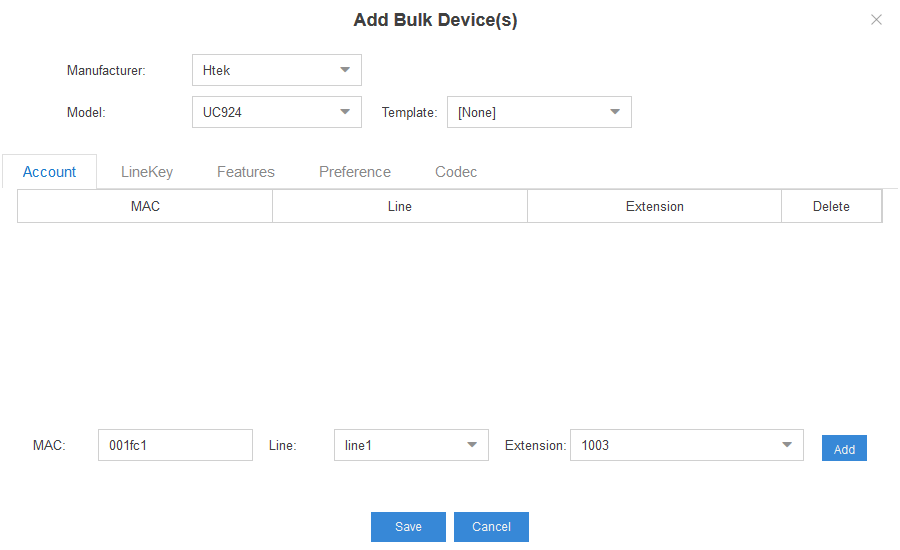
 5. Click "Bulk Add", and you can add phones of the same model.
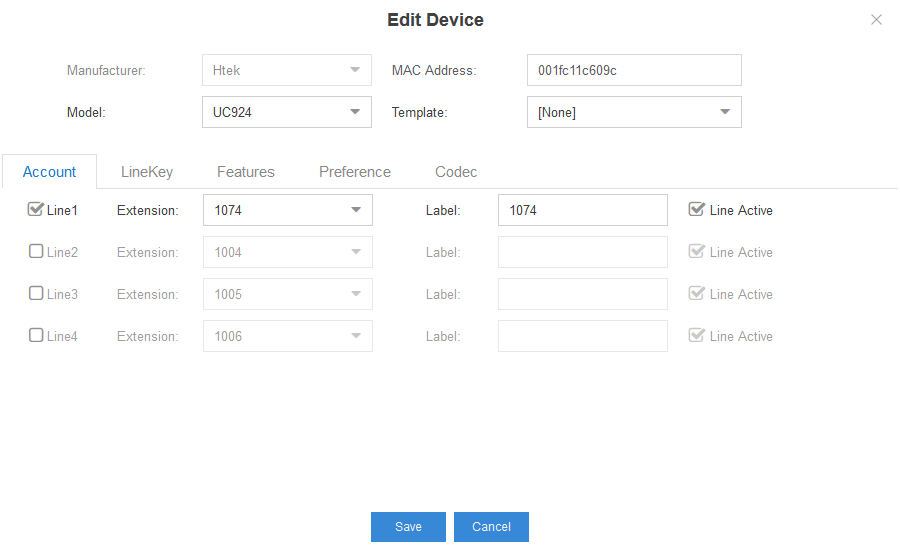
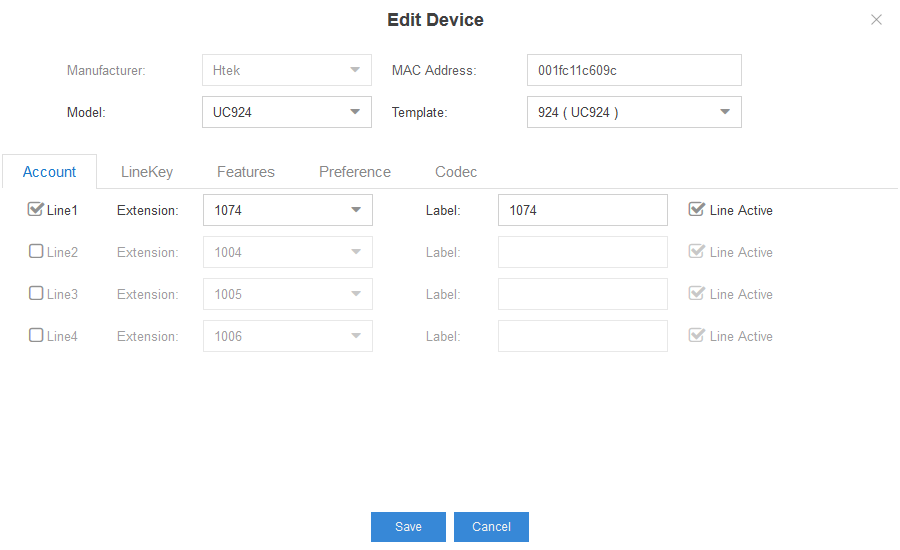
 6. Click "Edit" or
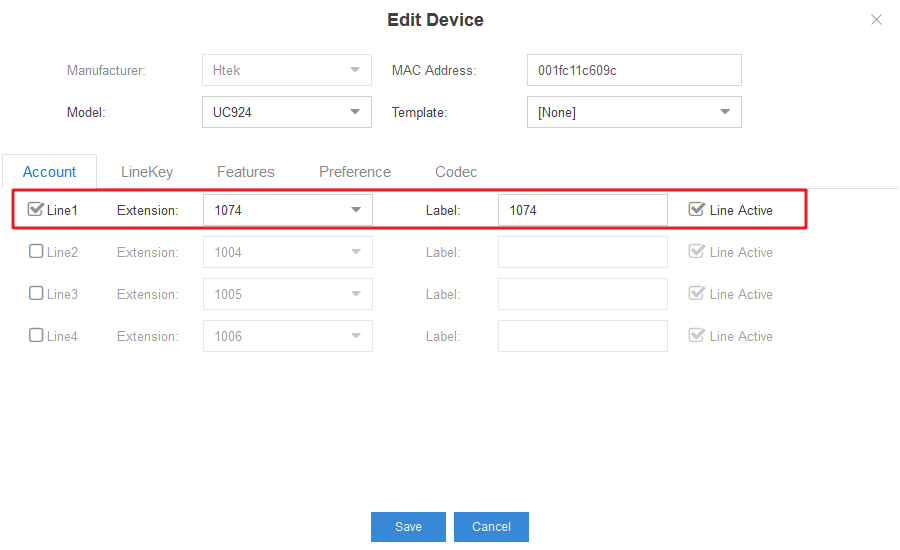
 ![]() , and assign an extension to it in the Account page.
, and assign an extension to it in the Account page.
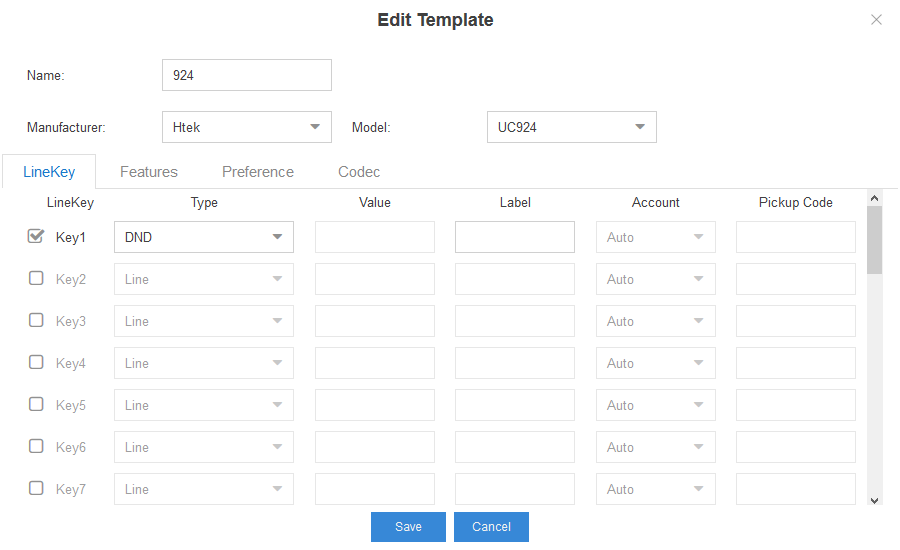
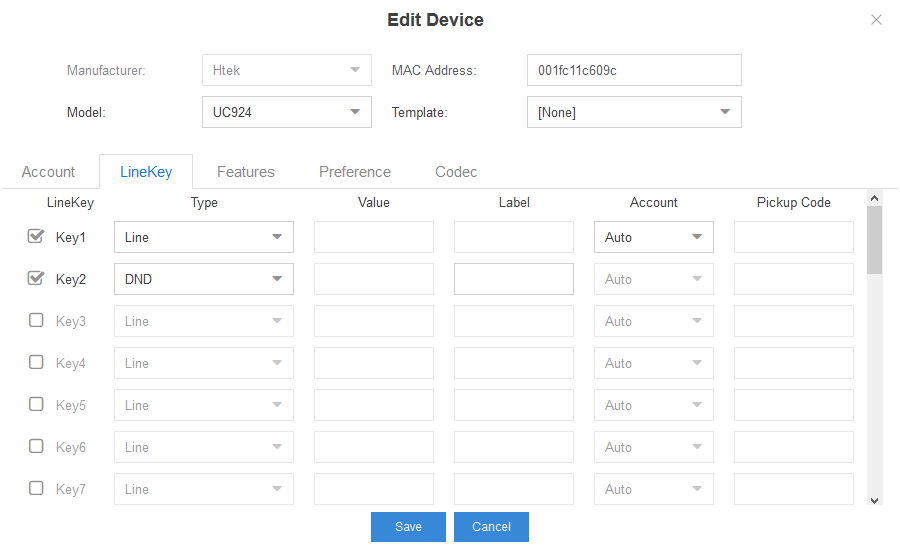
 7. Configure LineKey. You can edit Type, Value, Label and Pickup Code of a key. LineKey has 35 types: Line, SpeedDial, BLF, BLF List, Voicemail, Direct Pickup, Group Pickup, Call Park, Intercom, DTMF, Prefix, Local Group, XML Group, XML Browser, LDAP, BroadSoft Group, Conference, Forward, Transfer, Hold, DND, Redial, Call Return, SMS, Record, URL Record, Paging, Group Listening, Public Hold, Private Hold, Shine Line, Hot Desking, ACD, Zero Touch, MultiCast Paging.
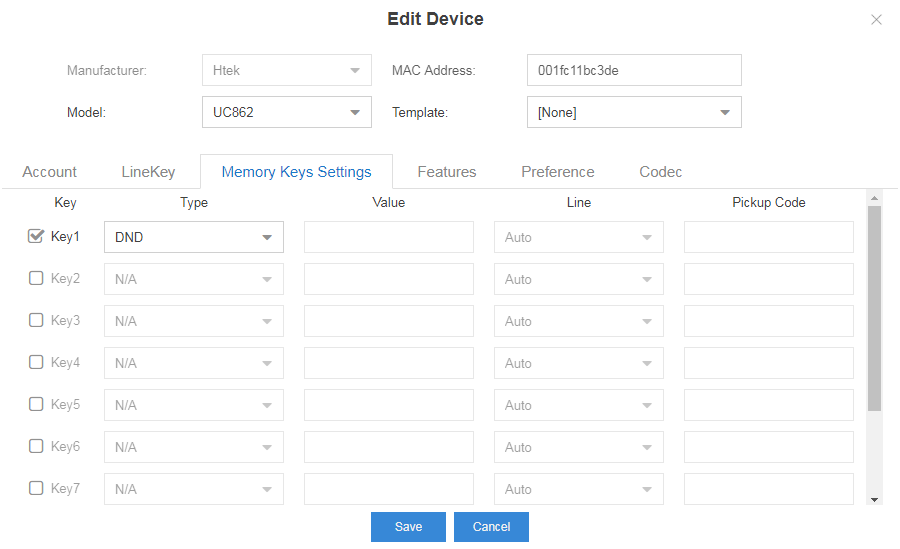
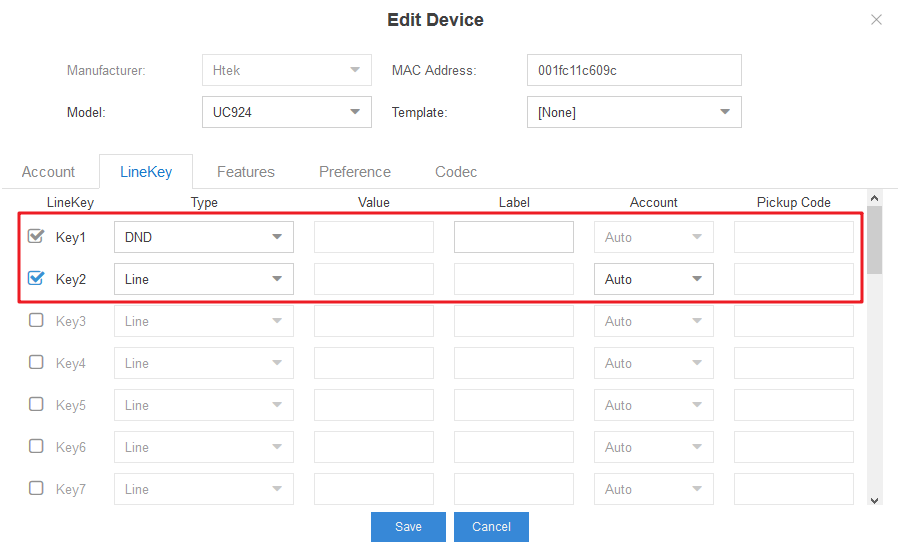 8. Configure Memory Keys Settings. You can edit Type, Value, Line and Pickup Code of a key. Memory Key has 35 types: Line, SpeedDial, BLF, BLF List, Voicemail, Direct Pickup, Group Pickup, Call Park, Intercom, DTMF, Prefix, Local Group, XML Group, XML Browser, LDAP, BroadSoft Group, Conference, Forward, Transfer, Hold, DND, Redial, Call Return, SMS, Record, URL Record, Paging, Group Listening, Public Hold, Private Hold, Shine Line, Hot Desking, ACD, Zero Touch, MultiCast Paging.
Tip: The Memory Keys Settings option is only for UC802, UC802T, UC803, UC803T, UC806, UC806T, UC806G, UC860, UC862
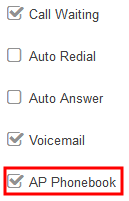
 9. Configure Features. You can configure Call Waiting, Auto Redial, Auto Answer, Voicemail, AP Phonebook, Key As Send and Remote Phone Book in this page.
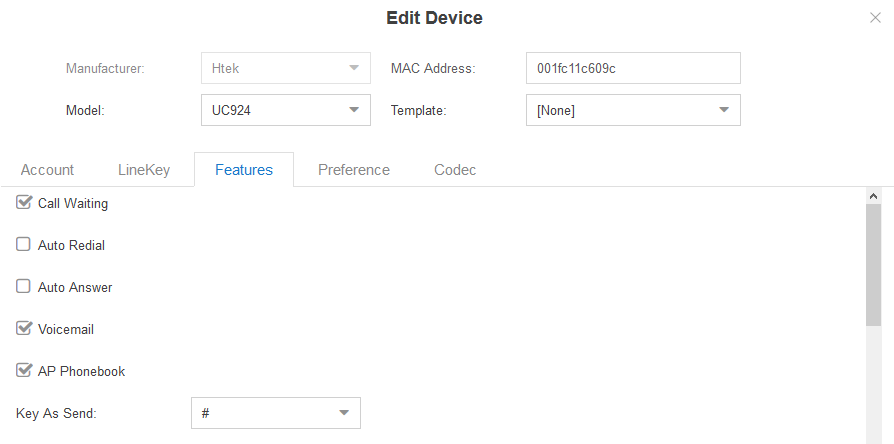
 You can enable call waiting, auto redial, auto answer, voicemail and AP phonebook.
Call waiting can let you receive other call when you are talking with someone.
Voicemail can let others leave message to you when your phone number is not available.
If "Key As Send" is selected "#", you can press "#" as send when you make a call.
You can edit phonebook URL and phonebook name to configure Remote Phone Book.
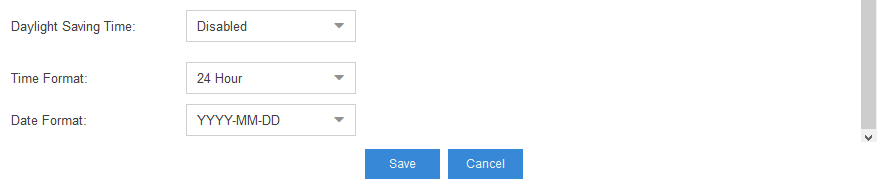
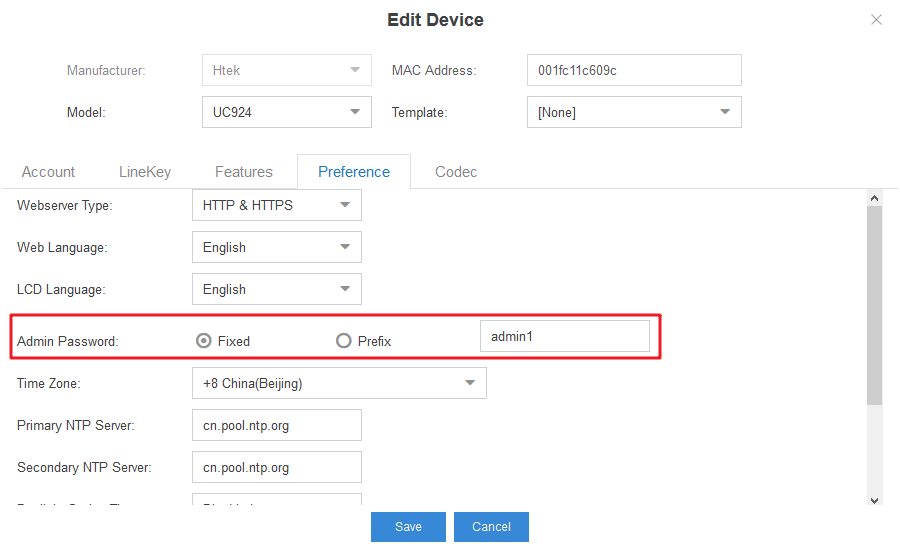
10. Configure Preference. You can set Webserver Type, Language, Admin Password, Time Zone, Primary NTP Server, Secondary NTP Server, Daylight Saving Time, Time Format and Date Format.
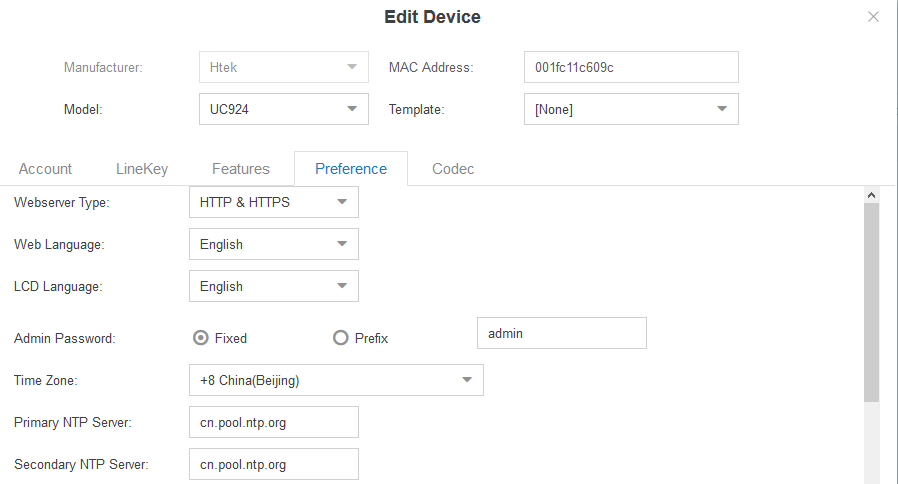
 Webserver Type is the type to access the web interface.
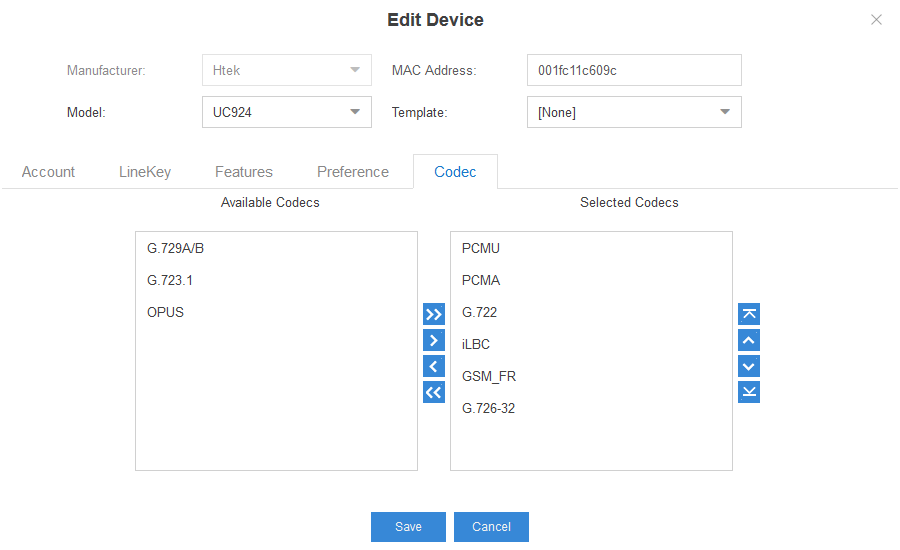
11. Configure Codec. Htek IP Phone supports PCMA, PCMU, G726-32, G722, iLBC, GSM_FR.
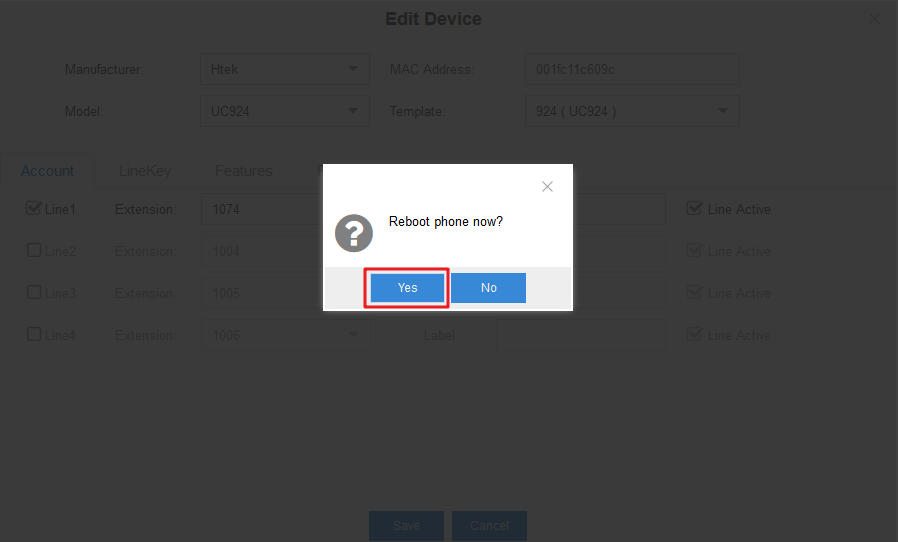
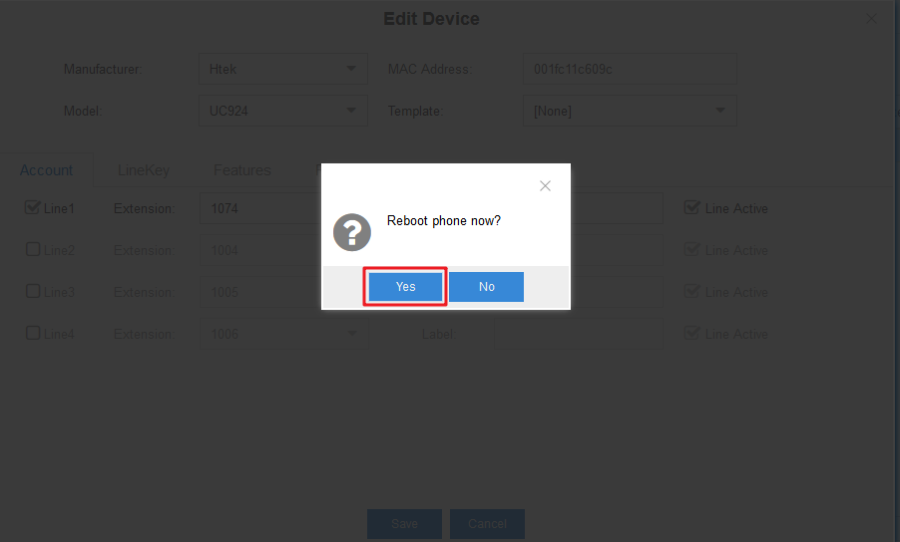
 12. Click "Save", "Reboot phone now?" will be shown. Click "Yes", the phone will restart.
 13. If the phone has PnP enabled, it will receive a link to a configuration file that records the settings you specify and configures itself.
14. The phone will apply the settings and connect to Yeastar Phone System. The IP phone will be manageable form within the Yeastar Auto Provisioning page.
15. Click "Delete" or ![]() , you can delete the configuration in the Yeastar Auto Provisioning page.
, you can delete the configuration in the Yeastar Auto Provisioning page.
Edit custom provision template
Over View
You can create a template in the Yeastar to choose when you assign an extension. The following part "Operating Instructions" will show you how to create a template by an example.
Operating Instructions
1. Auto Provisioning→Templates→Add. Fill in name and choose Manufacturer and model. Click "Save".
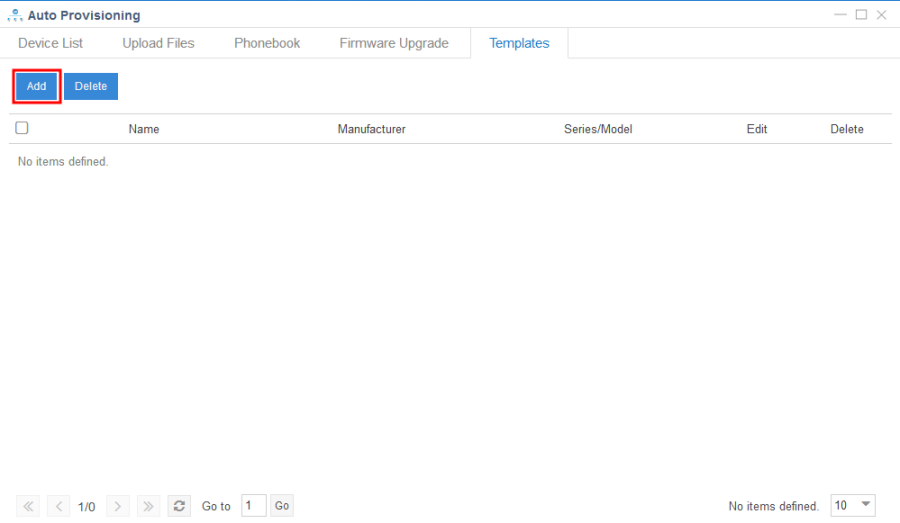
 2. Click
 ![]() . Configure LineKey, Memory Keys Settings, Features, Preference and Codec. Click "Save".
. Configure LineKey, Memory Keys Settings, Features, Preference and Codec. Click "Save".
3. You can choose the template and add an extension when you add or edit Device.
 4. Click "Save" and the phone with PnP enabled will restart and apply the settings of the selected template.
Upgrading Firmware
Over View
The phone will upgrade the firmware automatically when it restarts, otherwise the phone will auto-upgrade when the inspection time expires. The part "Operating Instructions" will show you how to upgrade the firmware in the Yeastar.
Preconditions
Auto Provisioning→Firmware Upgrade.
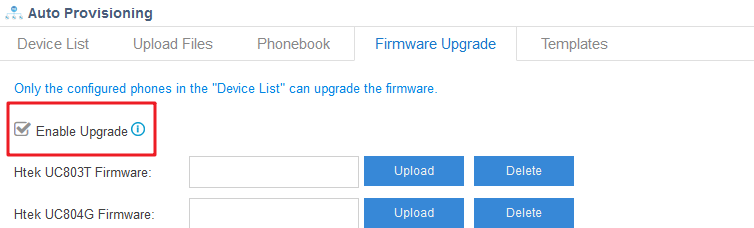
Only the models of the configured phones in the "Device List" can be listed on the "Firmware Upgrade" page. In this page, enable Upgrade. Only the configured phones in the "Device List" can upgrade the firmware.
Operating Instructions
1. Auto Provisioning→Firmware Upgrade.
Click "Upload".
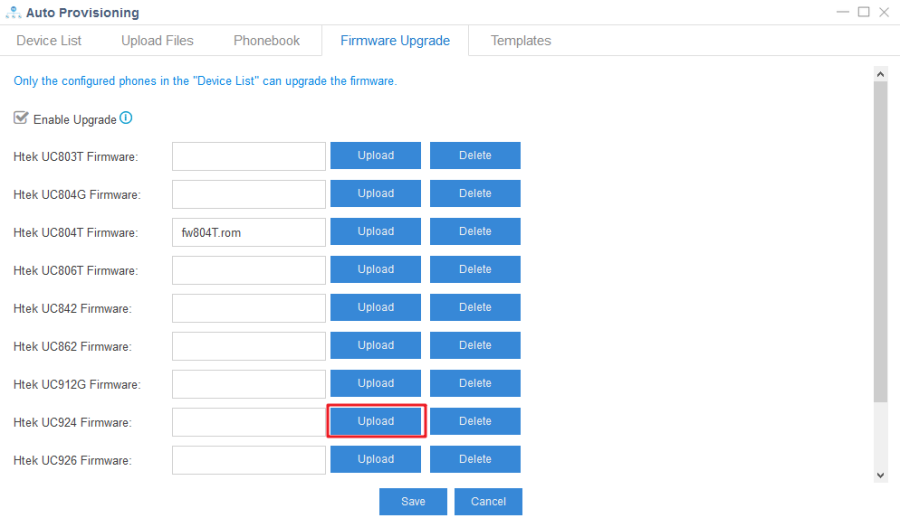 2. Click "Browse", choose a rom file matched with the model (fw8xx.rom and fw9xx.rom), and then click "Upload".
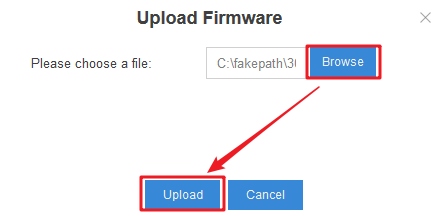 3. After uploading, the file's name will be filled in the blank.
![]() 4. Check the "Enable Upgrade" option.
4. Check the "Enable Upgrade" option.
 5. Auto Provisioning→Device List.
Edit the phone. Click "Save", then "Reboot phone now?" will be shown. Click "Yes" to upgrade firmware.
 Or click the IP Address of the phone and you will enter the webserver of the phone. Reboot the phone through the webserver, and it will upgrade.
Using Yeastar Integrated Features
This chapter provides the detail instructions and configurations for the following Yeastar integrated features:
- 2625203
- 2625203
- 2625203
- 2625203
- 2625203
- 2625203
- 2625203
- 2625203
- 2625203
- 2625203
- 2625203
- 2625203
- 2625203
- 2625203
- 2625203
Basic Setting
Over View
This chapter introduces the necessary configuration of account registration and common optional configuration. Topics include:
Account Registration
Add Extensions
To add an extension
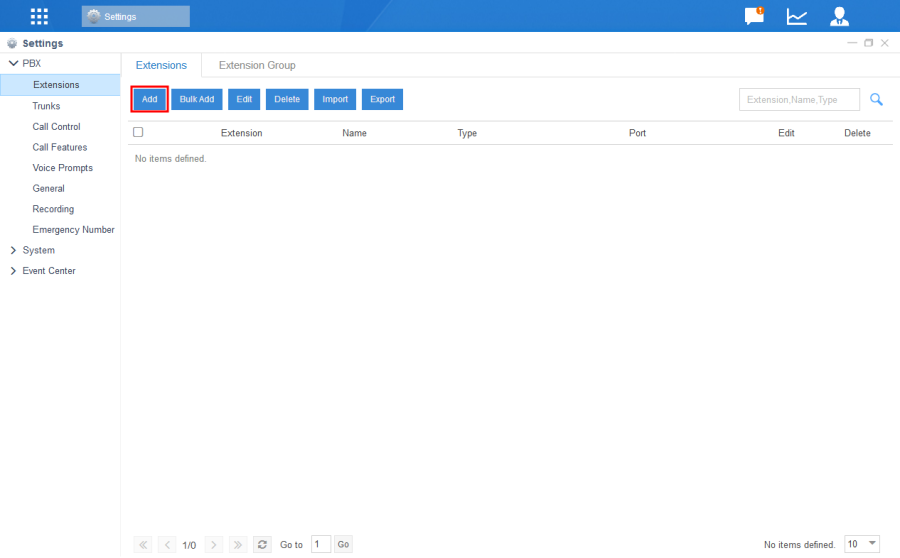
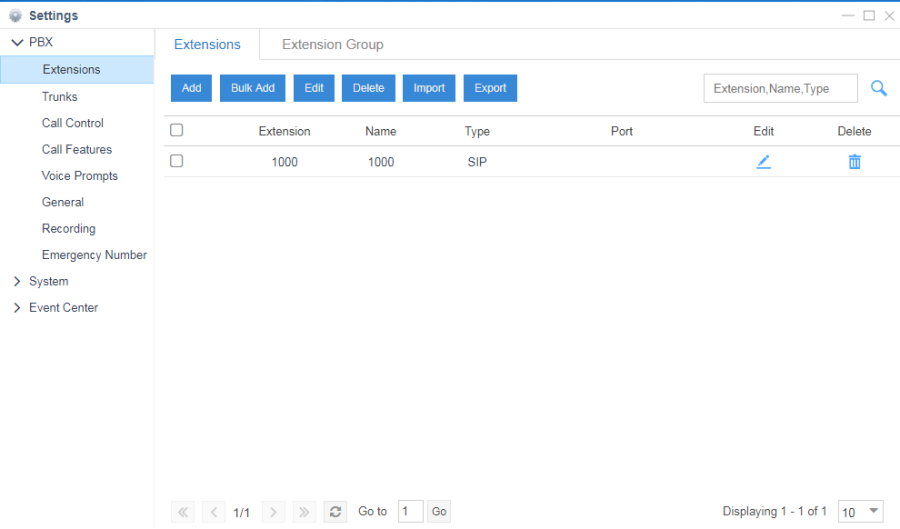
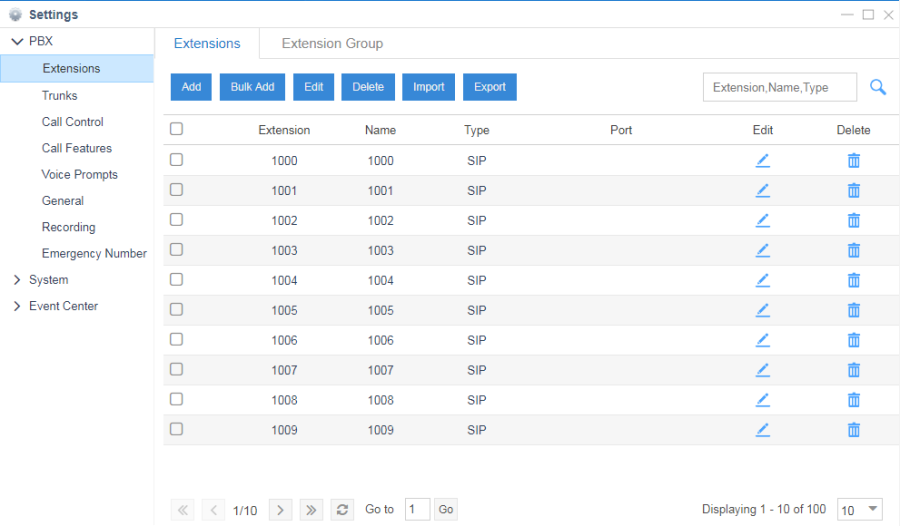
1. Settings→PBX→Extensions. Click "Add".
 2. Set the extension. The extension settings are divided into the following four sections: Basic, Features, Advanced, Call Permission.
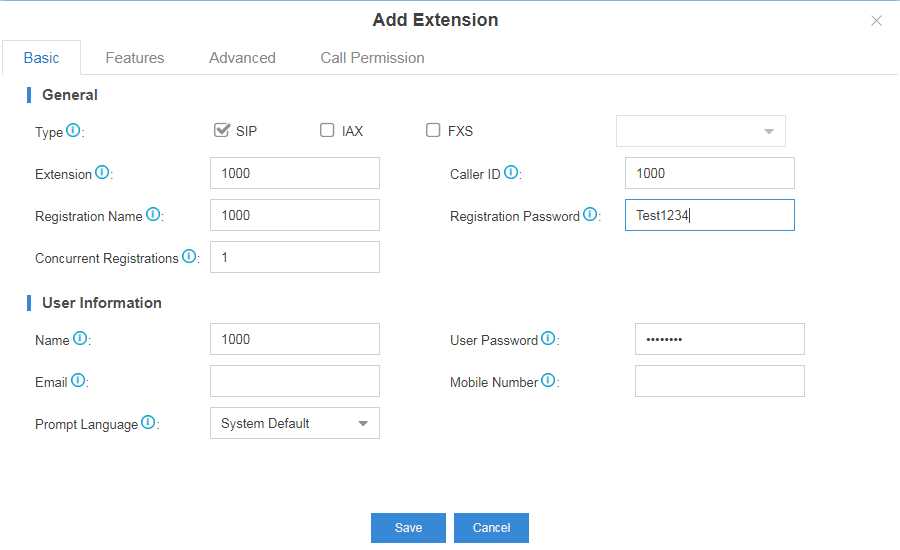 You can configure general settings and user information on the Basic page. The type of the extension is usually selected as SIP. You can edit the extension number, call ID, maximum concurrent registrations, registration name and registration password to register on the phone.
Note: The registration password is required to be at least 8 characters and must contain numbers and both uppercase letters and lowercase letters.
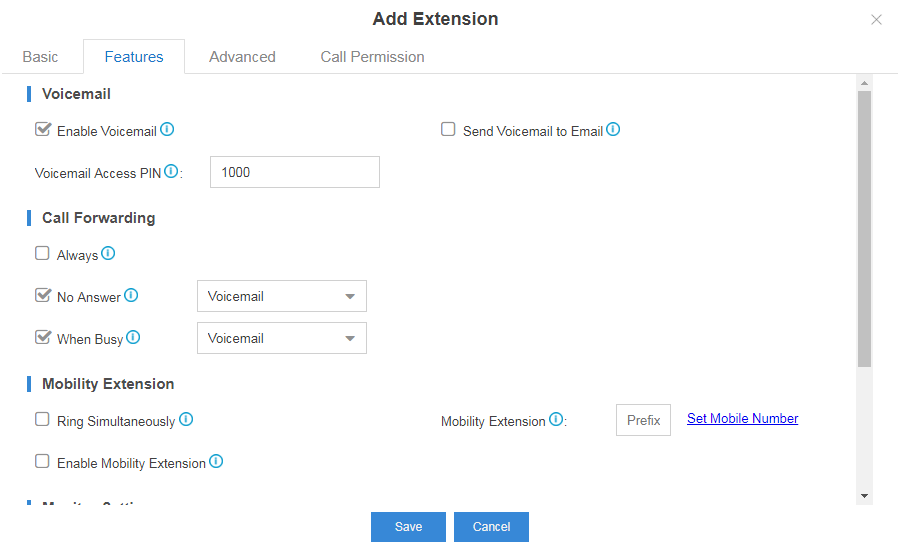
 You can configure voicemail, call forwarding, mobility extension, monitor settings, ring timeout, maximum call duration and DND on the Features page.
 You can configure VoIP settings and IP restriction on the Advanced page. You can select the protocol for transport, the mode for sending DTMF tones and enable SRTP for voice encryption on this page.
 You can select outbound routes and configure outbound dialing restriction for this extension on the Call Permission page.
3. Click "Save" to save the settings.
 Note: Each time you save the settings; you need to click "Apply" on the right side of the taskbar to make the settings effective.
To add bulk extensions
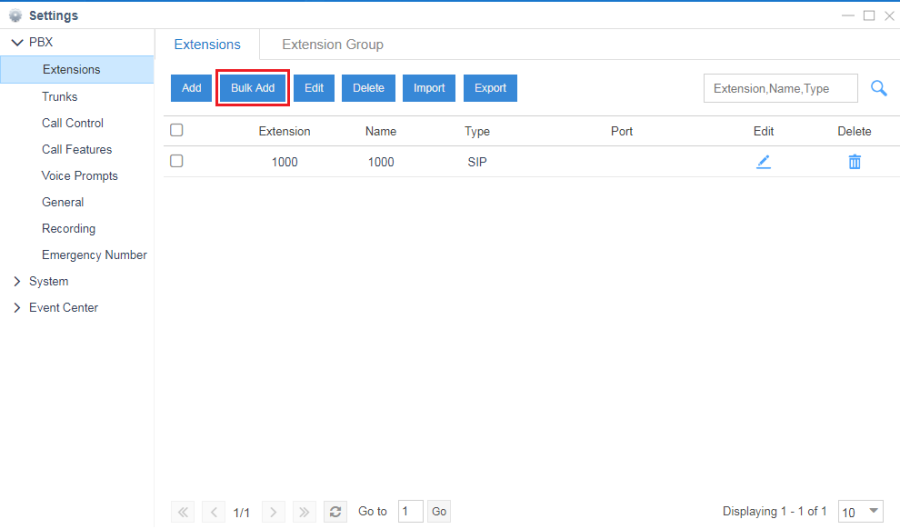
1. Settings→PBX→Extensions. Click "Bulk Add".
 2. Set the extensions. The bulk extensions settings are divided into the following four sections: Basic, Features, Advanced, Call Permission.
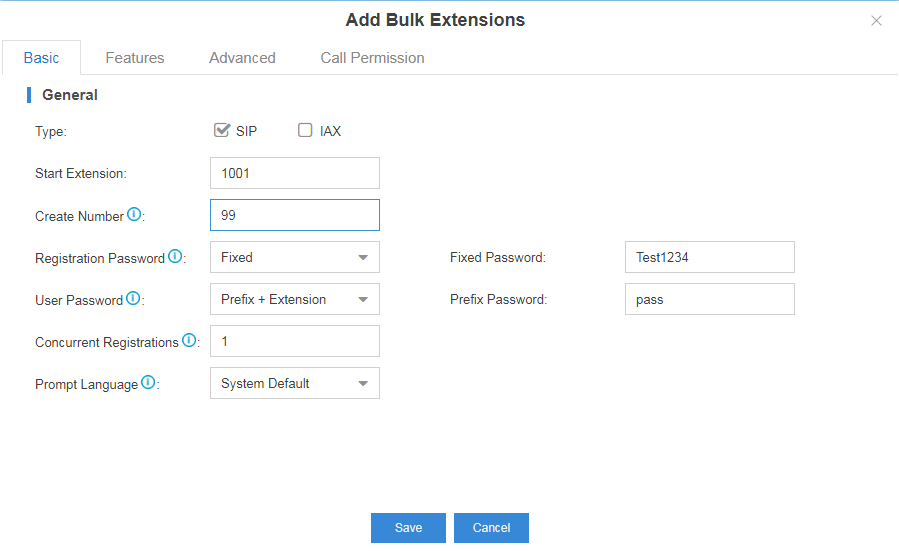 The type of the extension is usually selected as SIP. You can configure the start extension number, the number of extensions to be created, the type of registration password, the type of user password, maximum concurrent registrations and the language of voice prompts on the Basic page. The types of registration password are Random, Fixed and Prefix + Extension.
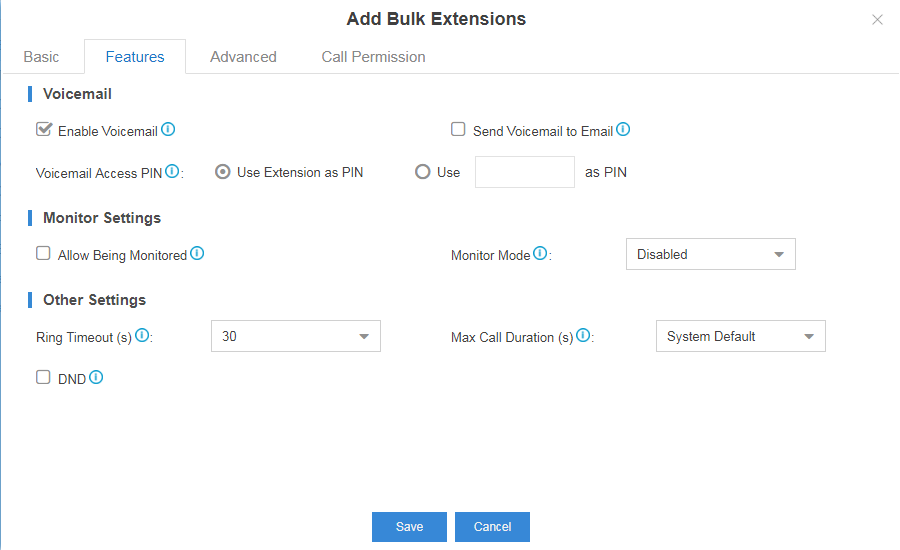 You can configure voicemail, monitor settings, ring timeout, maximum call duration and DND on the Features page.
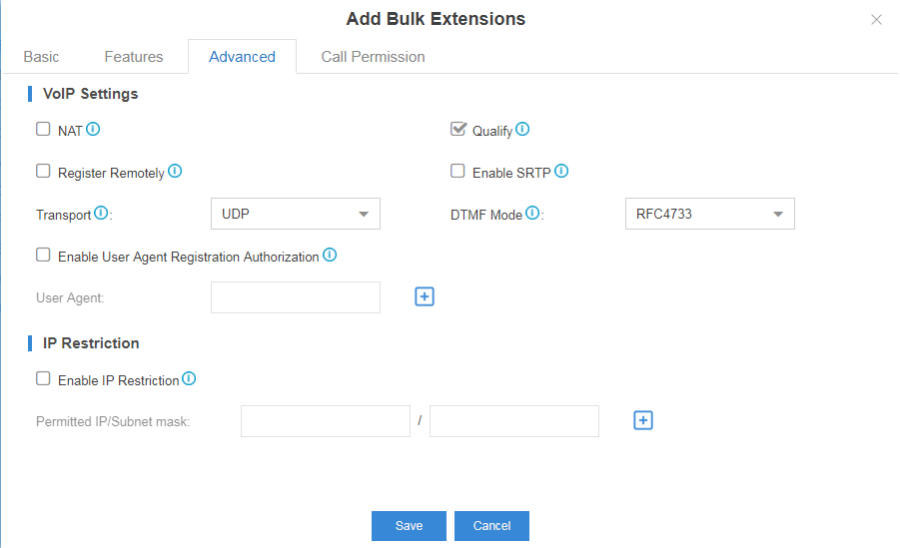 You can configure VoIP settings and IP restriction on the Advanced page. You can select the protocol for transport, the mode for sending DTMF tones and enable SRTP for voice encryption on this page.
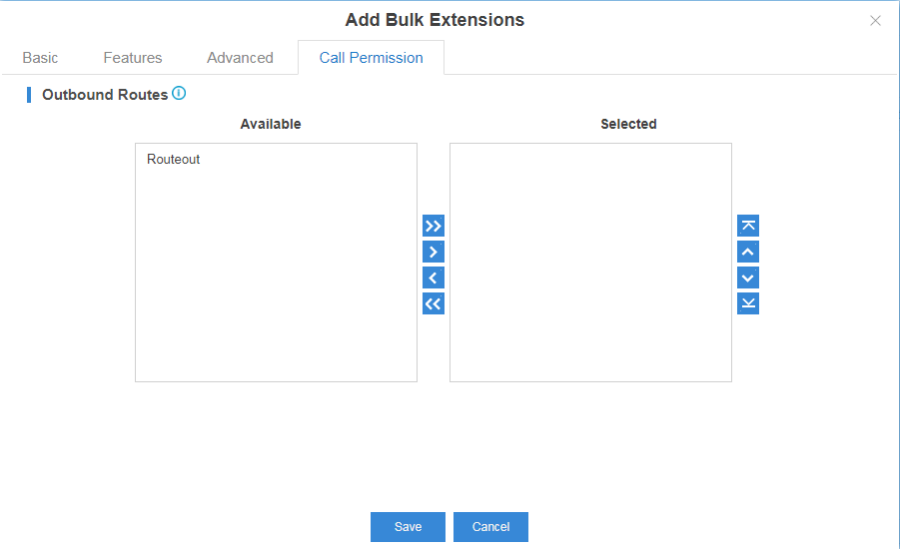 You can select outbound routes on the Call Permission page.
3. Click "Save" to save the settings.
To Register an Extension to the phone
Over View
To use the Htek phone with Yeastar S100, you need to configure an extension on the phone. The following chapter will show the operating.
Operating Instructions
1. Choose an extension for your phone.
Auto Provisioning→Device List. Edit the phone and select the previously added extension as the Account.
 Click "Save", then "Reboot phone now?" will be shown. Click "Yes" to reassign the extension.
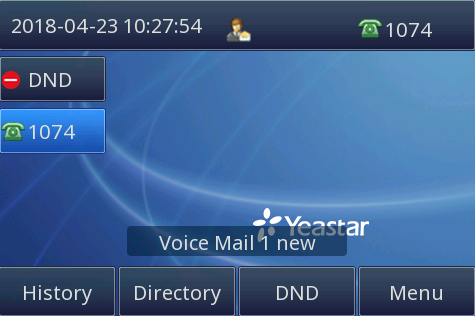
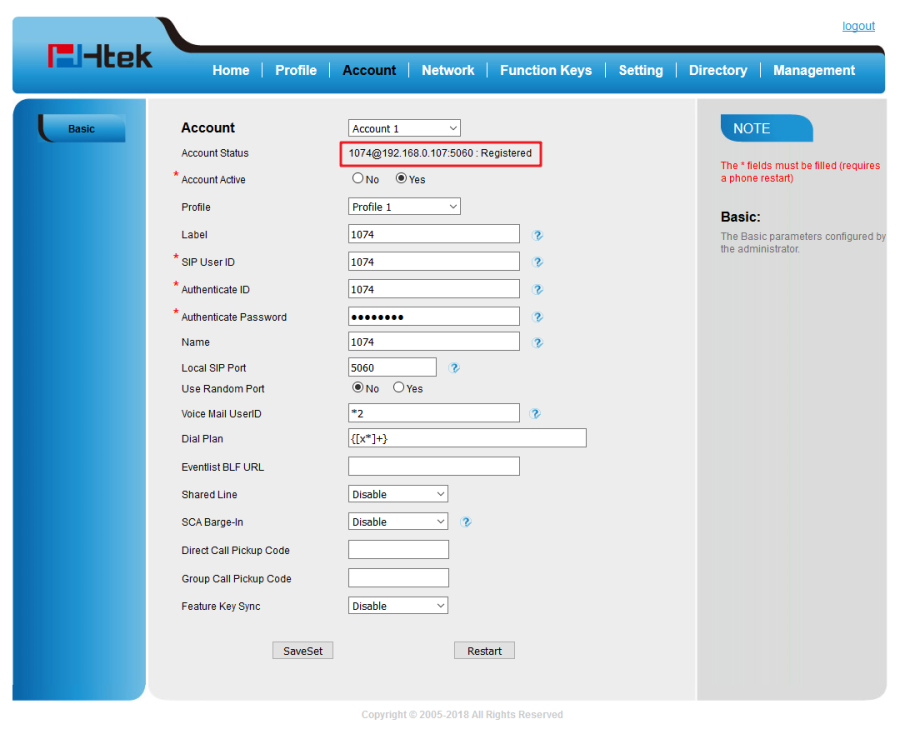
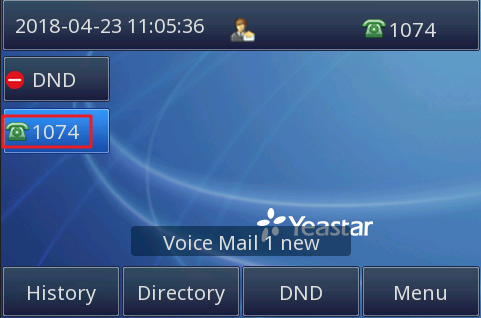
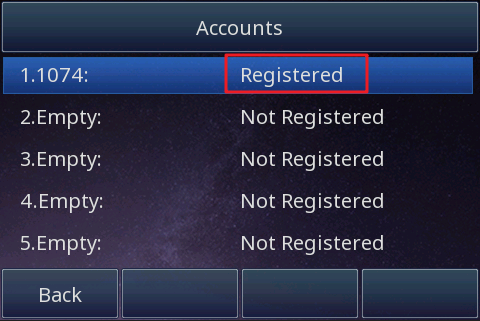
 2. If the extension has registered successfully, you will see the account status is registered on the web page and in the phone's screen.
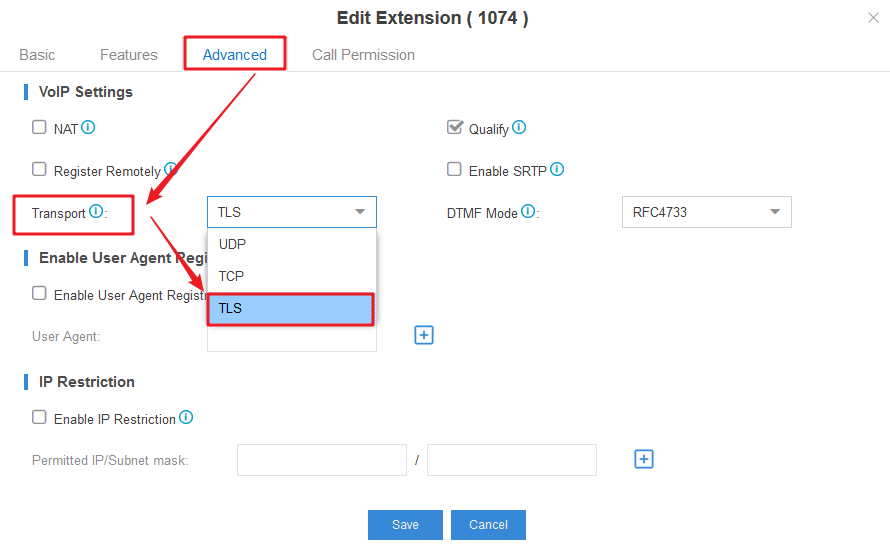
Security Transport
The default transport type is UDP. for security, you can choose TLS as the transport type.
To do this, select TLS on the Advanced page when you add an account.
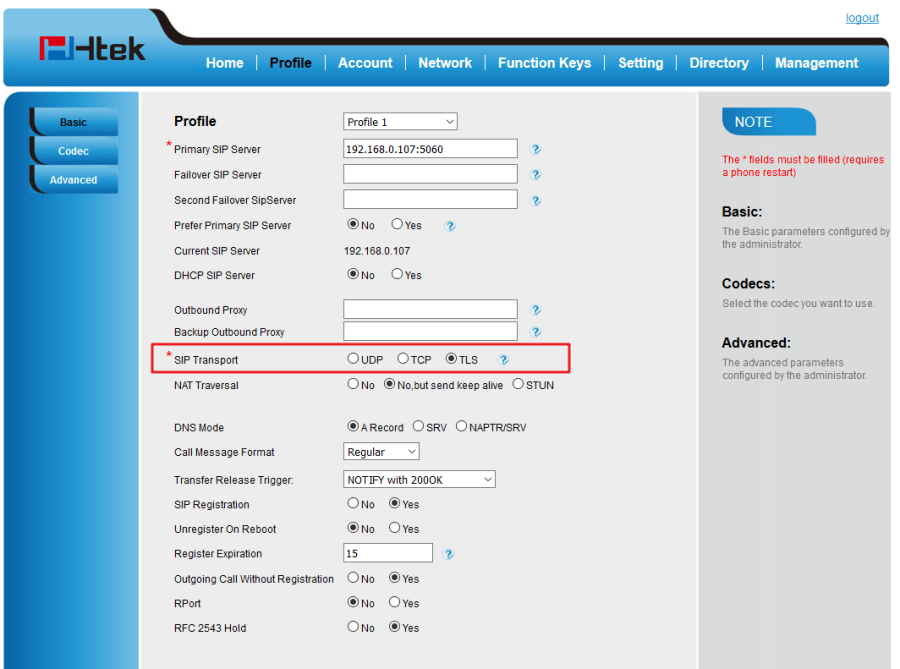
 After successful registration, you can check the transport type on the Profile page of phone's WEB GUI.
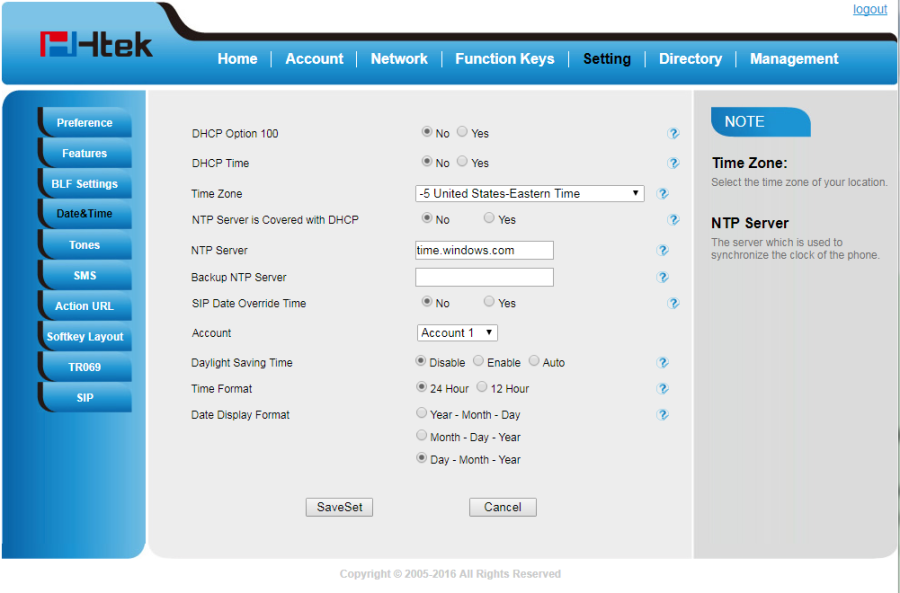
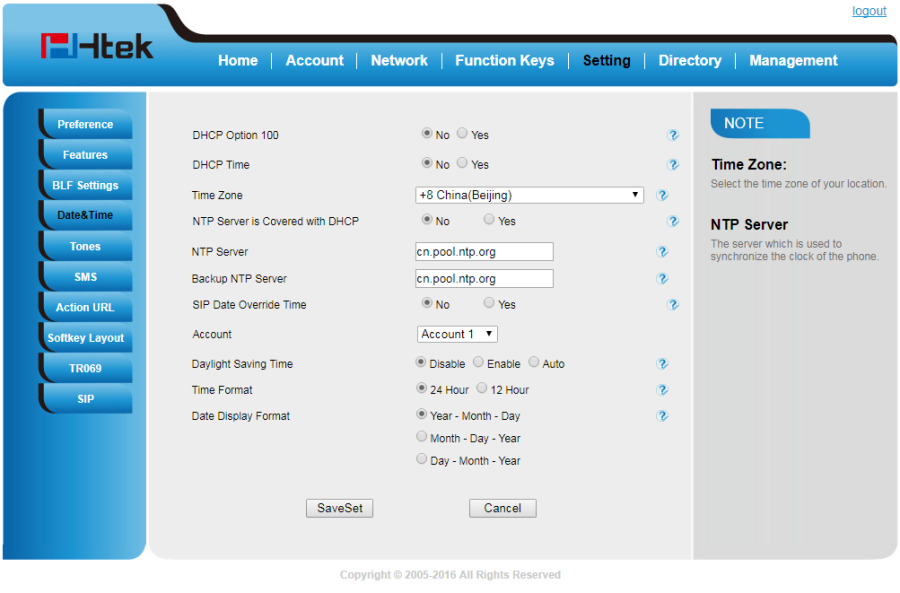
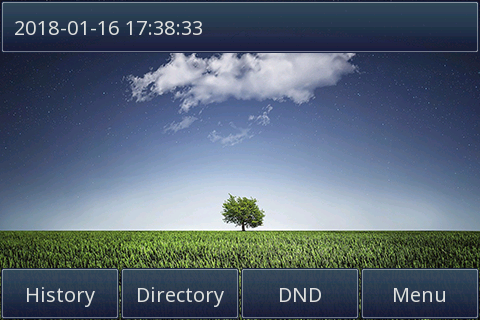
Time&Date
To configure the Time&Date via Auto Provisioning:
You can configure Time Zone, NTP server, time format and date format in Auto Provisioning→Edit Device→Preference.
 After auto-provisioning, the configuration of Time&Date will be applied in the phone.
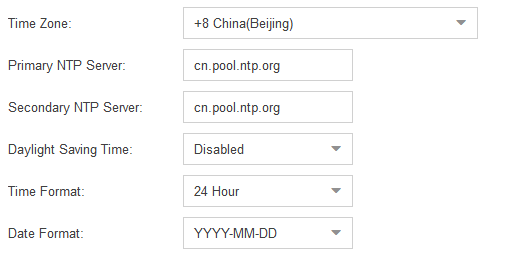
Before auto-provisioning:
 After auto-provisioning:
Phone Display Language
To configure the Display Language via Auto Provisioning:
You can configure Language in Auto Provisioning→Edit Device→Preference.
 After auto-provisioning, the configuration of Language will be applied in the phone.
Before auto-provisioning:
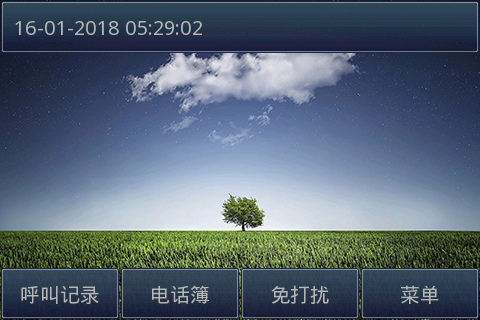 After auto-provisioning:

IVR
Over View
IVR is Interactive Voice Response. It can lead incoming calls to IVR voice, and people can dial number according to the IVR prompt.
How to Configure
1. Settings→PBX→Call Features→IVR.
You can add or edit IVR here.
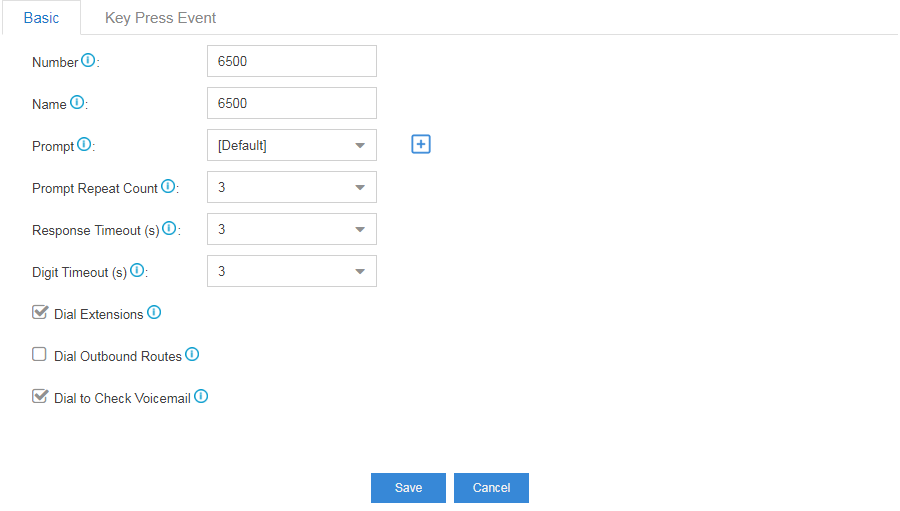
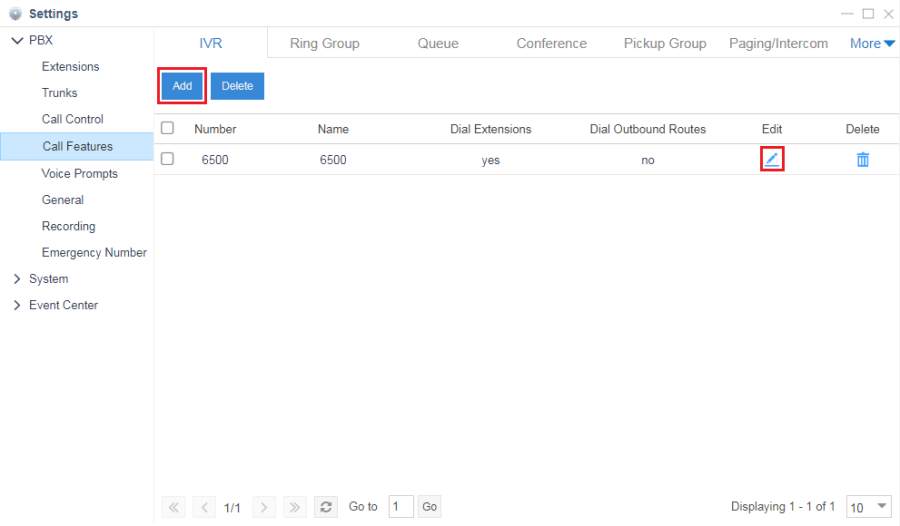 2. Set some basic settings.
1) "Number" is the extension number dialed to reach this IVR.
2) "Prompt Repeat Count" is the number of times that the selected IVR prompt will be played.
3) "Response Timeout" is the number of seconds to wait for a digit input after prompt. If no input is received, it will repeat the prompt according to the Repeat Count settings until it has finished the repeat. After that, the call will go to the Timeout destination set in Key Press Event.
4) "Digit Timeout" means that after the user enters a digit, the user needs to enter the next digit within the timeout (in seconds).
5) Enable "Dial Extension" allows the caller to dial extension directly.
6) Enable "Dial to Check Voicemail", then the caller will be allowed to dial "*02" to check voicemail after entering IVR.
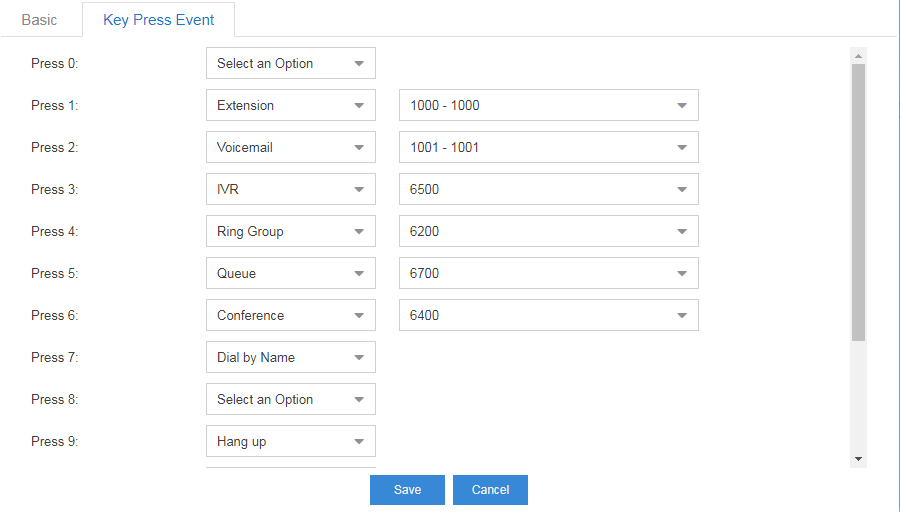
 3. Set Key Press Event. You can set press numbers to trigger different phone events here.
"Timeout" defines the timeout action. A timeout occurs after the IVR has finished playing for the number of times specified by the "Repeat Count" field on the Basic page.
"Invalid" defines the invalid action. The invalid action is triggered if the user enters a DTMF digit that is not defined for this IVR.

How to Use
1. If you call the number you set in "IVR", you will reach the IVR and hear the IVR voice.
2. The default prompt is to let you press the number you want. You can implement the functionality you want to use by pressing the appropriate key.
Call Forward
Over View
When your phone is ringing, but you don't want to answer it or are not free to answer it, you can forward the call to others.
How to Configure
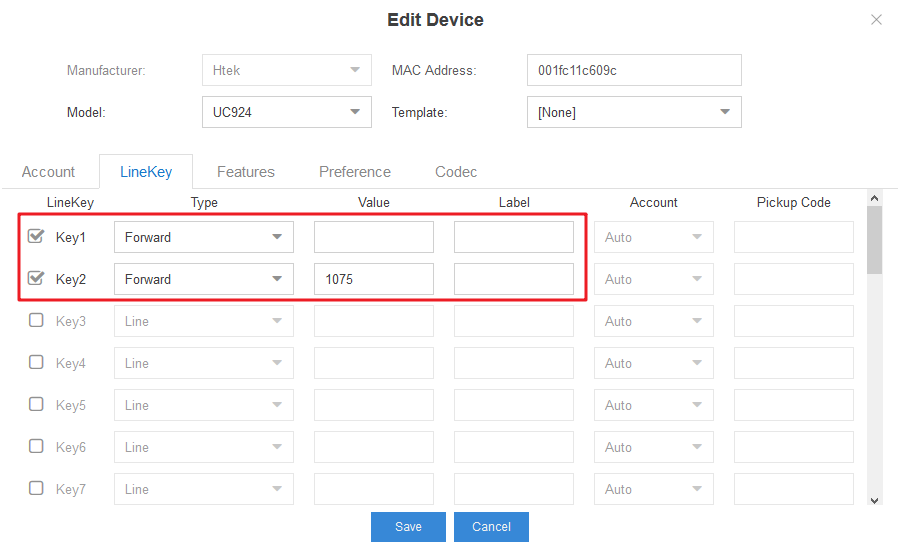
1. Auto Provisioning→Edit Device→LineKey/Memory Keys Settings.
You can configure a LineKey or a Memory Key as "Forward". The value of the Forward key is filled with blank or an extension number.
 2. Click "Save", then "Reboot phone now?" will be shown. Click "Yes" to provision the phone.
 3. After rebooting, the phone will apply the configuration.
How to Use
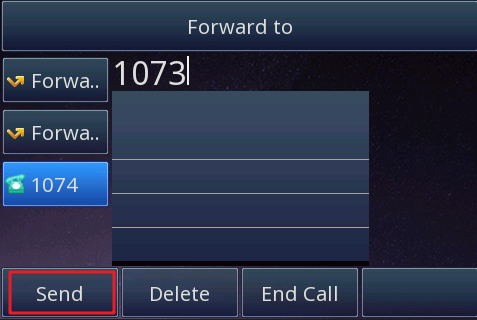
The value of the Forward key is blank:
This configuration applies that you do not have a fixed Forward target. So you can choose your Forward target as needed when receiving an incoming call.
Press the Forward Key, and press Send after you finish the target extension number. The call has been transferred with the value of Forward Key is still blank, so you can choose another target when you want to forward an incoming call next time.
 The value of the Forward key is the extension you want to forward to:
If you have a fixed forward target, you can fill in the target extension number when configuring the Forward Key or set the blank value of the Forward Key to the target number previously.
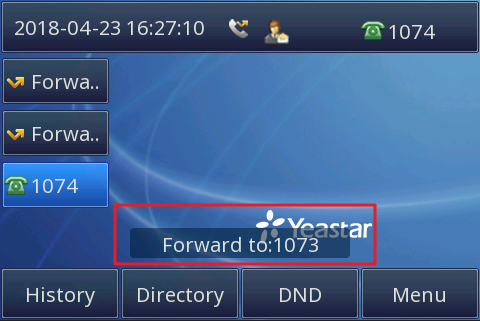
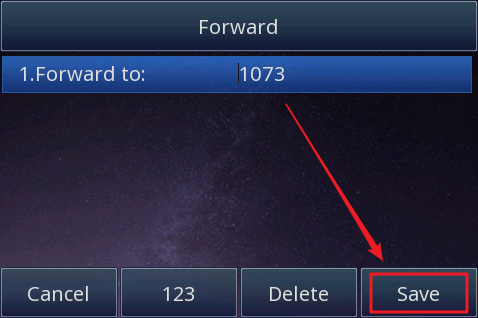 Before you forward an incoming call, you should press the Forward Key to set your phone status to Forward to: target extension.
Call Transfer
Over View
Yeastar supports three types of Transfer: Blind Transfer, Attended Transfer, Semi-Attended Transfer.
Blind Transfer: transfer a call directly to another party without consulting.
Attended Transfer: transfer a call with prior consulting.
Semi-Attended Transfer: transfer a call once you have determined that the target is accessible.
How to Configure
- Auto Provisioning→Edit Device→LineKey/Memory Keys Settings.
You can configure a LineKey or a Memory Key as Transfer.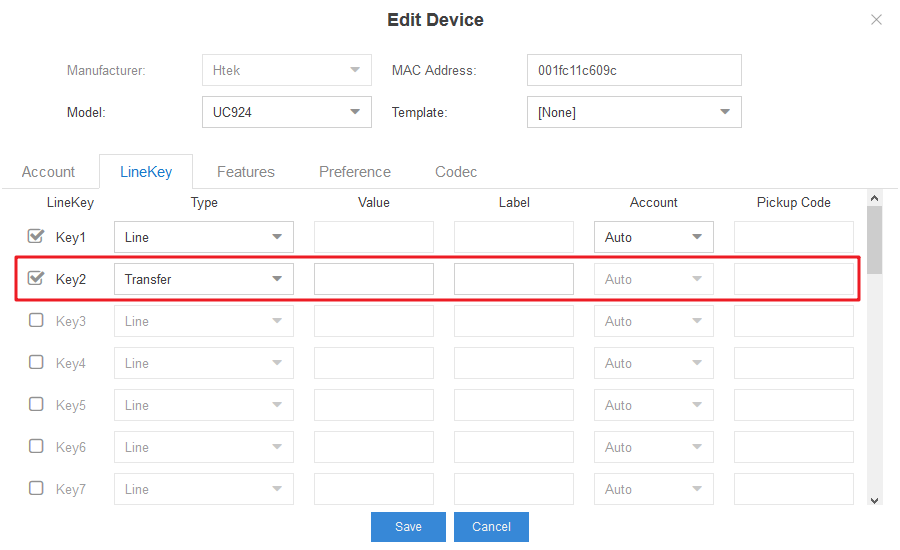

- Click Save, then Reboot phone now? will be shown. Click Yes to provision the phone.
- After rebooting, the phone will apply the configuration.
How to Use
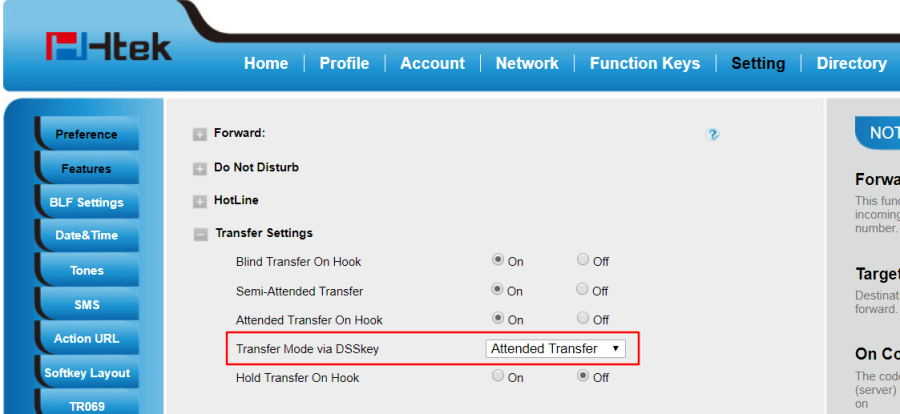
There are two configurations of Transfer Key. The value is blank or the extension number of Transfer target.
1. The value is the extension number of Transfer target
This configuration applies that you do not have a fixed Transfer target. So you don't need to enter the transfer extension number when using.
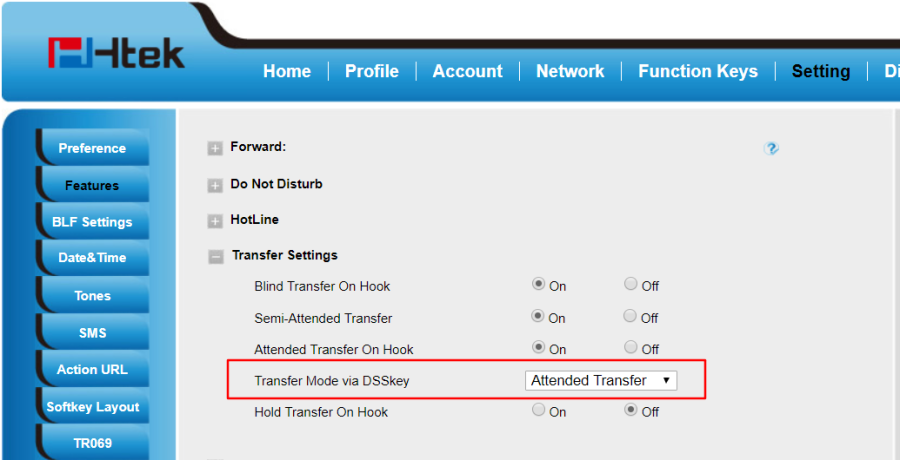
Tip: This configuration is limited by Transfer Mode via DSSkey setting. And you cannot change the Transfer type when you use it unless you select another Transfer Mode here.
2. The value is blank:
This configuration is suitable for dynamically selecting the transfer destination. You can choose the Transfer type when you use it, but you need to manually enter the extension number.
Operations
1. Attended Transfer
- When you are talking with B, press the Transfer key, then B will be held.
- If the value is blank, enter the extension number of C and press Send.
- C will ring.
- After C answers the call, you can consult with him.
- If C agree to talk with B, you press Transfer again.
- If C don't want to talk with B, C end the call, and you continue to talk to B.
2. Semi-Attended Transfer:
- When you are talking with B, press the Transfer key, then B will be held.
- If the value is blank, enter the extension number of C and press Send.
- C will ring.
- Before C answers the call, press Transfer again.
- The call is transferred to B and C.
3. Blind Transfer
- When you are talking with B, press the Transfer key, then B will be held.
- If the value is blank, enter the extension number of C and press Transfer again.
- The call is transferred to B and C.
Do Not Disturb
Over View
You can enable DND when you don't want to receive any calls. DND has two style: Local and Server.
How to Configure
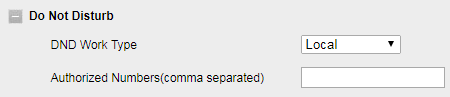
1. Local:
To configure DND via LineKey/Memory Key:
1. Yeastar S100 System: Auto Provisioning→Edit Device→LineKey/Memory Keys Settings.
You can configure a LineKey or a Memory Key as "DND".
 2. Click "Save", then "Reboot phone now?" will be shown. Click "Yes" to provision the phone.
3. After rebooting, the phone will apply the configuration.
4. The webserver of the phone: Setting→Features→Do Not Disturb.
DND Work Type is chosen as Local.
2. Server:
To enable DND via Settings in Yeastar S100 System:
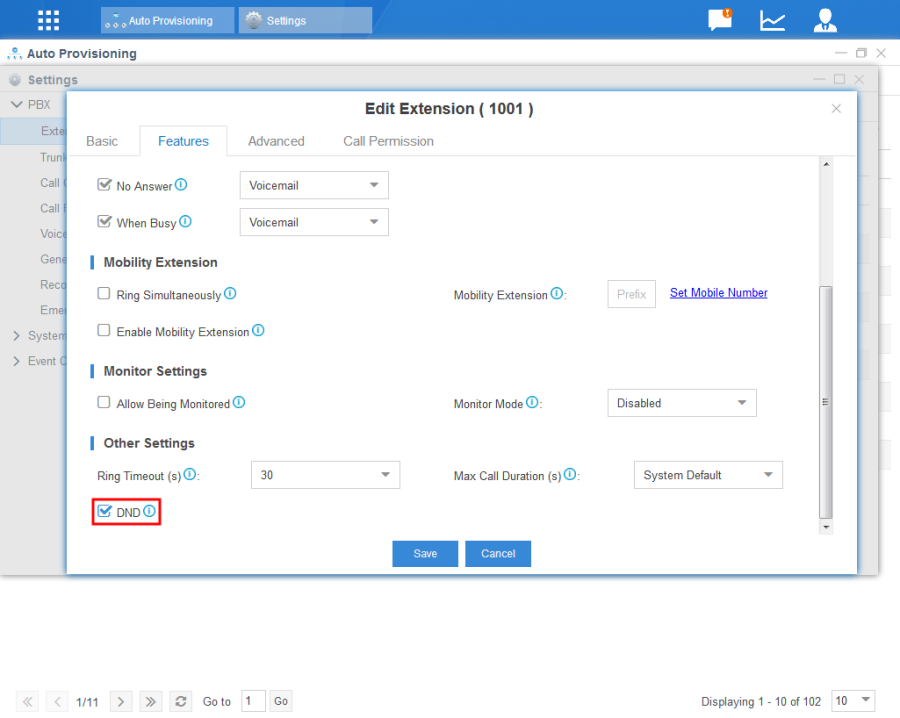
Settings→PBX→Extensions→Edit Extension→Features→Other Settings→DND.
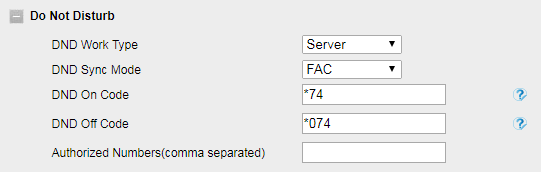
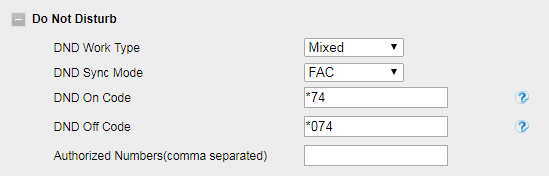
 To enable DND via Feature Codes of Yeastar S100 System:
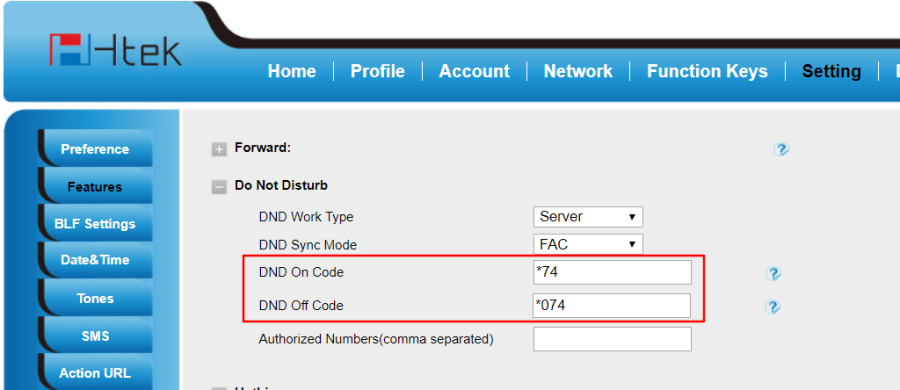
1. Yeastar S100 System: Settings→PBX→General→Features. The code of Enable Do Not Disturb is *74, and the code of Disable Do Not Disturb is *074.
 2. The webserver of the phone: Setting→Features→Do Not Disturb.
DND Work Type is chosen as Server or Mixed. DND Sync Mode is chosen as FAC. DND On Code is filled with the code of Enable Do Not Disturb in the Yeastar S100 System. DND Off Code is filled with the code of Disable Do Not Disturb in the Yeastar S100 System.
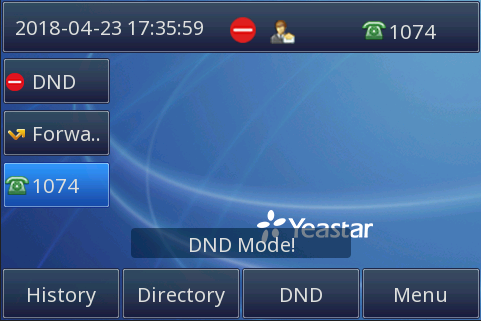
How to Use
Set the phone to DND
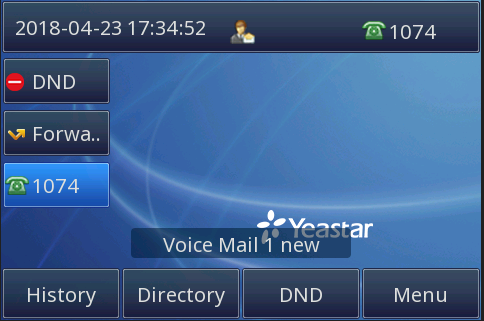
- Configure a Line Key as DND.
- Phone's WEB GUI → Setting → Features → Do Not Disturb → Local.
Tip: If you set the phone to DND, all the accounts will not receive any incoming call.
 Set one of the accounts to DND
- Configure a Line Key as DND.
- Phone's WEB GUI → Setting → Features → Do Not Disturb → Server/Mixed.
- Fill in the Code set in the Yeastar Server.
Tip: If you like, you can dial the Code manually.
BLF
Over View
You can use BLF to monitor a specific line for status changes on the phone. The BLF key turns into red when the specific line is in use. You can use BLF key to dial out the monitored phone number when the monitored line is idle. You can also pick up calls that are received on the monitored line or transfer a call to the monitored line.
How to Configure
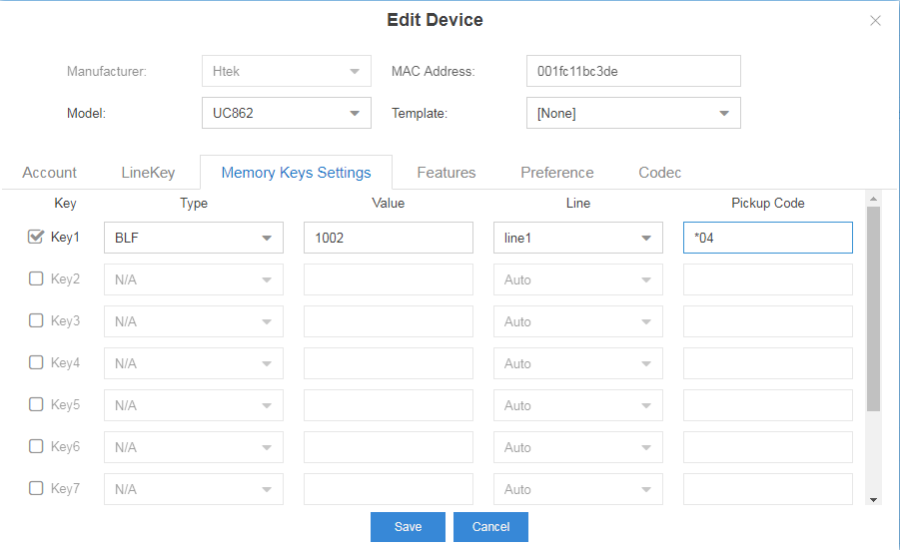
1. Auto Provisioning→Edit Device→Line Key/Memory Keys Settings.
Set a key as BLF. Fill in pickup code and the phone number you want to monitor.

 2. Click save, and the phone will reboot.
3. After rebooting, you will see BLF key in the screen.
How to Use
To monitor a specific line for status changes:
1. The BLF key's light will be solid green and icon will be solid blue or green (UC9 Series Color Phones) when the monitored number is in idle status.
UC8 Series: 
UC9 Series: 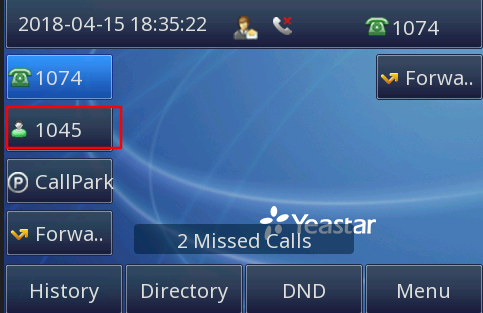
2. The BLF key's light will be flashing red and icon will be solid yellow or red (UC9 Series Color Phones) when the monitored number has an incoming call.
UC8 Series: 
UC9 Series: 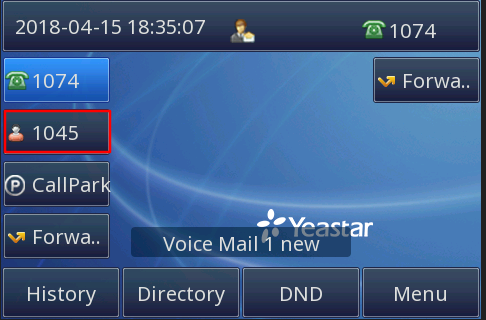
3. The BLF key's light will be solid red and icon will add a yellow handset or be solid red (UC9 Series Color Phones) when the monitored number is dialing or talking.
UC8 Series: 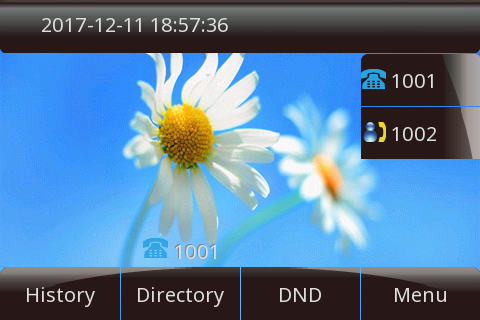
UC9 Series:
To pick up calls that are received on the monitored line:
When the monitored number has an incoming call, you can press the BLF key to pick up the call.
To transfer a call to the monitored line:
When you are talking with another extension (not the monitored extension), you can press the BLF key to transfer to the monitored extension.
The type of Transfer depends on the configuration on Transfer Settings.
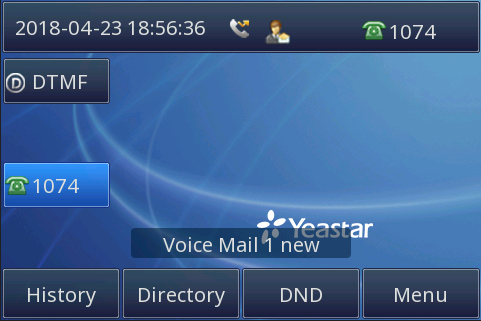
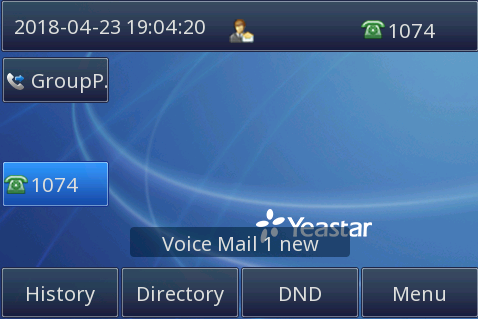
Voicemail
Over View
If your number is unavailable, others can leave a voice message to you by the feature of voicemail.
Preconditions
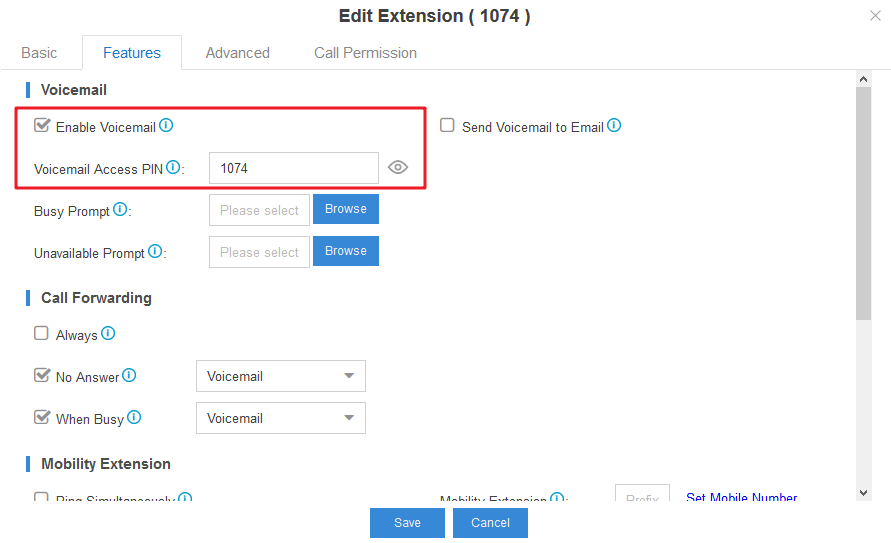
1. Settings→PBX→Extensions→Edit→Features.
Enable voicemail and configure the password (Voicemail Access PIN).
 2. Settings→PBX→General→Voicemail.
Configure some settings of voicemail.
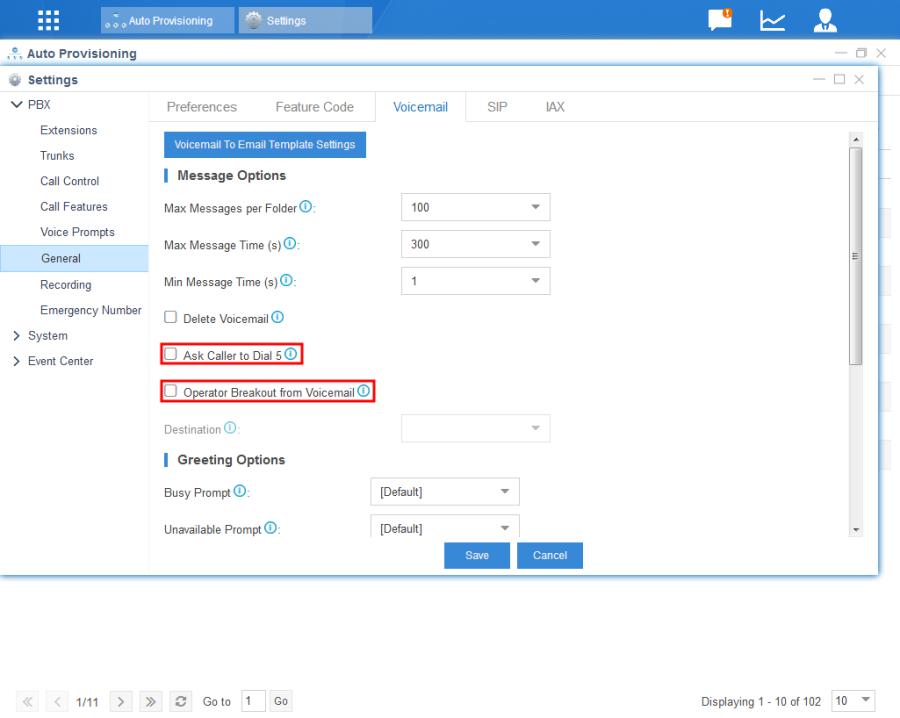 If you enable "Ask Caller to Dial 5", you need to dial 5 before you start recording your voicemail.
If you enable "Operator Breakout from Voicemail", you can dial 0 to exit the voicemail and go to the destination you set, the destination is IVR.
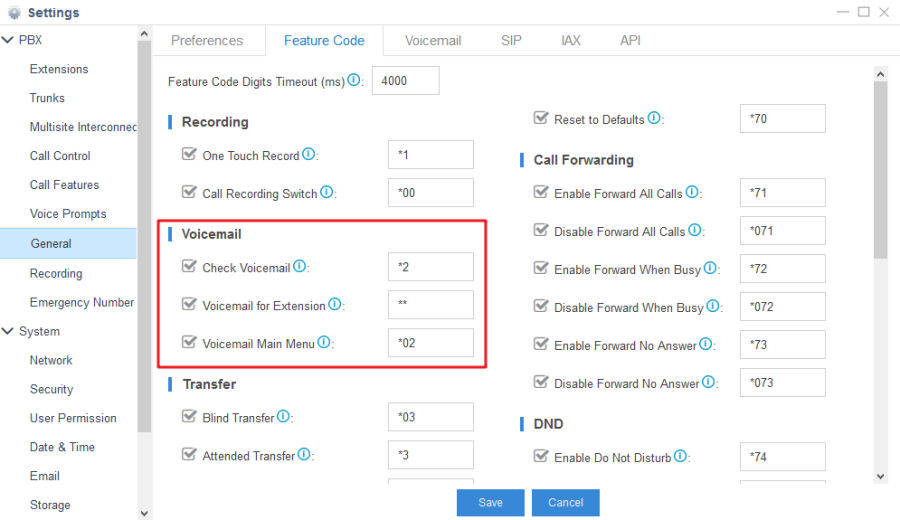
3. Settings→PBX→General→Feature Code
Check Voicemail by dialing *2.
Enter the Voicemail Main Menu by dialing *02.
Send Voicemail to the target directly by dialing **+extension number.
How to Configure
To configure Voicemail via auto-provisioning an extension:
1. Auto Provisioning→Edit Device→Account.
Assign an extension to the phone.
2. Click "Save", then "Reboot phone now?" will be shown. Click "Yes" to provision the phone.
 To configure Voicemail via LineKey/Memory Key:
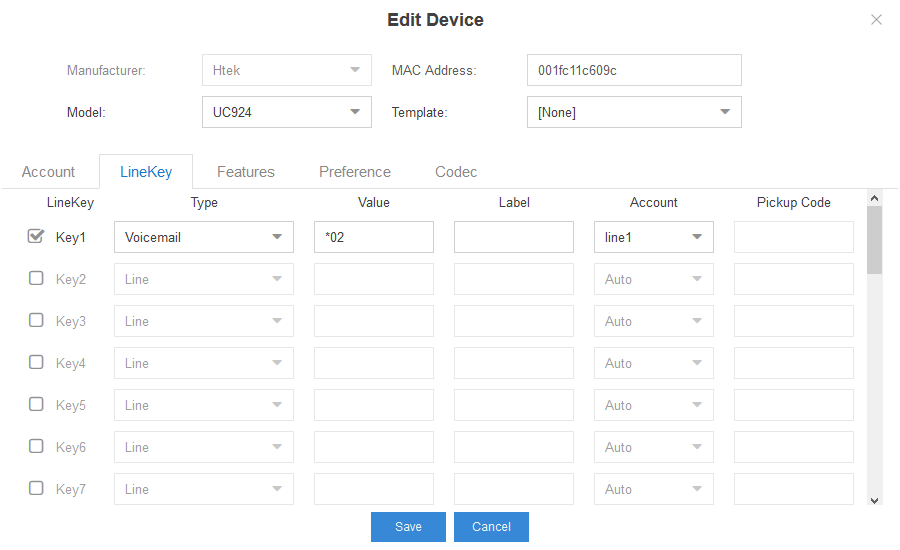
1. Auto Provisioning→Edit Device→LineKey/Memory Keys Settings.
You can configure a LineKey or a Memory Key as "Voicemail".
 2. Click "Save", then "Reboot phone now?" will be shown. Click "Yes" to provision the phone.
3. After rebooting, the phone will apply the configuration.
How to Use
To configure Voicemail via auto-provisioning an extension:
1. After rebooting, the phone will get the " Voice Mail UserID". Enter the web interface→Account→Basic.
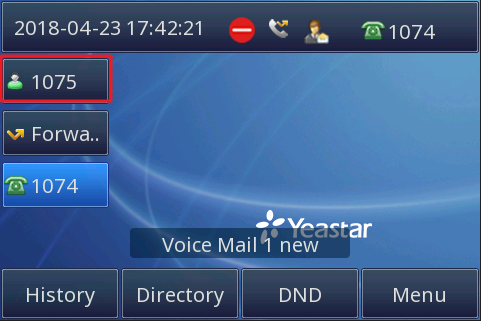
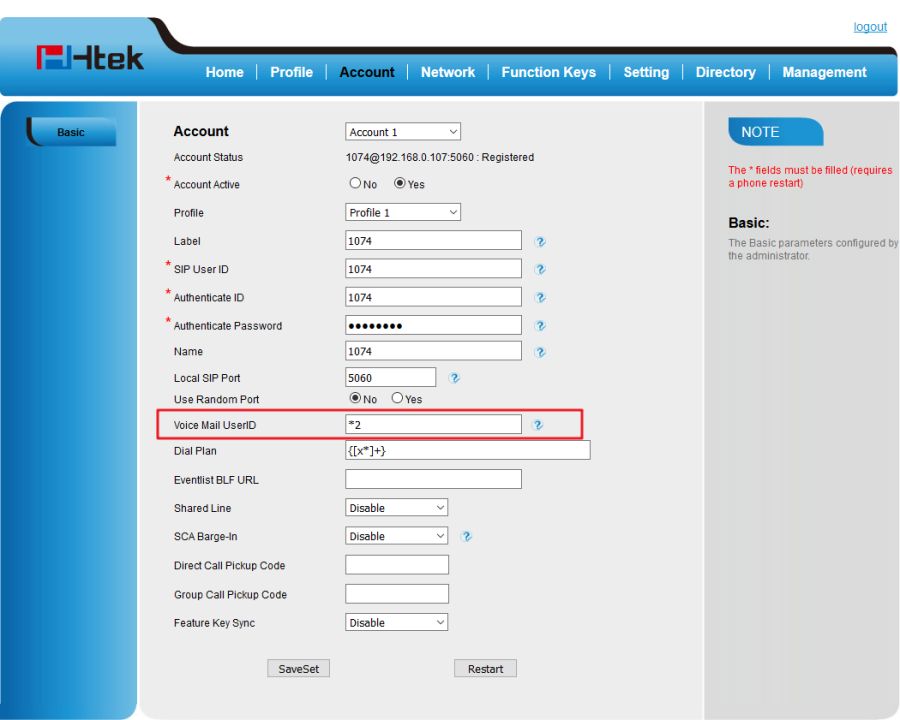 2. Press the Message function key. The prompt asks you for password. After inputting the password of voicemail of the extension, you will enter your voicemail menu.
To configure Voicemail via LineKey/Memory Key:
The value of the Voicemail key is *2:
1. Press the Voicemail key.
2. Input the password of voicemail of your extension.
3. Enter your voicemail menu.
4. Press the key according to the prompt to reach the function you need.
The value of the Voicemail key is "* + extension number":*
1. Press the Voicemail key.
2. Leave a message to the extension you set.
3. Hang up or press "#" to exit.
The value of the Voicemail key is "*02":
1. Press the Voicemail key.
2. Input the extension whose voicemail you want to listen to.
3. Input the password of voicemail of the extension.
4. Enter the voicemail menu of the extension you input.
5. Press the key according to the prompt to reach the function you need.
Conference
Over View
You can create a conference room in Yeastar. It allows you initiate or join a multi-party call.
How to Configure
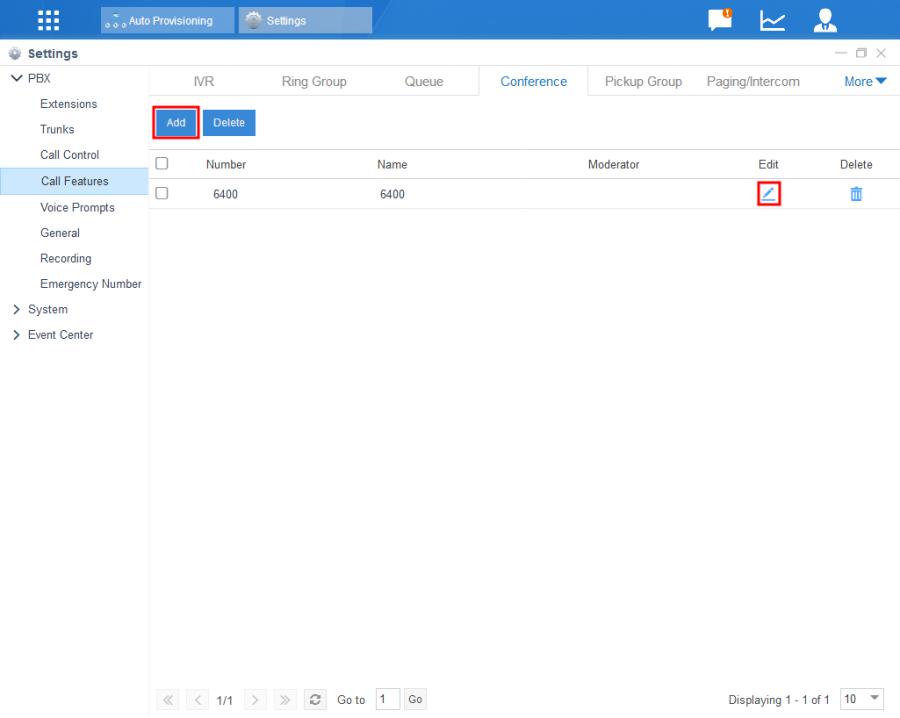
1. Settings→PBX→Call Features→Conference
Add or edit a conference room.
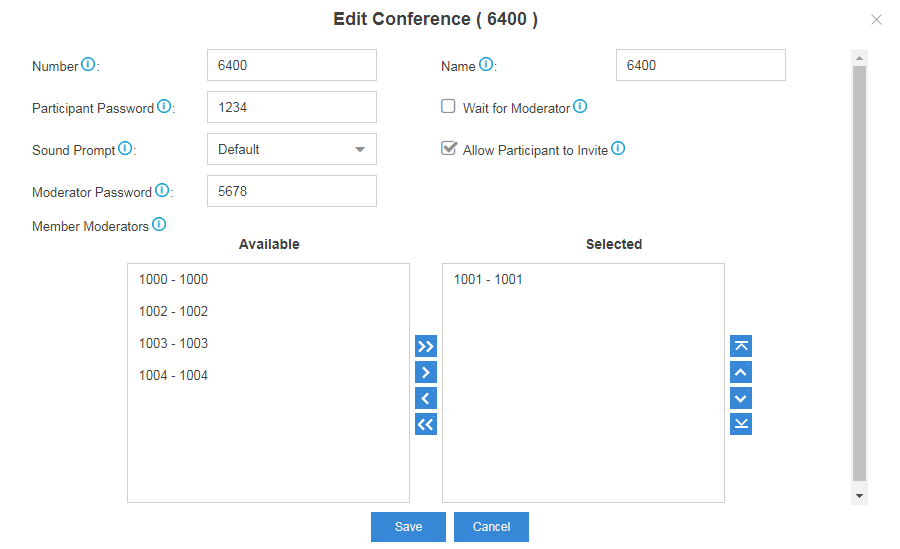
 2. Configure the conference room.
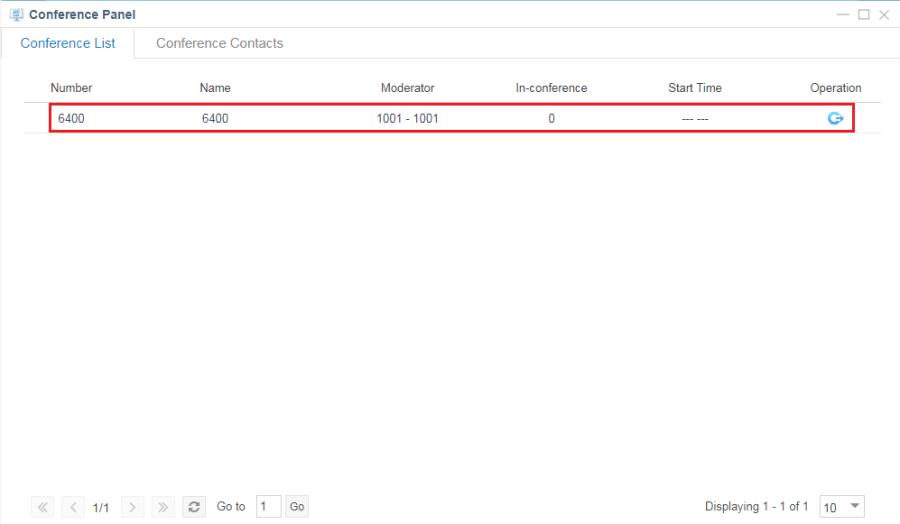
"Number" is the number dialed to reach this conference room. It is cannot be blank.
If "Participant Password" is set, the participants need to enter the password to join the conference.
The participant who has not been assigned a moderator role can enter "Moderator Password" to take on the role.
You can also select an extension as moderator that does not need to enter password when joining conference if you have set "Participant Password".
How to Use
To dial the conference number directly:
If your extension is one of the member moderators, you can directly join the conference room without the password.
If your extension is not the member moderators, you need to input the Participant password or Moderator password to enter the conference room.
To enter Conference Panel (if not found, it can be installed in App Center):
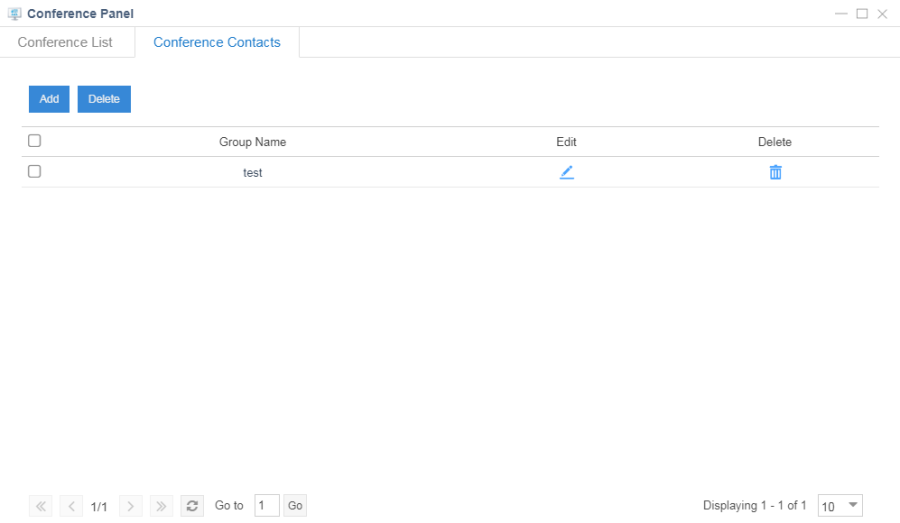
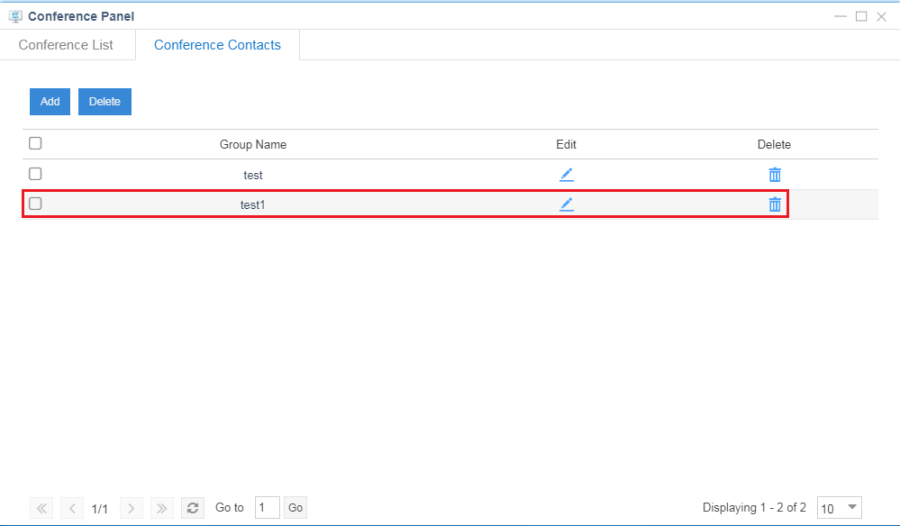
1. Conference Contacts:
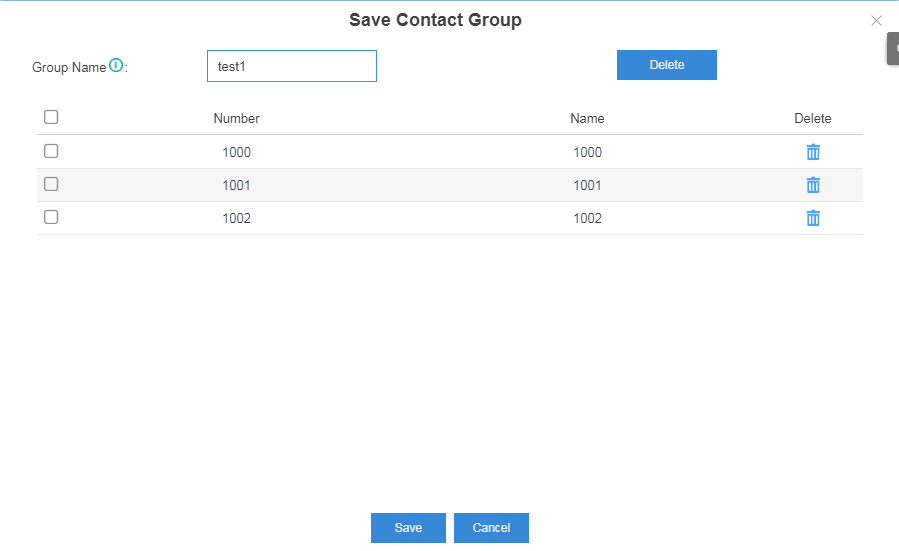
(1) Click "Add".
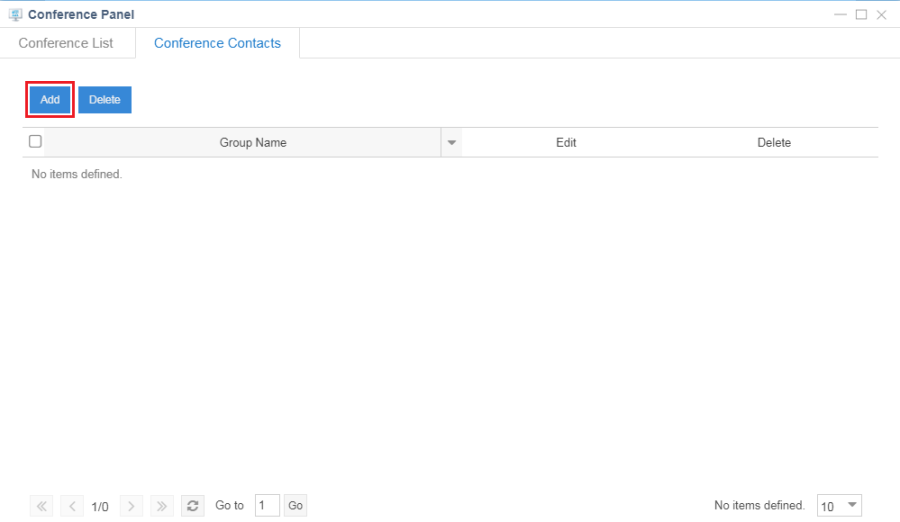 (2) Set "Group Name". It cannot be null.
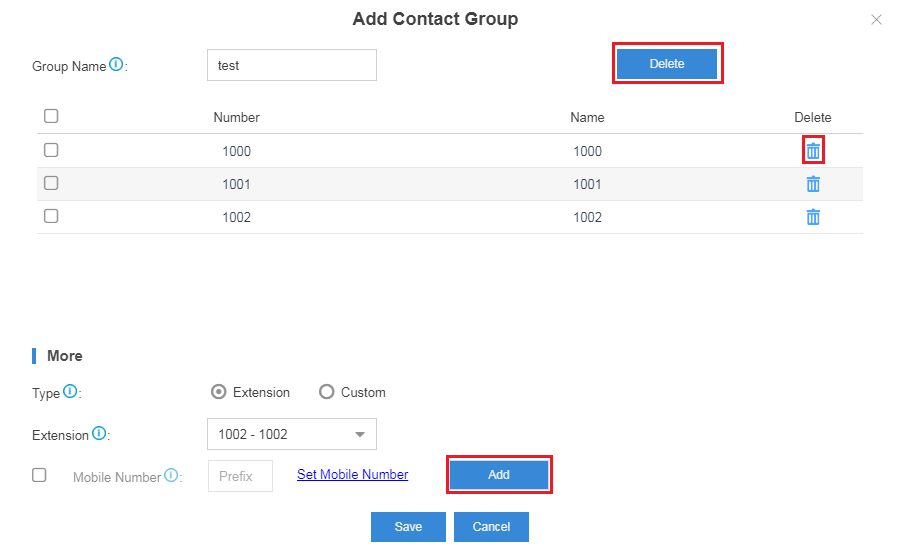
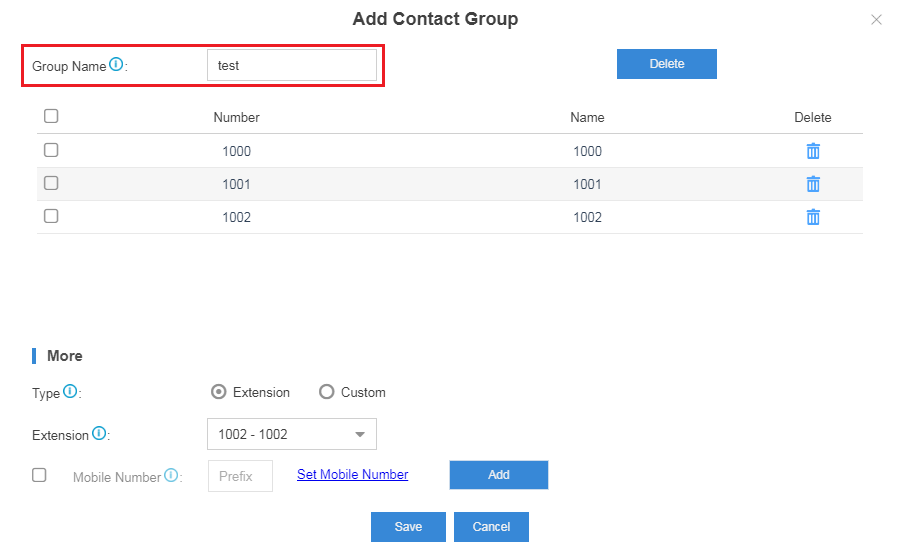 (3) Add or delete extensions.
 (4) Save the configurations and the contact group will be shown in the list.
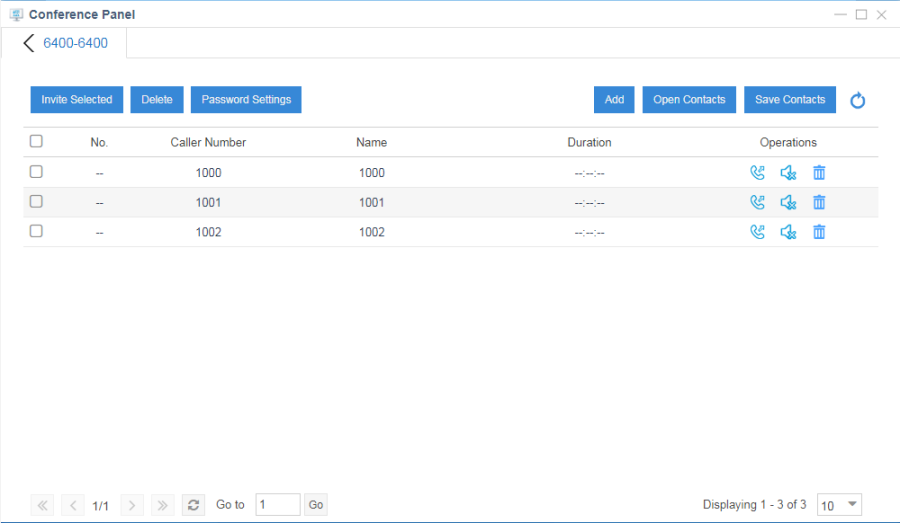
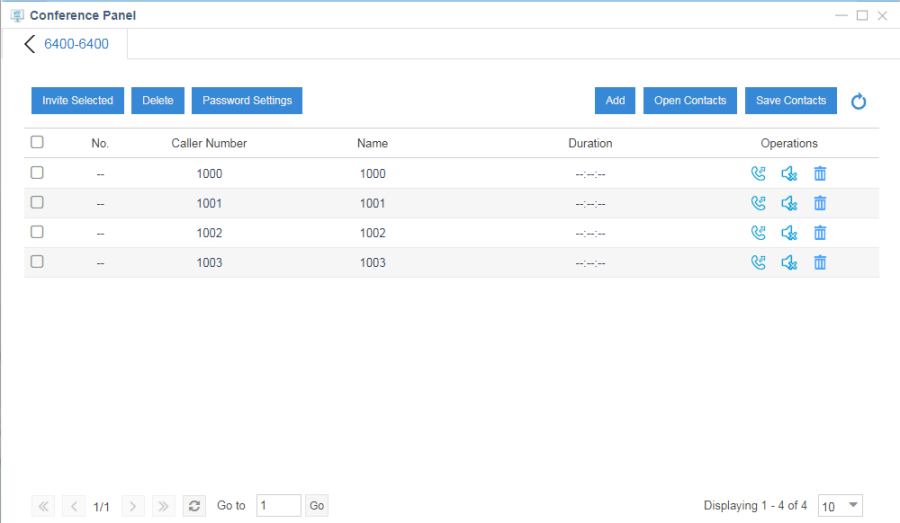
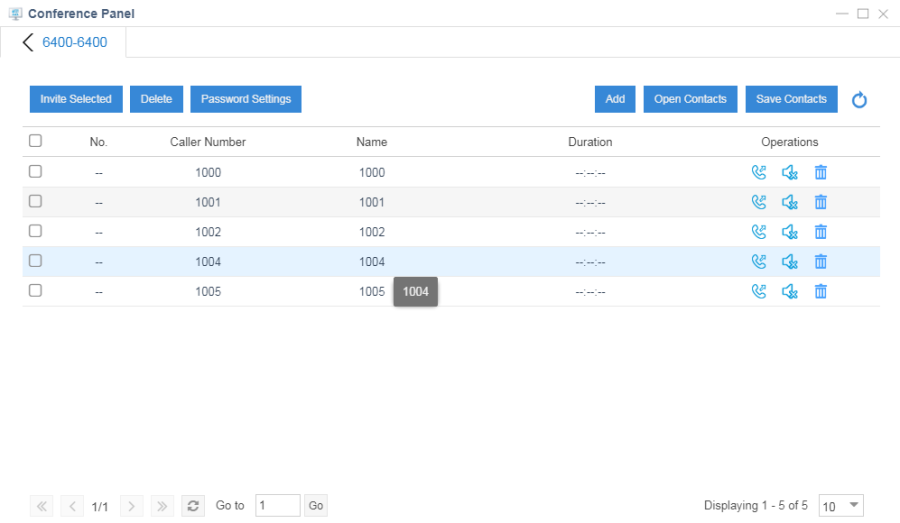
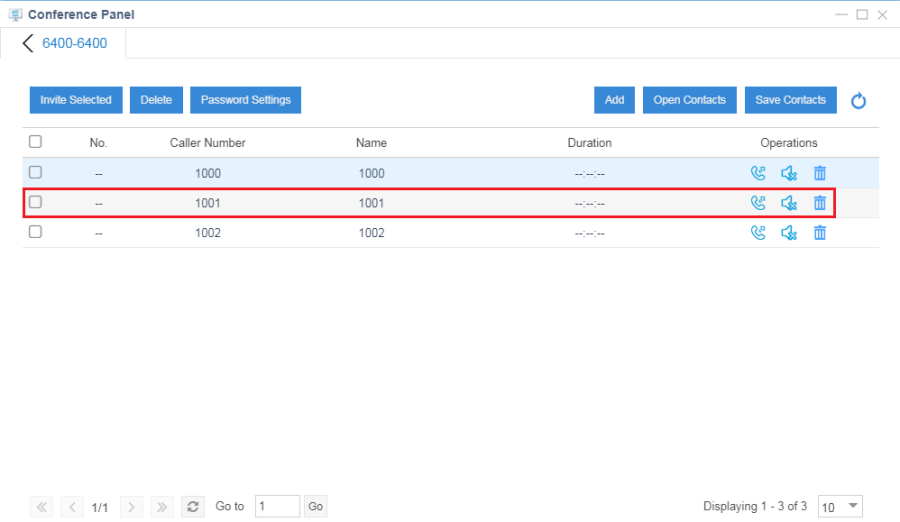
 2. Conference List:
(1) Click ![]() .
.
 (2) Click "Open Contacts".
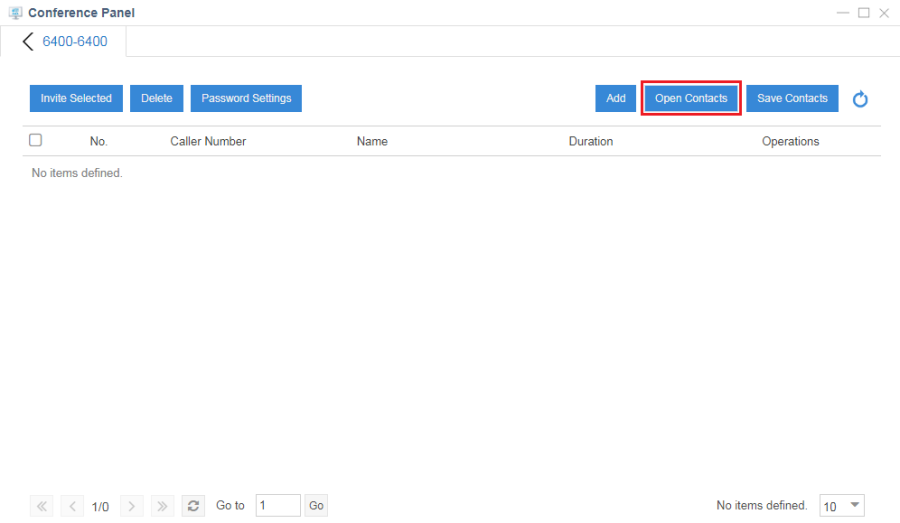 Select a Contact Group.
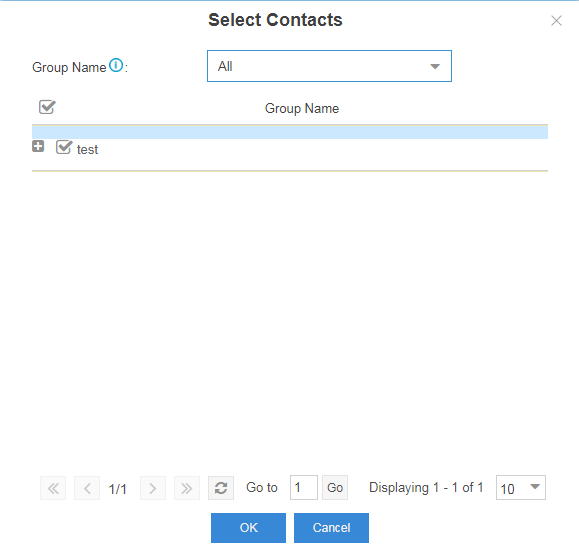 Click "OK" and the Contact Group is added into the management list of the conference room's member.
 (3) Click "Add".
 Select an extension.
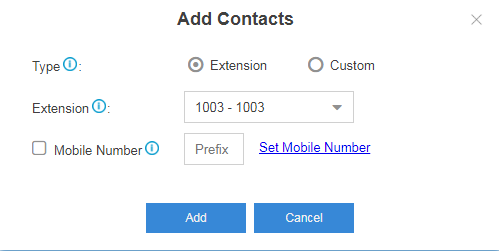 Click "OK" and the extension is added into the management list of the conference room's member.
 (4) Click
 ![]() .
.
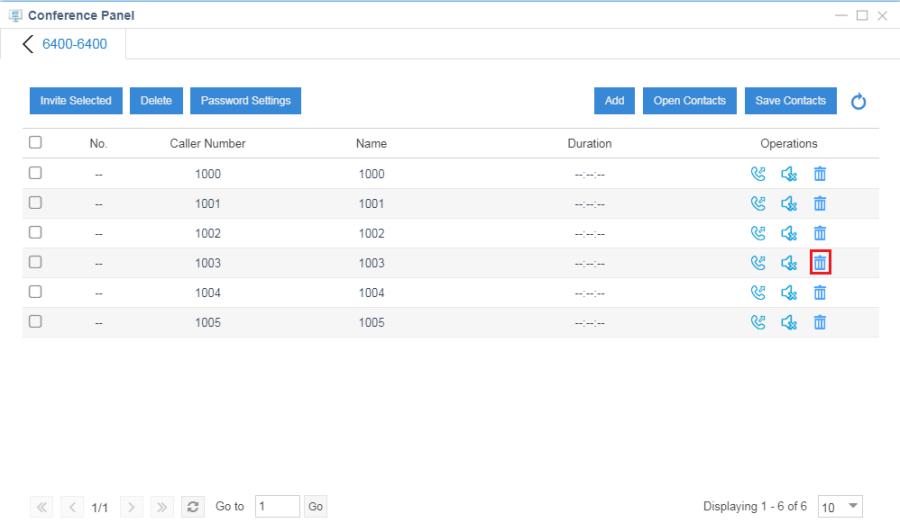 "Are you sure you want to delete the selected item? - the selected extension" will be shown.
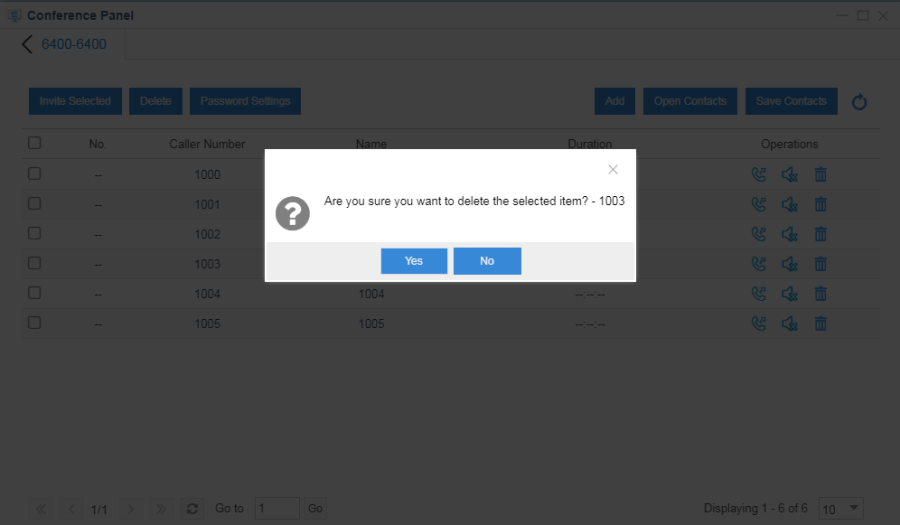 Click "Yes" to delete the extension.
 (5) Select one or more extensions.
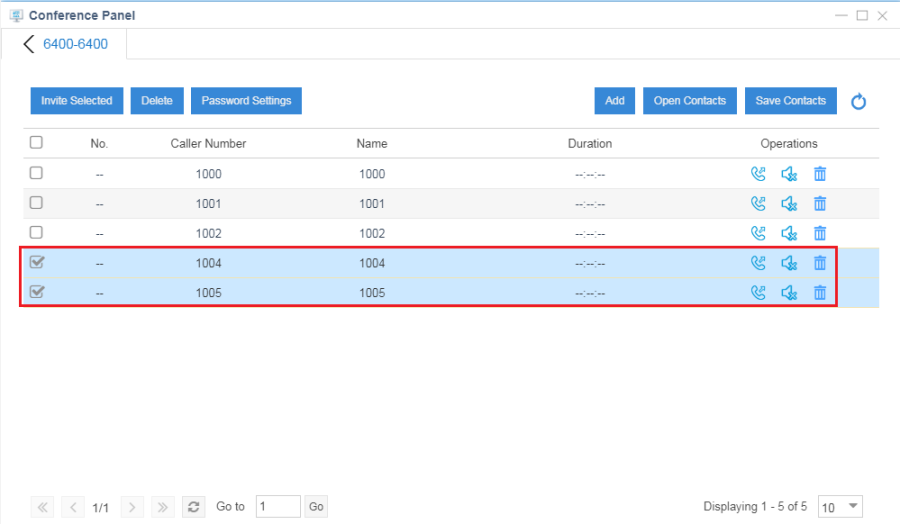 Click "Delete". "Are you sure you want to delete the selected item? - the selected extensions" will be shown.
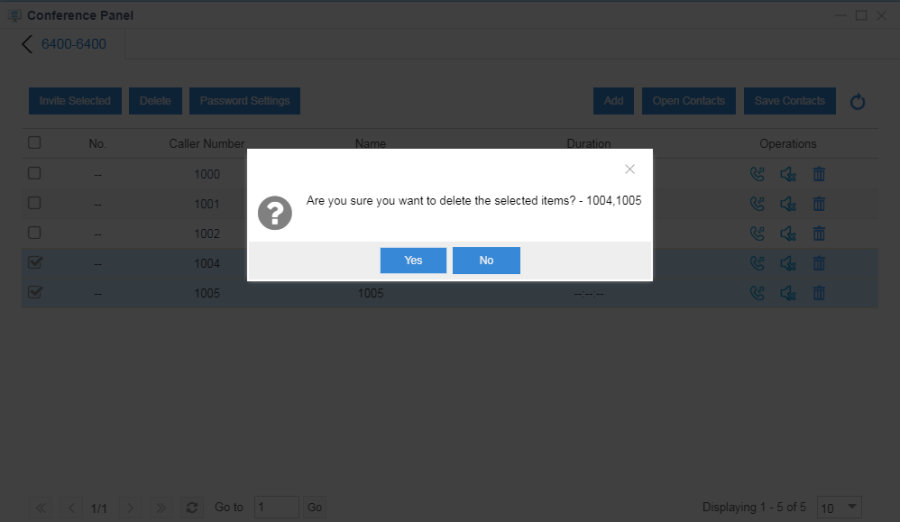 Click "Yes" to delete the extensions.
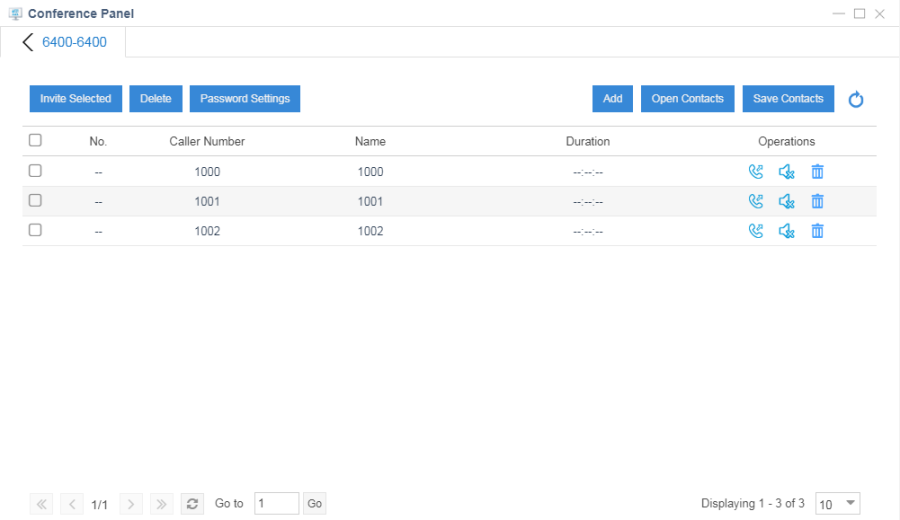 (6) Click "Save Contacts".
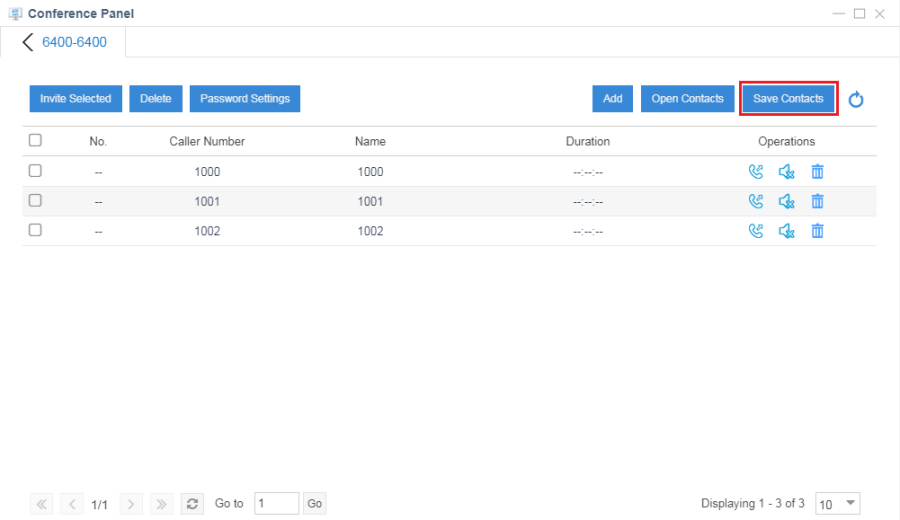 Set "Group Name". It cannot be null.
 Click "Save" and then the Contact Group will be shown on the Conference Contacts page.
 (7) Click
 ![]() .
.
 "Are you sure you want to invite the selected contact? -the selected extension" will be shown.
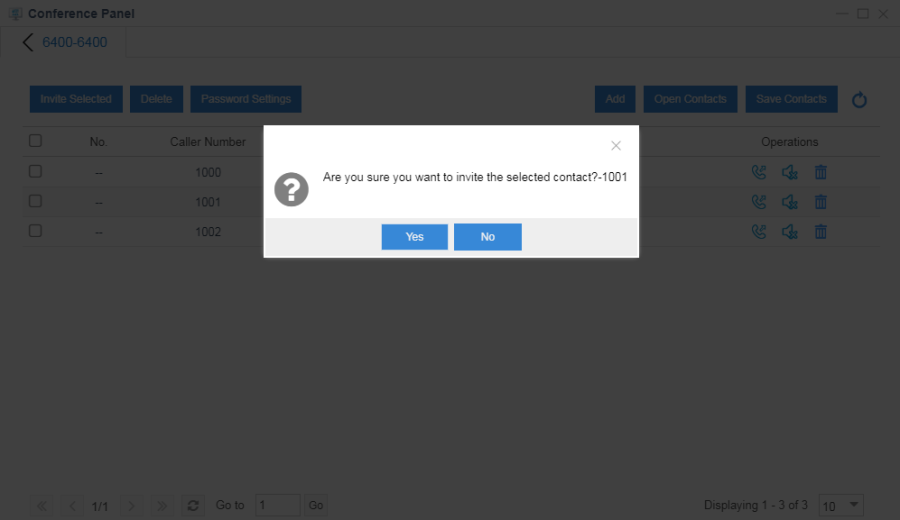 Click "Yes" and the conference room will dial the extension. The extension answers and enters the conference room.
 (8) Click
 ![]() . The extension is mute. Other members cannot hear the extension's voice.
. The extension is mute. Other members cannot hear the extension's voice.
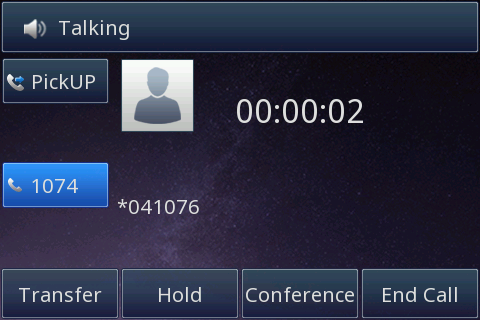
Call Park
Over View
You can use Call Park feature to park a call, and then retrieve the parked call from another phone.
The Call Park orbits should be predefined. You can park an active call by pressing the DTMF key (if configured) on the phone.
1. Call Parking
The server will automatically hunt for the first available orbit within the Parking Extension Range and park the call there.
2. Directed Call Parking
The call will be parked to the directed Parking Extension.
How to Configure
- Configure the Call Park feature on Yeastar S100.
Settings→PBX→General→Call Parking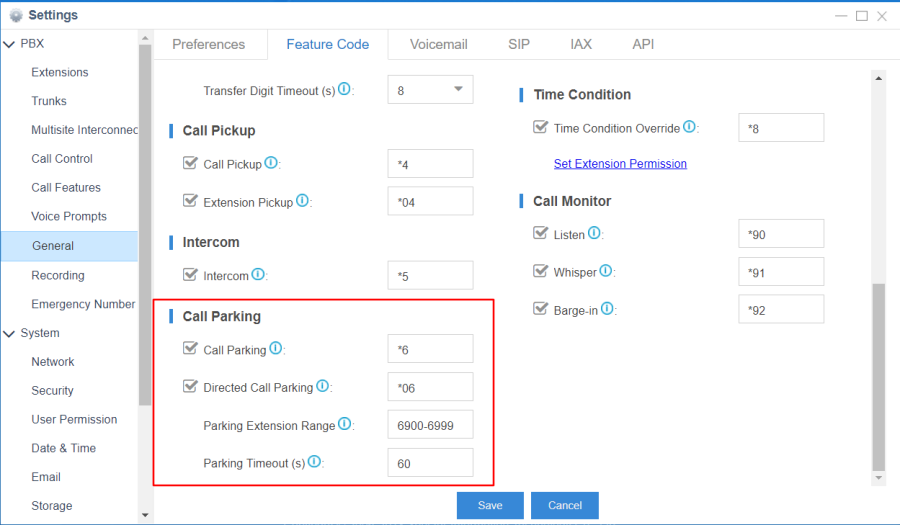
- Configure the LineKey/Memory Keys
Auto Provisioning→Edit Device→LineKey/Memory Keys Settings
You can configure a LineKey or a Memory Key as "DTMF". The value of the key is "*6" or "*06+extension number".

- Click "Save", then "Reboot phone now?" will be shown. Click "Yes" to provision the phone.
- After rebooting, the phone will apply the configuration.
How to Use
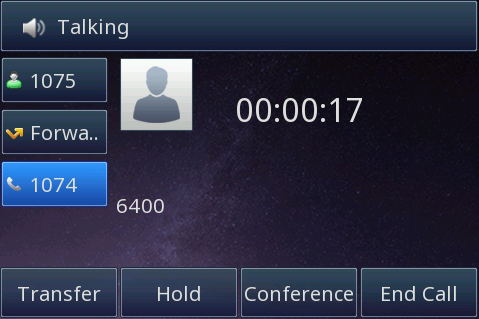
1. When A is talking with B, A presses the DTMF key. Then A will hear an extension number for picking up the call and B will be held.
2. A or others can dial the extension number to pick up the call to continue talking with B.
Speed Dial
Over View
Speed dial can help you dial some long or commonly used number quickly.
How to Configure
To configure Speed Dial via Settings in Yeastar S100 System:
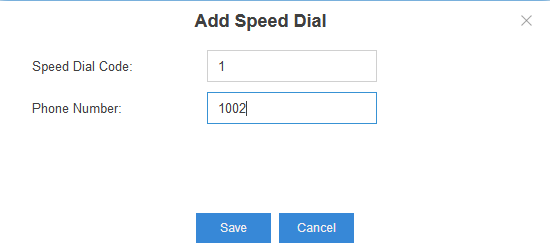
1. Settings→PBX→Call Features→Speed Dial→Add.
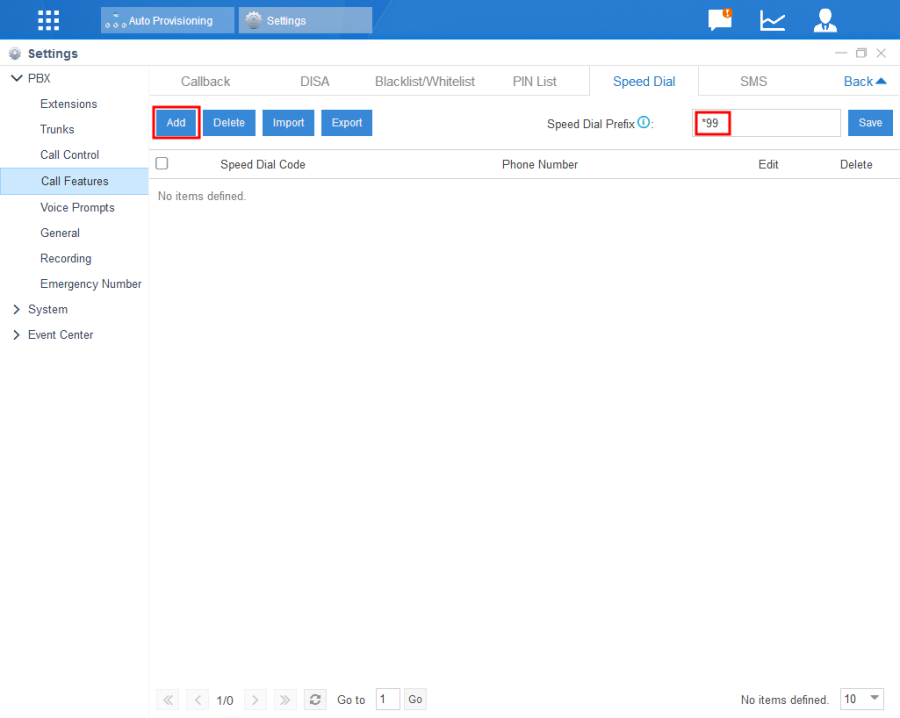 2. Fill in speed dial code and phone number, and then click "Save".
 To configure Speed Dial via LineKey/Memory Key:
1. Auto Provisioning→Edit Device→LineKey/Memory Keys Settings.
You can configure a LineKey or a Memory Key as "SpeedDial". Fill in the phone number you want to dial.

 2. Click "Save", then "Reboot phone now?" will be shown. Click "Yes" to provision the phone.
3. After rebooting, the phone will apply the configuration.
How to Use
Dial the Feature Code:
You can make a call by dialing "the speed dial prefix + speed dial code". For example, if the speed dial code is 1 and the phone number is 1002, you can dial *991 to call 1002.
Dial by LineKey/Memory Key:
You can also press the SpeedDial key to dial out.
Queue
Over View
When someone calls the extension number of a Queue, the extensions in the Queue will ring according to the Ring Strategy.
How to Configure
1. Add or edit a queue
Settings→Call Features→Queue→Add or Edit
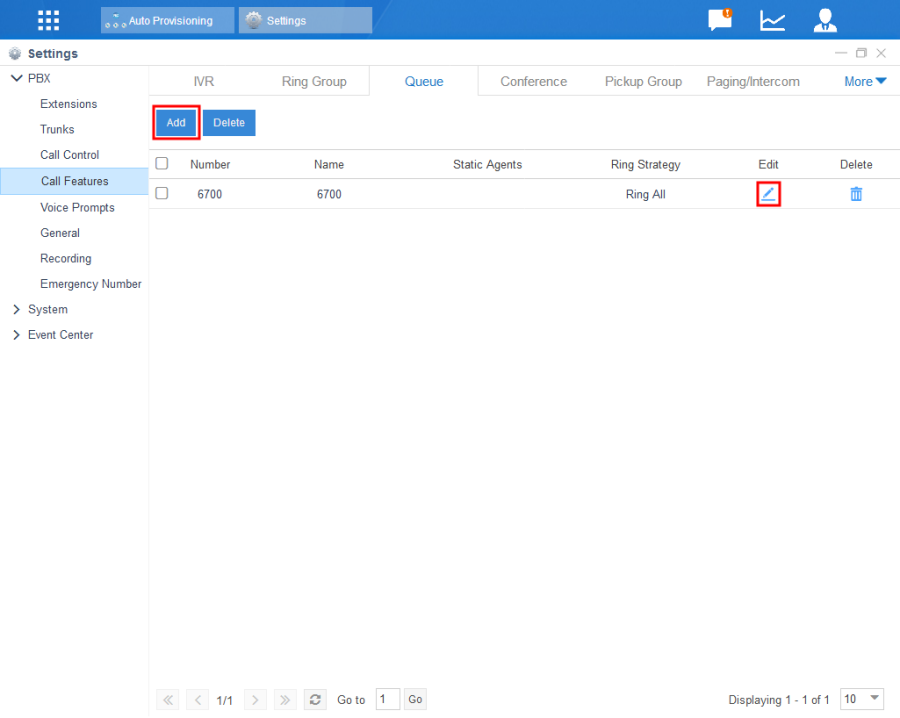 2. Configure the queue.
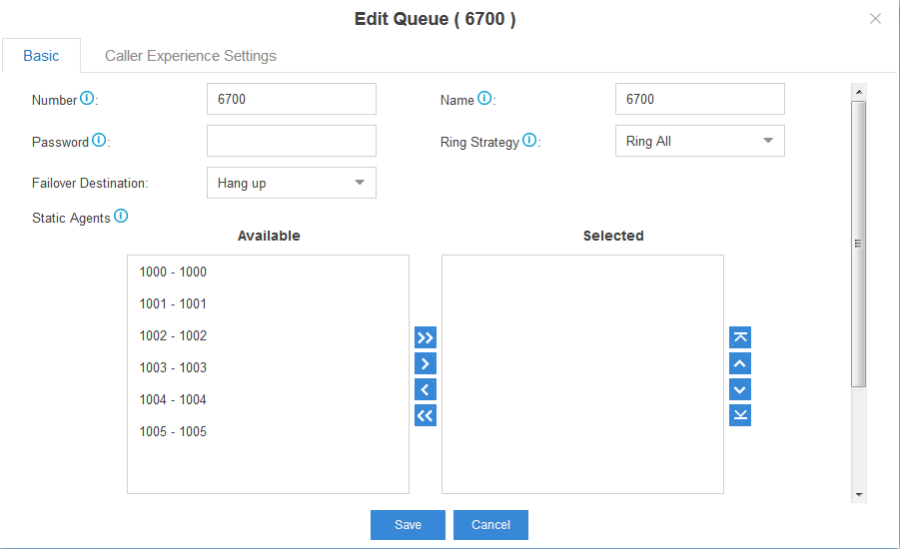 Number is used to dial into the queue.
Password requires Dynamic Agents to enter "Password" before they can log in to this queue.
Note: Dynamic Agents can dial "Queue number"+"*" to log out the queue.
"Ring Strategy" has six options:
(1) Ring All: ring all available agents simultaneously until one answer.
(2) Least recent: ring the agent which was least recently called.
(3) Fewest Calls: ring the agent with the fewest completed calls.
(4) Random: ring a Random Agent.
(5) Rrmemory: Round Robin with Memory, remembers where it left off in the last ring pass.
(6) Linear: rings agents in the order specified in the configuration file.
"Failover Destination" is the destination when no answer after dialing the queue number.
"Static Agents" are the agents that have logged in the queue.
How to Use
When someone calls the queue number, the agents in the queue will ring according to the Ring Strategy. If one of the agent in the queue answers the call, other agents will stop ringing.
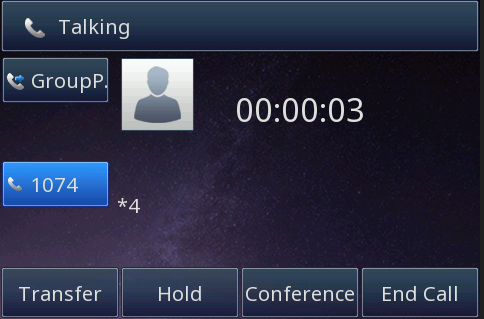
Pickup
Over View
If a specific extension cannot answer his incoming call, the others can pick up the call by dialing a Pickup code.
There are two kinds of pickup: Direct pickup and Group pickup.
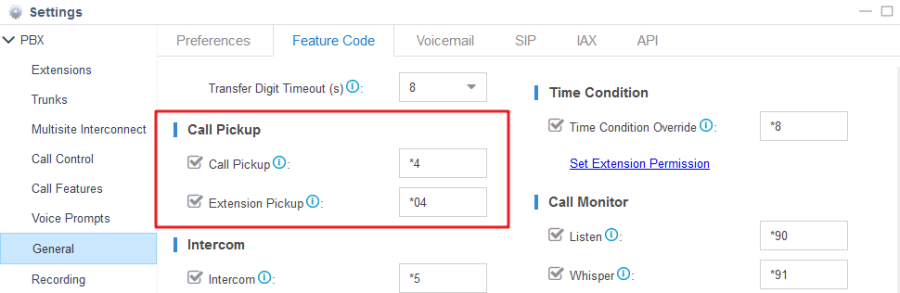
How to Configure
Direct pickup:
1. Auto Provisioning→Edit Device→LineKey/Memory Keys Settings.
You can configure a LineKey or a Memory Key as "Direct Pickup". Fill "*04+ extension number" in the Value blank.

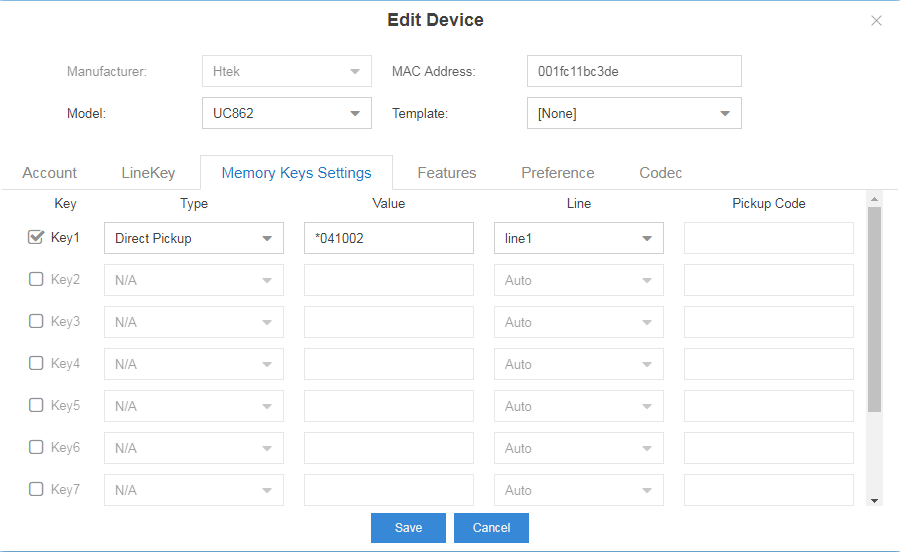 2. Click "Save", then "Reboot phone now?" will be shown. Click "Yes" to provision the phone.
3. After rebooting, the phone will apply the configuration.
 Group pickup:
1. Settings→Call Features→Pickup Group
Add or edit a pickup group.
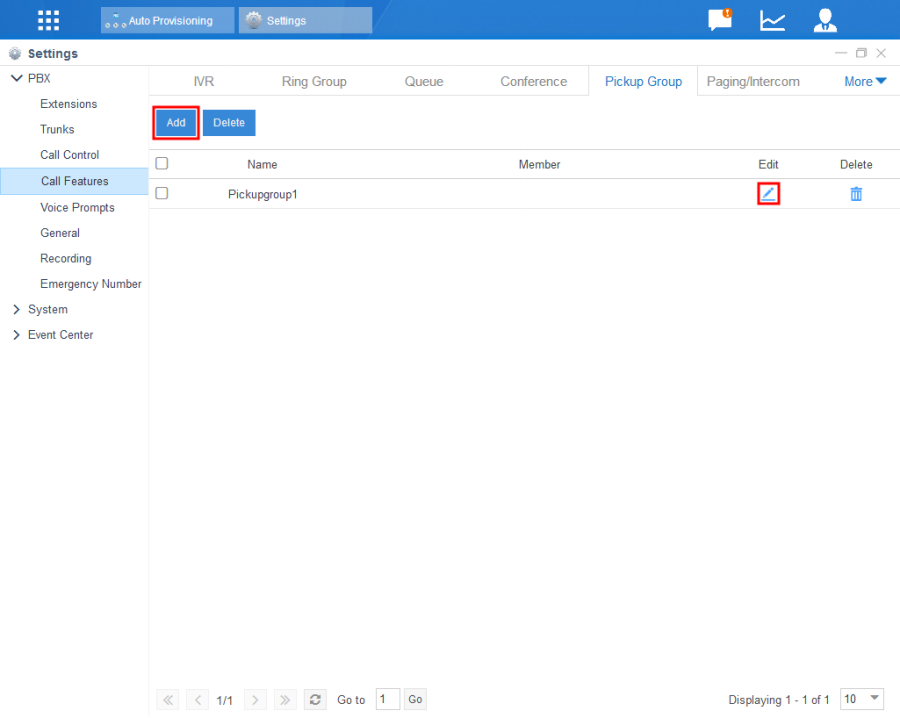 2. Select the extensions as the Pickup Group members.
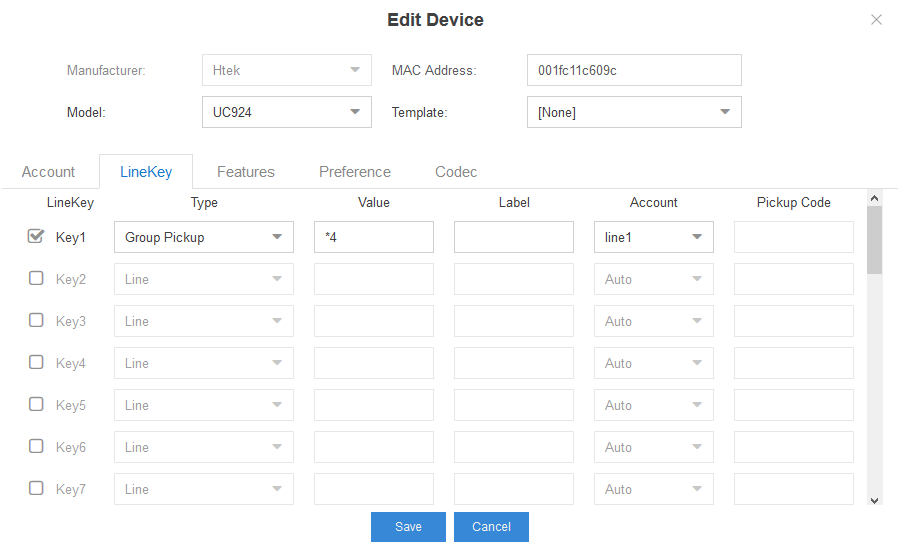
 3. Auto Provisioning→Edit Device→LineKey/Memory Keys Settings.
You can configure a LineKey or a Memory Key as "Group Pickup" and fill "*4" in the Value blank.
 4. Click "Save", then "Reboot phone now?" will be shown. Click "Yes" to provision the phone.
5. After rebooting, the phone will apply the configuration.
How to Use
Direct pickup
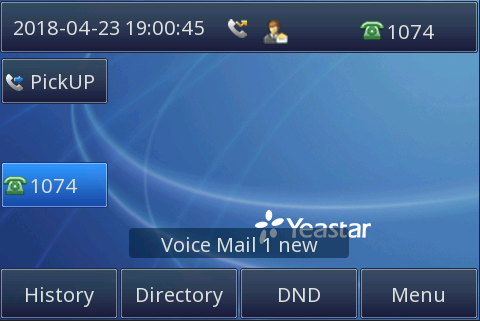
When a specific extension who cannot answer his incoming call, you can pick up the call by press the Pickup key or dialing *04+extension number.
 Group pickup
When a specific extension who cannot answer his incoming call, and you are in the same group with the extension, you can pick up the call by press the Pickup key or dialing *4.
Call Monitor
Over View
You can use this feature to listen to other's call. Yeastar supports three modes of Call Monitor: Listen, Whisper, Barge-in.
In Listen mode, the monitor can only listen to the call but can't talk. The feature code of this mode is *90.
In Whisper mode, the monitor can listen to and talk with the monitored extension without being heard by the other party. The feature code of this mode is *91.
In Barge-in mode, the monitor can listen to and talk with both parties. The feature code of this mode is *92.
How to Configure
1. The extension being monitored:
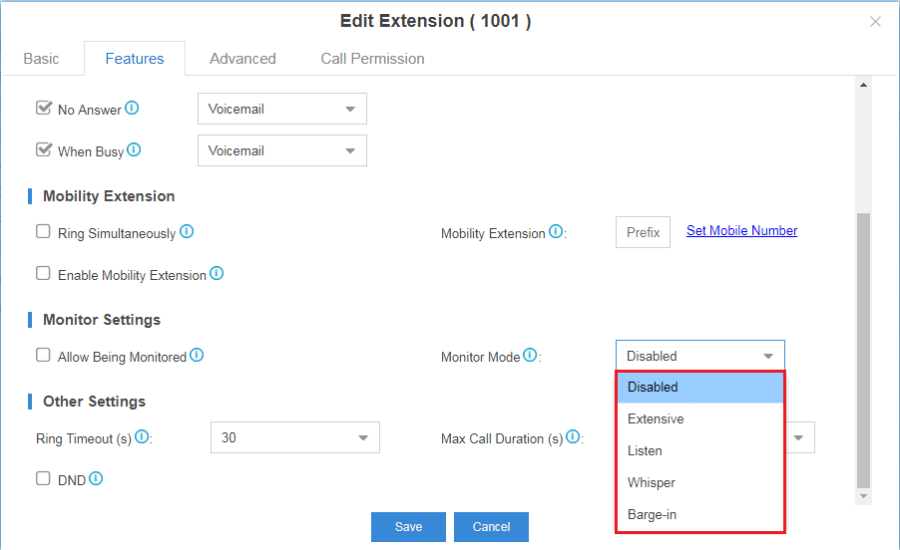
Settings→PBX→Extensions→Edit Extension→Features→Monitor Settings→check Allow Being Monitored.
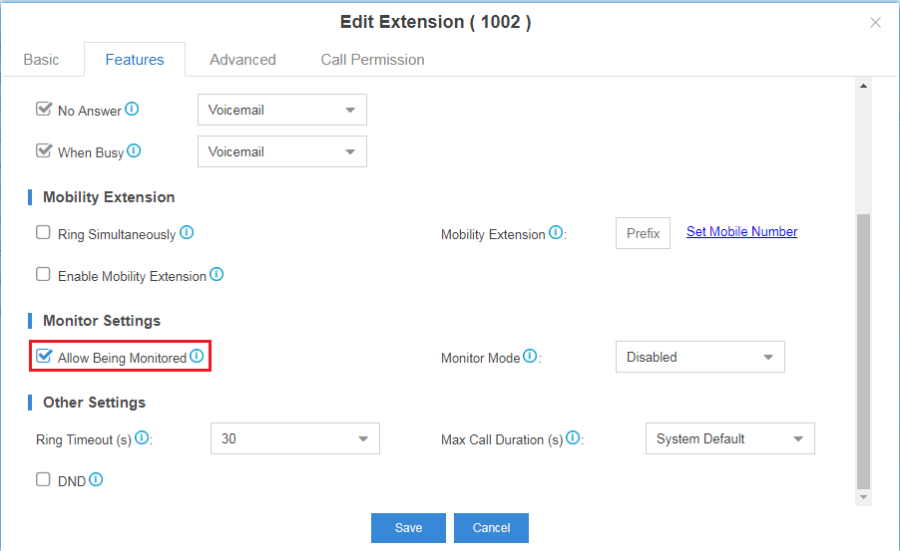 2. Monitor:
Settings→PBX→Extensions→Edit Extension→Features→Monitor Settings→Monitor Mode
There are 5 kinds of monitor mode: Disabled, Extensive, Listen, Whisper, Barge-in.
Disabled: you will not be allowed to monitor calls.
Extensive: all the following 3 modes will be available for use.
Listen: you can only listen into the call, but cannot talk.
Whisper: you can talk to the extension you're monitoring without being heard by the other party.
Barge-in: you can talk to both parties.
How to Use
Your monitor mode is "Extensive" or "Listen":
A and B is talking and A is allowed being monitored, you will hear what A and B is saying but A and B cannot hear what you are saying if you dial "*90 + A's extension number".
Your monitor mode is "Extensive" or "Whisper":
A and B is talking and A is allowed being monitored, you will hear what A and B is saying and A can hear what you are saying but B can't if you dial "*91 + A's extension number".
Your monitor mode is "Extensive" or "Barge-in":
A and B is talking and A is allowed being monitored, you will hear what A and B is saying and A and B can hear what you are saying if you dial "*92 + A's extension number".
Intercom/Paging
Overview
Intercom allows you to play announcements to a single extension. The called extension can hear the broadcast without off-hook.
Paging is used to broadcast to a paging group. So you need to create a paging group first.
How to Configure
1. Intercom
Auto Provisioning→Edit Device→LineKey/Memory Keys Settings.
You can configure a LineKey or a Memory Key as "Intercom" and fill "*5+extension number" in the Value blank.

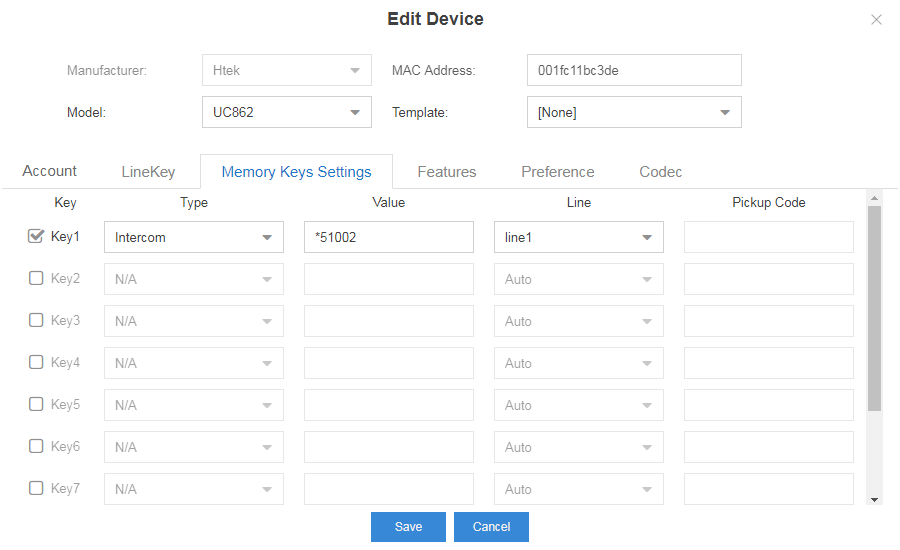 Click "Save", then "Reboot phone now?" will be shown. Click "Yes" to provision the phone.
After rebooting, the phone will apply the configuration.
2. Paging
Setting→PBX→Call Features→Paging/Intercom
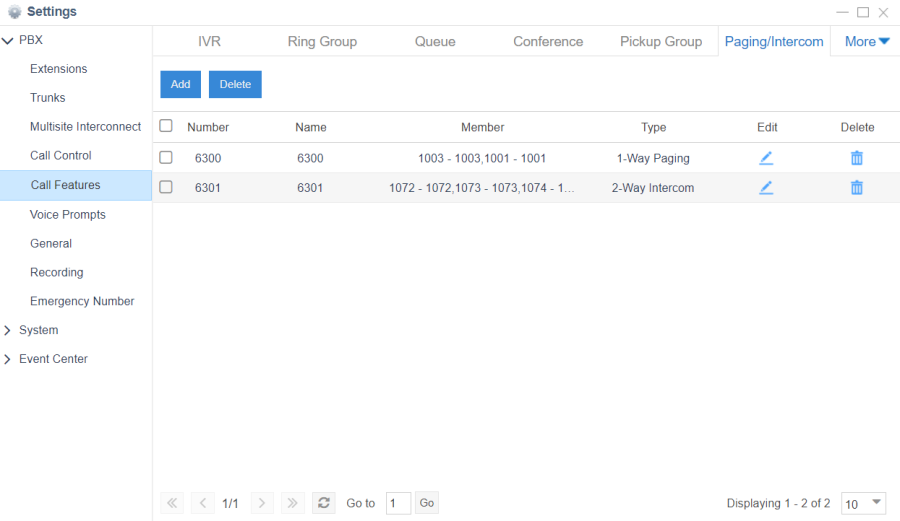 Click on Add, choose the member from the Available list and join them to the Selected list.
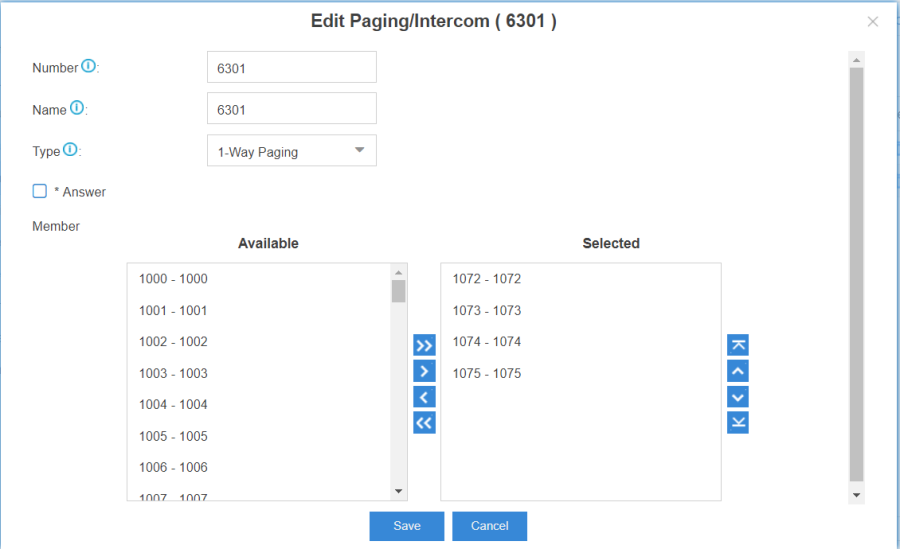 There are two call modes for the paging group.
- 1-Way Paging: All the members can only hear the voice of the initiator.
- 2-Way Intercom: All the members can talk and listen to each other.
Tip: You might see the option *Answer. If you have checked this option, once someone press *** on his IP Phone, a dialogue will be established with him and the initiator, along the other members will all automatically exit the Paging.

How to Use
Press the Intercom key or the Paging key, or dial the feature code + extension number.
Phonebook
Yeastar S100 supports three types of phonebook: Remote Phone Book, AP Phone Book and LDAP.
Remote Phone Book
Operating Instructions
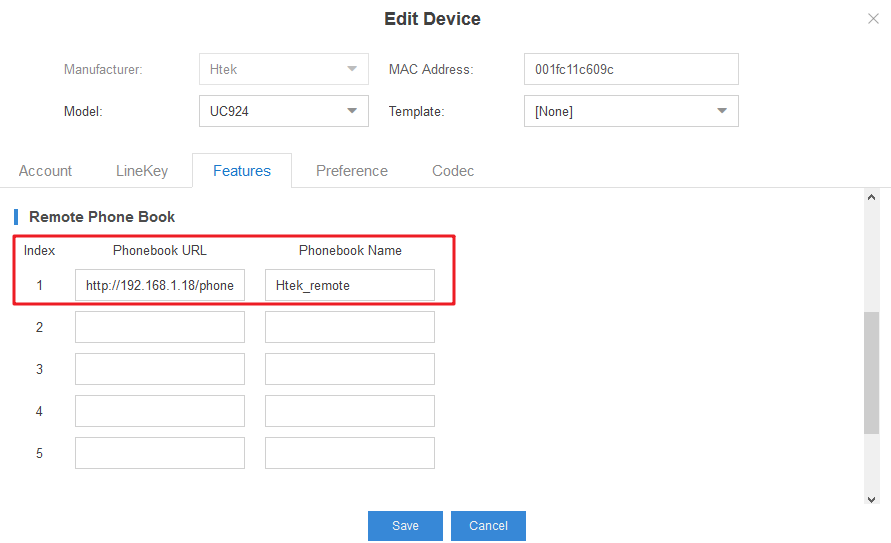
1. You can configure Remote Phone Book in Auto Provisioning→Edit Device→Features→Remote Phone Book.
Phonebook URL supports HTTP or HTTPS server. You can fill in the Phonebook URL, such as "http://192.168.1.18/phonebook/remote_phonebook.xml".
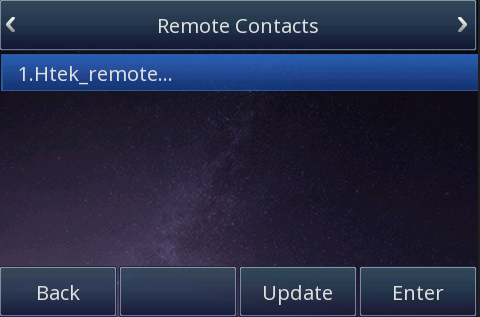
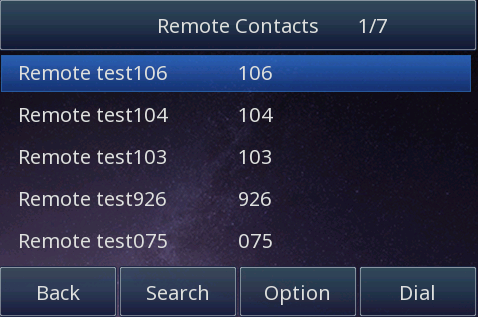
 2. After configuring successfully, you can see the phone book in your screen.
AP Phone Book
Preconditions
You need to enable AP phone book in Auto Provisioning→Edit Device→Features.
Operating Instructions
You can configure AP Phone Book in Auto Provisioning→Phonebook.
There are 2 ways to add contacts. One is adding one by one, the other is importing the xml file of phonebook.
Add contacts one by one:
1. Click "Add".
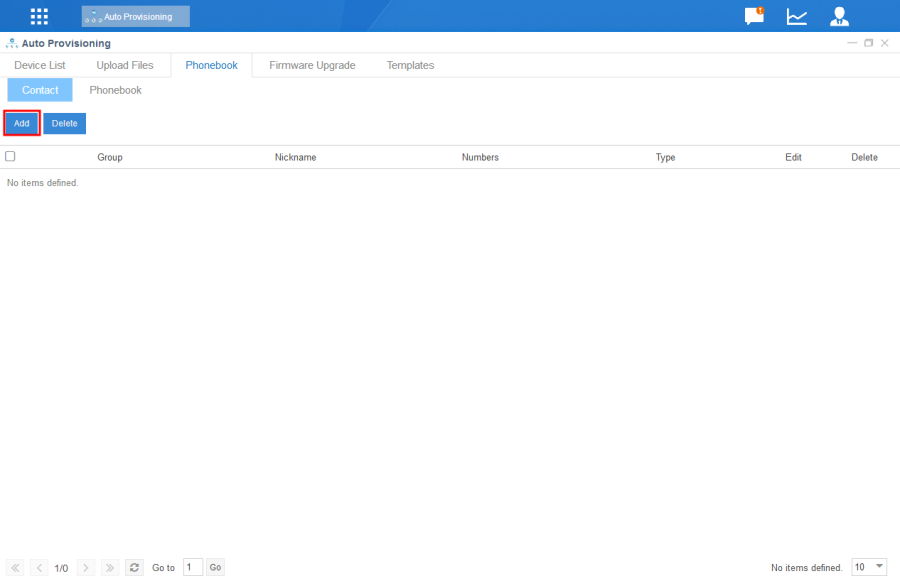 2. Fill in contact's information.
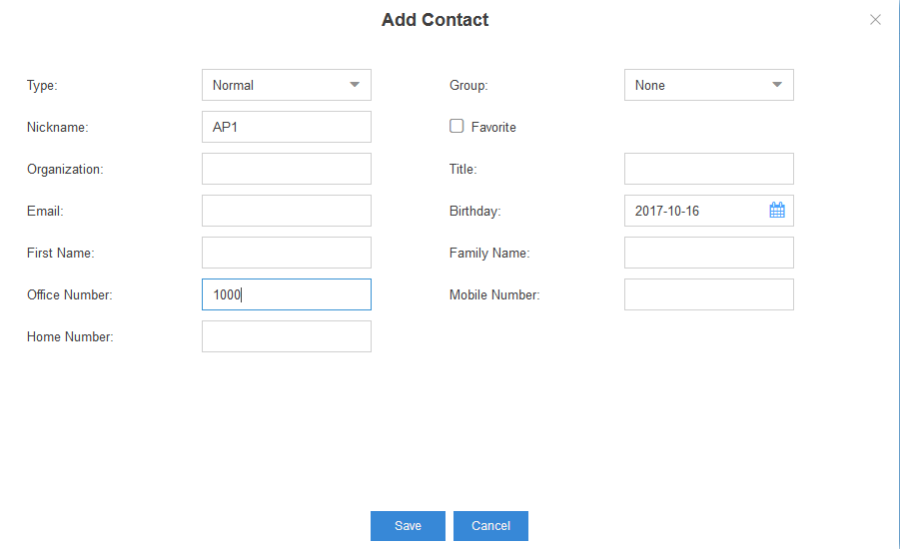 3. Click "Save".
4. Reboot your phone.
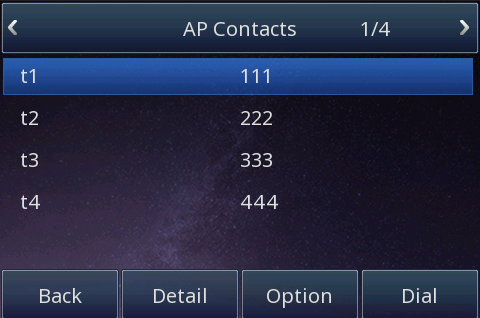
5. After rebooting, you can see AP Contacts in your phone.
 Import phonebook:
1. Click "Upload Phonebook".
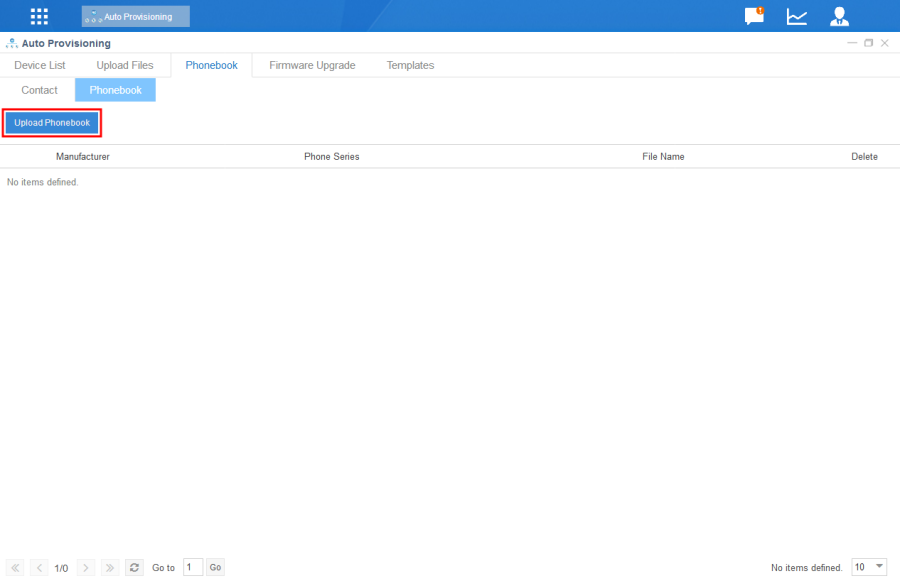 2. Choose a xml file named "phonebook.xml".
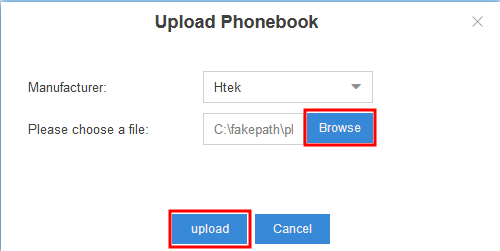 3. Click "upload".
![]() 4. Reboot your phone.
4. Reboot your phone.
5. After rebooting, you can see AP Contacts in your phone.
LDAP
Over View
LDAP is a phone book which is restored in server. If not found, it can be installed in App Center
How to Configure
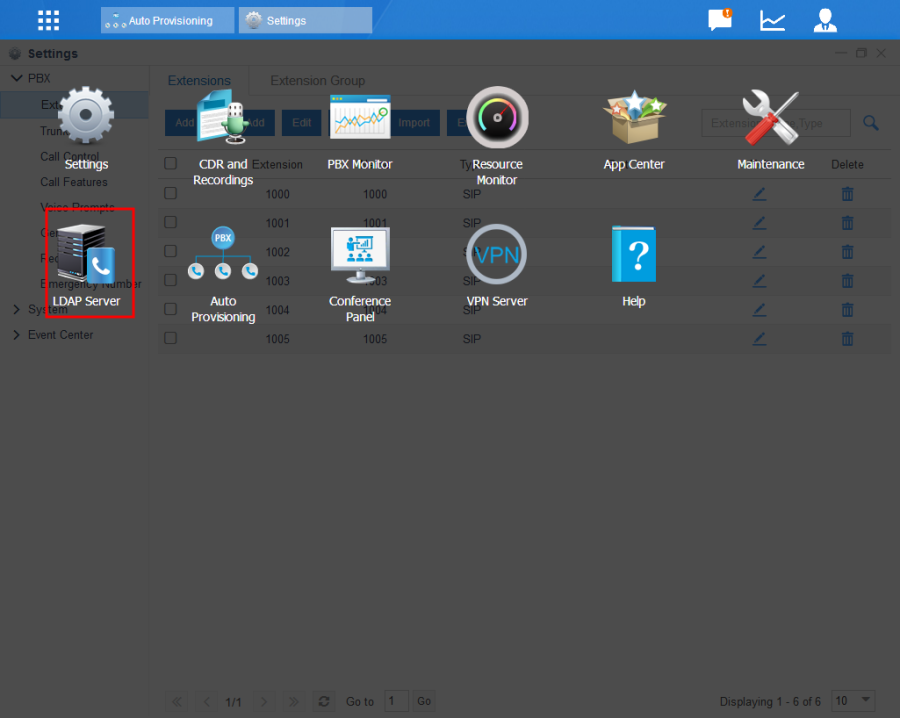
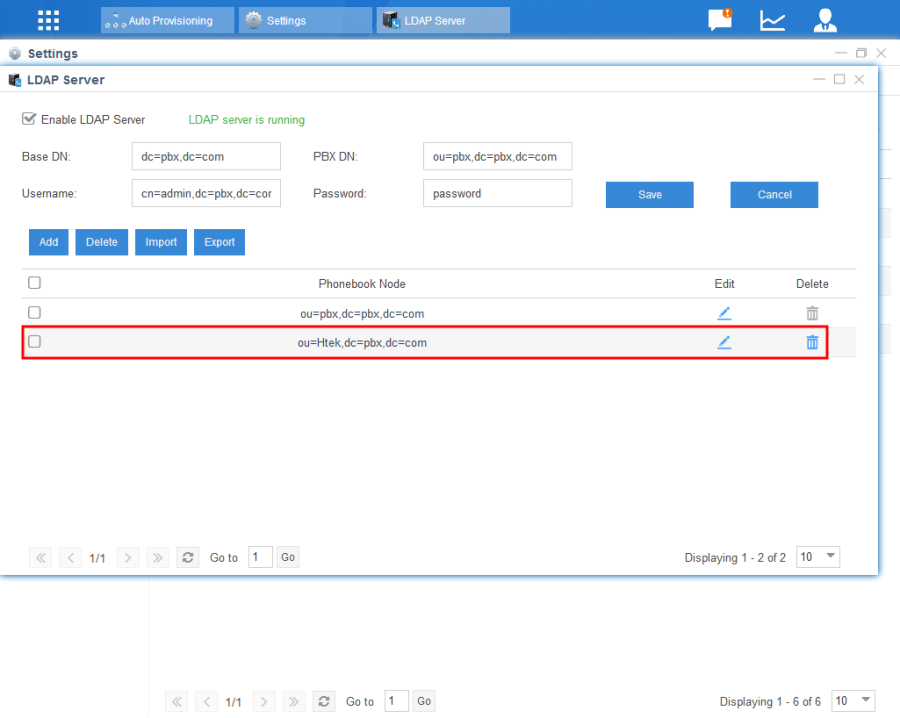
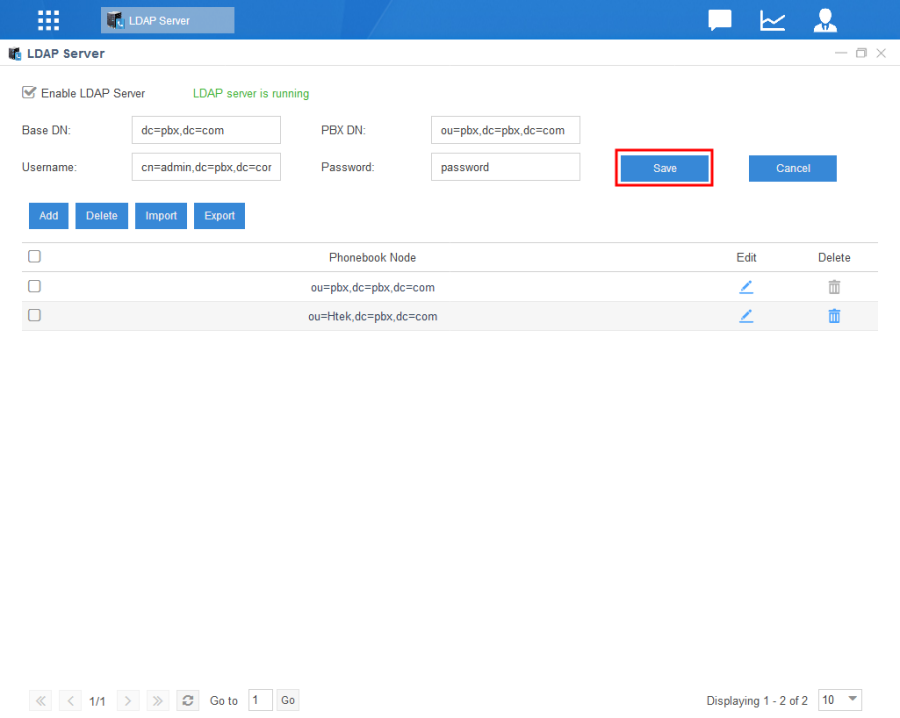
1. Open LDAP Server page.
 2. Enable LDAP Server. The default phonebook includes the extensions in the sip server.
Note:
You cannot add or delete the contacts in the default phonebook directly. Go to "Settings→PBX→Extensions" to configure extensions, the phonebook will be automatically updated.
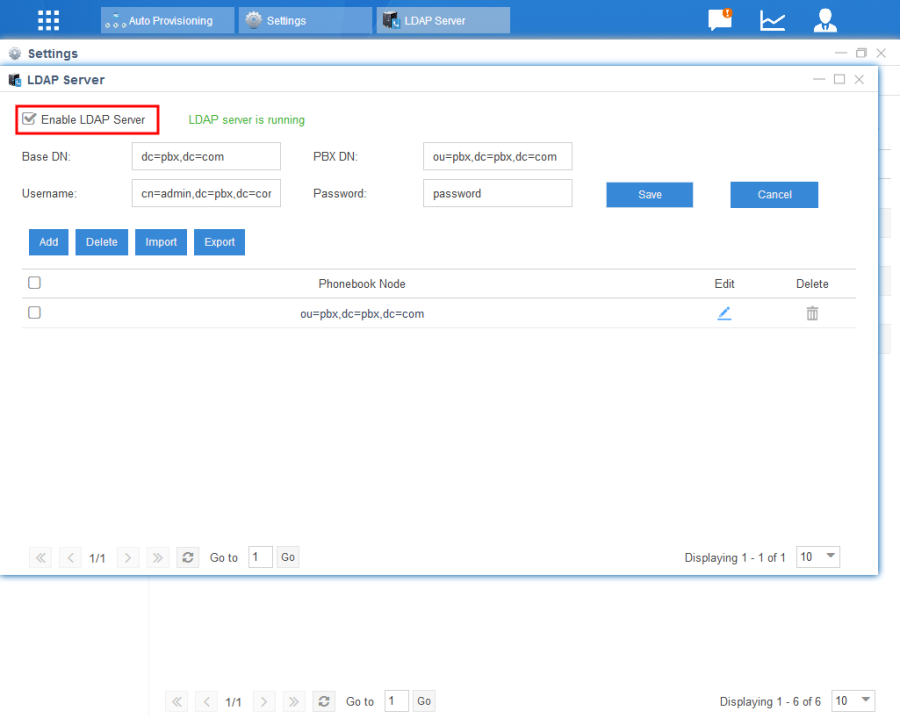 3. If you want to add a phonebook manually, you can click "Add". Fill in the phonebook name. Click "Save".
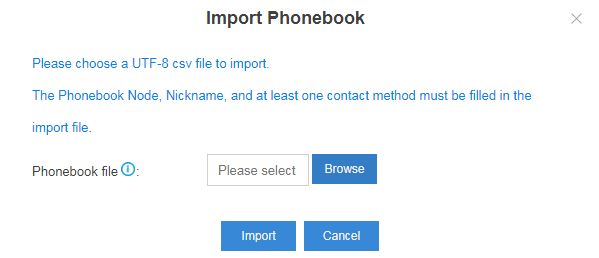
 4. You can also click "Import" to upload a phonebook.
 Note:
Note:
1. The file to be imported must be a CSV file with UTF-8 encoding. You can open the file with Notepad and save it with UTF-8 encoding.
2. Phonebook Node, Nickname and at least one contact information (Email, Mobile Number, Office Number or Home Number) are required in the CSV file.
3. Phonebook Node cannot be set to "pbx", which is the same with the default phonebook node.
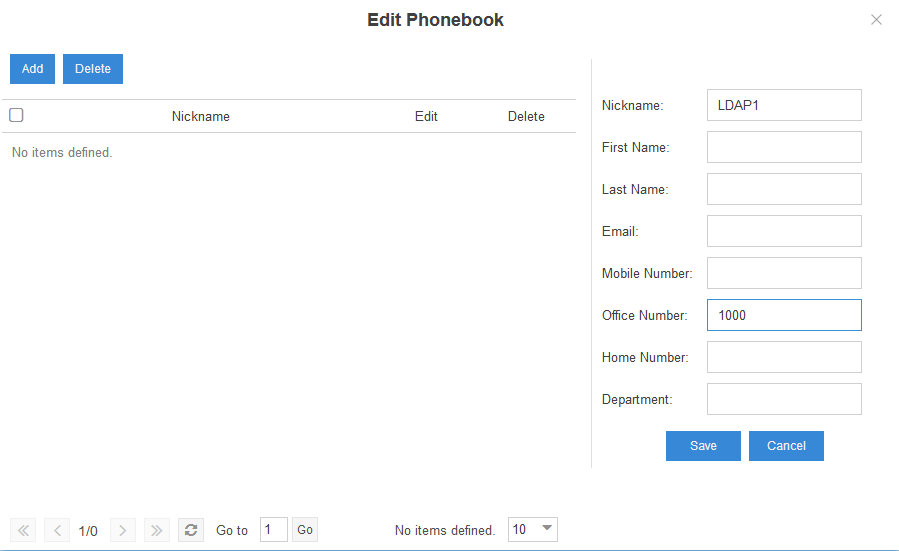
5. Edit the phonebook you add, and add contacts.
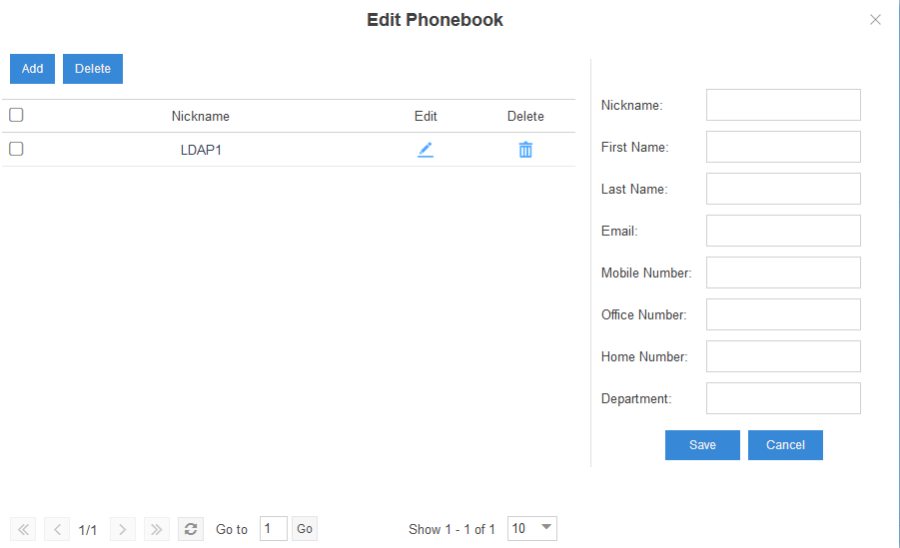 5. Save your changes.
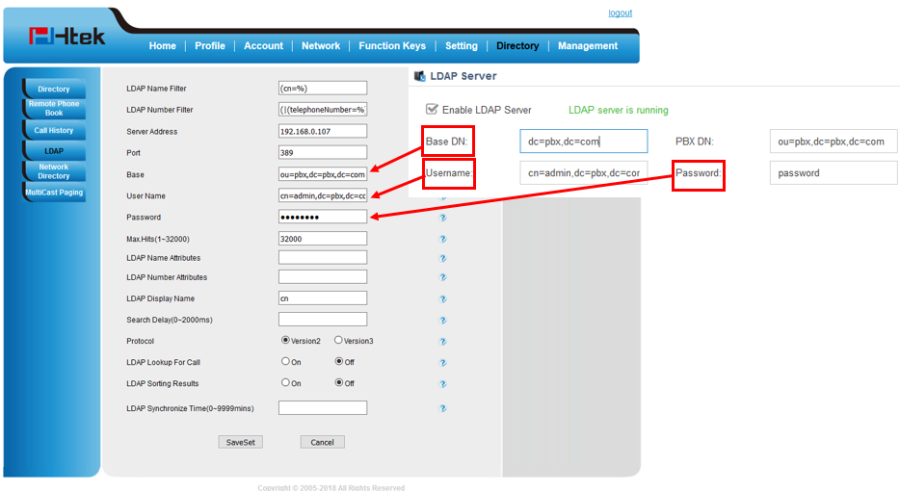
 6. Login web interface→Directory→LDAP.
Fill in the information referred to the sip server.
 7. Function Keys→Line Key
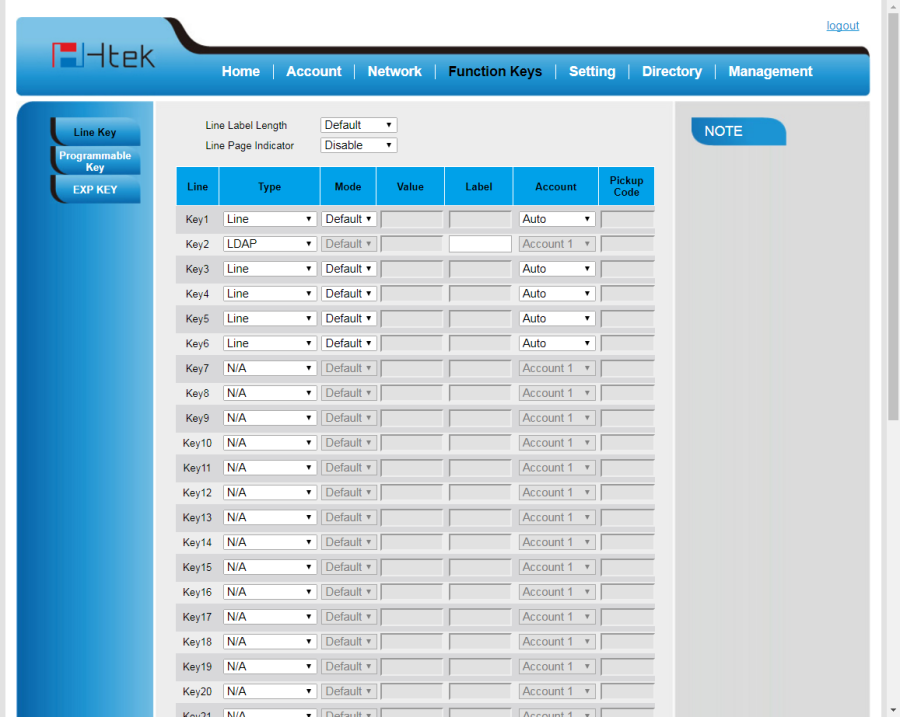 You will see LDAP key in your screen.
How to Use
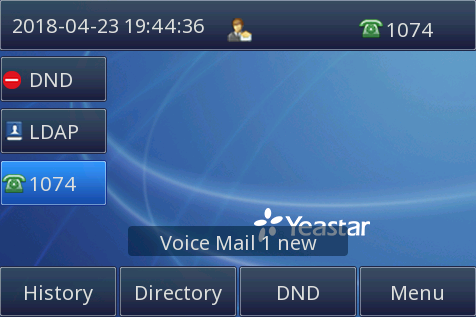
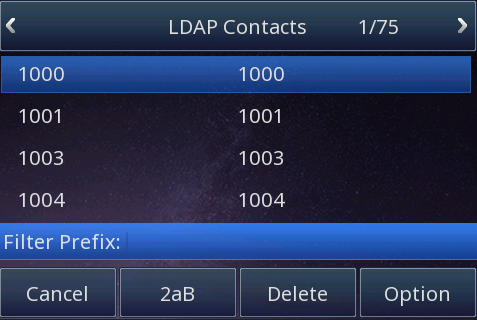
Press LDAP key, and you can see the LDAP phonebook.
Resetting your phone
Over View
Reset the phone to factory configurations after you have tried all troubles- hooting suggestions but do not solve the problem.
Preconditions
You need to note that all customized settings in the Yeastar will be overwritten after reset. Auto Provisioning →Delete Configured Device.
Operating Instructions
To reset the phone via phone user interface(LCD):
1. Enter Menu→Settings→Advanced→Settings→Reset.
The password of Advanced is provisioned by Yeastar phone system.
 2. Press the "Enter" softkey or "OK" key.
 3. The phone will be reset to factory settings successfully after startup.
Note: Reset of your phone may take a few minutes. Do not power off until the phone has started up successful.
To reset the phone via web interface:
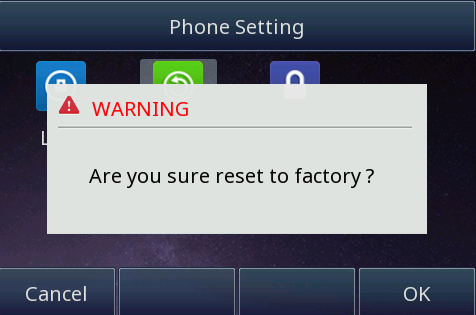
1. Enter Management→Upgrade→Reset To Factory→"All of the configuration will be restored to factory Settings. Are you sure reset to factory?".
The password of the web interface is provisioned by Yeastar phone system.
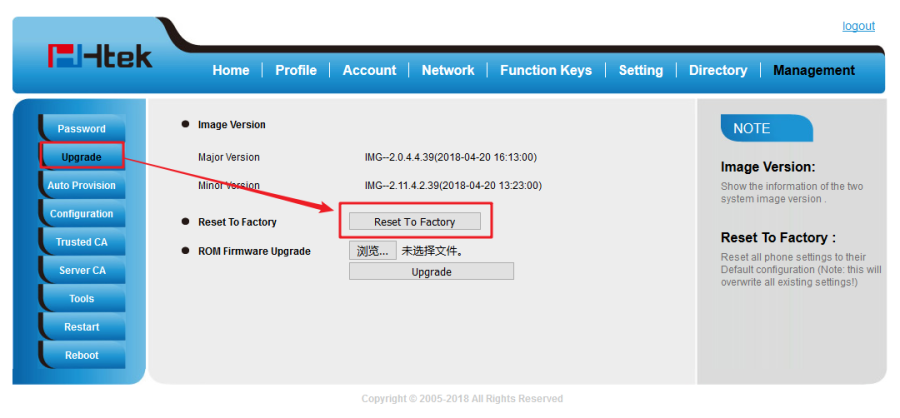 2. Select "OK".
3. The phone will be reset to factory settings successfully after startup.
Troubshooting
This chapter provides general troubleshooting information to help you solve the problems you might encounter when using your phone. If you require additional information or assistance with your new phone, contact your system administrator.
Why is the LCD screen blank?
- Ensure that the phone is properly plugged into a functional AC outlet.
- Ensure that the phone is plugged into a socket controlled by a switch that is on.
- If the phone is plugged into a power strip, try to plug it directly into a wall out let instead.
- If the phone is powered from POE, ensure that you use a POE-compliant switch or hub.
Why does the phone display "Network unavailable"?
- Ensure that the Ethernet cable is plugged into the Internet port on the phone and the Ethernet cable is not loose.
- Ensure that the switch or hub in your network is operational.
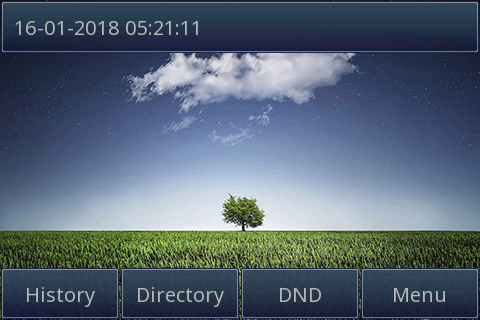
Why doesn't the phone display time and date correctly?
Check if you have configured the phone to obtain the time and date from the SNTP server automatically. If the phone fails to connect to the SNTP server, you need to configure the time and date manually.
Why the phone can't auto-configuration successful?
- Make sure that the phone is connect to the same subnet with Yeastar S100.
- Make sure that the model of your phone is supported by Yeastar.
- Make sure that the TFTP server of Yeastar SIP system is enabled.
- To reset the phone as the following steps:
- Press Menu soft key.
- Navigate to Settings and press Enter soft key.
- Select Advanced and press Enter soft key.
- Enter the password (admin by default) and press Enter soft key.
- Select Settings and press Enter soft key
- Select Reset and press Enter soft key.
- Press OK soft key to confirm, the phone will reboot and perform a factory reset.