Htek IP Phones Integrated with bicom Configuring Guide
- susie (Unlicensed)
Summary of Changes
V1.0 (2018-07-04): Provide a basic guidance for auto-provision Htek IP phones with Bicom phone system.
About This Guide
Thank you for choosing the Htek IP phones, which are exquisitely designed to provide basic phone features plus advanced business features.
The purpose of this guide is to serve as a basic guidance for auto-provisioning.
Htek IP phones with Bicom phone system and HTek supported features:
Htek 8 Series: UC802, UC803,UC804,UC806,UC840,UC842,UC860,UC862
Htek 9 Series: UC902, UC903,UC923,UC924,UC926
In This Guide
Topics provided in this guide include:
- Chapter 1 Getting Started
- Chapter 2 Auto-provisioning your Phone
- Chapter 3 Use Bicom Integrated Features
- Chapter 4 Troubleshooting
Note: The configuration process outlined in this guide applies to Htek SIP IP phones running.
Firmware version x.0.4.4.46 or later and Bicom phone system running version Free. The configuration process described in this guide take the Htek UC926 as an example.
Getting Started
This chapter will show you the basic process of phone's start-up and instructions of the way to get the basic information of the phone.
Topics include:Phone Initialization and Phone Status
Phone Initialization
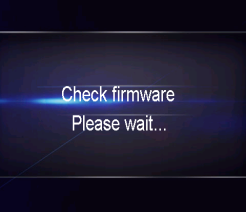
After your phone is powered on, the phone will boots up, complete the initialization and check firmware. Please refer to the three phases of the LCD display


In the process of initializing, the phone will attempts to contact a DHCP server in your network to obtain valid IPv4 network settings (e.g., IP address, sub net mask, default gateway address and DNS address) by default.
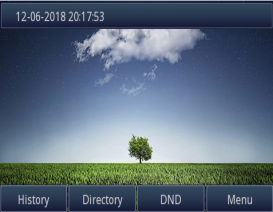
Phone Status
After the phone comes up, you can view phone status on phone user interface (LCD) via the following ways:
1.Press "OK" button twice.
2.Press the following button one by one: "Menu" -> "Status" -> "information".
Available information of phone status includes:
Network status (e.g., IPv4 status, IP mode, MAC address).
Phone status (e.g., product name, firmware version, MAC address and device certificate status).
Language information.
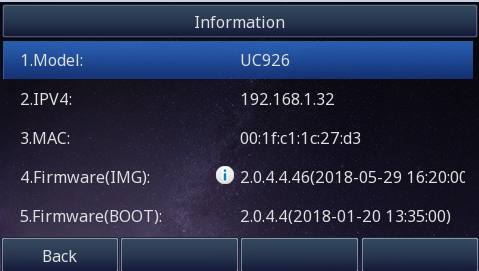
Press "Up" or "Down" to scroll through the list and view the specific information.
Auto provision
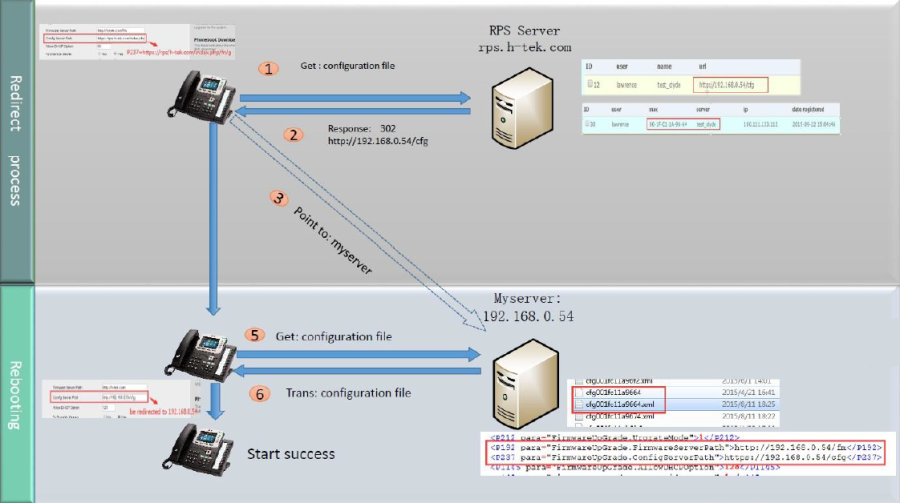
Auto Provision via RPS
Provision the IP Phone via RPS is a convenience way.
When the IP Phone start up , default it will send 'Get' message to the RPS server, if the phone's MAC address is assigned on the RPS Server previously, the RPS server will send the preset URL of the configure server to IP Phone.
The work process of RPS show below. And more information about how to use RPS, please refer to these documents fm.htek.com/rs/rps.zip .
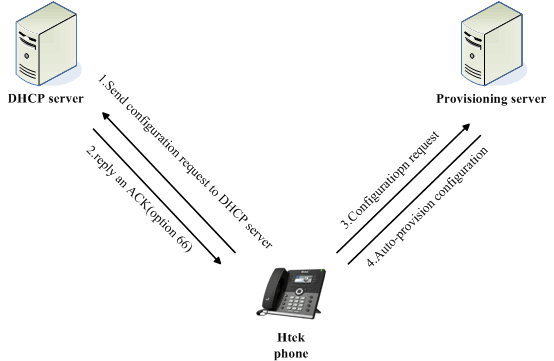
Auto provision your phones
The most important way of Auto provision is option 66(Option 66=http://username:password/185.59.92.97/prov).Here we will introduce how to auto provision via option 66.the working chart is as follows:
Operating Instructions
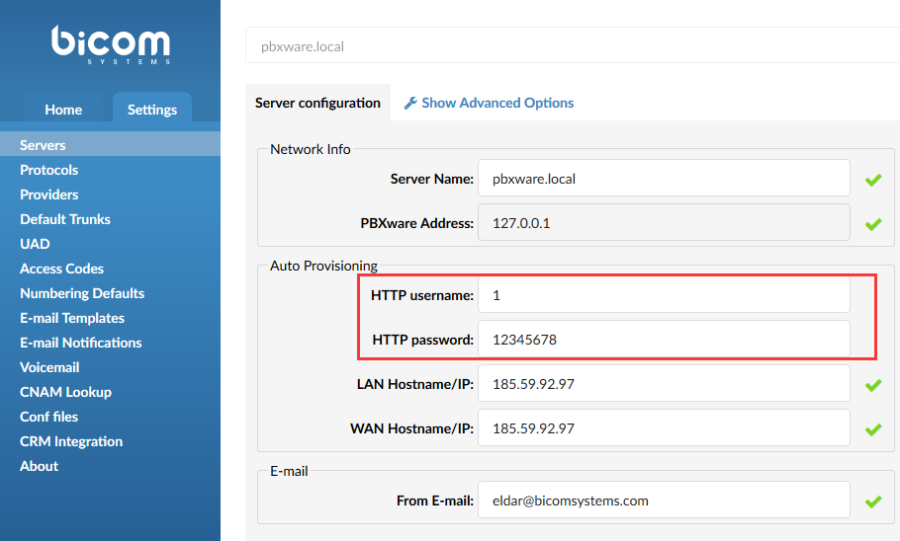
1.First,we set the http username and http password: Settings -> Servers -> Your Server Name (edit) -> Auto Provisioning (section) -> http username/http password,then fill in the necessary information;
2.Choose an existing extension(you also can build a new extension );
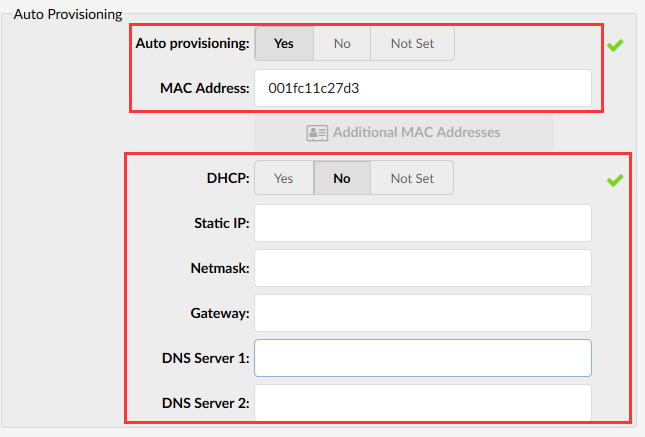
3.Click edit button , enter Advanced Options button ,then choose Auto Provisioning as yes and then fill in the mac address of the phone which you want to provision;
Note:If you want to set a static address for your phone and you can fill in the Static IP, Net mask ,Gateway,DNS Server 1 information ,When you fill out these contents, choose DHCP as yes ;
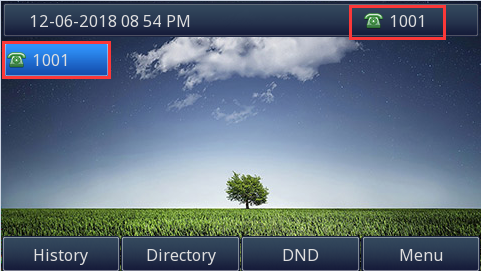
4.Then you can save the configuration and then restart the phone,then phone's LCD will display provision success then phone restart(Phone's option 66 is turned on by default);
5.Phone will get the configuration after Restarting;
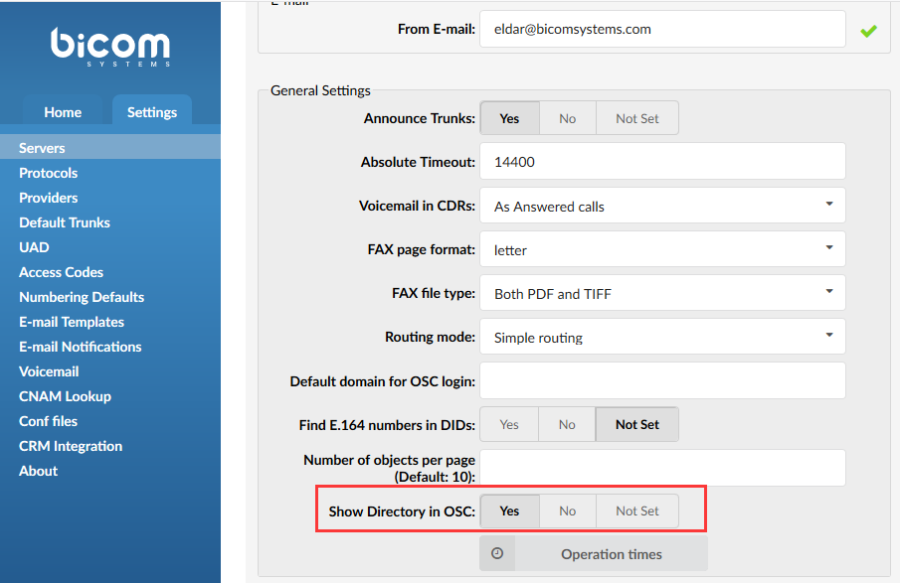
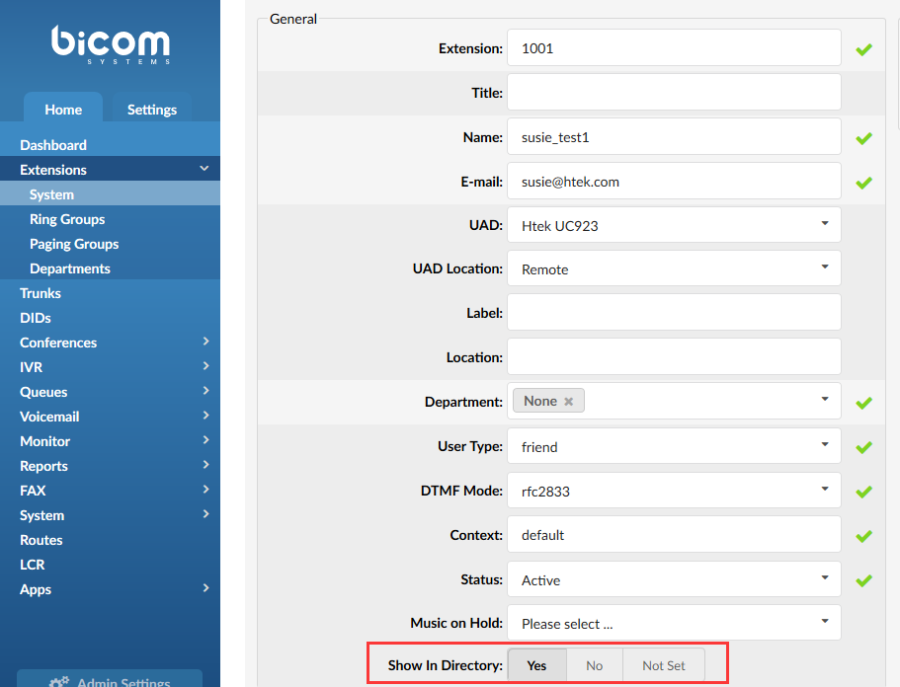
Auto provision Remote Phonebook via Bicom
Operating Instructions
1.Settings->Servers menu, and then enabling the "Show Directory in OSC"Option in General Settings;
2.When you create extensions, you need to enable the "Show in Directory"option so that extension in seen in the Directory (Phonebook);
3.When you finish the configuration on the Bicom PBX,then you can unplug the power and the phone will restart(Preconditions:IP Phone's option 66 is open);
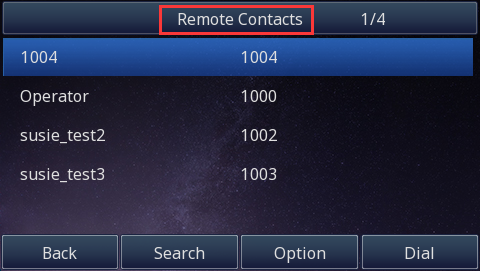
4.When the phone up and it will get the Phonebook . press Directory-> press Update button,and then press Enter button ,you will see the contacts on phone ;
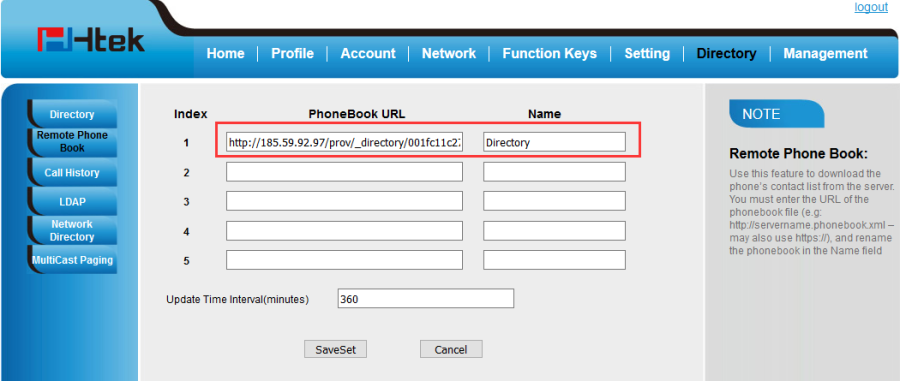
5.login phone's web page->Directory->Remote Phone Book, the Phonebook URL will get the path of the phonebook;
Basic Setting
Account registered
To register via Bicom Management Console
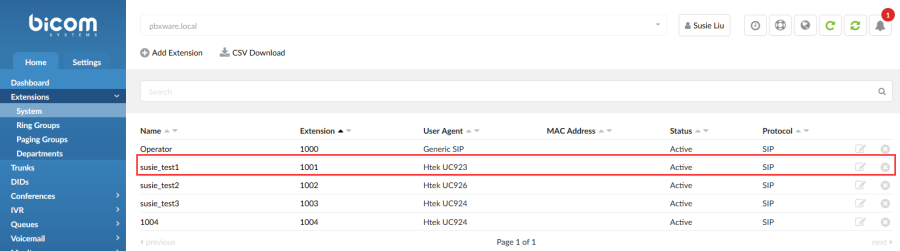
Log in Bicom Management Console->Extensions
1. click Add Extension;
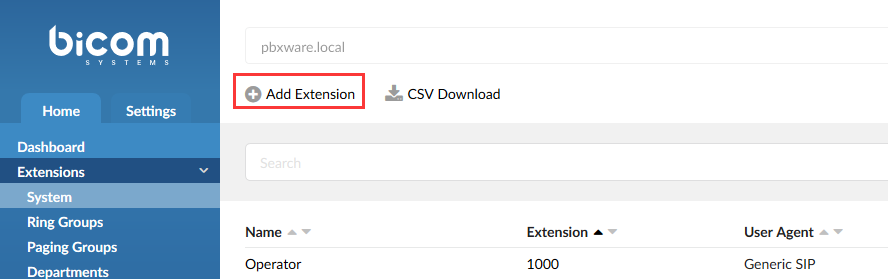
2.Choose UAD(Here you can choose corresponding phone model) and Location(Choose according to the location of your account),click Next step;
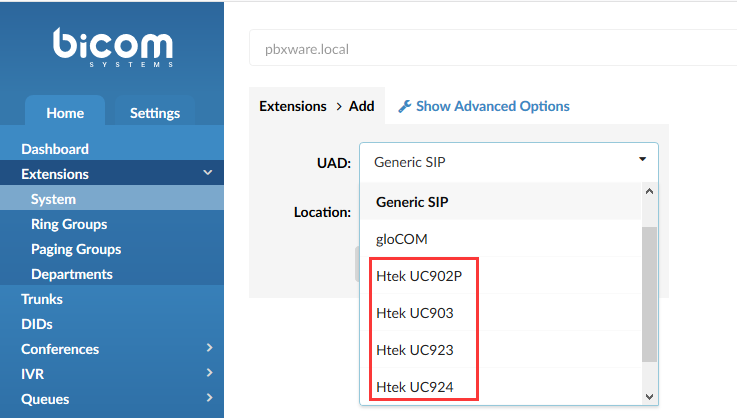
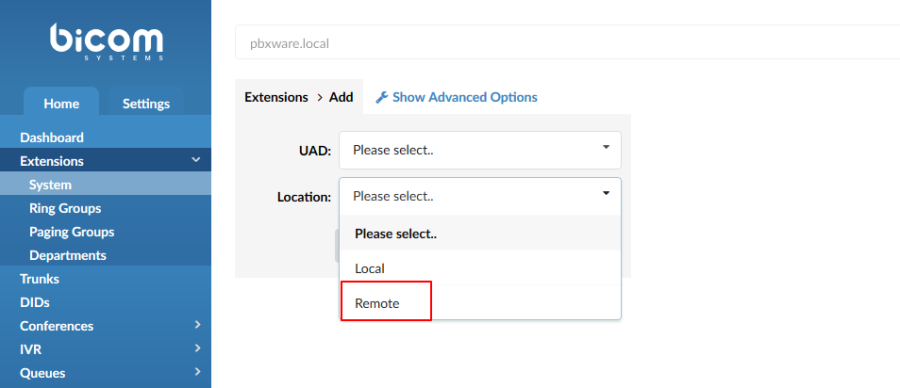
3.fill in some information about the extension(the frame which Plays the hook is necessary to fill in );
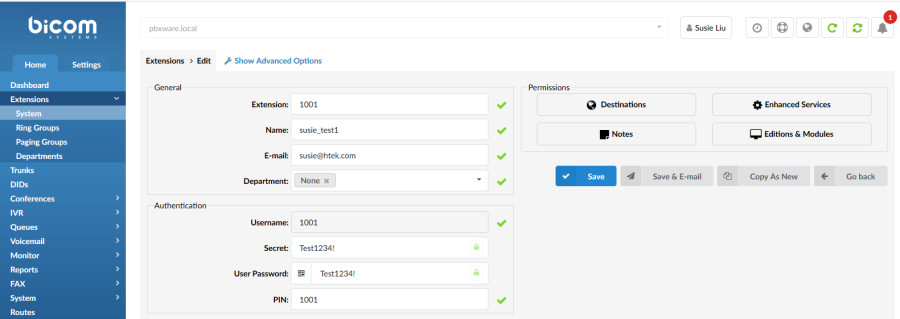
4.After filling in the blanks,you can click save button.(If the extension is registered success,you will see the extension in Bicom Management Console );
DND
Over View
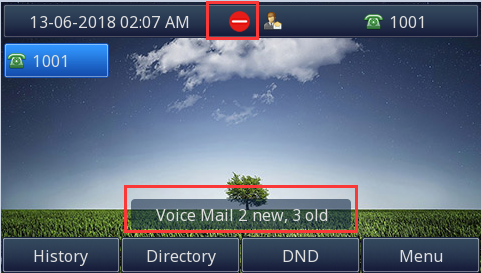
You can use DND to reject incoming calls automatically on the phone. The message "n New Missed Call(s)" ("n" indicates the number of missed calls) will appear on the LCD screen, and callers will receive a busy message.
How To Configure
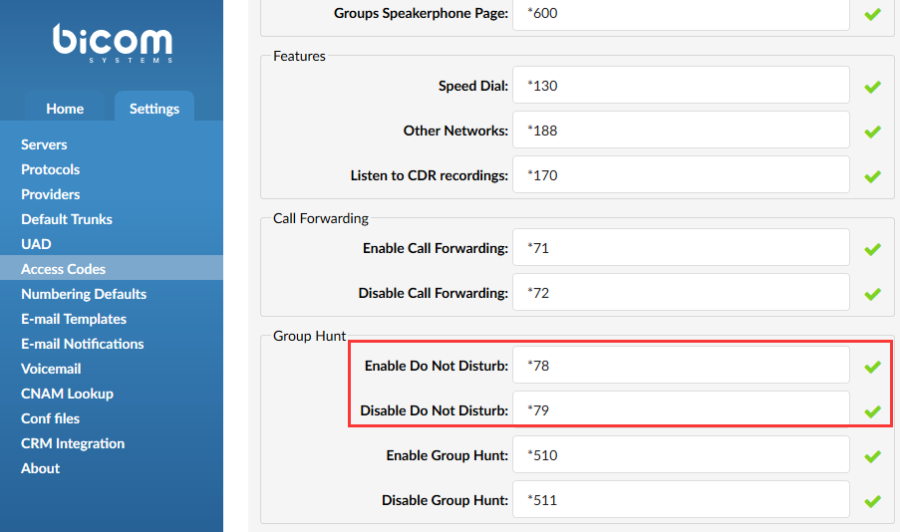
Log in Bicom Management Console->Settings->Access codes->Group hunt
There are feature codes about DND.
How To use
Use via Bicom
1.Log in Bicom Management Console->Extensions->choose one extension->Edit->Enhanced services->Do Not Disturb;

- Click Edit,There are three options you can choose:
Not Active:if you choose this option,DND feature is not available;
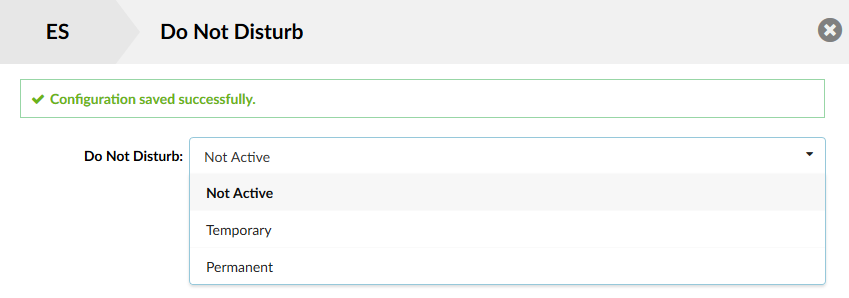
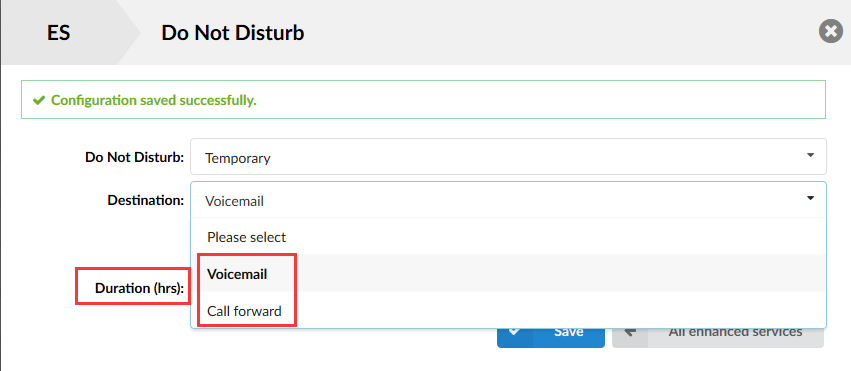
Temporary:if you choose this option,you can set up an incoming call to voicemail or a specific number and the setting of DND is time-limited;
Permanent:if you choose this option,you can set up an incoming call to voicemail or a specific extension and the setting of DND is Permanent;
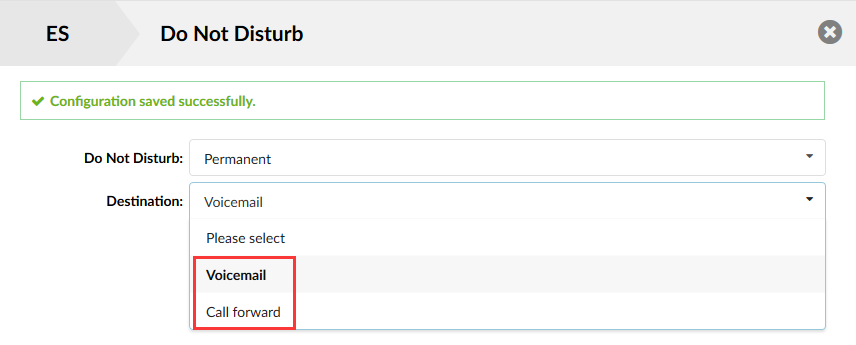
3.click save;
4.then other extension call 1001 will be entered 1001's voice mail or transfer incoming calls to specific extension;
Use via phone
- Press the DND softkey when the phone is idle. The icon on the status bar indicates that DND is enabled. Incoming calls will be rejected automatically and "n New Missed Call(s)" will prompt on the LCD screen.
Call Forwarding
Over View
The call forwarding feature allows you to automatically forward an incoming call to voice mail, another extension, an external number, your mobile, or send a busy signal, depending on your current status and time.
How To Configure
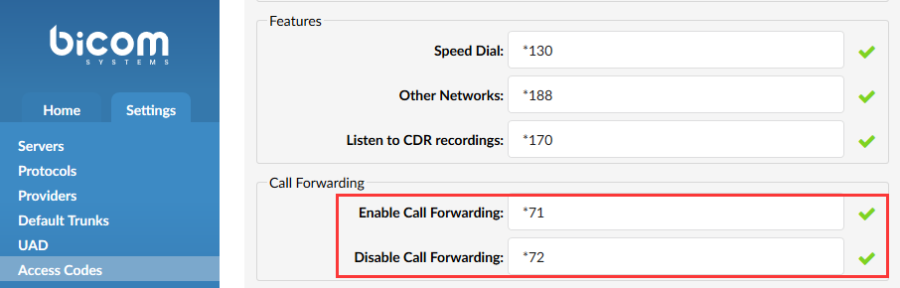
Log in Bicom Management Console->Settings->Access codes->call forward
There are feature codes about call forwarding.
How To Use
Use via Bicom
- Log in Bicom Management Console->Extensions->choose one extension->Edit->Enhanced services->Call Forwarding;
- Click Edit,there are three scenes,you can choose anyone;
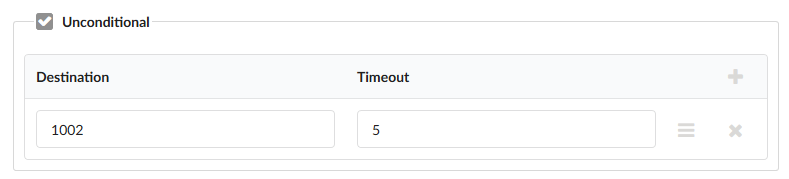
Unconditional:whenever one number (1003) call another number(1001),this call will be forwarded to other(1002).
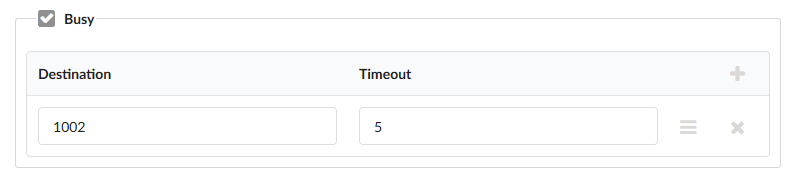
Busy:one number (1003) call another number(1001),1001 is busy(Talking to another phone),the call will be forwarded to other phone (1002).
No Answer:one number (1003) call another number(1001),1001 is no response within the set time,the call will be forwarded to other (1002).
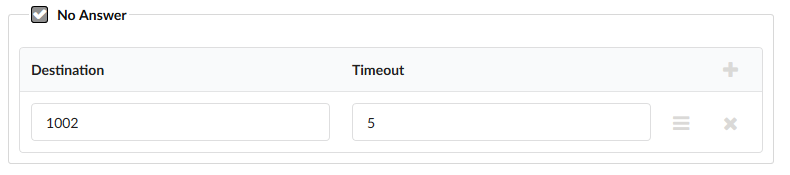
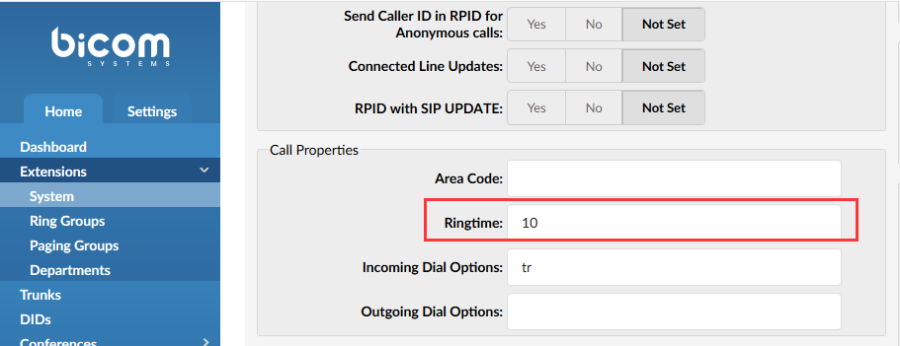
Set the ring time before answering a call(Log in Bicom Management Console->Extensions->choose one extension->Edit->Show Advanced Options->Call Properties):
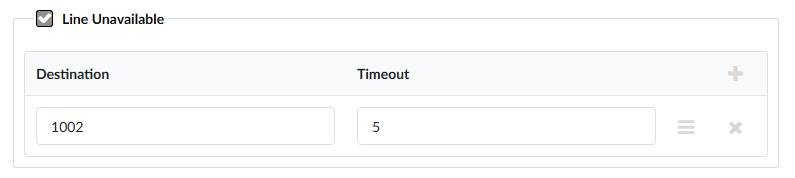
Line Unavailable:one number (1003) call another number(1001),1001 is not registered but the phone has a net,the call will be forwarded to other (1002).
Call Transfer
Over View
You can transfer a call to another extension in one of three ways:
Blind Transfer: Transfer a call directly to another party without consulting.
Semi-Attended Transfer: Transfer a call when the target phone is ringing.
Attended Transfer: Transfer a call with prior consulting.
How To Configure
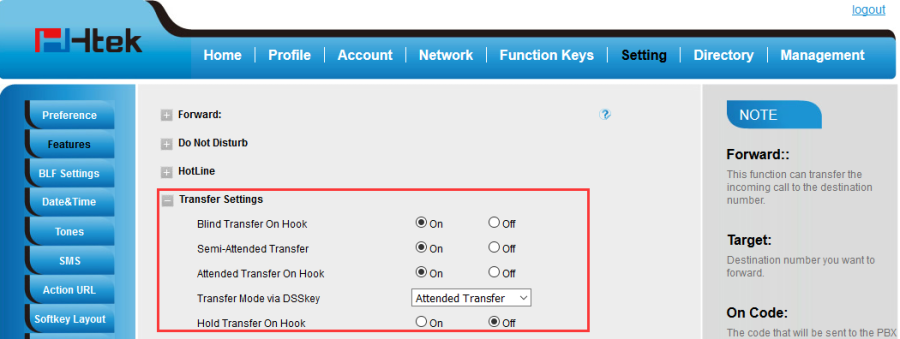
1.Log in web page->Settings->Features->Transfer Settings;
2.There are three scenes. Which scene do you want to use ,then you need to choose on
How To Use
Blind Transfer On Hook:one phone(1003) is talking with another phone(1004), then 1003 or 1004 can transfer the call to phone(1005), press "transfer" + "1005" + "transfer" to transfer the call to 1005.
Semi-Attended Transfer:one phone(1003) is talking with another phone(1004), then 1003 or 1004 can transfer the call to 1005, press "transfer" + "1005" + "#"or"send", 1005 is ringing then 1004 press "transfer"to transfer the call to 1005.
Attended Transfer On Hook:one phone(1003) is talking with another phone(1004), then phone(1003) or phone(1004) can transfer the call to phone(1005), press "transfer" + "1005" + "#"or "send", wait for 1005 answer the phone, then 1004 press "transfer" to transfer the phone to 1005.
Call parking
Over View
You can use call park feature to park a call, and then retrieve the parked call from another phone.Htek IP phone supports call park Feature. For call park feature, the server will automatically hunt for the first available orbit in the call park orbits and parks the call there. The call park orbits should be predefined. You can park an active call by pressing the park call key(if configured) on the phone. And you also can retrieve the parked call by pressing a (retrieve) parked call key or dialing the retrieve access code.
How To Configure
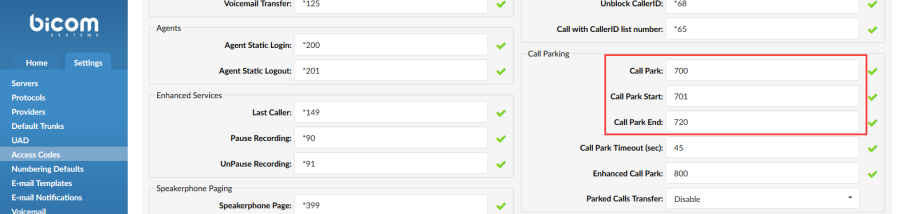
- Log in Bicom Management Console->Settings->Access codes->call parking
There are feature codes about call parking.
How To Use
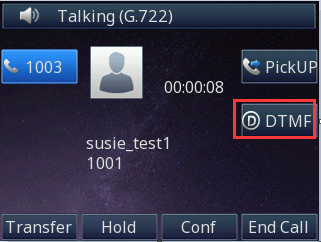
1.when one phone (1001) call another phone(1003),1003 has something to do then 1003 can click "DTMF"button(value is #700) to park this call ;
- another phone(1002) configure all the parking space,when there is a call which is stopping on the parking space ,the line key'LED will Blinking red,then you can press the line key to answer this call.
Notes:another phone(1002) must have call pickup enabled in Enhanced Services in order to be able to pick up parked calls.
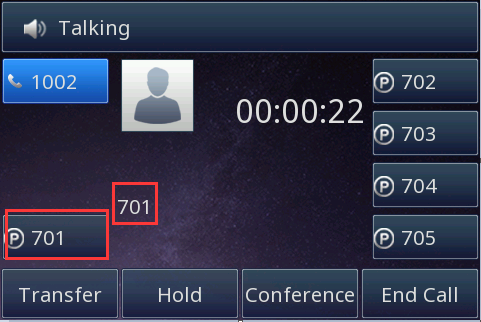
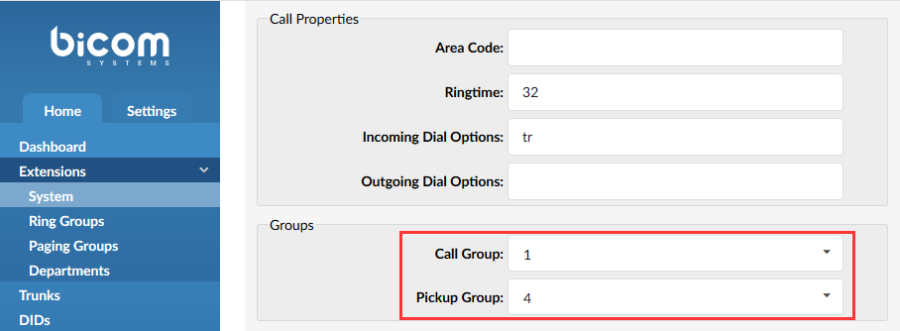
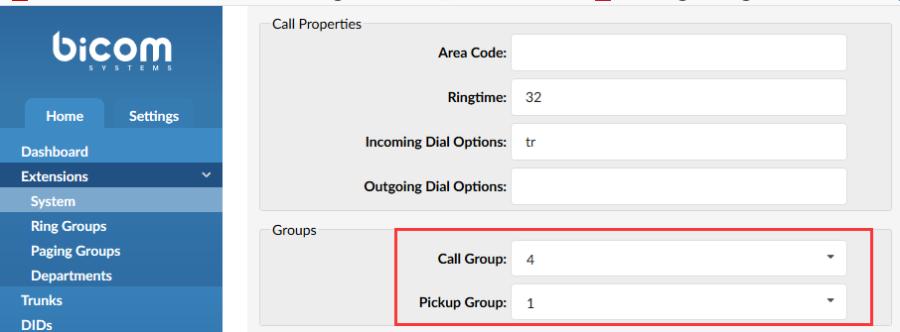
Pickup
Over View
Bicom phone system supports call pickup function, that allows you to pick up any incoming call that is ringing at another extension(If one extension's call group is the same as another extension's pickup group).
How To Configureure
Log in Bicom Management Console->Extensions->choose one extension and edit->Advanced Options->Groups
If one extension's(A) call group is the same as another extension's(B) pickup group,then B can pickup A's coming call.
1. 1002:choose one call group(1) and pickup group (4);
2.1003:choose one call group(4) and pickup group (1);
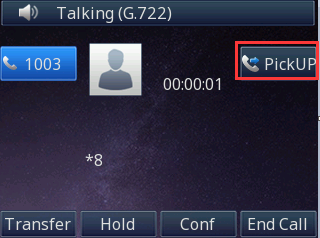
How To Use
1.one phone(1001) call another (1002) and there is nobody(1002) answer this call,then other phone(1003) can press pickup key to answer this call .
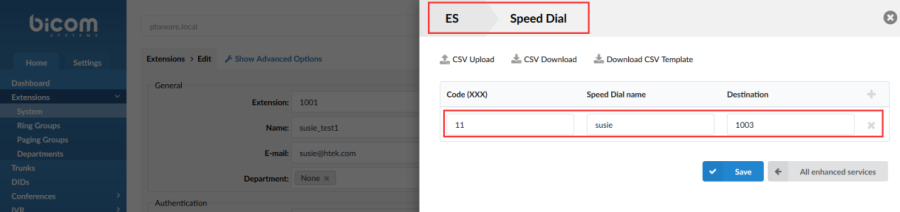
Speed Dial
Over View
When you want to make a call to someone quickly, you can configure his number as the speed dial, then press the speed dial button to dial the extension directly.
How To Configure
Log in Bicom Management Console->Settings->servers->Speed dial
Speed Dial is used with the *130 Access Code. When you dial *130XX, where XX is a two digit Speed Dial Code, you will dial the extension associated with that code.The difference here is that you set Speed Dial Codes for all extensions on the system, not just the ones which have this turned on in Enhanced Services;
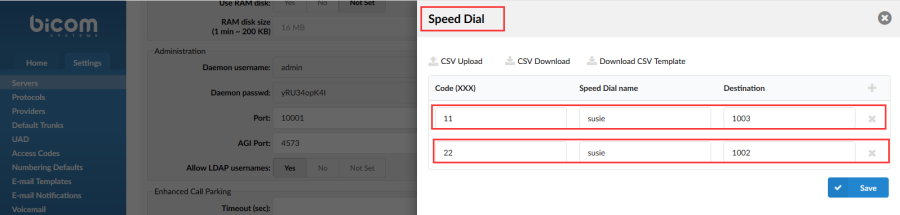
Log in Bicom Management Console->Choose one Extensions->Edits->Enhanced Services->turned on the Speed Dial
It's the ones which have this turned on in Enhanced Services,then this extension can use Speed dial function;
How To Use
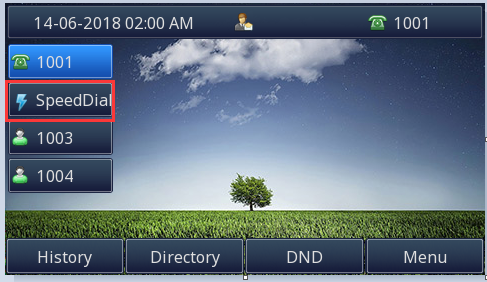
When you want to quickly call an extension, you can press SpeedDial line key
BLF
Over View
You can use BLF to monitor a specific extension for status changes on the phone. The BLF key illuminates solid red when the specific extension is in use. You can tap a BLF key to dial out the monitored phone number when the monitored extension is idle. You can also pick up calls that are received on the monitored extension.
How To Configure
Log in Bicom Management Console->Choose one Extensions->Edits->Enhanced Services
1.turned on the Speed Dial

2.Then click Edit to set up the monitored extension,then turn on BLF function and one extension which you want to monitor;

3.Click save button and re-provision the phone;
How To Use
When you complete the configuration:
- The BLF key's light will solid green and icon will solid green when monitored number is in idle status.
- The BLF key's light will flashing red and icon will flashing red when monitored number has a incoming call.
- The BLF key's light will solid red and icon will solid yellow when monitored number are talking.
Voice mail
Over View
When you are inconvenient to answer the call or you just do not want to answer the incoming call, you can transfer the call to voicemail.
How To Configure
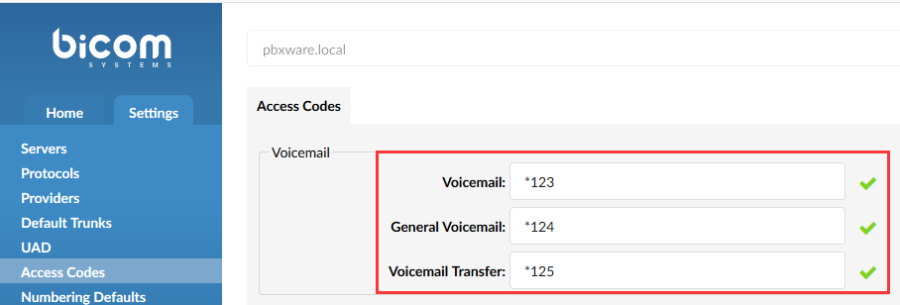
Log in Bicom Management Console->Settings->Access codes->voice mail
There are feature codes about voicemail.
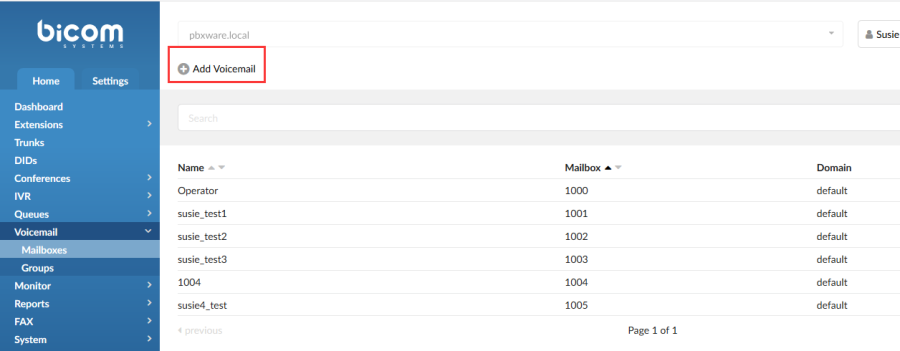
Log in Bicom Management Console->voicemail->mailbox
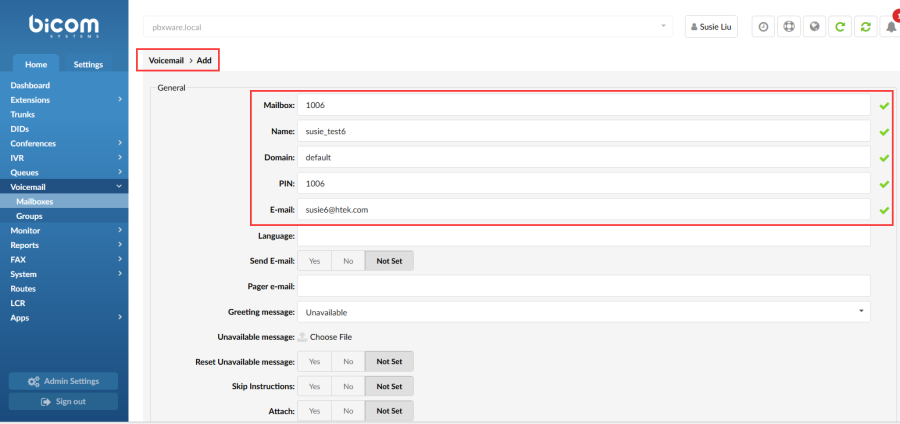
1.You can click Add Voicemail to add a mailbox;
- fill in some basic information;
How To Use
1.if you want to listen your extension's voice mail,and you can dial *123 to listen,then enter your extension's PIN code;
2.If you want to listen other extension's voice mail,and you can dial *124 to listen other extension's PIN code;
3.Leave a voicemail:you can dial the mailbox from any extensions,then it will prompt you leave a voicemail;
4.Listen to voice messages:you can dial the *124 and enter the mailbox and the PIN,then you can listen your voicemail;
Conference
Over View
Conferences allow two or more participants to communicate with each other at the same time using voice, video, or both.
Add Conference
How To Configure
Log in Bicom Management Console->conferences->conferences->Add conferences
1.click Add Conference;

2.Fill in conference name and conference number, then you can choose the groups which you stay;
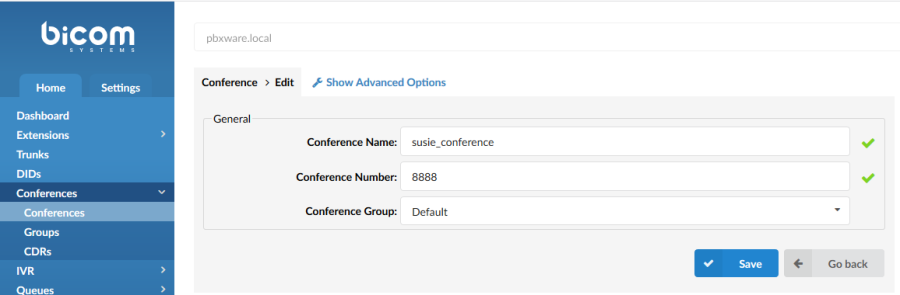
3.click Advanced Options,fill in some advanced settings,conference PIN must be filled in;
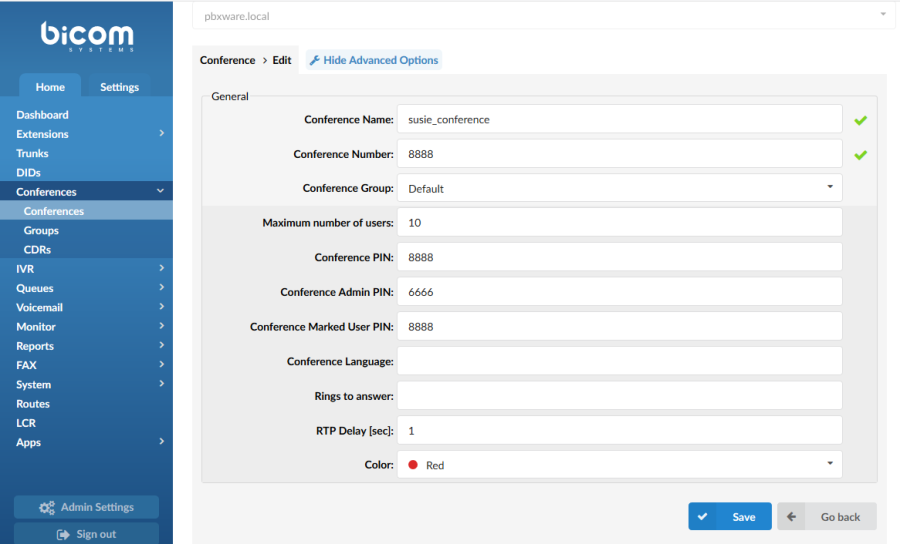
4.click save and then there is a conference name and number;
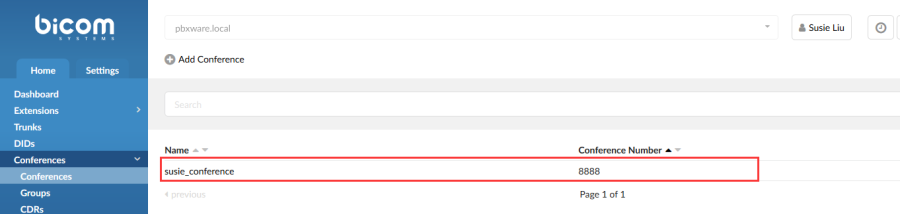
How To Use
- when any IP phone want to participate in this meeting,then it can dial the conference number and conference PIN.
Notes:only two calls are allowed
Group
Conference Groups are used to create groups of users that have certain permissions for conferences.
How To Configure
Log in Bicom Management Console->conferences->Groups
1.click Add Conference Group;

2.fill in the Group Name and choose some Options that you want to use,(There are two options for enabling users to join a specific conference room. You can either enable all users by selecting the check box for Enable All Users or you can manually add users by clicking the"+" sign in the upper right corner of the Users table. This will open the Conference Groups: Add User pop-up window where you can perform a search by the Extension number, Name, or e-mail address. After your search results are displayed, simply click on the user that you want to add to the Users table.);
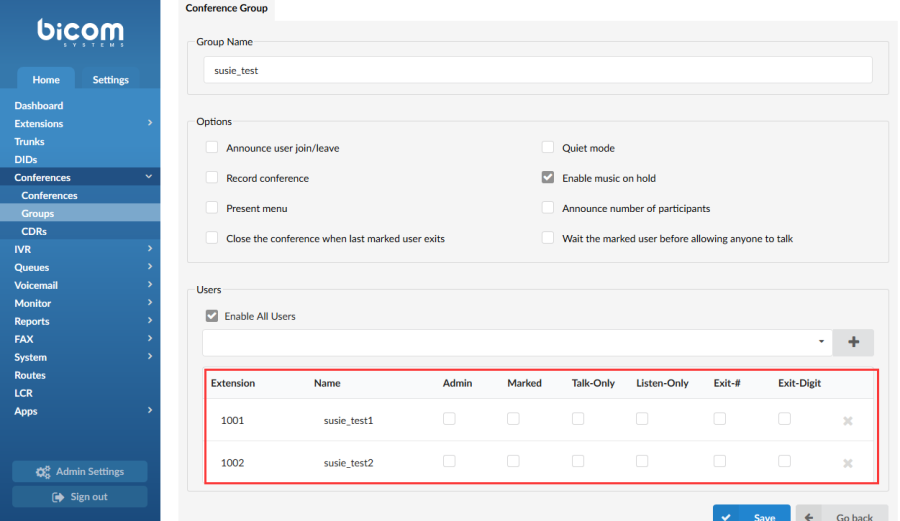
Admin:Sets the admin conference mode. If this option is enabled, conference calls coming from the extension will be treated with admin privileges.
Marked:Sets the marked conference mode. If this option is enabled, conference calls coming from the extension will be given less privileges than admin, but more than regular conference participants.
Talk-Only:Sets the 'talk only' conference mode. If this option is enabled, conference calls coming from this extension will be allowed to talk only (no voice will be heard on the UAD/Phone).
Listen-Only:Sets the listen only conference mode. If this option is enabled, conference calls coming from the extension will be allowed to listen only (no voice will be sent from the UAD/Phone).
Exit-#:If this option is enabled, users will be allowed to exit the conference by dialing the '#' key.
Exit-Digit:If this option is enabled, users will be allowed to exit the conference by dialing any digit.
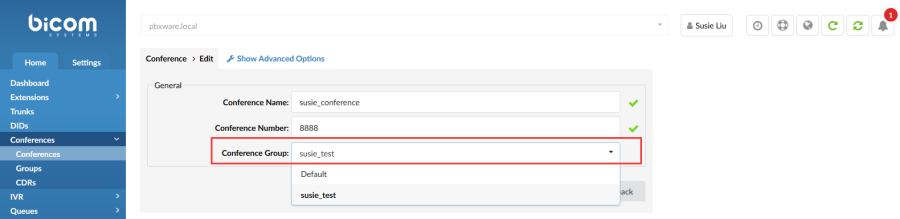
3.After setting up the conference group, you can select the conference group when you set up the new conference;
How To Use
- When setting a conference group, you can set some configurations for each group member,when any IP phone want to participate in this meeting,then it can dial the conference number and conference PIN.
Notes:only two calls are allowed
Troubleshooting
Why does the phone display "Network unavailable"?
1.Ensure that the Ethernet cable is plugged into the Internet port on the phone and the Ethernet cable is not loose.
2.Ensure that the switch or hub in your network is operational.
Why doesn't the phone display time and date correctly?
Check if you have configured the phone to obtain the time and date from the SNTP server automatically. If the phone fails to connect to the SNTP server, you need to configure the time and date manually.
Why the phone can't auto-provision successful?
1.First, the Bicom provision method is option66, you should make sure that your phone's option 66 is on.
2.If you have turned on the option 66,but the phone do not provision successfully,then you should check your phone whether turn on the PNP or not;PNP provision method priority is higher than option 66.