Vodia Configuring Guide
- Former user (Deleted)
About This Guide
Thank you for choosing the Htek IP phones, which are exquisitely designed to provide basic phone features plus advanced business features, such as Call Park, Call Pickup, Intercom and Enhanced Monitor Extension over IP network.
The purpose of this guide is to serve as a basic guidance for auto-provisioning. Htek IP phones with Vodia phone system, including:
• Htek 8 Series: UC862, UC842, UC803P, UC802P.
• Htek 9 Series: UC926, UC924.
NOTE:
- The configuration process outlined in this guide applies to Htek SIP IP phones.
- Firmware version x.0.4.2 or later and Vodia server running version V58 or later.
- The configuration process described in this guide take the Htek UC924 as an example.
In This Guide
Topics provided in this guide include:
• Chapter 1 Getting Started
• Chapter 2 Automatic Provisioning of Htek Phones
• Chapter 3 Vodia Integrated Features
• Chapter 4 Factory Resetting and Upgrading
• Chapter 5 Troubleshooting
Summary of Changes
• V1.0 (2017-08-16): Providing a basic guidance for auto-provision Htek IP phones with Vodia phone system.
Getting Started
This chapter will show you the basic process of phone's start-up and instructions of the way to get the basic information of the phone. Topics include:
• Status
Initialization
After your IP phone has been powered up, the system boots up and performs the following steps:
The IP phone finishes the initialization process by loading the saved configuration. The phone LCD screen will display "Booting".

And then show "Initializing" during the initialization.

The IP Phone will upgrade the firmware if there is a new firmware on your server. And the IP Phone will show "Check firmware, please wait…" after initialization.

By default the phone attempts to contact a DHCP server in your network in order to obtain its valid network settings, e.g. IP address, subnet mask, default gateway, DNS server.
Status
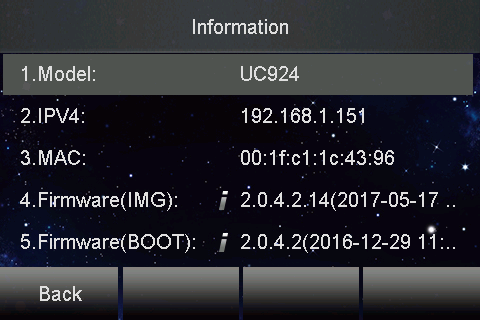
You can view the system status of your phone via phone user interface. The information of phone status includes:
- Information (e.g. Model, IP, MAC, Firmware, Device cert)
- Network (e.g. IP, IP Port Mode, LAN Type, MAC)
- Account (e.g. register status of accounts)
To view the phone status via phone interface:
- Press Menu → Status → Information/ Network/ Account
Automatic Provisioning of Htek Phones
This chapter provides the following instructions of automatic provisioning with Vodia PBX system. Topics include:
• Configuring the Domain Settings
• Configuring the Extension(s)
• Provisioning via DHCP Option
• Htek Phone Settings for Auto Provisioning
• Customize Phone Config Template
When provisioning a Htek phone, you should first set the required settings on the PBX as shown in provisioning document Steps Before Provisioning.
Steps Before Provisioning
Many Vodia PBX settings are downloaded to the phone during Plug and Play, so it's best to configure these settings before actually doing Plug and Play. That way, when the phones are provisioned, they will have those settings. Some of these settings are listed below.
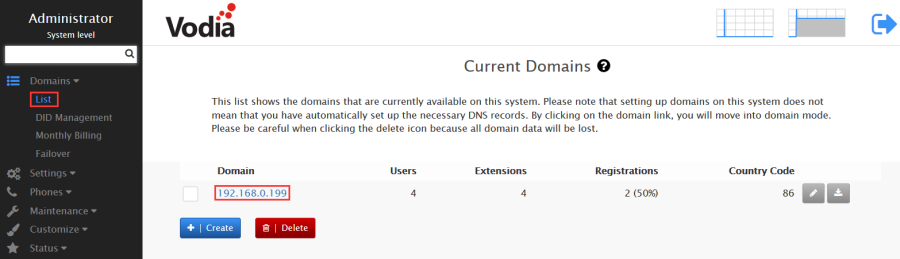
Configuring the Domain Settings
Many domain settings are also uploaded to the extension (the phone) during plug and play, such as language settings and country codes etc.
- Go to your selected domain in the Vodia PBX web interface.
- Go to General Settings
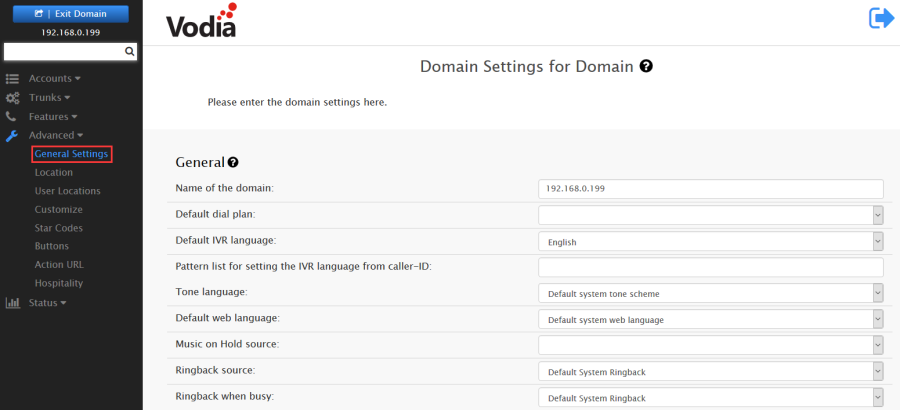
- Choose default IVR and web languages, a time zone, and country and area codes etc.
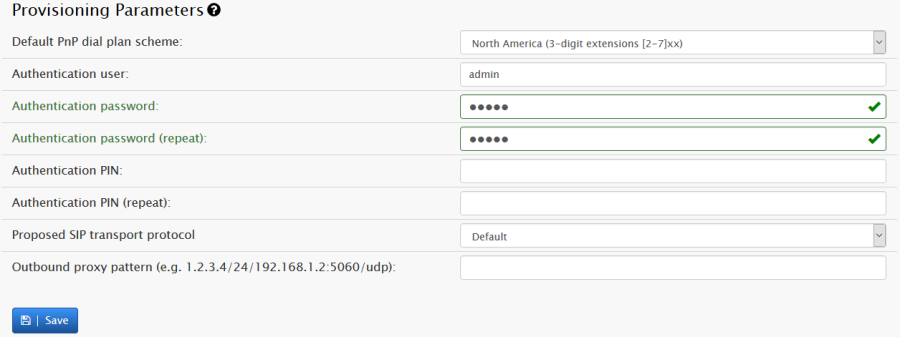
- Scroll to the bottom of the page to Provisioning Parameters, and select a default dial plan scheme and enter the username and password for the phones.
Configuring the Extension(s)
Many extension settings are also uploaded to the extension (the phone) during plug and play. The extension based settings can be set from the domain (while logged in as admin and selecting the extension for which changes are to be made) and also from the user portal (logged in as a user).
- Go to your selected domain in the Vodia PBX web interface.
- Click on the extension from the list for which you want to change settings.
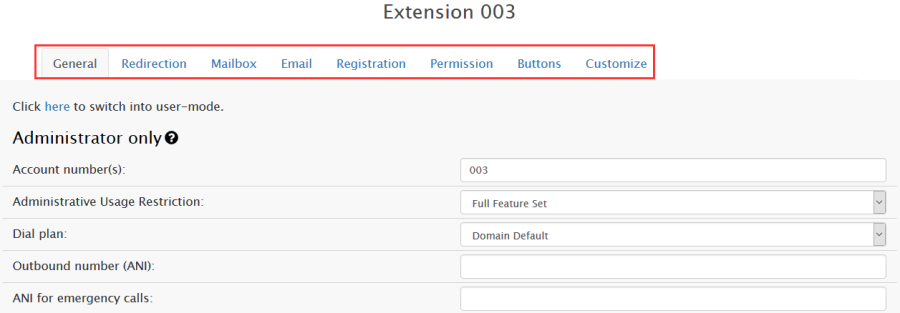
- For that extension you will see several tabs, which have related settings that you can change for PnP, e.g.
- General tab for some general settings.
- Registration tab for some registration specific settings including binding a phone to a specific MAC.
- Buttons tab for selecting or customizing a buttons profile. All these settings will be uploaded to the phone tied to this extension on provisioning.
- You can tie a phone to an extension by adding the phone's MAC address to the extension. Under the tab Registration for the extension, enter the MAC address of the phone you want to tie to that extension in the setting Bind to MAC Address and press Save. This will tie the phone to that extension and when it is provisioned, the phone will get all the settings from this extension, including registration information, buttons, and everything else that is provisioned.

Provisioning
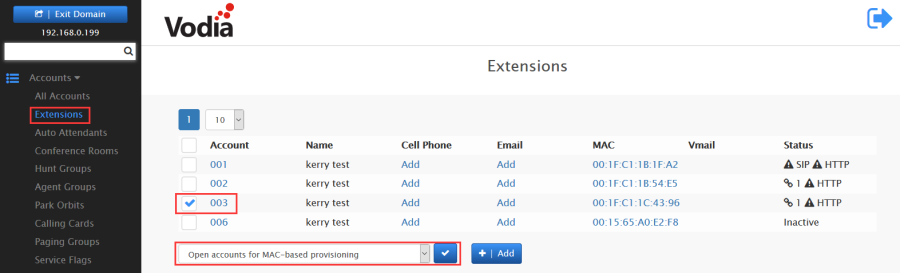
Open MAC Provisioning
For security reasons, navigate to the extension level and activate "Open account for MAC based provisioning" as shown, to allow the phone to provision to that specific account.
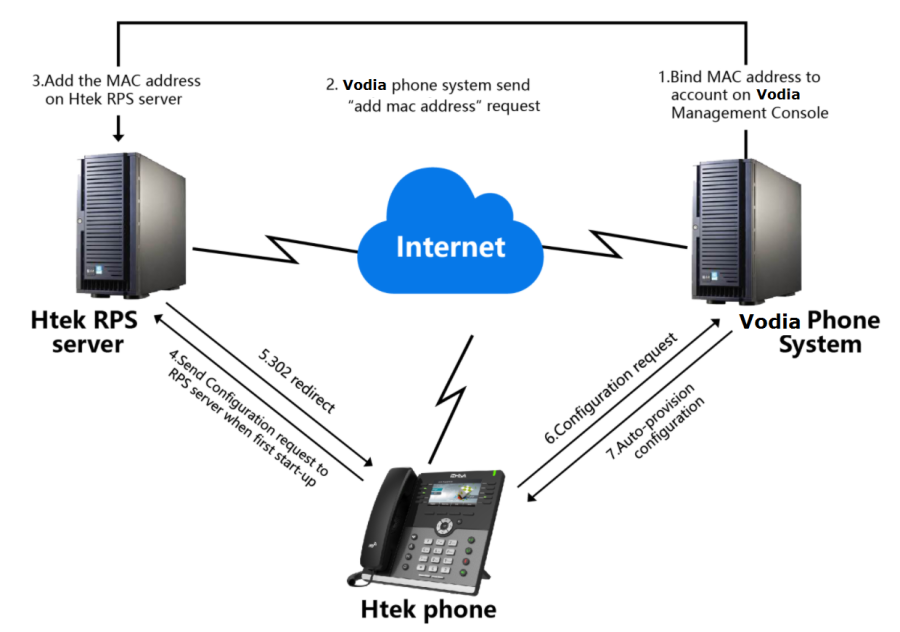
Provisioning via RPS
This method, known as redirection service, allows for touch-free, WAN-based plug and play and can be used for a large deployment of phones. You can arrange to have the MAC addresses of your phones provisioned to a setting URL that reflects your Vodia PBX. Please refer to the following picture.
Operating Instructions
- Log into the Vodia PBX web interface.
- Go to Settings.

- In the "Provisioning Server Redirection", add this URL tftp://192.168.0.199.
- Fill in Username and Password of Htek RPS server.
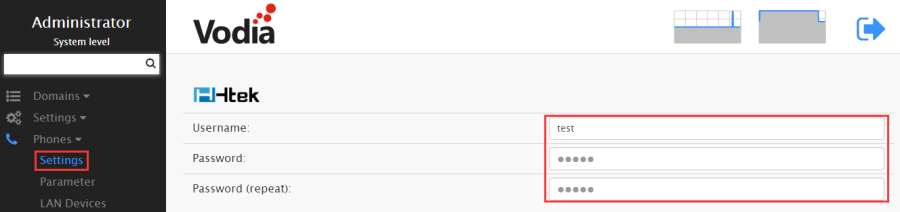
- Click Save.
- Then, once we adding a phone's MAC address to a extension, the URL and MAC information will be added to the RPS server.
- Power up and connect the phone to the network, it will be provisioned automatically.
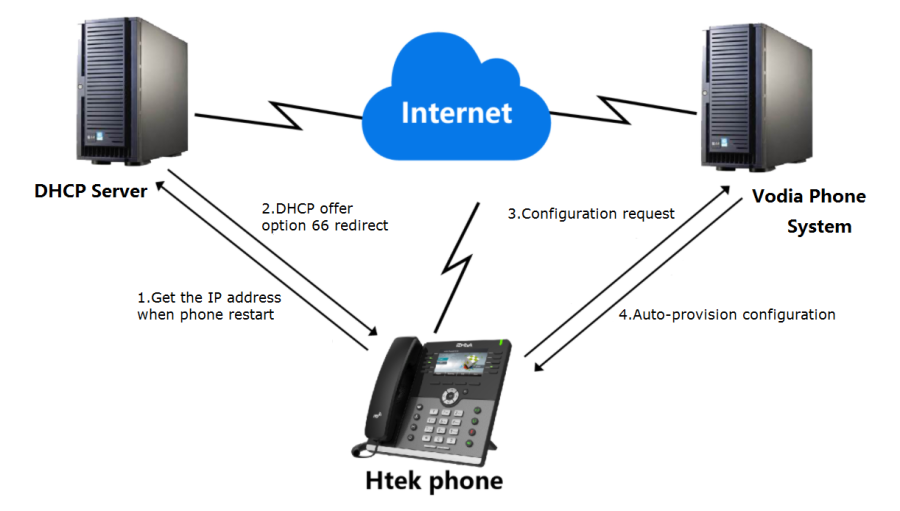
Provisioning via DHCP Option
This method can be used to provision in both LAN (internal) and WAN (remote) environments as long as you can control the local DHCP server and the DHCP server supports option 66. The phone retrieves its IP address and other configuration information through dynamic host configuration protocol (DHCP). In order to use this method, you need to put in the address of the PBX on your DHCP server, e.g. tftp://192.168.0.199.
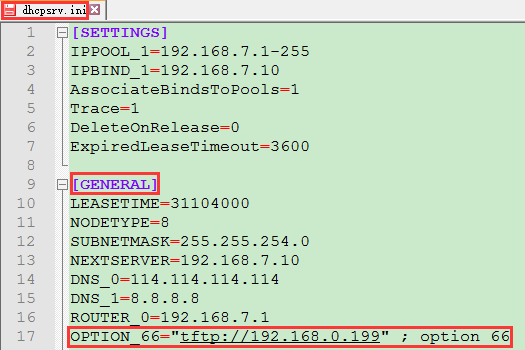
Operating Instructions
- Edit DHCP configuration file.
- In the GENERAL field, add this URL tftp://192.168.0.199.
- Log into the web interface of the phone and navigate to "Management", then "Auto Provision" page. Set as below.
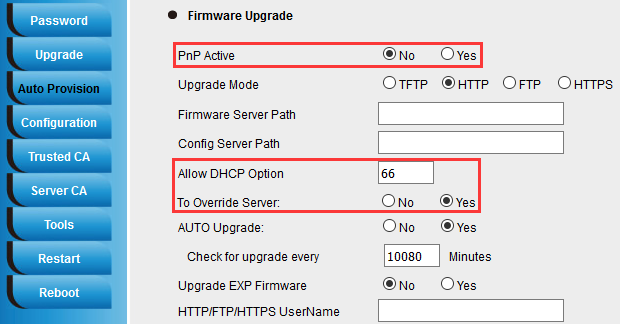
- Reboot the phone, it will be provisioned automatically.
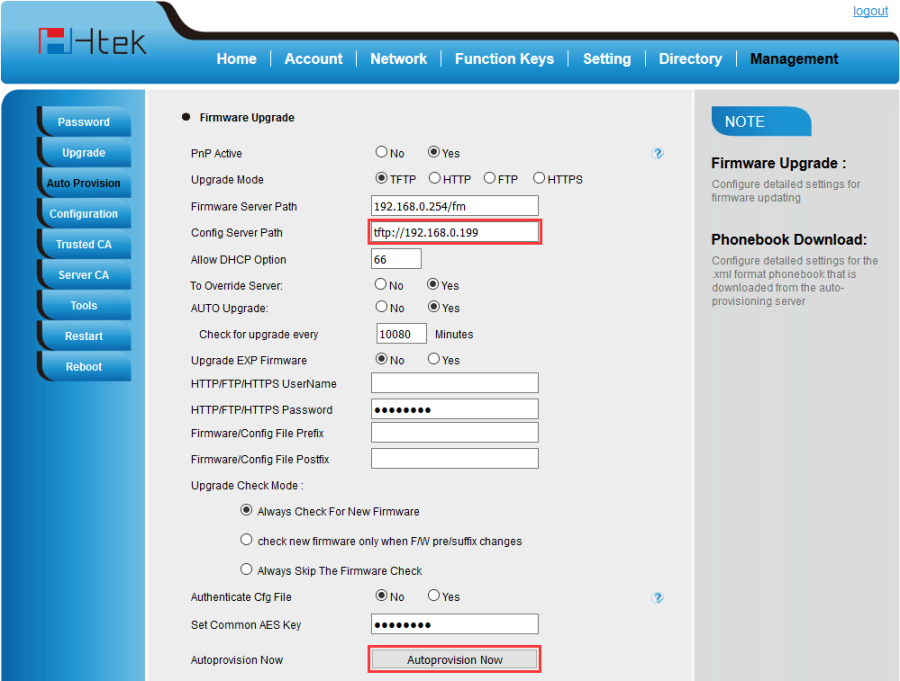
Htek Phone Settings for Auto Provisioning
Log into the web interface of the phone and navigate to "Management", then "Auto Provision" page. In the "Config Server Path", add this URL tftp://PBXIP, e.g. tftp://192.168.0.199.
You don't have to reboot the phone for provisioning, it is okay to save the information and then use the Autoprovision Now button.
Customize Phone Config Template
Maybe you are not satisfied with the default config of auto-provision. Each Htek phone setting provisioned by Vodia PBX is connect with a P number of Htek template file on Vodia PBX. We can modify the value of the P number in template so that to change the config which is provisioned by Vodia PBX system. Some related setting steps are listed below.
Operating Instructions
For example, we can refer to the following steps to change the default ringtone to Ring 2.
1 ) Find out which P number you want to change and what value you want to change to for the P number by the browser (e.g. Firefox).
a ) Login phone's webpage → Setting → Preference → Ring Tones
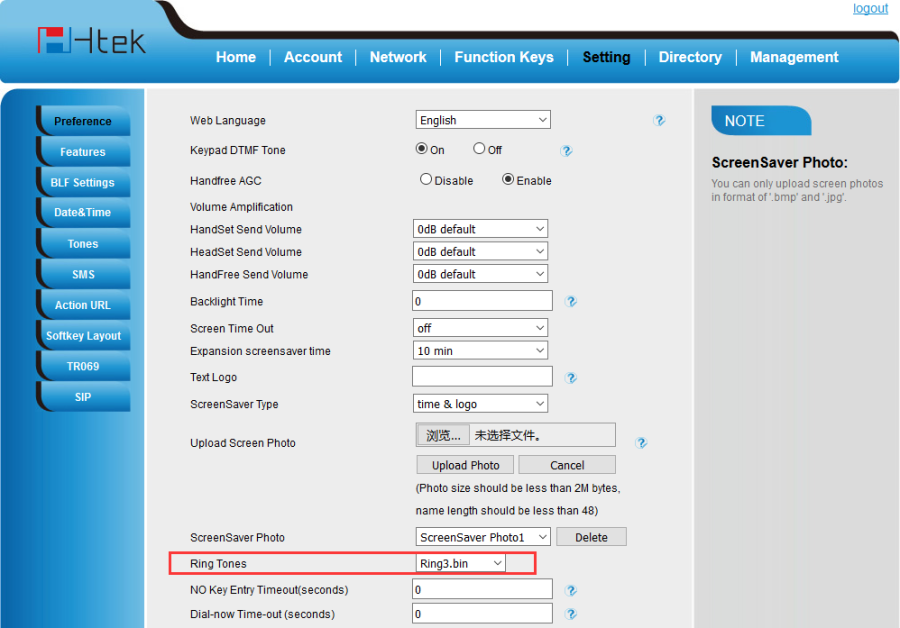
b ) Right click the drop-down box and chose the "Check the Elements" item.
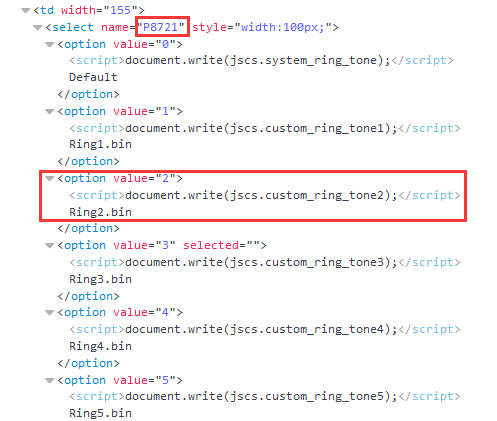
Now, we know the P number of setting Ring Tone is P8721, and the value 2 mean Ring2.
Tips: You also can refer to our another document "parameters list"
2 ) Find out the P number in the template and modify its value.
a ) Login Vodia Management Console -> Customize ->Templates -> Type -> Page ->htek_common.xml
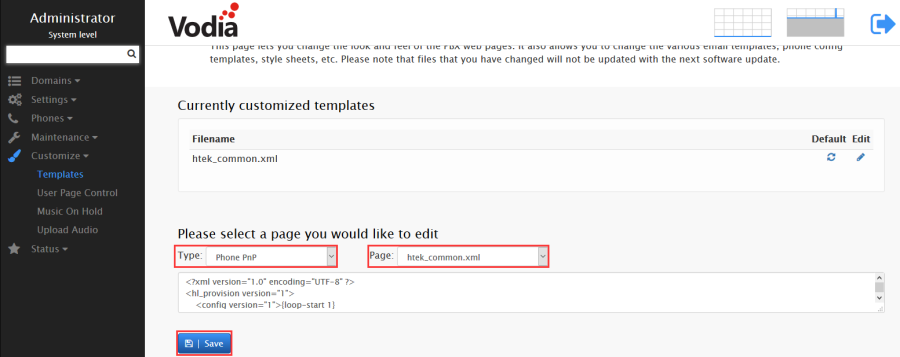
b ) Locate the num "P8721" in the template by "Ctrl + F". And modify the value to what you want.
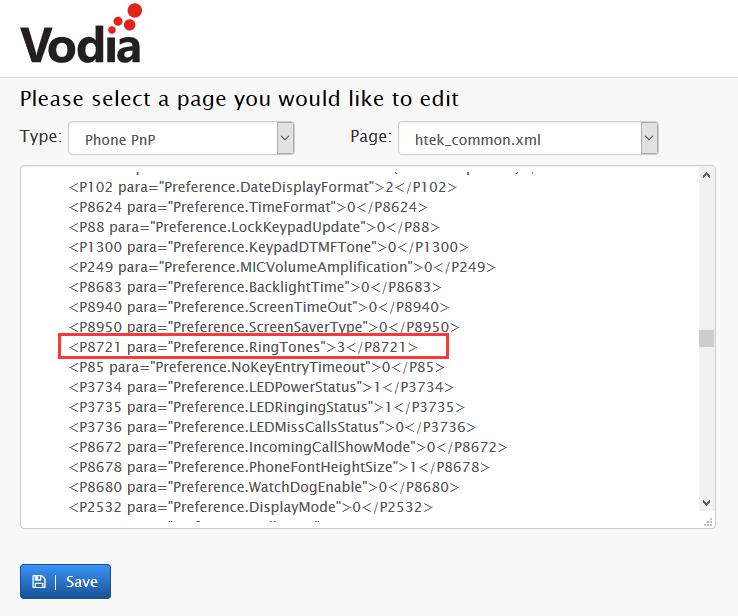
c ) If you can't find it in the template. You can add this item in "Custom parameters" area.
![]()
d ) Click Save.
3 ) After modify the template successful, just need you re-provision the phone.
Vodia Integrated Feature
This chapter provides the detail instructions and configurations for the following Vodia integrated features. Topics include:
Web Attendant Console
The web attendant console lets you manage calls from your user portal on the PBX, like hang up, blind transfer, hold, attended transfer or making a call etc. All these actions can be performed very easily by either clicking or dragging and dropping as explained below. It also lets you monitor the other extensions on your domain, like whether they are registered, in a call or idle etc.
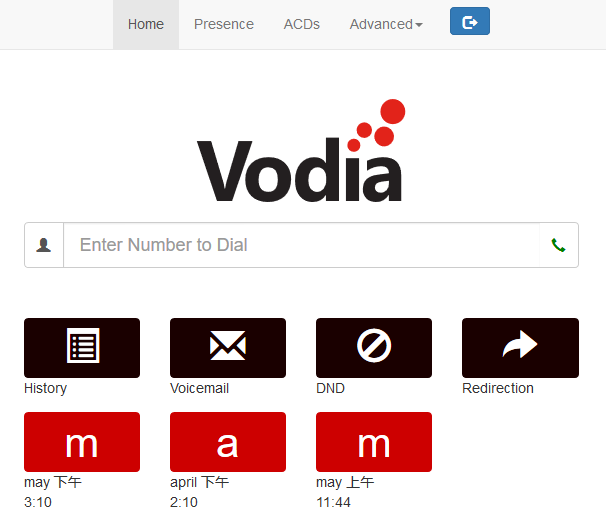
Before, you should login to your user portal, enter the extension number of the user portal you want to enter and the corresponding password and press the button or the enter key. You will enter the user portal. On the home page of your user portal, you can use the WAC.

Extension Monitoring
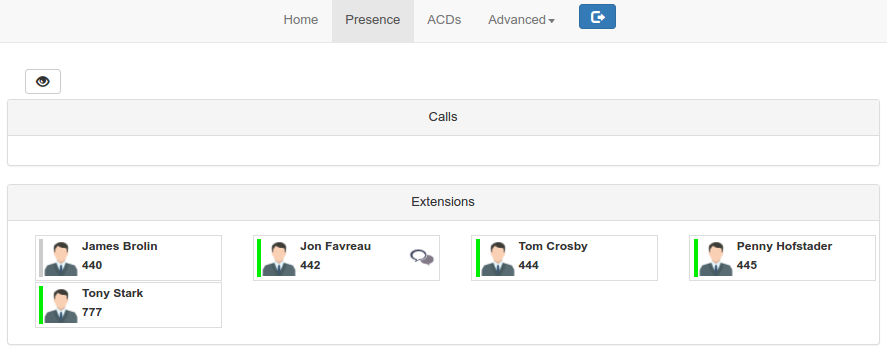
On the home page of your User Portal you will see the status of all other extensions in your domain.
- Gray square box next to an extension means it is not registered.
- Green square box next to an extension means it is registered and idle.
- Red square box next to an extension means it is registered but busy.
Call Controls
When a user is logged in to his User Portal, the calls are shown on his portal's home page along with call controls which are used for call management. There are three sections for the calls:
- Ringing Calls (for calls that are currently ringing and can be picked up)
- Active Call (the call to which the user is talking at the moment)
- Calls On Hold (calls that are on hold)
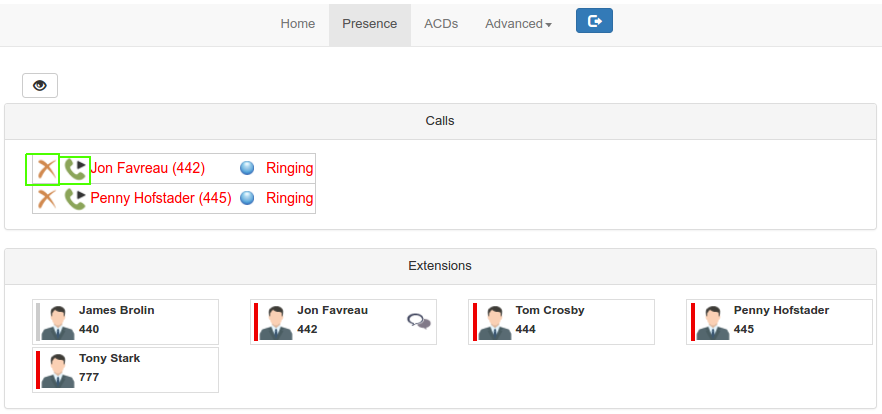
1 ) Ringing Calls
When a new call comes in and the registered phone rings, the call is also shown in the "Ringing Calls" list. As more calls come in, they keep adding to this list.
You have two options for each call:
- Pick it up by clicking on the green handset icon next to the call
- Hang up by clicking on the cross next to the call.
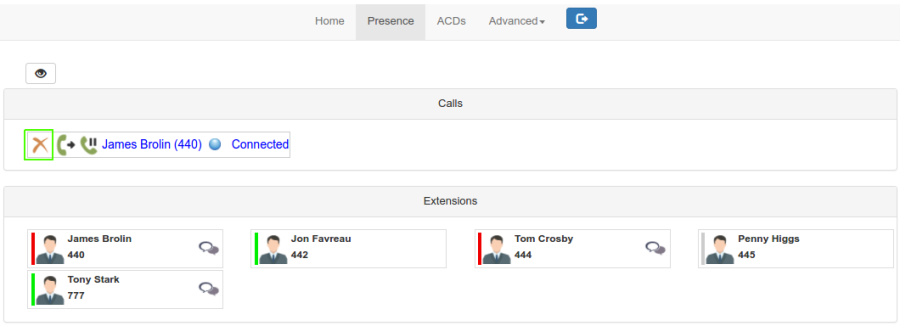
2 ) Active Call
The call to which you are currently connected and talking is shown here. You have four options:
1. Hang up
To hang up the call, simply click on the cross beside the call that you want to hang up.
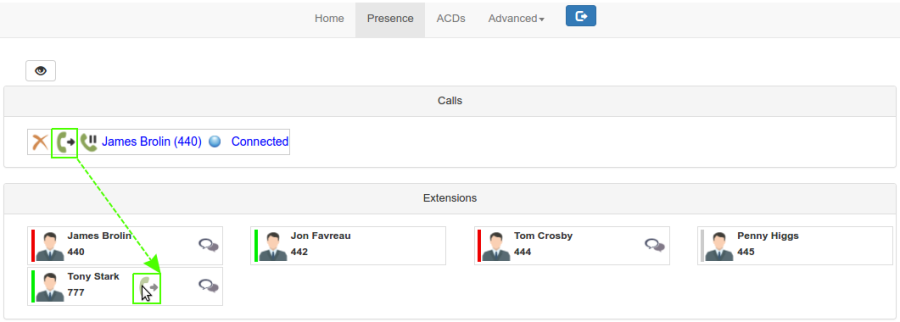
2. Blind Transfer
To Blind Transfer a call, simply click and drag the transfer icon (handset with an arrow) beside the call you want to transfer, and drop it on the extension (shown in the monitoring section) you want the call to be transferred to. The call will be transferred and disappear from your portal.
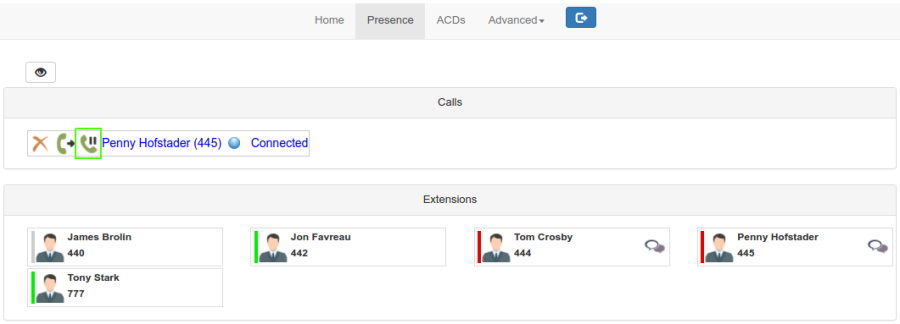
3. Hold
To hold a call, simply click on pause icon (handset with the pause sign) beside the call you want to hold. The phone will go on hold and the call will move from the active call section to the "Calls On Hold" list. All calls that are held will keep adding to the hold list.
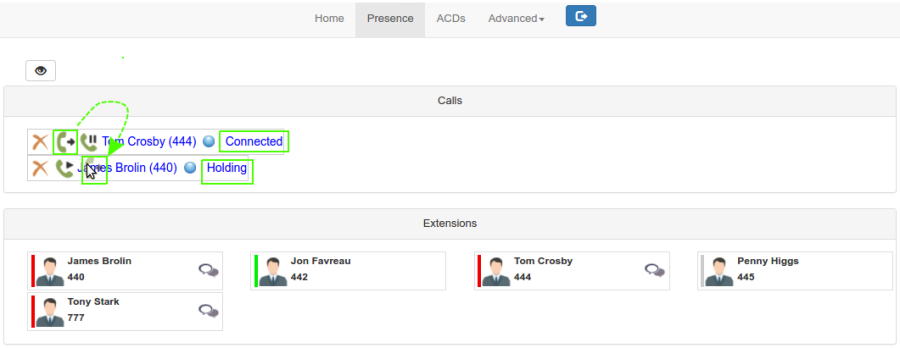
4. Attended Transfer
For Attended Transfer, you will usually have at least one call on hold as you dial and talk to another extension for a possible transfer. The active call will be in the "Active Call" section and the held calls will be in the "Calls On Hold" list. You can now transfer the active call (after telling him/her that there is call for him/her) by dragging the transfer icon of the active call and dropping it on one of the held calls (in the hold list) to which you want the call transferred.
Note: As you drag the icon on the held calls for a transfer, the selected call will be highlighted by dotted lines. Once you are on the correct held call, you can drop the icon for the tranfer to complete.
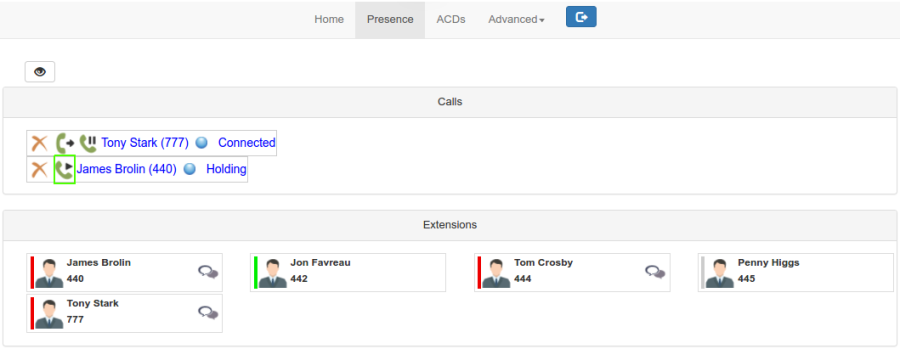
3 ) Calls On Hold
From the hold list, you can hang up any of the calls by pressing the cross beside it, or resume any of the calls by clicking the resume icon (handset with the play sign) beside the call you want to resume. When a call is resumed, it will move back to the "Active Call" section. If there was already another active call, that call will go on hold and move from the "Active Call" section to this list.
Park Orbits
A park orbit is like a parking lot. It provides a holding place where calls can be parked while the caller is being located. Once a call has been parked on a park orbit, it can be retrieved by other users, which is very different than if the call had been placed on hold. (A call on hold requires the person who originally answered the call to track someone down and transfer the call to the right person.) With a park orbit, the person answering the phone can put the call out there for anyone to pick up.
- Park - Once an account has been created, users can park the call on the orbit by executing the Call Park star code (*85 by default), followed by the account number of the park orbit.
- Retrieve - Other users can retrieve the call by executing the Call Park Retrieve star code (*86 by default).
You can also configure a Park Orbit button so that users can just click the button to park and retrieve the call.
Creating a Park Orbit
- Go to your selected domain in the Vodia PBX web interface.
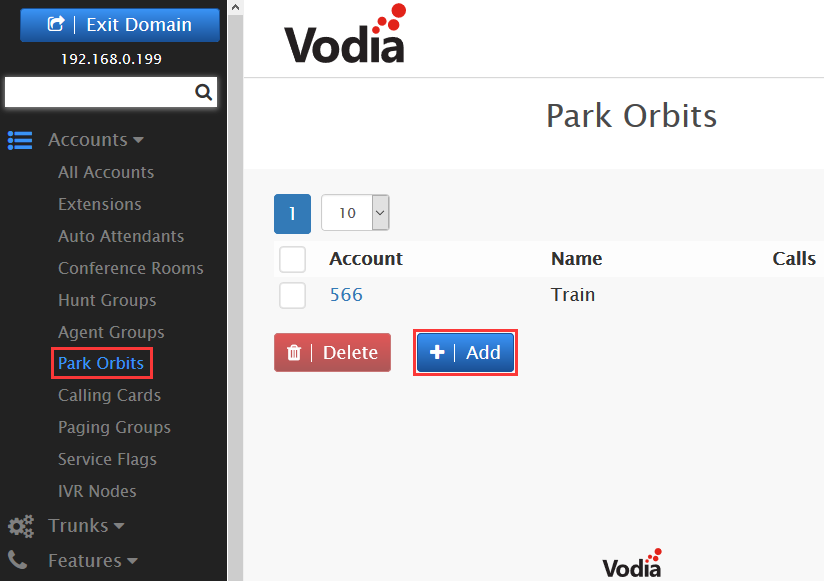
- Go to park orbits by clicking on Park Orbits under Accounts as shown above.
- On top, click the tab Add to create a new Park Orbit.
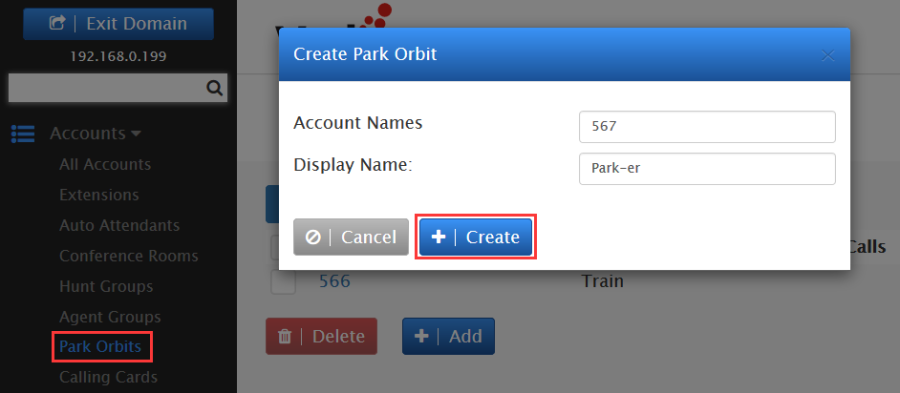
- In the Account Name field, enter an account number and/or alias.
- To create multiple accounts at the same time, use a space between the numbers: 567 568 569.
- Press Create.
- The park orbit(s) will be created which you can see in the "park orbit list" or in "all accounts list", where you can enter each park orbit just by clicking it, in order to modify it if you want, as explained below.
Configuring a Park Orbit
Once you've created a park orbit account, use the following information to configure your settings.
Click on any park orbit from the list that you want to change.
- Explanation and use of the settings
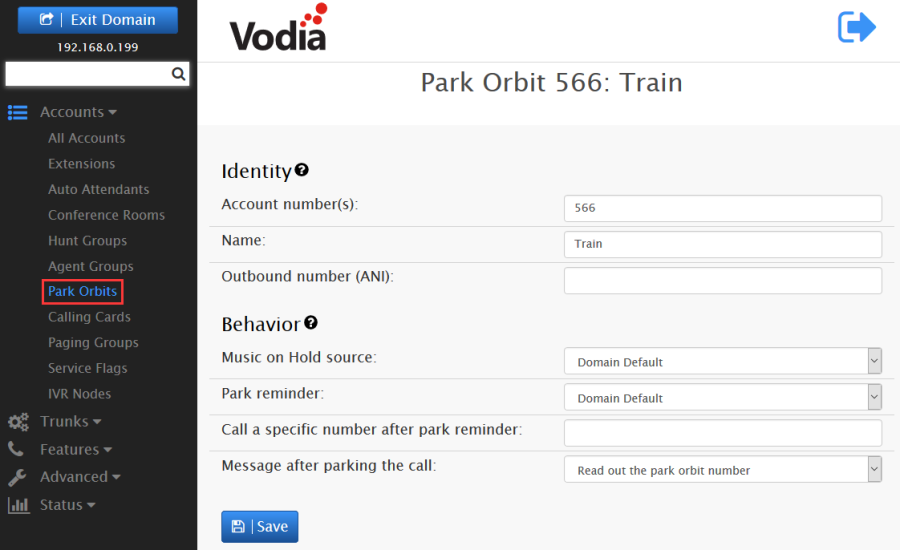
- Account number: This field is automatically populated with the account information you entered into the Account Name field when the account was created.
- Name: By naming the park orbit, you will be able to identify it more easily.
- ANI: ANI (Automatic Number Identification) is a service that tells the recipient of a telephone call which telephone number made the call. In most cases, the ANI is used in the From field in the SIP packets or the caller-ID. Each domain can be configured with a default ANI or you can specify a unique ANI here.
- Music on Hold source: From the dropdown, choose a music on hold source.
- Park reminder: Once a call has been parked and the required time has lapsed, the system will call back the extension that parked the call. This will serve as a reminder to the user that the caller is still waiting and that no one has picked up the call.
- Call a specific number after park reminder: If set, this feature calls a specific number after the park reminder, like a hunt group or agent group etc.
- Message after parking the call: This setting lets you choose what to play when the call has been parked.
- Configuring a call park key to the Htek phone via the Vodia PBX
1. Login Vodia Management Console → Domains → List → Select the Domain → Accounts → Extensions → Select the extension which you want to provision → Buttons.
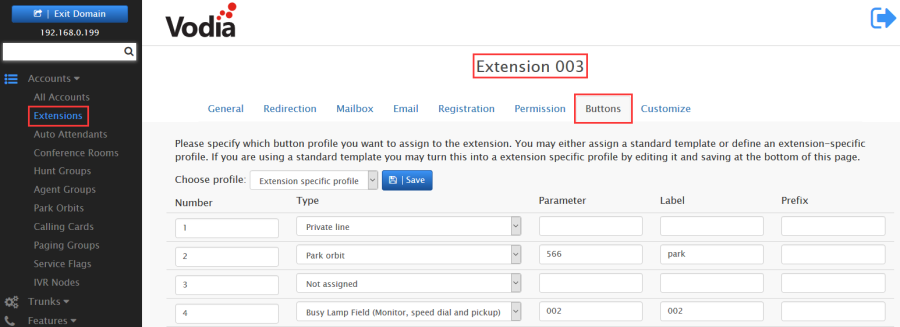
2. Choose the button profile "Extension specific profile".
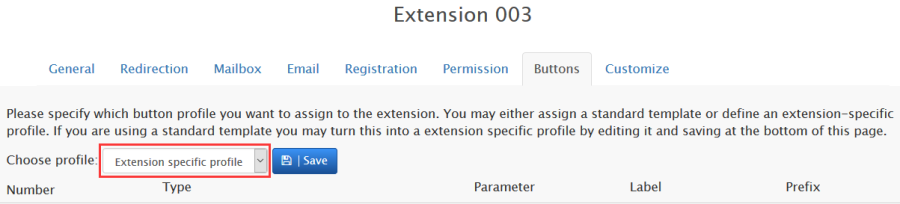
3. Choose the button Type which is a drop down list from which to choose.
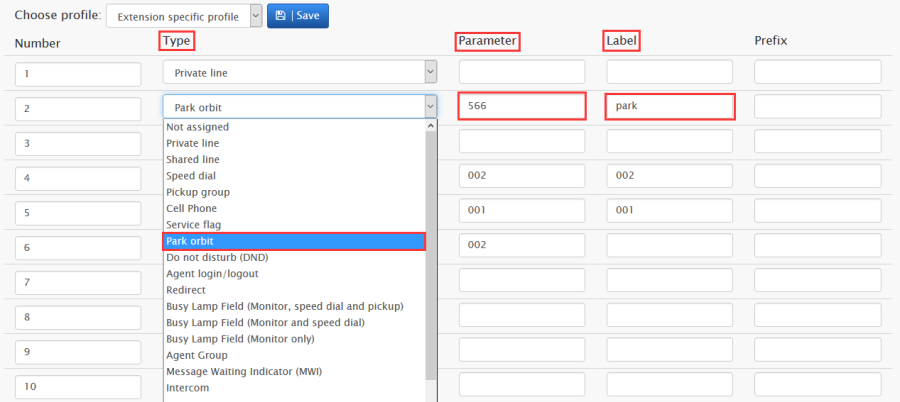
4. Enter a value in the parameter field. This value will generally consist of an account on the system or an extension.
5. Note Label is used only where phones use a display in front of their keys for labels or virtual keys.
6. Press Save.
7. Provision or re-provision this extension, the call park key will appear on the Htek IP phone.
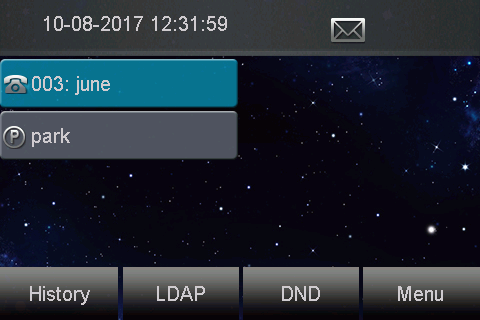
- Operating Instructions
- Suppose you have three phones provisioned by Vodia PBX system. (Phone A/Phone B/Phone C). Phone A and B were provisioned a Call park key with the same Park Orbit account.
- A make a call with C. A press call park key. The call will be parked and you will heard call park tone from A.
- B press the call park key, the parked call will be picked up. Now B have a call with C.
Auto Attendants
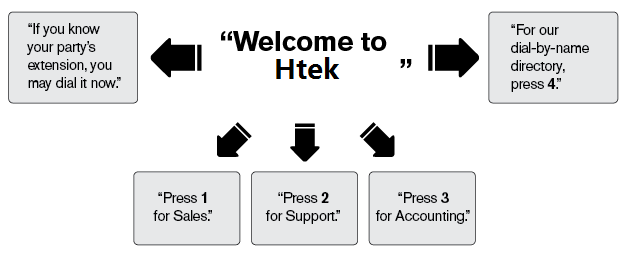
The auto attendant functions like a virtual receptionist, connecting incoming calls to extensions and other devices that have been configured to the system. The auto attendant often announces a company's name, followed by a selection of dialing options.
A typical welcome message might be "Thank you for calling Htek," for Sales, press 1," "for Accounts, press 2," and "for the dial-by-name directory, press 4." Callers press the number that corresponds with their selection and are directed accordingly.
Creating an Auto Attendant
- Go to your selected domain in the Vodia PBX web interface.
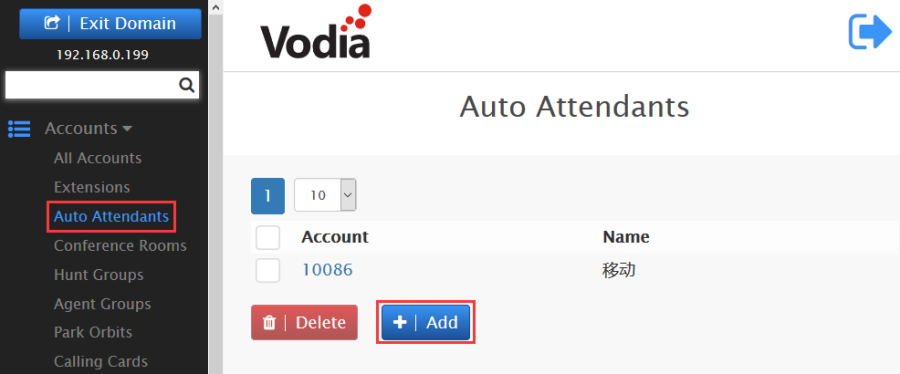
- Go to auto attendants by clicking on Auto Attendants under Accounts as shown above.
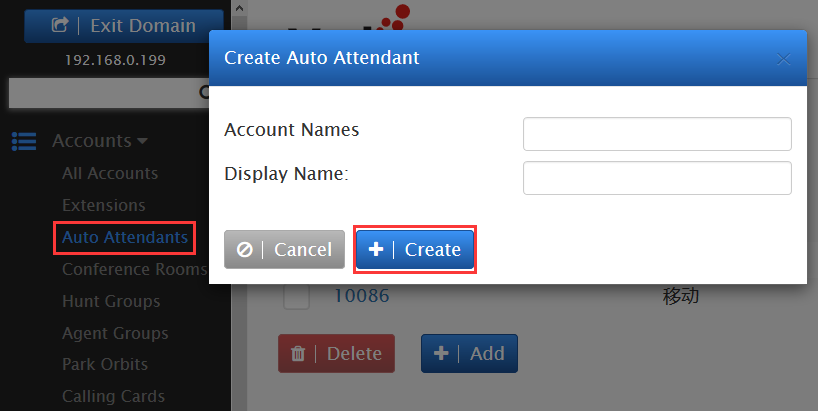
- On top, click the tab Create to create a new auto attendant.
- In the Account Name field, enter an extension number. Note: If you use a space instead of a slash (667 9781234567), you will create two separate accounts that will be unrelated to each other.
- To create multiple accounts at the same time, use a space between the numbers: 567 568 569
- Press Create
- The auto attendant(s) will be created which you can see in the "auto attendant list" or in "all accounts list", where you can enter each auto attendant just by clicking it, in order to modify it if you want.
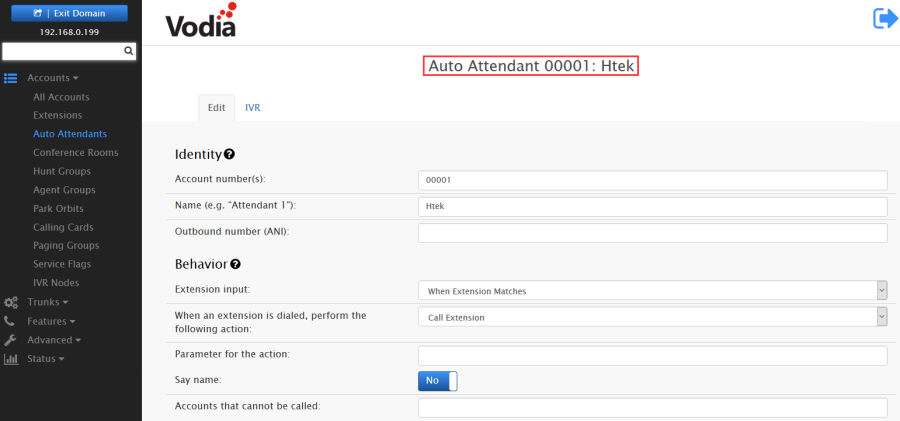
Configuring an Auto Attendant
Once you've created an auto attendant account, use the following information to configure your settings.
- Go to your selected domain in the Vodia PBX web interface.
- Go to Auto Attendants.
- Click on any auto attendant from the list that you want to change.
- Here you can configure the settings. You can also go back to the list of Auto Attendants, if you want, by clicking on the List tab above.
Here we just introduce "Direct Destinations".
- Direct Destinations
The Direct Destinations feature is somewhat like a built-in version of the IVR system. To direct inbound calls to specified extensions, you can use the pre-configured destination fields and link them to pre-recorded announcements and user input options. Using the sample shown below, the auto attendant's welcome message will be as follows: "For Sales, press 1. For Support, press 2. For Accounting, press 3. For all other inquiries, press 0." (The user input options are linked to extensions 001, 002, 003, and 004.)
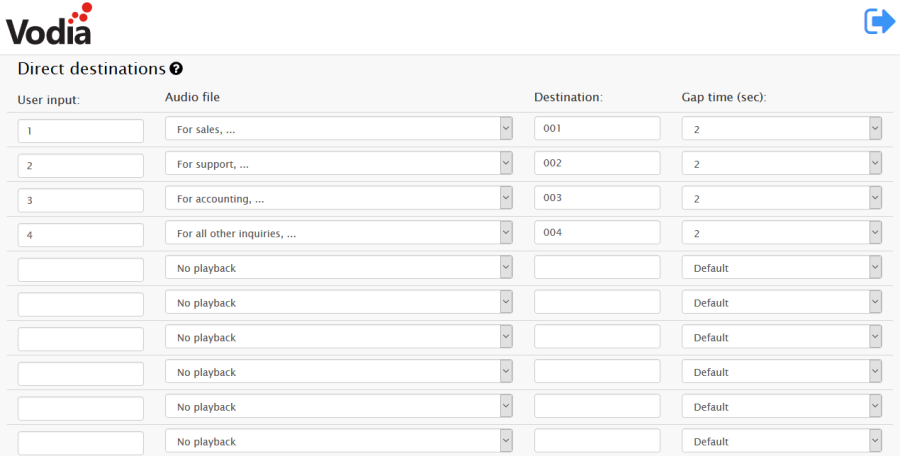
When configuring straightforward, uncomplicated auto attendants, direct destinations are a great solution.
Once the direct destination links have been established, the system will call the destination number whenever a caller enters the number that is associated with it.
In the sample shown above, when the caller presses 1, the call will be connected to extension 001.
Buttons
Setting up buttons on the phones is a very useful feature of the Vodia PBX. It makes it very easy and intuitive to set up buttons on the phones that it serves.
On the Vodia PBX you can set up button profiles which you can assign to different extensions.
You can also modify a button profile to customize it for a particular extension.
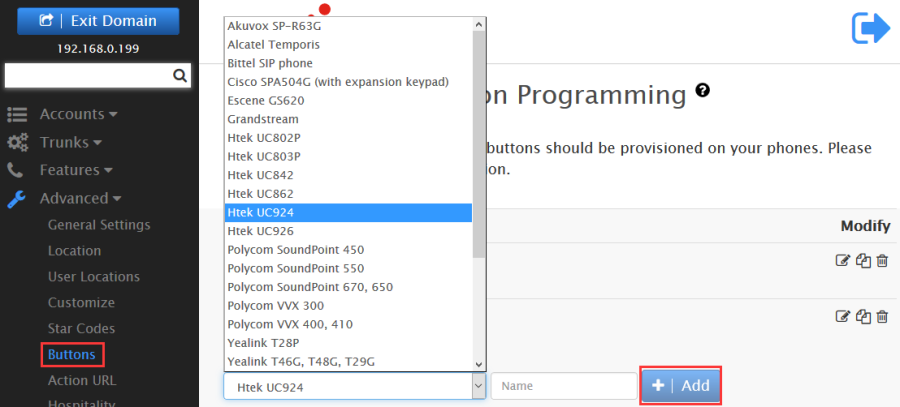
Creating a Button Profile
- Go to your selected domain in Vodia PBX web interface.
- Go to Buttons page.

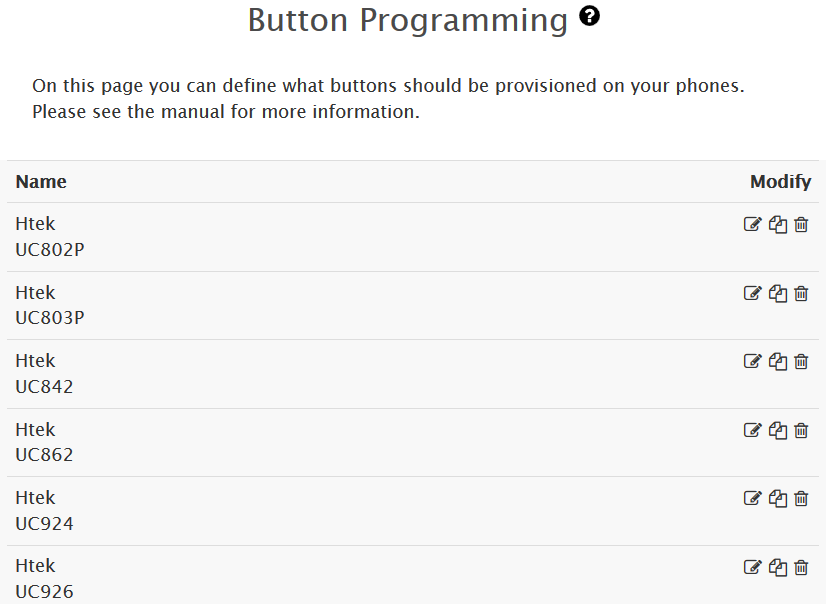
- On the buttons profiles page, just provide a name for the profile and press Create. The new profile will appear in the list, which you can then edit to add and map buttons.
Add and Map Buttons
- Once you have created a profile, you can edit it to add or modify buttons for that profile.
- Choose a number for the button. This number determines which button on the phone will be mapped to this button and got these settings. It may be different for different phones and models. More details on button numbers are given below.
- Choose the button Type which is a drop down list from which to choose. Button types are explained below.
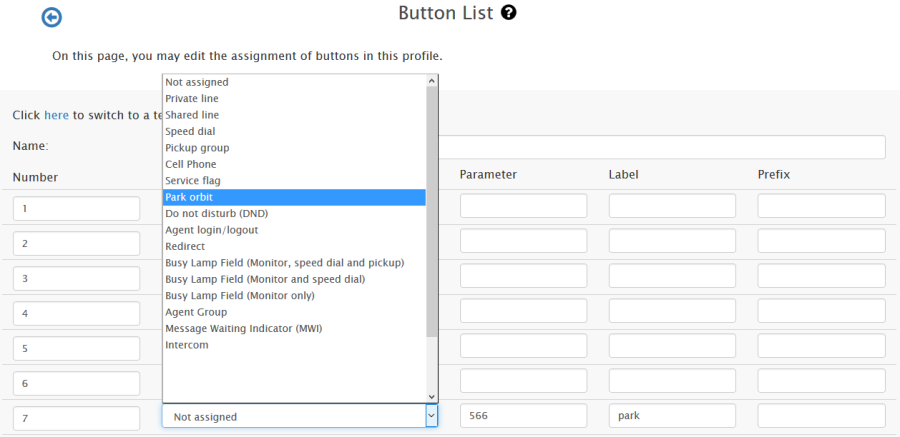
- Enter a value in the parameter field. This value will generally consist of an account on the system or an extension.
- Note Label is used only where phones use a display in front of their keys for labels or virtual keys.
Assigning Button Profile to an Extension
- Go to your selected domain in the PBX web interface.
- Go to the extension to which you want to assign a particular button profile.
- Go to the Buttons tab of the extension found at the top.
- In the Choose Profile dropdown, select the profile you want to assign to that extension, which can be any of the phone defaults or any other profile you might have created. You can also clone one of the existing button list and edit that to make your own list.
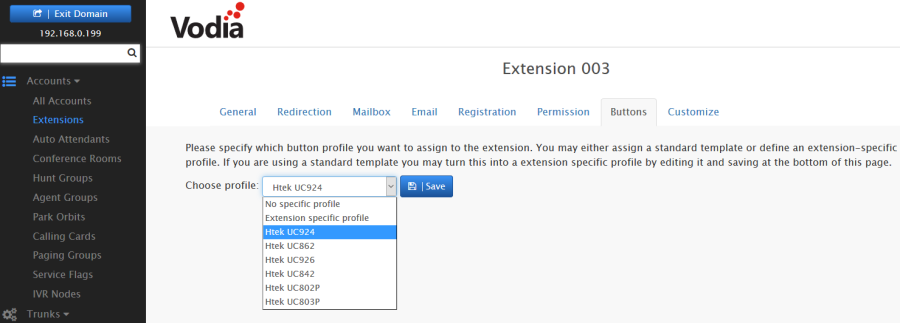
- Press Save
- Furthermore, you can make changes to that chosen profile as it appears below on that page, in order to customize it for that extension.
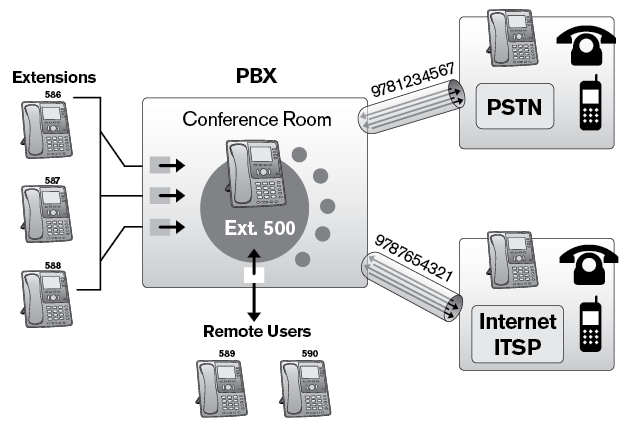
Conference Rooms
A conference room or conference server is normally an expensive add-on with traditional phone systems. With the Vodia PBX phone system, you can have your own conference rooms within your own system.
Creating a Conference Room
- Go to your selected domain in the Vodia PBX web interface.
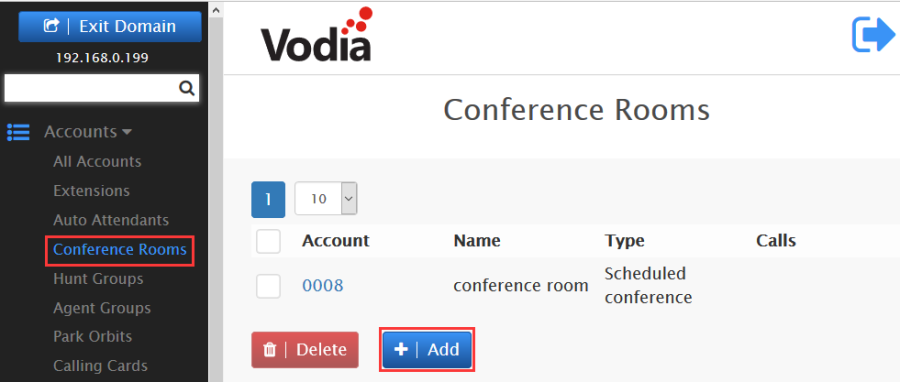
- click the tab Add to add a new conference room.
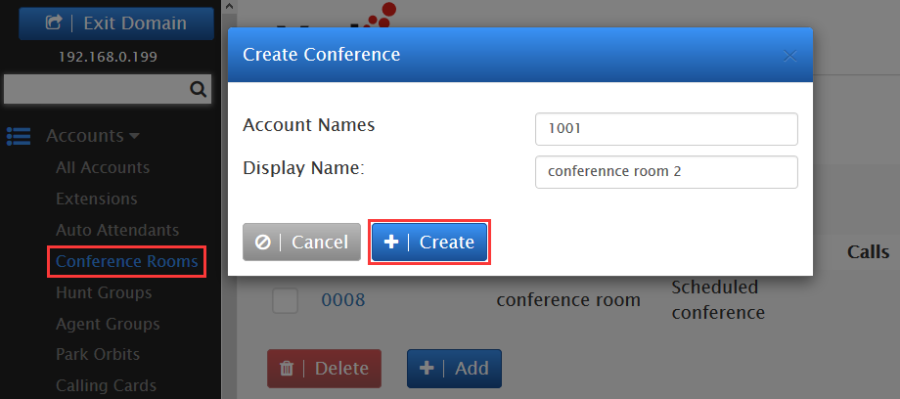
- In the Account Name field, enter an extension number.
Note: If you use a space instead of a slash (667 9781234567), you will create two separate accounts that will be unrelated to each other.
- To create multiple accounts at the same time, use a space between the numbers: 567 568 569
- Press Create.
- The conference room(s) will be created which you can see in the "conference rooms list" or in "all accounts list", where you can enter each conference room just by clicking it, in order to modify it if you want, as explained below.
Configuring an Ad Hoc Conference
The ad hoc conference account allows users to hold conferences at a moment's notice. No planning is required, and no emails are sent out. This method of conferencing is handled through the system and produces a high-quality three-way conference. Although this method offers a simple way to hold a conference, unauthorized users will be able to access the conference room if an access code requirement has not been set on the account.
Once you've created a conference room account, use the following information to configure it.
- Go to your selected domain in the Vodia PBX web interface.
- Go to Conference Rooms.
- Click on any conference room from the list that you want to change.
- Here you can configure the settings. You can also go back to the list of Conference Rooms, if you want, by clicking on the List tab above.
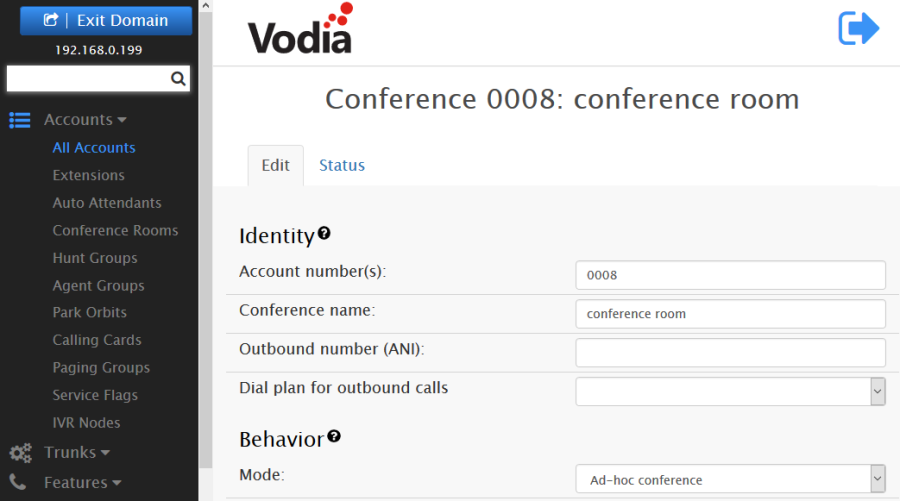
- Mode: Select Ad-hoc conference.
- Moderator Access Code: This field can be left empty.
- Participant Access Code: When no moderator access code has been set, this field can be left empty; otherwise, a code is required (users will be unable to access the conference without a code if the moderator has one).
Calling into an Ad Hoc Conference
To hold an ad hoc conference, users need to know the extension number that has been reserved for ad hoc conferencing. If the designated extension is 0008, then all parties who enter 0008 from their extension phones will be joined to the same call. Participants will be required to enter an access code if one has been set; otherwise, they will be joined directly into the conference room. Any number of participants can join the call. (Participants can also be blind-transferred into the conference.)
Forward
Vodia phone system provides several forward rules for the different phone status. Make sure that you won't miss all of your calls.
1. All Forward
2. Busy Forward
3. No Answer Forward
4. Unregistered Forward
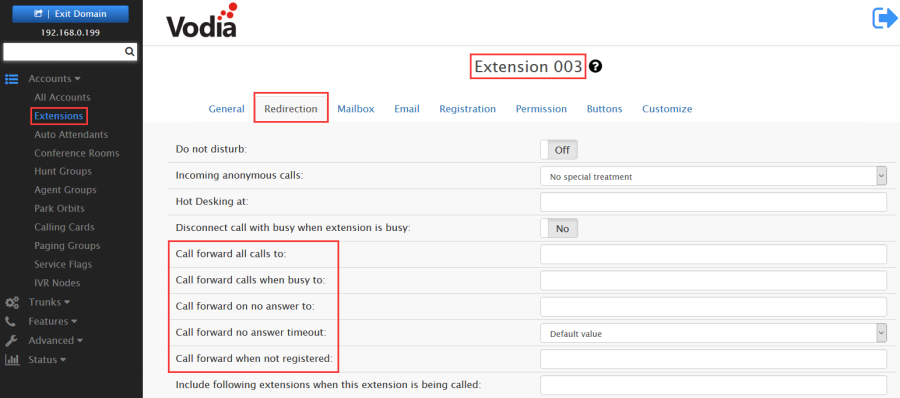
Configuring Forward via Vodia Management Console
- Go to your selected domain in the PBX web interface.
- Go to the extension which you want to configured.
- Go to the Redirection tab of the extension found at the top.
- Then you can configure forward rules.
Transfer
Calls can be transferred using the transfer button on Htek phones. The system supports three types of call transfers:
- Blind Transfer
- Semi-Attended Transfer
- Attended Transfer
Operating Instructions
- Blind transfer
When the user activates a blind transfer, the call is transferred with no knowledge as to whether the receiving party will be available to receive the call.
1 ) Press the Transfer soft key during a call.
2 ) Enter the extension number which you want to transfer the call to.
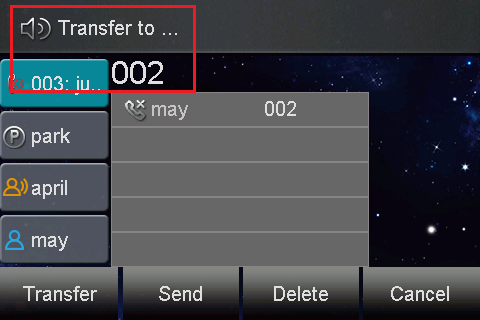
3 ) Press the Transfer soft key to complete the transfer, then the call is connected to the number to which you are transferring.
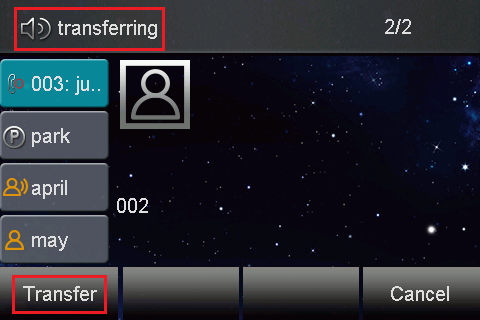
- Semi-Attended Transfer
When the user activates a semi-attended transfer, the call is transferred after the target phone ringing.
1 ) Press the Transfer soft key during a call.
2 ) Enter the extension number which you want to transfer the call to.
3 ) Press send soft key or "#" button to dial out the transferring call, when the phone which is transferred ringing and then press the transfer soft key to complete the transfer.
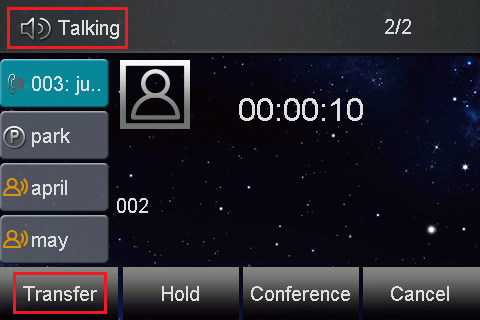
- Attended Transfer
When using attended transfer, the user must speak with the party who is receiving the call to ensure that the call can be received.
1 ) Press the Transfer soft key during a call.
2 ) Enter the extension number which you want to transfer the call to.
3 ) Press send soft key or "#" button to dial out the transferring call, when the phone which is transferred ringing and answered, then press the transfer soft key to complete the transfer.
If you are using a handset, the transfer can be completed by hanging up the handset.
You can cancel the transfer before the call is connected by pressing the Cancel soft key
- Some Additional Function of Transfer
Login phone's webpage → Settings → Features → Transfer Settings.
There are some additional settings of transfer. Please refer to the following picture.
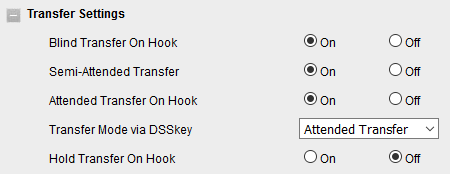
1 ) Blind Transfer On Hook
Once you've completed the step 2 of blind transfer, you can transfer the call by on hook.
The P number of this setting is P3201, the value list is: 0 - off, 1 - on.
You can refer to the chapter Customize Phone Config Template to edit custom template.
2 ) Attended Transfer On Hook
Once you've completed the step 2 of attended transfer, you can transfer the call by on hook.
The P number of this setting is P3204, the value list is: 0 - off, 1 - on.
You can refer to the chapter Customize Phone Config Template to edit custom template.
3 ) Transfer Mode via DSSkey ( DSSkey type must be BLF )
when two phones have built a call, one phone which configured the BLF can press the BLF line key to achieve New call / Blind Transfer / Attended Transfer to another extension.
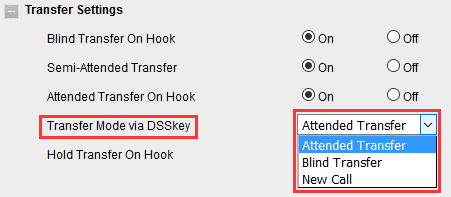
The P number of this setting is P3205, the value list is: 0 - Attended Transfer, 1 - Blind Transfer, 2 - New Call.
You can refer to the chapter Customize Phone Config Template to edit custom template.
Hunt Groups
A hunt group is a set of extension numbers that are embedded inside a single virtual extension. Incoming calls are rotated through the pool of extensions until someone answers and the caller is connected.
Creating a Hunt Group
- Go to your selected domain in the Vodia PBX web interface.

- Go to hunt groups by clicking on Hunt Groups under Accounts as shown above.
- On top, click the tab Add to add a new hunt group.

- In the Account Name field, enter an extension number.
Note: If you use a space instead of a slash (667 9781234567), you will create two separate accounts that will be unrelated to each other.
- To create multiple accounts at the same time, use a space between the numbers: 567 568 569
- Press Create.
- The hunt group(s) will be created which you can see in the "hunt group list" or in "all accounts list", where you can enter each hunt group just by clicking it, in order to modify it if you want.
Configuring a Hunt Group
Once you've created a hunt group account, use the following information to configure it.
- Go to your selected domain in the Vodia PBX web interface.
- Go to Hunt Groups.
- Click on any hunt group from the list that you want to change.
- Here you can configure the settings. You can also go back to the list of Hunt Groups, if you want, by clicking on the List tab above.
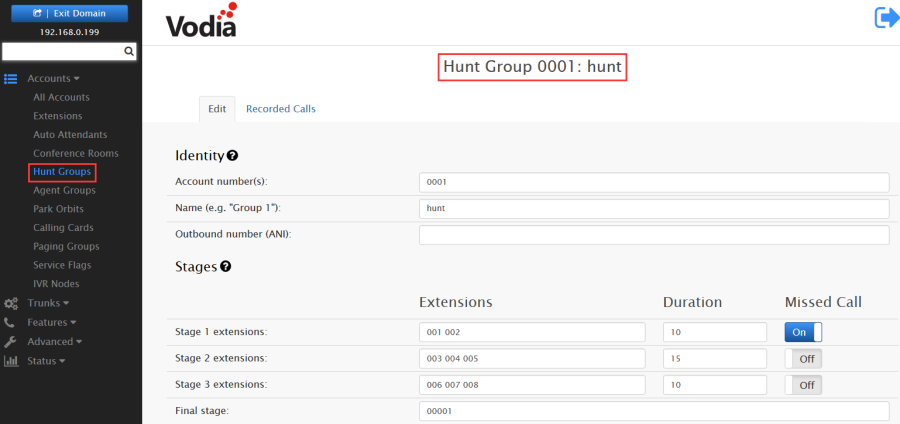
- The hunt group supports three stages and a final stage. Each stage can be configured to ring for a different number of seconds, and the final stage can be either an internal or external phone number.
- For each stage:
1 ) List the extensions or numbers that should be part of that stage. When entering multiple extensions, use a space as a separator (only one number is permitted for the final stage).
2 ) For duration, specify the length of time that the system should ring each stage before ringing the next. The duration of the stages must be specified in seconds.
3 ) For unwanted stages, leave the fields empty.
If all extensions of a stage are unavailable, the system will immediately move to the next stage.
If you check the missed flag for the stage, the PBX will send a missed call indication to the phone
when it moves to the next stage and the phone is not part of the next stage.
Factory Resetting and Upgrading
This chapter provides a basic guidance for upgrading firmware and resetting the phone. Topics include:
Factory Resetting
- To set Factory Reset via phone interface
1 ) Press Menu → Settings → Advanced ( Default password: admin / Once provisioned, it will be changed by Vodia system) → Factory Reset
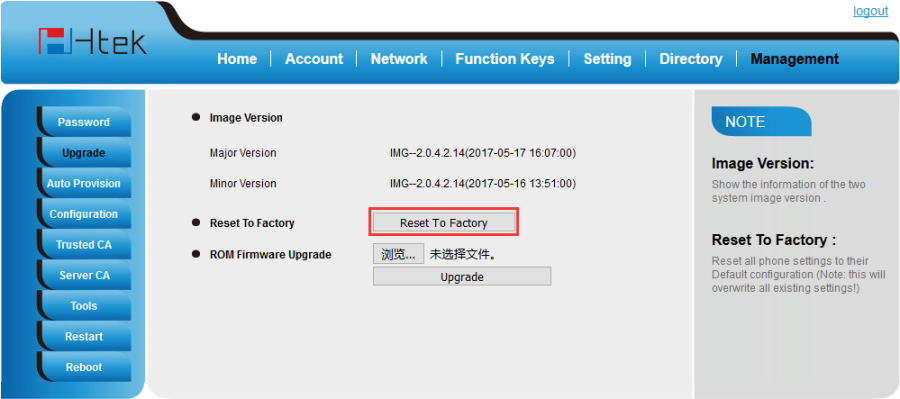
2 ) Press OK soft key in the warning page. - To set Factory Reset via web interface
1 ) Click Management → Upgrade
2 ) Click Reset to Factory and then confirm the setting.
Upgrading
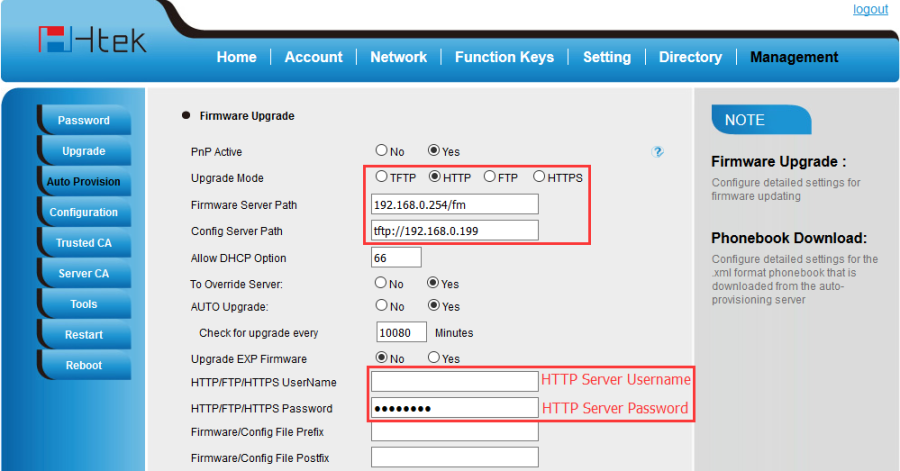
- To configure the server path via web interface
1 ) Click Management → Auto provision:
2 ) Select the upgrade mode in the upgrade mode field
3 ) Enter the Firmware server path and config server path (192.168.0.254 is HTTP server).
4 ) Enter the HTTP server's username and password (optional).
5 ) Click the Saveset button to save the configuration.
6 ) Restart the phone, it will restart and auto-get firmware files from HTTP server.
NOTES:
- Htek recommends end-user use the Htek HTTP server. For large companies, we recommend to maintain their own TFTP/HTTP/FTP/HTTPS server for upgrade and provisioning procedures.
- Once a "Firmware Server Path" is set, user needs to update the settings and restart the IP Phone. If the configured firmware server is found and a new code image is available, the phone will attempt to retrieve the new image files by downloading them into the phone's SDRAM. During this stage, the phone's LEDs will blink fastly until the checking/ downloading process is completed. Upon verification of checksum, the new code image will then be saved into the Flash. If TFTP/HTTP/FTP/HTTPS fails for any reason (e.g. TFTP/HTTP/FTP/HTTPS server is not responding, there are no code image files available for upgrade, or checksum test fails, etc), the phone will stop the TFTP/HTTP/FTP/HTTPS process and simply boot using the existing code image in the flash.
- Firmware upgrade may take as long as 3 to 8 minutes over Internet, or just 1 minutes if it is performed on a LAN. It is recommended to conduct firmware upgrade in a controlled LAN environment if possible. For users who do not have a local firmware upgrade server.
- Htek's latest firmware is available at http://www.htek.com → Support → Firmware Download.
- Oversea users are strongly recommended to download the binary files and upgrade firmware locally in a controlled LAN environment.
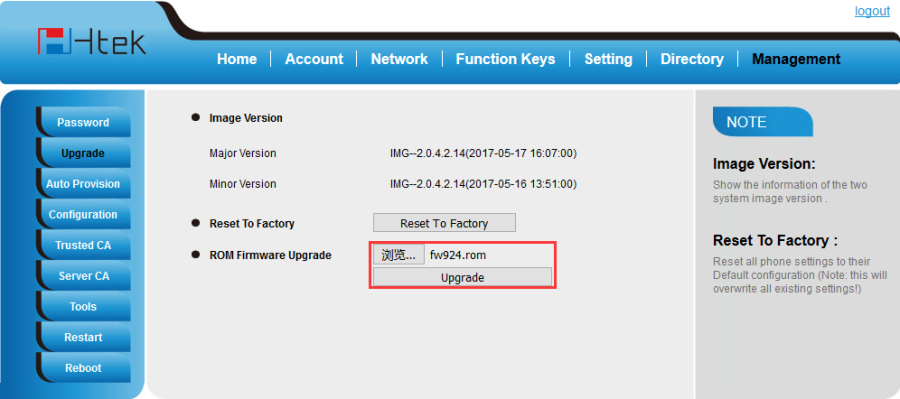
- To upgrade manually via the Web configuration interface
- Click Management → Upgrade
- Click Brower or the blank.
- Select the firmware ( fw924.rom )and then click Upgrade.
Troubleshooting
Why is the phone LCD screen blank?
- Ensure your phone is properly plugged into a functional AC outlet.
- Ensure that the phone isn't plugged into a plug controlled by a switch that is off.
- If the phone is plugged into a power strip, try plugging it directly into a wall outlet instead.
- If your phone is powered from PoE, ensure you use a PoE compliant switch or hub.
- Check that the power LED is on to ensure the phone is powered on.
Why does the phone display "Network Unavailable"?
- Ensure that the Ethernet cable is plugged into the Internet port on the phone and the Ethernet cable is not loose.
- Ensure that the switch or hub in your network is operational.
How to obtain the MAC address of a phone when the phone is powered off?
Three ways to obtain the MAC address of a phone:
- You can ask your supplier for the shipping information sheet which includes MAC addresses according to the corresponding PO( Purchase Order ).
- You can find the MAC address on the label of the carton box.
- You can also find the MAC address from the phone's bar code at the back of the phone.