Zadarma Configuring Guide
- Former user (Deleted)
Htek IP Phones with Zadarma Configuring Guide V1.0
About This Guide
Thank you for choosing the Htek IP phones, which are exquisitely designed to provide basic phone features plus advanced business features, such as Call recording,Call Forward,Call Transfer, Call Pickup,SMS and Conference.
The purpose of this guide is to serve as a basic guidance for using.
Applicable Htek IP Phone moudel on Zadarma phone system as follow:
Htek 8 Series: UC862, UC860, UC842, UC840, UC806, UC806T, UC806G, UC804, UC804T,UC804G,UC803, UC802T,UC802.
Htek 9 Series: UC926E,UC924E,UC926, UC924, UC923, UC912G,UC912,UC912E UC902, UC901
In This Guide
Topics provided in this guide include:- Chapter 1 Getting Started
- Chapter 3 Use Zadarma Features
- Chapter 4 Resetting your phone
- Chapter 5 Troubleshooting
Note: The configuration process outlined in this guide applies to Htek SIP IP phones running.
Firmware version x.0.4.4.46 or later and Zadarma phone system running version Free. The configuration process described in this guide take the Htek UC926 as an example.
Getting Started
This chapter will show you the basic process of phone's start-up and instructions of the way to get the basic information of the phone. Topics include:
Phone Initialization
After your phone is powered on, the phone will boots up, complete the initialization and check firmware. Please refer to the three phases of the LCD interface display:


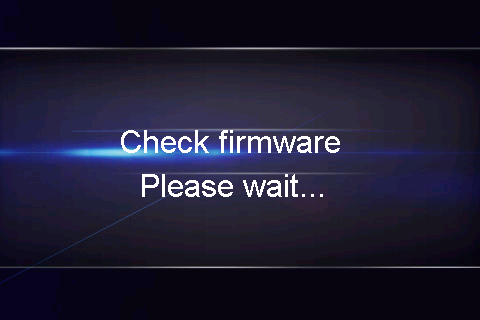
In the process of initializing, the phone will attempts to contact a DHCP server in your network to obtain valid IPv4 network settings (e.g., IP address, subnet mask, default gateway address and DNS address) by default.
Phone Status
After the phone comes up, you can view phone status on phone user interface (LCD interface) via the following ways:
- Press "OK" button twice.
- Press the following button one by one: "Menu" → "Status" → "information".
Available information of phone status includes:
- Network status (e.g., IPv4 status, IP mode, MAC address).
- Phone status (e.g., product name, firmware version, MAC address and device certificate status).
- Language infomation.
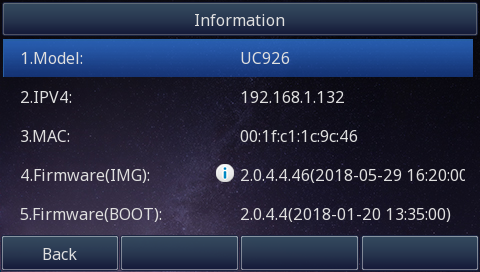
Press "Up" or "Down"to scroll through the list and view the specific information.
Use Zadarma Feature
This chapter provides the detail instructions and configurations for the following Zadarma features:
- Account Register
- Call Recording
- Call Forwarding
- SMS
- Call Transfer
- Call Pickup
- Incoming calls scenario
- Do Not Disturb
- Conference
Account Register
How to Config
Obtain an extension number from Zadarma phone system:
1.Go to the Zadarma phone system→MyPBX→Extension Numbers

2.Choose an extension number( e.g.: extension 100)
How to use
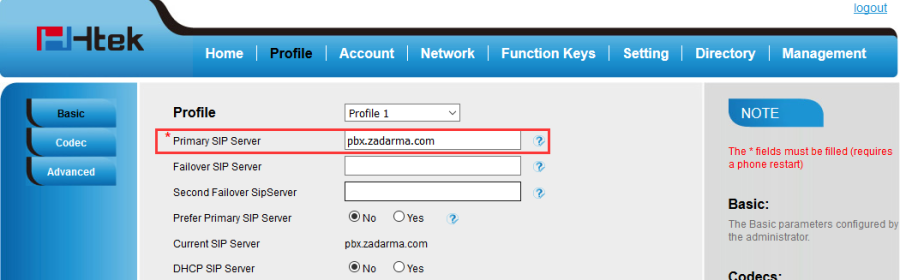
1.Open the phone's web interface, under the tab "Profile"
Enter the following data:
Primary SIP Server: pbx.zadarma.com:
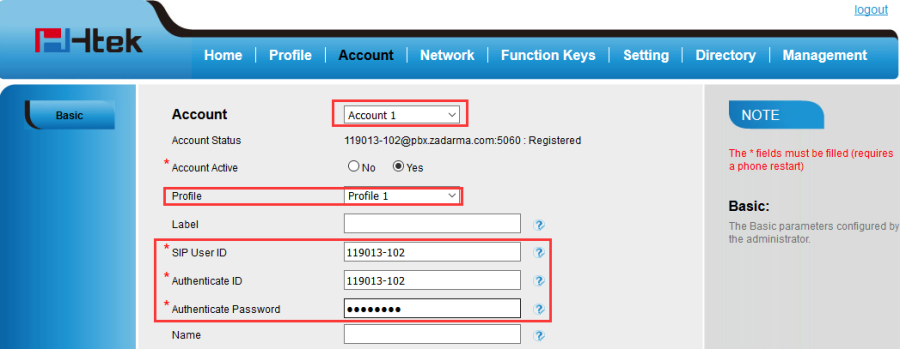
2.Under the tab "Account"
Enter the following data:
SIP User ID : Your internal PBX number (for example 119013-102).
Authenticate ID: Your internal PBX number (for example 119013-102).
Authenticate Password: Your password of internal PBX number.
3.After complete to fill in all of the information, click "SaveSet" Button.
If the extension is registered successfully, you will see the extension status in Zadarma phone system.
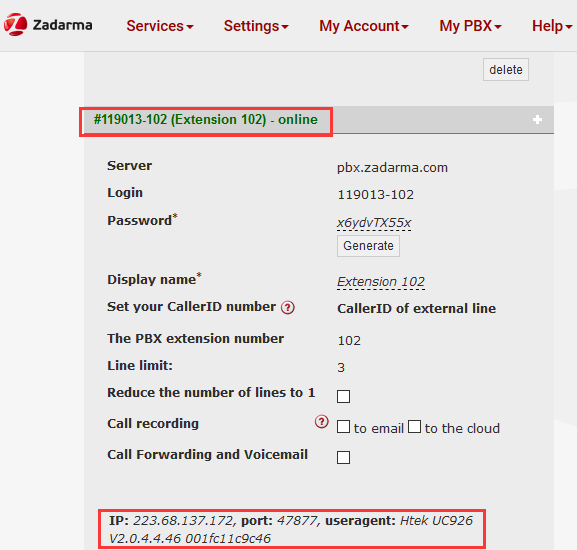
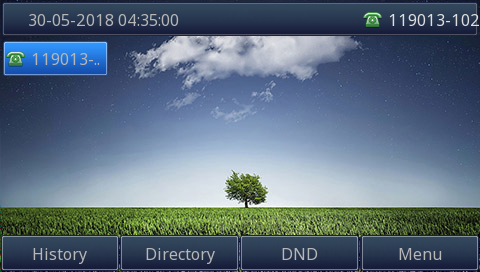
The line state in the LCD interface screen is "?", not "×".
Call Recording
Over View
To activate the call recording feature, select this option in the settings of the extension number that you want to record the calls from.
There are two ways to send the call recording:
- All recordings are sent to the email,specified in the extension number settings.
- All recordings are Saved in the cloud storage.
How to config
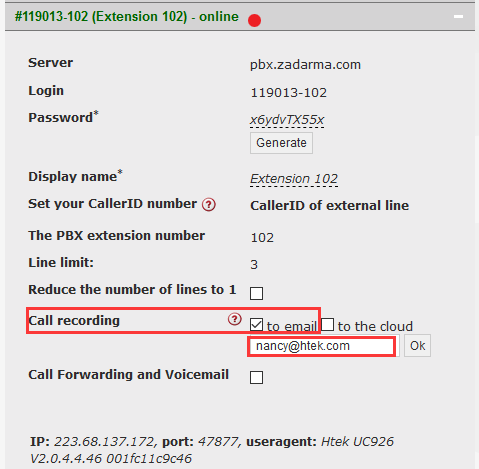
1.Go to the Zadarma phone system→MyPBX→Extension Numbers.
2.Enable call recording to the email, as follow:
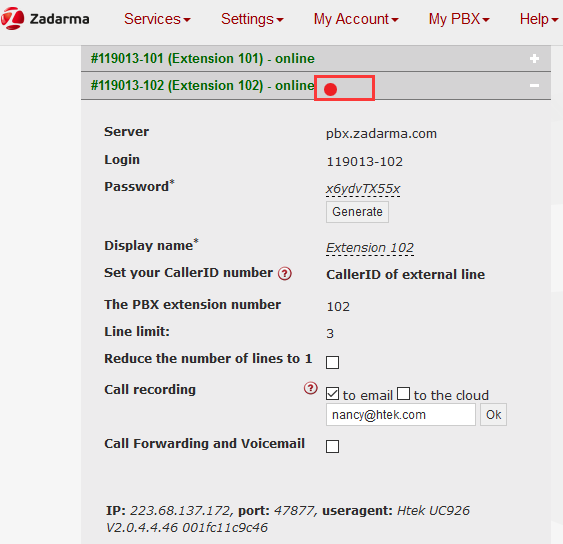
3.The call recording icon will be shown on the Zadarma phone system, it means that this extension enable the call recording function, as follow:
How to Use
All recordings are sent to the email,specified in the extension number settings.
1.Phone A(100) and DUT(102) are registered to Zadarma phone system.
2.Phone A make a call with DUT.
3.The call recording will be sent to nancy@htek.com email after ending this call. The file format is MP3.
![]()
![]()
4.You can listen this call record from your email.
All recordings are saved in the cloud storage:

You can listen to your call recording or download or delete the call recording file from MyPBX→PBX Statistics→Calls statistics:

Note:
The size of the free cloud storage is 200 MB. If you choose to disable this feature, the call recordings are deleted from the cloud storage in 180 days.
You can check the call recording storage from MyPBX→Extension Numbers

Call Forwarding
Over View
You can create conditional or unconditional call forwarding for any phone number. Conditional forwarding takes place when the user's phone is inactive, or if they have not responded to a call within 20 seconds.
To activate the voicemail feature, enter your email address in the call forwarding settings.
Note: we do not recommend using the «voicemail to email address» option if you have already chosen to forward calls to another phone number. In this case, the «voicemail to email address» scenario will override the call forwarding to another number.
Call forwarding notification. If you want to be notified if the call you are receiving is forwarded from another number, you can enable the «Notification about call forwarding». In this case you will receive a voice notification before the start of the conversation.
How to config
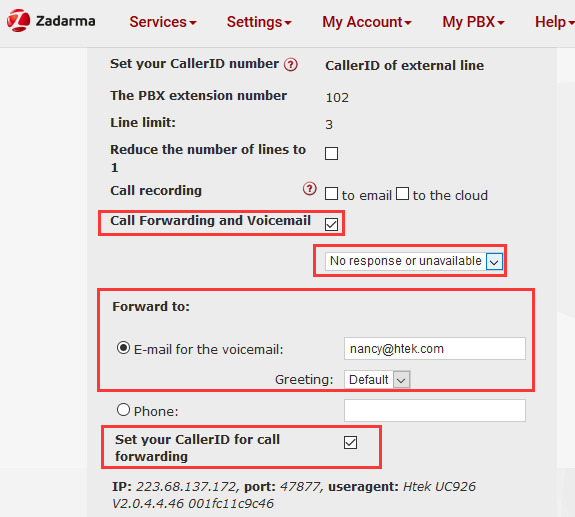
Conditional forwarding to email when user's phone has no respond or unavailable:
1.Go to the Zadarma phone system→MyPBX→Extension Numbers.
2.Enable call forwarding and voice email
3.Choose the No response or unavailable
4.Enter the E-mail for the voicemail:(e.g: nancy@htek.com)
5.Choose the Greeting: Default
6. Enable Set your CallerID for call forwarding , as follow:
How to Use
Conditional forwarding to email when user's phone has no respond or unavailable:
1.Phone A(100) call DUT(102).
2.DUT has no answer this call within 20 seconds.
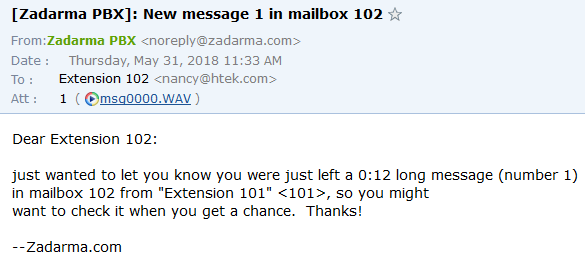
3.This call will call forward to voicemail.
4.If Phone A leave a message for DUT, nancy@htek.com will receive a email,as follow:
unconditional call forwarding to email
It means that all incoming call always forward to email if "Call Forwarding and Voicemail" set to always.
Note:
You can check the call forward history in the "PBX statistics" section.
SMS
Over View
Htek IP Phone support the SMS function, Phone can send and receive the Messages.
Zadarma system (e.g.: Zadarma for Windows) The application optimal for work with a clear interface SMS sending.
How To Use
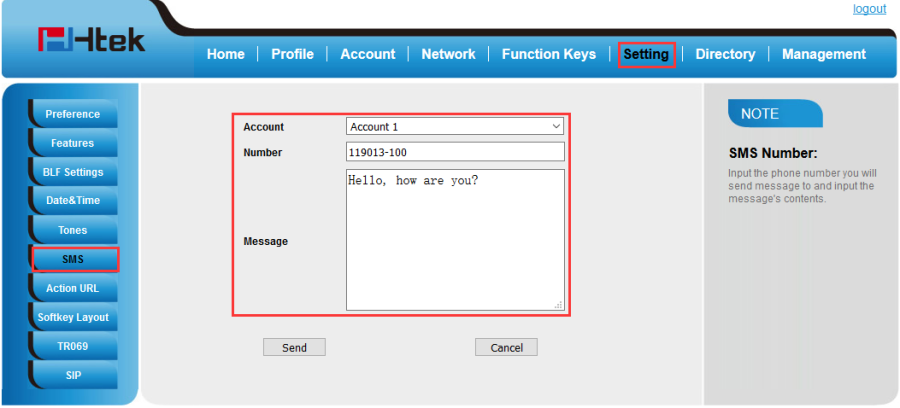
Send the Message to other phone via DUT's webpage:
1.Login the DUT's webpage(username: admin, password:admin )
2.Enter Setting→SMS
3.Choose zadarma's account
4.Enter the desire number and message contents.
5.Click the "Send " button.
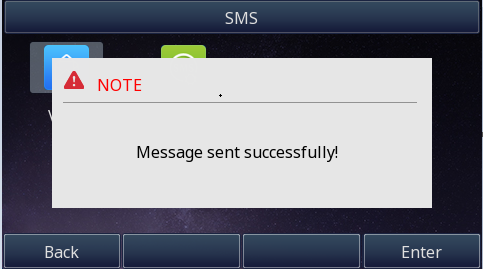
If this message is sent successfully, the DUT's LCD interface will popup "Message sent successfully"
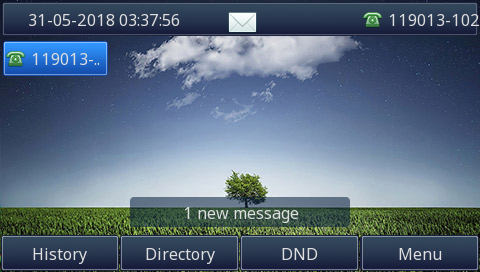
Receive the Message on DUT:
- Zadarma for Windows send the Message to DUT
DUT will receive this message,Message icon will be shown on DUT's screen, as follow:
View the Message detail information:
1.Press the Menu→Messages→SMS→View:
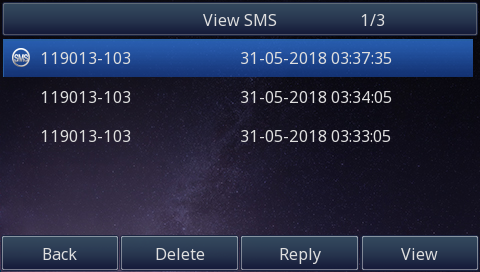
2.Choose an item to view:
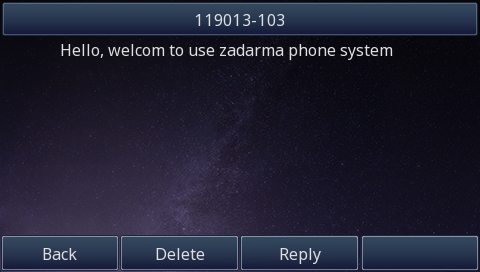
3.Reply to this message, please press Reply softkey and enter the message contents.
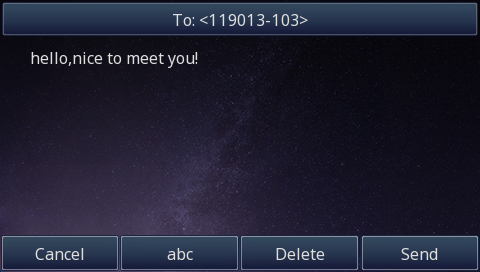
4.Press the "Send" softkey, if the message is sent successfully. And DUT will popup:
Call Transfer
Over View
Zadarma phone system supports call transfer function, But only the called party can implement this transfer function.
Blind Transfer:
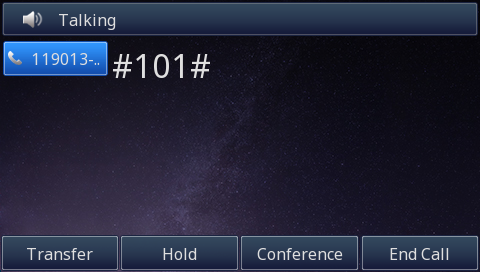
To transfer a received call: press the phone's # key on your phone, dial the number to which you want to transfer the call, followed by the # key. (Example: #101#)
Attend transfer:
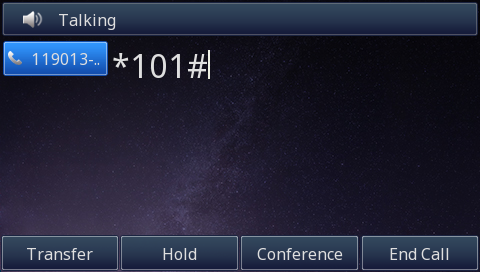
To transfer a call with voice notification: press *, followed by the extension number you want to transfer the call to and the # key. (Example: *101#),if other party reject this call or no answer this call, then Phone A and DUT will resume the first call.
To transfer a call to an IVR scenario, dial the scenario number. For example: #1#
How To Use
Blind transfer:
1.Phone A (100) call DUT(102),DUT answer.
2.DUT press the phone's # key on your phone(Phone A is in the hold state), dial the number to which you want to transfer the call, followed by the # key.Then DUT will back to Idle status automatically.
Note:
You can configure the DTMF key On DUT, You can press this DTMF key directly to implement transfer call during talking:
1.Configure the DTMF key via DUT's webpage→Function keys→Line key 7:
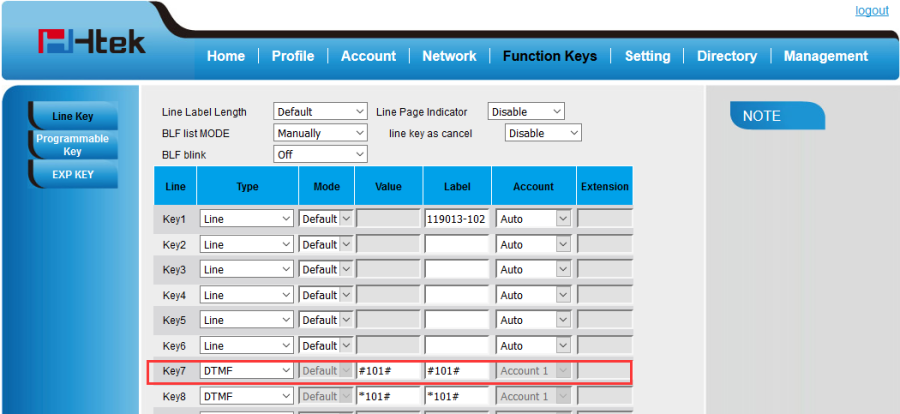 2.Configure the DTMF key
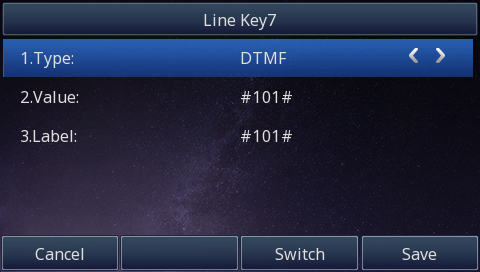
via DUT's LCD interface→Menu→Features→Function→Line →Line key 7:
 Attend transfer On Hook:
1.Phone A (100) call DUT(102),DUT answer.
2.DUT press the phone's * key on your phone(Phone A is in the hold state), dial the extension number (Phone C)to which you want to transfer the call, followed by the # key.
- If DUT has no hang up, then Phone C answer this call, then DUT will talk with Phone C.
- If DUT hang up, Then Phone A will talk with Phone C.
- if Phone C reject this call or no answer this call, then Phone A and DUT will resume the first call.
Note:
You can configure the DTMF key On DUT, You can press this DTMF key directly to implement transfer call during talking:
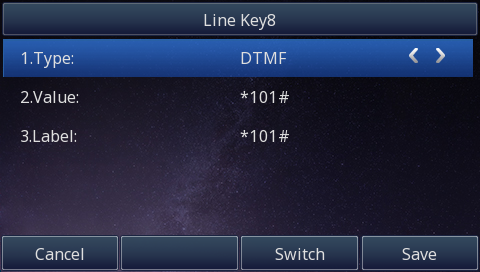
1.Configure the DTMF key via DUT's webpage→Function keys→Line key 8:
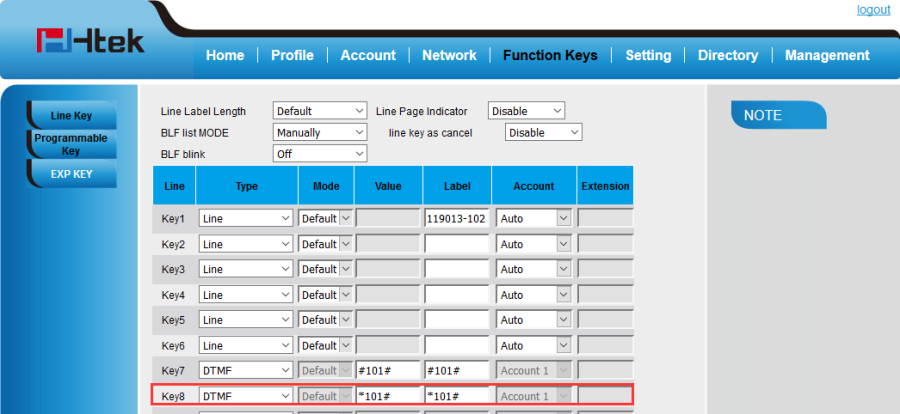
2.Configure the DTMF key
via DUT's LCD interface→Menu→Features→Function→Line →Line key 8:
If you are using a handset, the transfer can be completed by hanging up the handset.
Call Pickup
Over View
Zadarma phone system supports call pickup function, To use a call pickup (that allows you to pick up any incoming call that is ringing at another extension): answer the phone call and dial 40.
How To Use
1.Phone A (100) call Phone B(101)
2.DUT(102) dial 40 or press a speed dial key which configured via phone's webpage or LCD interface.
3.DUT will pickup this call successfully, Phone A will talk with DUT.

Incoming calls scenario
Setting up the incoming calls scenario is one of the main features of the cloud PBX. In the Zadarma PBX all incoming calls are routed according to the setup call scenarios.
In each scenario, you have to set up which extension numbers will receive a call, and in what order. You can determine which extension number will be called, the order in which they are called, and the time delay between the calls.
How to config
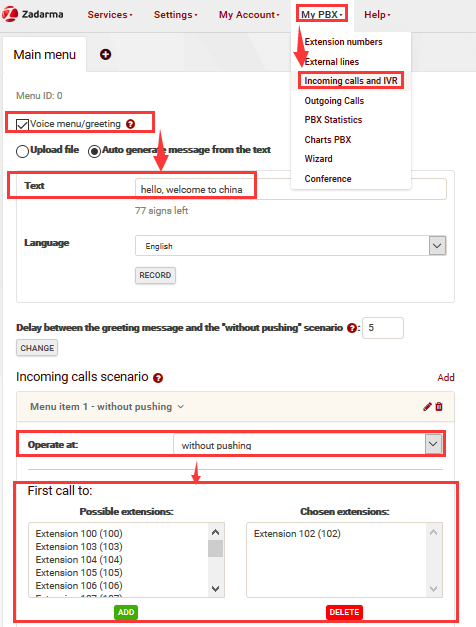
1.Go to the Zadarma phone system→MyPBX→Incoming calls and IVR.
2.Set the Greeting and set the incoming call scenario, as follow:
How to use
1.Phone A (100) call 481935(SIP Account)
2.Zadarma phone system will routed to 102 according to the setup call scenario.
Do Not Disturb
Over View
You can use DND to reject incoming calls automatically on the phone. The message "n New Missed Call(s)" ("n" indicates the number of missed calls) will appear on the LCD interface screen, and callers will receive a busy message.
How to Use
To activate DND in phone mode:
Press the DND soft key when the phone is idle. The icon on the status bar indicates that DND is enabled. Incoming calls will be rejected automatically and "n New Missed Call(s)" will prompt on the LCD interface screen.

To inactivate DND in phone mode:
Press the DND soft key when the phone is idle again. The icon on the status bar indicates that DND will disappear. Phone will can receive incoming calls.

Conference
Over view
Htek IP Phone support five-way conference,but each extension number Line limit is three-way on Zadarma phone system,So you can set up a conference call with other three parties.
How to use
To set up a conference call:
1.Assuming that call party DUT and A are in conversation. DUT wants to bring B and C in a conference
2.DUT press the Conference soft key, the call is placed on hold.
3.DUT enter the number of B and then press send soft key or ![]() .
.
4.B answering the call.
5.DUT press ![]() or the conference soft key, then DUT, A and B are now in a conference. (and now this is 3-way conference)
or the conference soft key, then DUT, A and B are now in a conference. (and now this is 3-way conference)
6.DUT press the Hold soft key, the current 3-way conference is placed on hold.
7.DUT press New Call softkey, then enter the number of C and then press send soft key or ![]() .
.
8.C answering the call.
9.DUT press ![]() or the conference soft key, then A, B and C are now in a conference. (and now this is 4-way conference)
or the conference soft key, then A, B and C are now in a conference. (and now this is 4-way conference)
10.DUT end the call, the conference is finished.
During the conference call, you can do the following actions:
- Press the "Hold" soft key to place the conference on hold.
- Press the "Split" soft key to split the conference call into three individual calls on hold.
- Press the "End Call" soft key to drop the conference call.
Resetting your phone
Reset the phone to factory configurations after you have tried all troubles- Hooting suggestions but do not solve the problem. You need to note that all customized settings will be overwritten after reset.
To reset the phone via phone user interface(LCD interface):
1.Press Menu →Settings →Advanced →Settings →Reset(Default password is admin)
2.Press the Enter softkey or OK key.
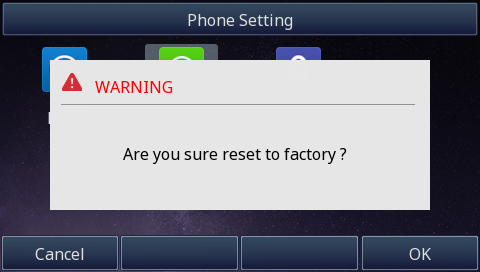
3.Press OK softkey.
The phone will be reset to factory settings sucessfully after startup.
Note: Reset of your phone may take a few minutes. Do not power off until the phone has started up successful.
Troubleshooting
This chapter provides general troubleshooting information to help you solve the problems you might encounter when using your phone. If you require additional information or assistance with your new phone, contact your system administrator.
Why is the LCD interface screen blank?
1.Ensure that the phone is properly plugged into a functional AC outlet.
2.Ensure that the phone is plugged into a socket controlled by a switch that is on.
3.If the phone is plugged into a power strip, try to plug it directly into a wall out let instead.
4.If the phone is powered from POE, ensure that you use a POE-compliant switch or hub.
Why does the phone display "Network unavailable"?
1.Ensure that the Ethernet cable is plugged into the Internet port on the phone and the Ethernet cable is not loose.
2.Ensure that the switch or hub in your network is operational.
Why doesn't the phone display time and date correctly?
Check if you have configured the phone to obtain the time and date from the SNTP server automatically. If the phone fails to connect to the SNTP server, you need to configure the time and date manually.
Why the phone can't make the fourth way call at the same time?
Extension number Line limit Maximum is three.
Why the phone can't make the second call or call transfer,conference?
Check the extension number whether enable Reduce the number of lines to 1.