ZYCOO Configuring Guide
- Former user (Deleted)
- Former user (Deleted)
Table of Contents
About This Guide
Thank you for choosing the Htek IP phones, which are exquisitely designed to provide basic phone features plus advanced business features, such as Call Park, Call Pickup, Intercom and Enhanced Monitor Extension over IP network.
The purpose of this guide is to serve as a basic guidance for auto-provision. Htek IP phones with ZYCOO phone system, phones including:
Htek 8 Series: UC862, UC860, UC842, UC840, UC806, UC806T, UC806G, UC804, UC804T,UC804G,UC803, UC802T,UC802.
Htek 9 Series: UC926, UC924, UC923, UC902, UC901.
Note: The configuration process outlined in this guide applies to Htek SIP IP phones running.
Firmware version x.0.4.2 or later and ZYCOO phone system running version V2.1.2 or later. The configuration process described in this guide take the Htek UC926 as an example.
In This Guide
Topics provided in this guide include:
Summary of Changes
- V1.0 (2017-09-20): Provide a basic guidance for auto-provision Htek IP phones with ZYCOO phone system.
Getting Started
This chapter will show you the basic process of phone's start-up and instructions of the way to get the basic information of the phone. Topics include:
Phone Initialization
After your phone is powered on, the phone will boots up, complete the initialization and check firmware. Please refer to the three phases of the LCD display:


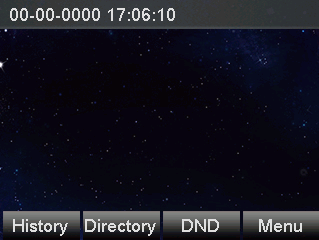
In the process of initializing, the phone will attempts to contact a DHCP server in your network to obtain valid IPv4 network settings (e.g., IP address, subnet mask, default gateway address and DNS address) by default.
Phone Status
After the phone comes up, you can view phone status on phone user interface (LCD) via the following ways:
- Press "OK" button twice.
- Press the following button one by one: "Menu" -> "Status" -> "information".
Available information of phone status includes:
- Network status (e.g., IPv4 status, IP mode, MAC address).
- Phone status (e.g., product name, firmware version, MAC address and device certificate status).
- Language infomation.
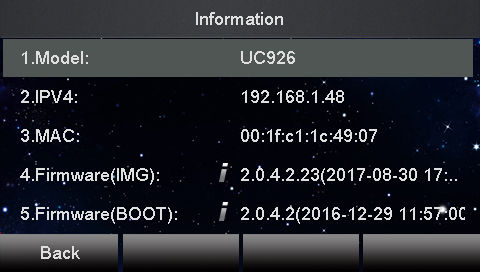
Press "Up" or "Down"to scroll through the list and view the specific information.
Auto-Provisioning your phone
3473907 Provision via RPS
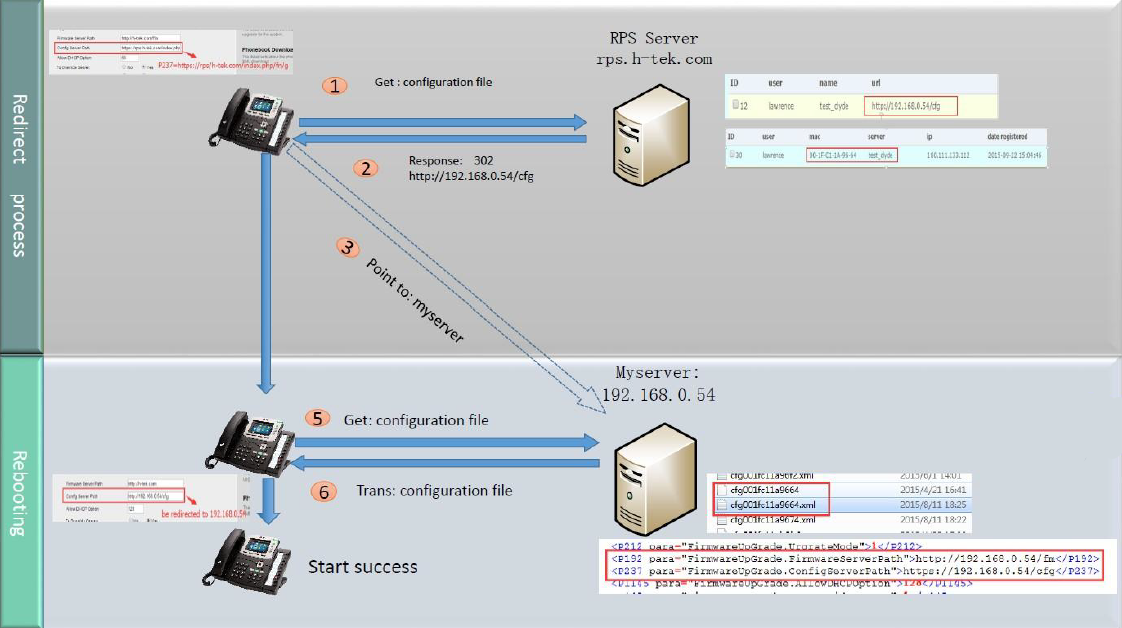
Provision the IP Phone via RPS is a convenience way.
When the IP Phone start up , default it will send 'Get' message to the RPS server, if the phone's MAC address is assigned on the RPS Server previously, the RPS server will send the preset URL of the configure server to IP Phone.
The work process of RPS show below. And more information about how to use RPS, please refer to these documents fm.htek.com/rs/rps.zip .
Provisioning via Plug and Play
Over View
If the ZYCOO Phone System runs on the default sip port 5060 and that the IP phones resides on the same local lan subnet. Then, Provisioning via Plug and play is a good choice to provision your phones.
Operating Instructions
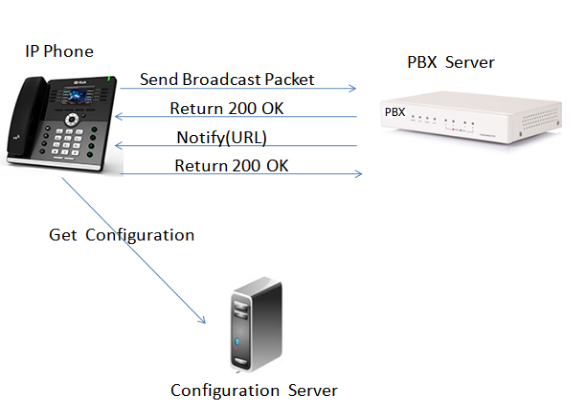
1, Plug the phone into the network.
2, The phone will send a multicast message across the LAN. This will be picked up by ZYCOO Phone System.
3, Phones Settings:Advanced->phone Provisioning->Phones Settings
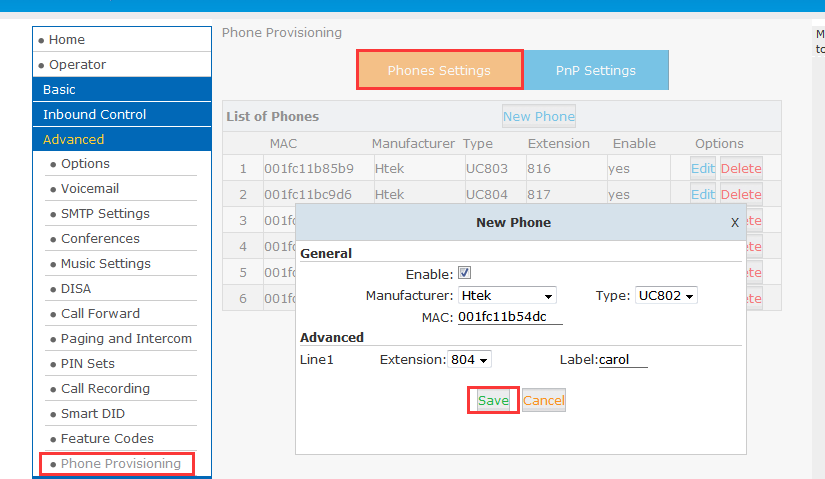
This is the way ZYCOO Phone System comes with it,If you just want to assign the extension number to the IP Phone,you can set it in the phones Settings.For example:You can choose the phone manufacturer type, and the Mac address should be filled in correctly.Select the extension number to be assigned,then click to the save.
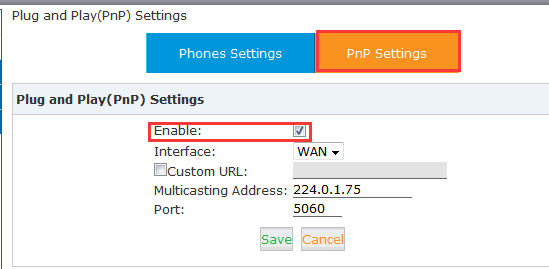
4,You need Enable PNP setting.
Other
ZYCOO can also customize the URL to be configured on the path
1, P lug the phone into the network.
2, The phone will send a multicast message across the LAN. This will be picked up by ZYCOO Phone System.
3, PnP Settings:Advanced->phone Provisioning->PnPSettings
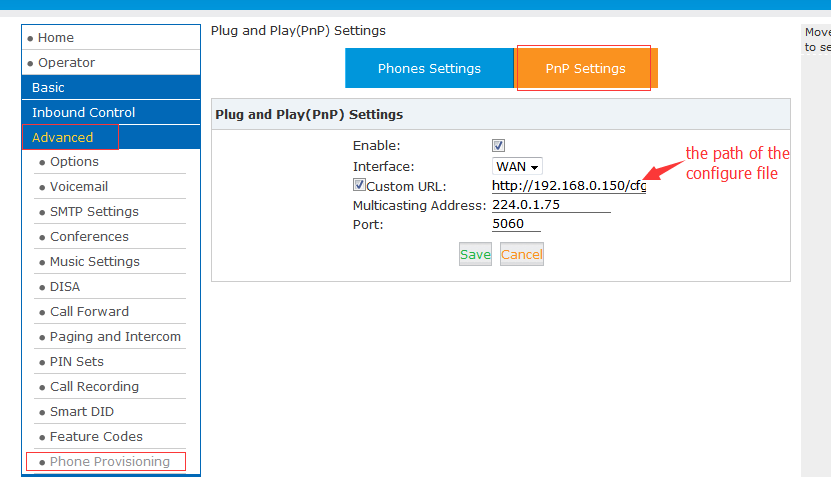
4, You can put your phone's configuration in your own server, and the format can be:factory000x.bin->cfg000x.xml->cfgmac->cfgmac.xml(In cfgmac As an example)

Note:Htek Phone Default PnP Active:Yes.
Use ZYCOO Integrated Features
This chapter provides the detail instructions and configurations for the following ZYCOO integrated features:
Basic Setting
Over View
This chapter introduces the necessary configuration of account registration and common optional configuration. Topics include:
Account Register
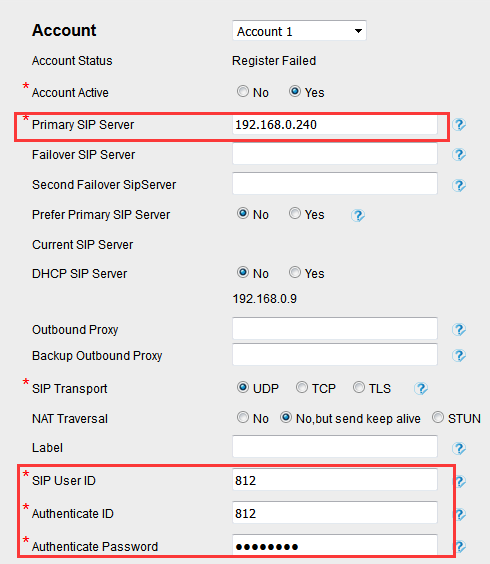
1, On the general page, you need to fill in some information about the extension.
Extension is your phone number, it must be filled.
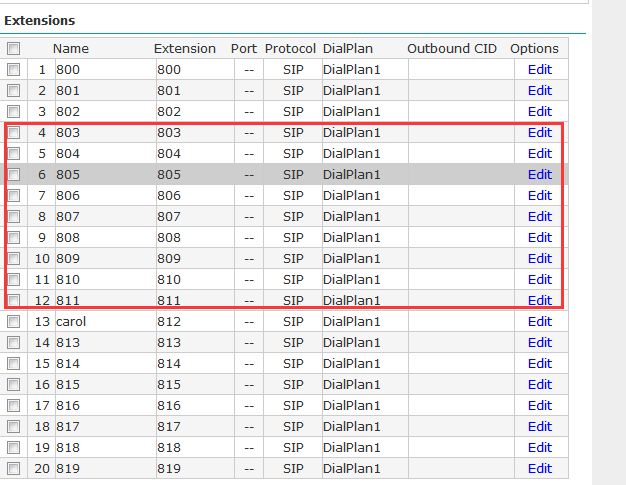
Basic->Extensions->New User,Automatic account allocation.

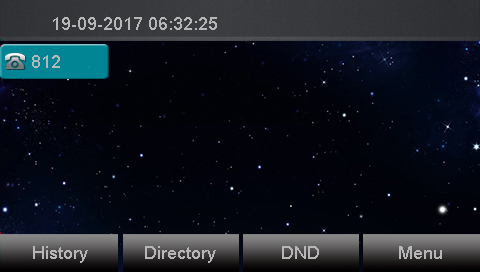
Name will be combined to display on LCD after auto-provisioning success.
Password is automatically generated, and can be modified to facilitate memory.
Also,you can batch add,you can fill extension Start and Extension End,Passwords can be either random or customized.

2, After complete to fill in all of the information, click "Save".
Home->Operator,If the extension is registered successfully, you will see the icon turns green in ZYCOO Phone System.
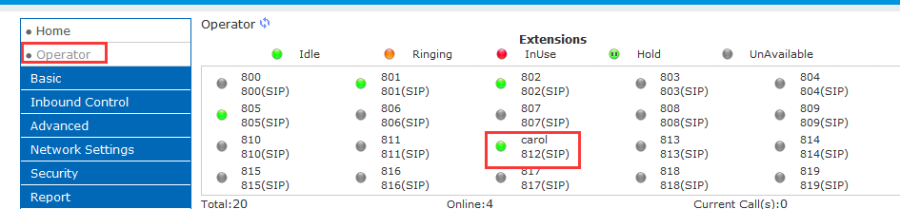
3,registration
The line state in the LCD screen is "?", not "×".
Call Forward
Over View
ZYCOO phone system provide forward rules for the different phone status (Always/Busy/No Answer). Make sure that you won't miss all of your calls.
How To Config
To configure forward via ZYCOO Phone System:
Log in ZYCOO Phone System -> Advanced -> Call Forward,click to the New forward. You can configure the forwarding rules for the three kind of phone statusAlways,Busy,No Answer. Now we take as an example.
Always:
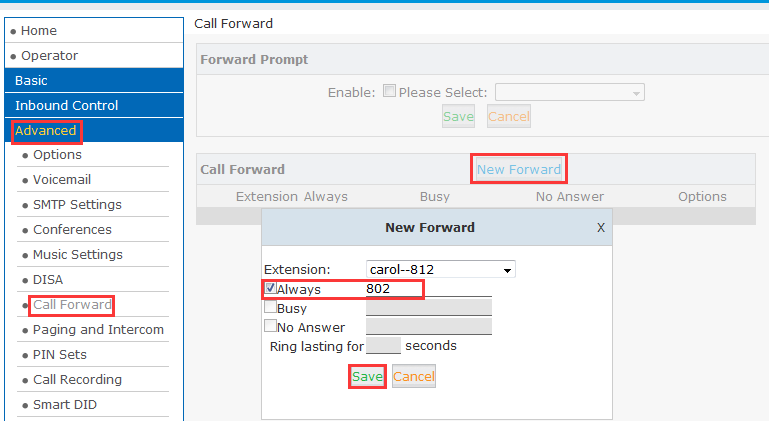
- There are two cases of forward rule for Internal Calls.
If A phone calls the extension 812, the following setting, 812 will be directly forwarded to the extension 802 phone, 802 ringing.

Busy:
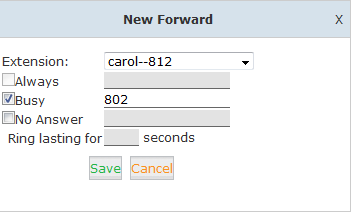
There are two cases of forward rule for Internal Calls.
If A phone calls the extension 812, the following setting, 812 reject, 802 ringing.

No Answer:
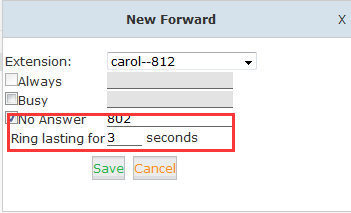
- There are two cases of forward rule for Internal Calls.
If A phone calls the extension 812, the following setting, 812 no answer, 802 ringing for three seconds later.

Call Transfer
Over View
You can transfer a call to another extension in one of three ways:
Blind Transfer: Transfer a call directly to another party without consulting.
Semi-Attended Transfer: Transfer a call when the target phone is ringing.
Attended Transfer: Transfer a call with prior consulting.
How To Use
To perform a blind transfer:
1. Press the Transfer soft key during a call.
2. Enter the extension number which you want to transfer the call to.
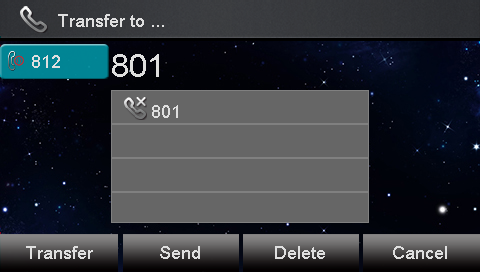
3. Press the Transfer soft key to complete the transfer, then the call is connected to the number to which you are transferring.
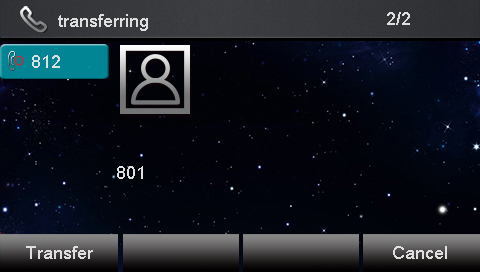
To perform a semi-attended transfer:
1. Press the Transfer soft key during a call.
2. Do one of the following:
- Enter the number you want to transfer the call to.
- Press the Dir soft key, and then select the desired group and search for the contact
3.Press send soft key or "#"button to dial out the transferring call, when the phone which is transferred ringing and then press the transfer soft key to complete the transfer.
To perform an attended transfer:
1. Press the Transfer soft key during a call.
2. Do one of the following:
- Enter the number you want to transfer the call to.
- Press the Directory soft key, and then select the desired group and search for the contact.
3.Press send soft key or "#"button to dial out the transferring call,when the phone which is transferred ringing and answer a call ,then press the transfer soft key to complete the transfer.
If you are using a handset, the transfer can be completed by hanging up the handset.
You can cancel the transfer before the call is connected by pressing the Cancel soft key .
Local Conference
Over view
You can set up a conference call with other four parties. It support up to 5 parties (including yourself) in a conference call.
How to config and use
To set up a conference call:
1. Place a call to the first party.
2. When the first party answers the call, press the Conference soft key to place a new call. The active call is placed on hold.
3. Enter the number of the second party and press "#"or the Send soft key.
4.When the second party answers the call, press the Conference soft key again to join all parties in the conference.
5.Press "split" button, then other two parties will be in hold state. then the active call press "new call" button and enter the number of the third party and press "#"or the Send soft key.
6.When the third party answers the call, press the Conference soft key again to join all parties in the conference.
7.Press "split" button, then other third parties will be in hold state. then the active call press "new call" button and enter the number of the fourth party and press "#"or the Send soft key.
8.When the fourth party answers the call, press the Conference soft key again to join all parties in the conference.
During the conference call, you can do the following actions:
- Press the "Hold" soft key to place the conference on hold.
- Press the "Split" soft key to split the conference call into four individual calls on hold.
- Press to "mute" the conference call. - Press the "End Call" soft key to drop the conference call.
Network Conference
Over view
Several users extension or outside call if need to set up a conference call, you can through the keyboard input extension number 916 meeting room function, and then enter the conference room password 123456 (222222 the administrator password) is the password through the rear can conference call, this equipment support three telephone conference room.
How to config and use
1.Advanced->Conferences,click to the New Conference
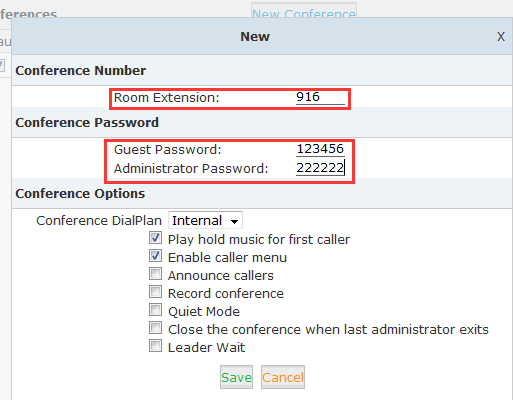
2. Phone A enters the conference room number (916), enters the conference room password (123456) according to the voice prompt, and enters the conference call.
Call Park
Over View
You can use call park feature to park a call, and then retrieve the parked call from another phone. Htek IP phone supports call park Feature. For call park feature, the server will automatically hunt for the first available orbit in the call park orbits and parks the call there. The call park orbits should be predefined. You can park an active call by pressing the call park key(if configured) on the phone. And you also can retrieve the parked call by pressing a (retrieve) parked call key or dialing the retrieve access code.
How to Config
1,How to Config on the ZYCOO phone system?
- ZYCOO Phone System-> Advanced -> Feature Codes->Call Parking

2.Dial codes
Code of Park a call: when you dial the code during a call, you will park the call to the call park orbits.
Code of Pickup a parked call: when you dial the code, you will pick up a parked call from the call park orbits.
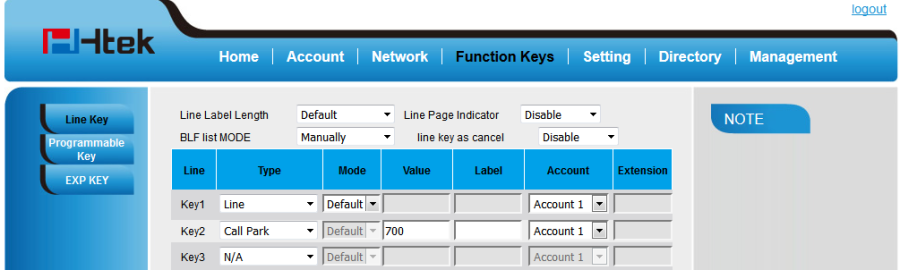
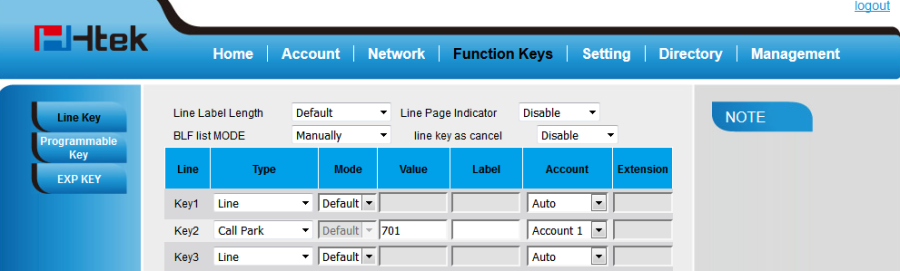
3, How to Config on the IP Phone?
Phone A
Phone B
How To Use
1, Suppose Phone A and B were provisioned a Call park key with the same Shared park extension.
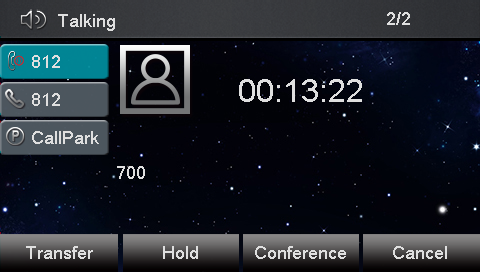
2, Phone A make a call with phone C.A press Call park key. The call will be parked and you will heard call park tone from A. And the Call park key of phone A and B will turn red.
3, B press the call park key, the parked call will be picked up. Now B have a call with C. And the Call park key of phone A and B will turn green.
Call Queues
Over View
When someone make a call to the queue, the extensions in the queues will ring followed a principle if they are logged in. You also can logout the queue when you didn't want to receive any call by the queue.
How to Config
1, Create a new Queue,ZYCOO IP Phone System->Inbound Control->Call Queues,click to the New Queue.

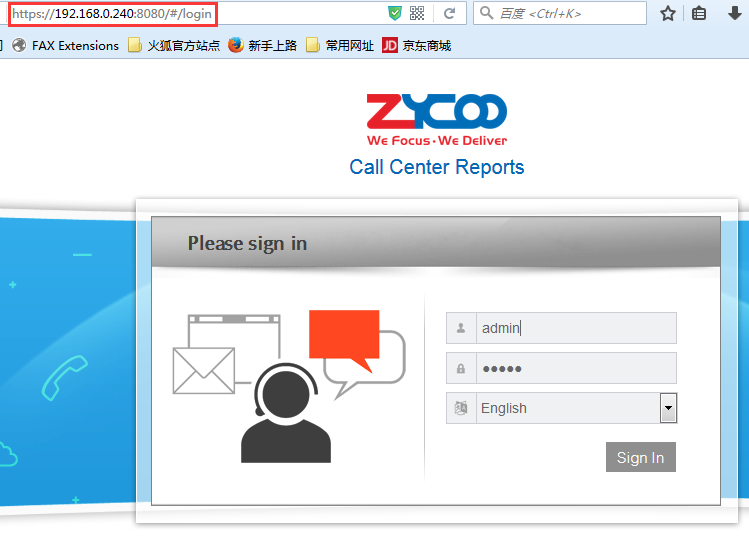
2, login in Call Center Reports(username:admin,password:admin).
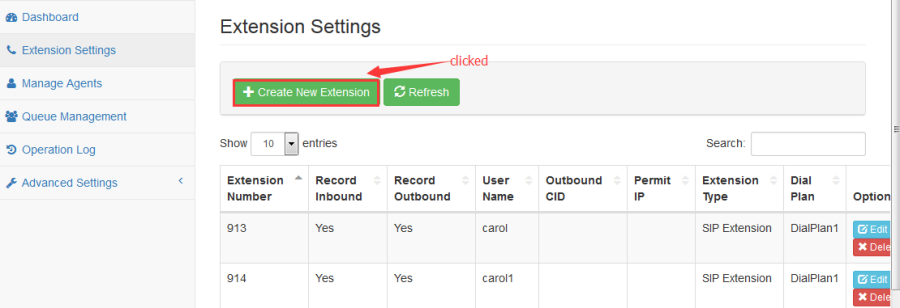
3, Call Center Reports->Extension Settings,Click to the Create new Extension.
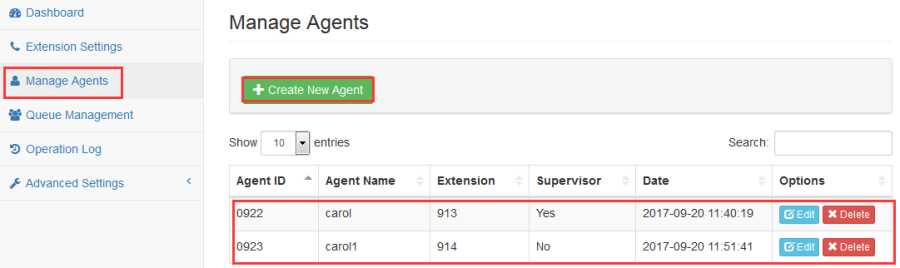
4, Call Center Reports->Manage Agents,Click to the Create new Agent.
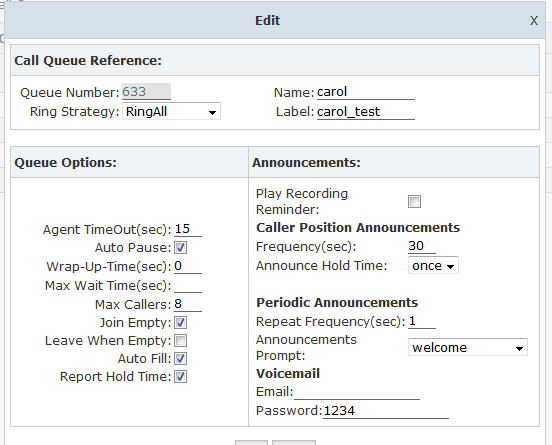
5, Call Center Reports->Queue Management,Click to the Edit. 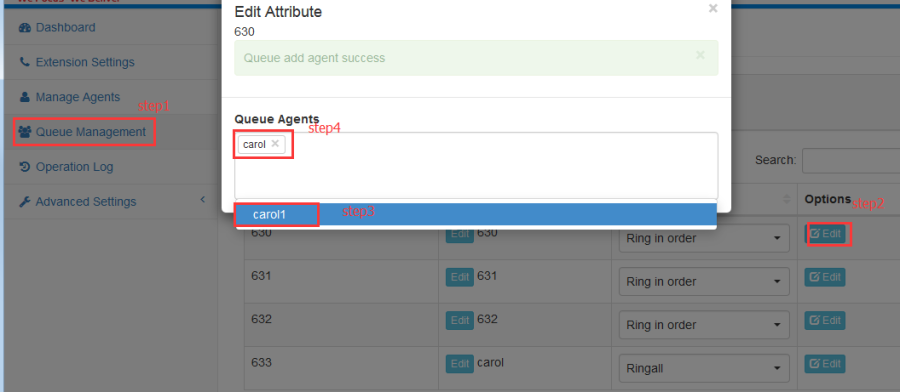
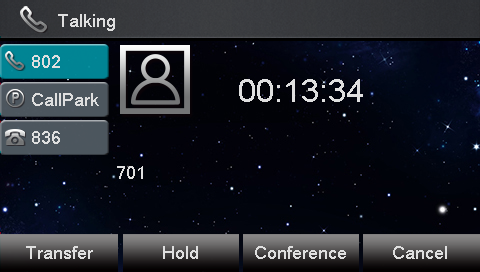
How To Use
1,Configure the extension number (913 ,914) on the phone's web page and display the registration success.


2,On the other phone call the queue for the extension 633, phoneA(913) and phoneB(914) ringing.
Ring Groups
Over View
Ringing set of extension set, when the call into the ring group, all belong to the extension of the ringing according to set up different ways of bell ringing, when a user extension set the ringing time more than the number of seconds after the corresponding processing.
How To Config
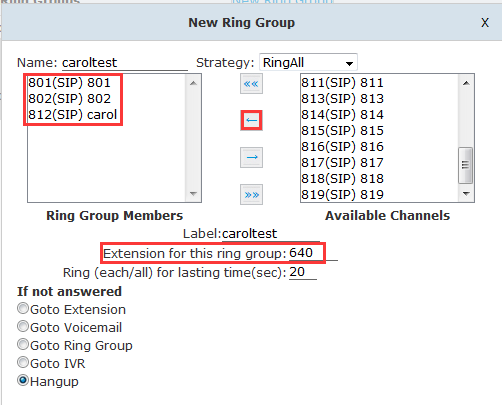
1,ZYCOO Phone System -> Inbound Routes -> Ring Groups,click to the New Ring Group.
How To Use
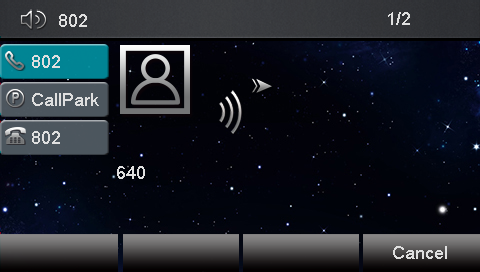
1, Phone A call 640 extension, and All the members are ringing.
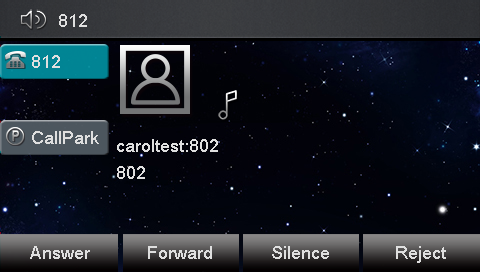
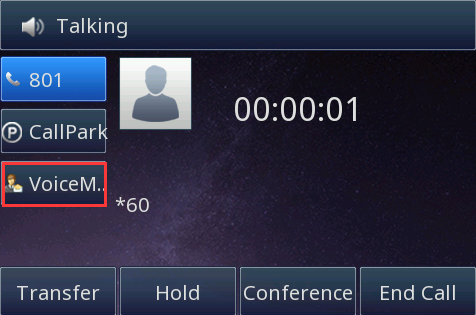
Voice Mail
Over View
When the phone is unresponsive, it will go to the other person's voicemail and voice messages, and the other party can listen to the voice message afterwards.
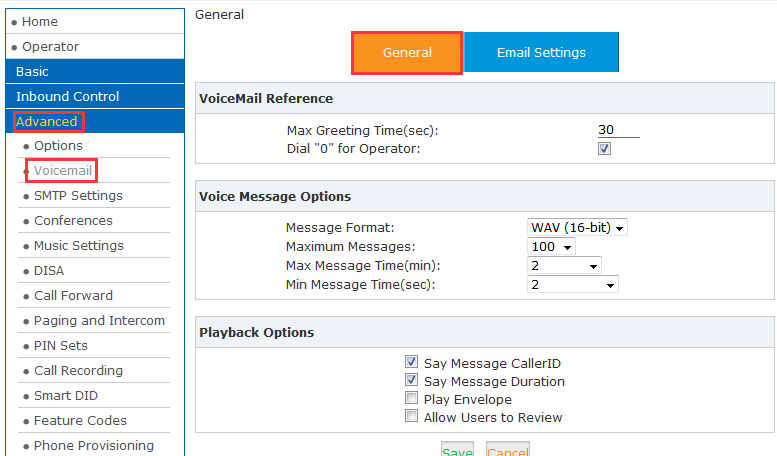
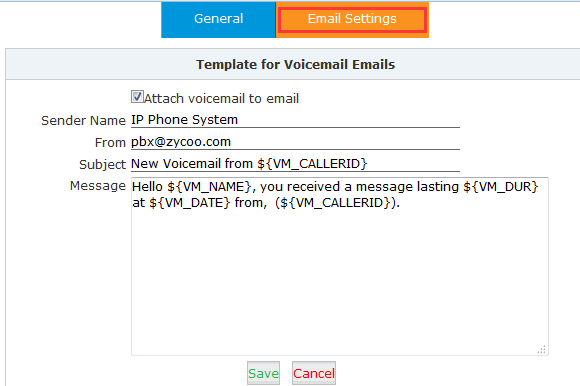
How To Config
1,ZYCOO Phone System -> Advanced -> Voicemail.
2,ZYCOO Phone System-> Advanced ->Feature Codes-> Voicemail.

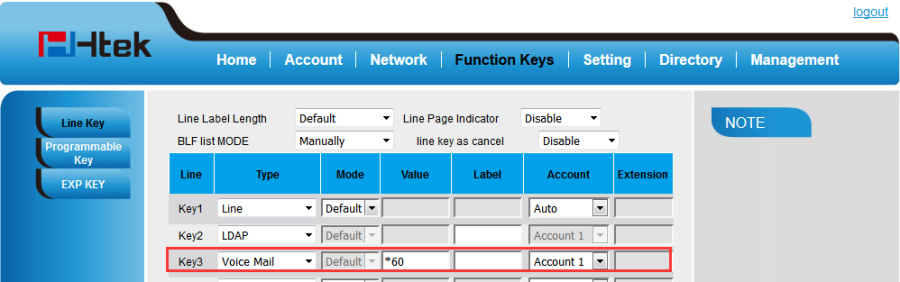
3,How to config on the Phone?
How To Use
Press Line key on the phone, enter voicemail password, listen to voice prompt message, listen to voice message.
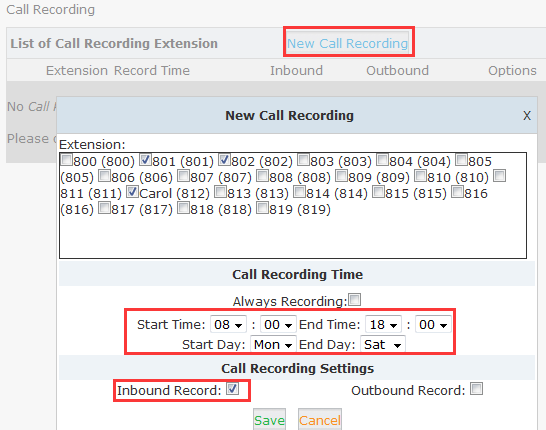
Call Recording
Over View
The call recording function refers to the recording of a designated user extension call.
How To Config
1,ZYCOO Phone System -> Advanced -> Call Recording,click to the New Call Recording.
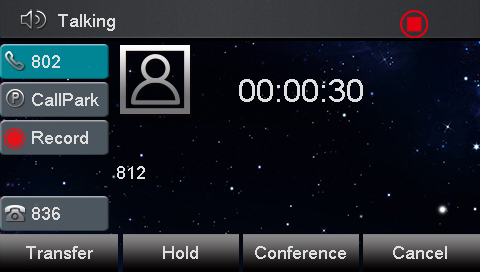
How To Use
1, Record softkey on the phone, press the button during the phone call.
Pickup Call
Over View
When the phone has a call, the phone is not empty, but it can be installed on other phones.
How To Config
1,ZYCOO Phone System -> Advanced -> Feature Codes.

2,How to config on the phone?
![]()
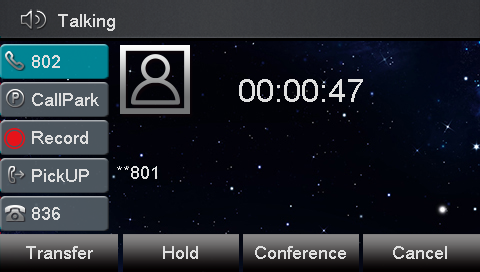
How To Use
1, Phone C pickup Phone A, set up the linekey (Direct Pickup) on the phone C , form at: **+ Extension.B calls C, C ringing,B press linekey, and B is talking to C.
Paging and Intercom
Over View
Ringing set of extension set, when the call into the ring group, all belong to the extension of the ringing according to set up different ways of bell ringing, when a user extension set the ringing time more than the number of seconds after the corresponding processing.
How To Config
1,ZYCOO Phone System -> Advanced -> Paging and Intercom,click to the New Paging Group.
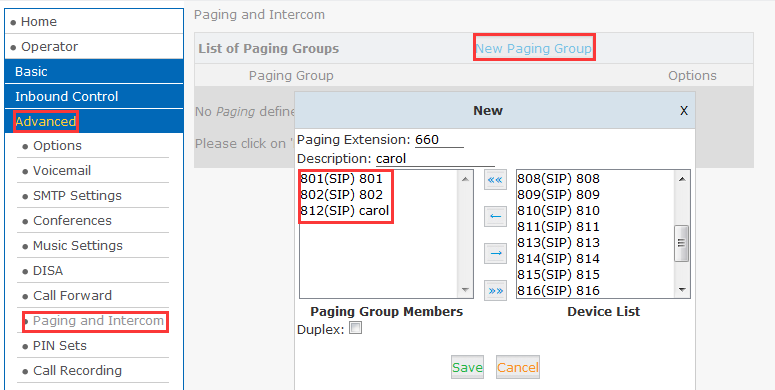
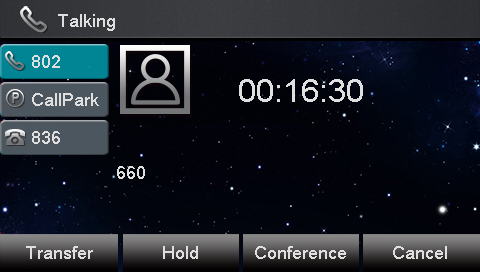
How To Use
1, Phone A call 660 extension, and all members of the ring will be connected.The other members can hear and phone A could not hear other members.

LDAP Server
Over View
When open the LDAP server, configure corresponding parameters, and also on the IP phone end configuration corresponding parameters, can be on the phone LCD screen function of LDAP users can easily check on the ZYCOO PBX system extension.
How To Config
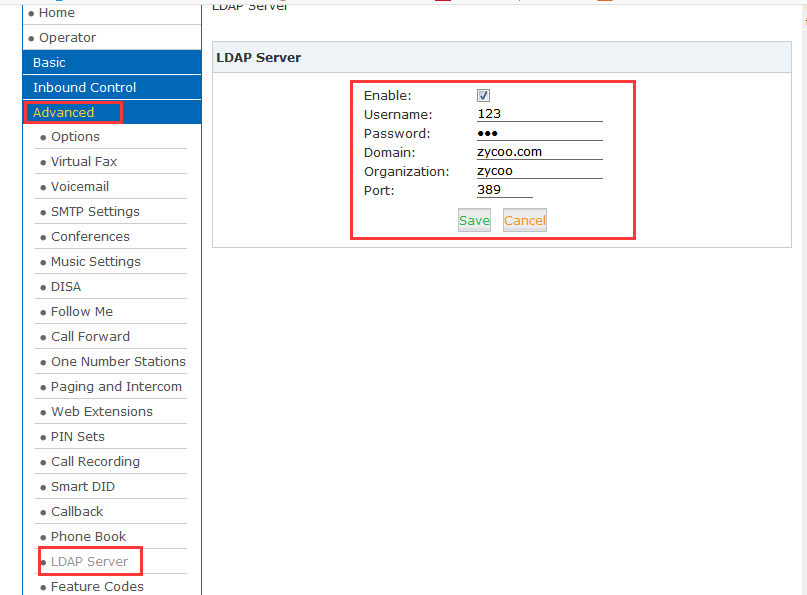
1,ZYCOO Phone System -> Advanced -> LDAP Server,enable this function and fill out this configuration,then click to the save.
How To Use
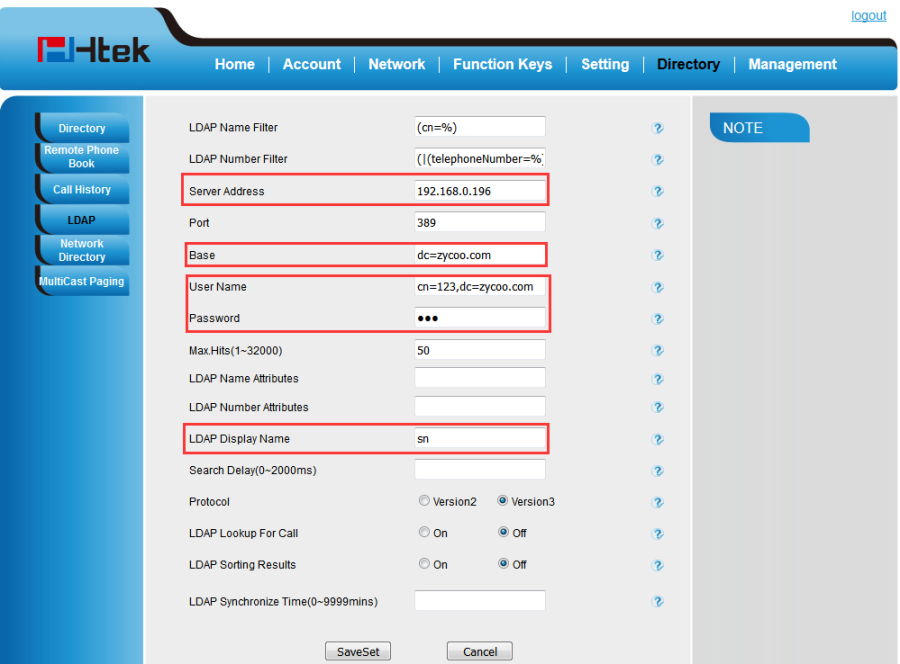
1, IP Phone web page->Directory->LDAP
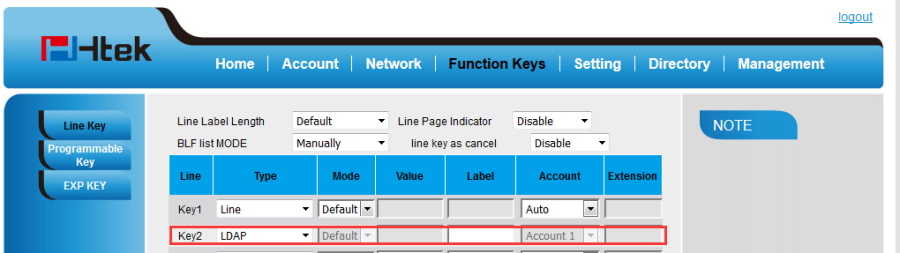
2,IP Phone web page->Function Keys->Line Key
Phone Book
Over View
When LDAPserver is turned on, you can customize the add contacts, delete contacts, import/go out of contact, and the phone can be loaded correctly.
How To Config
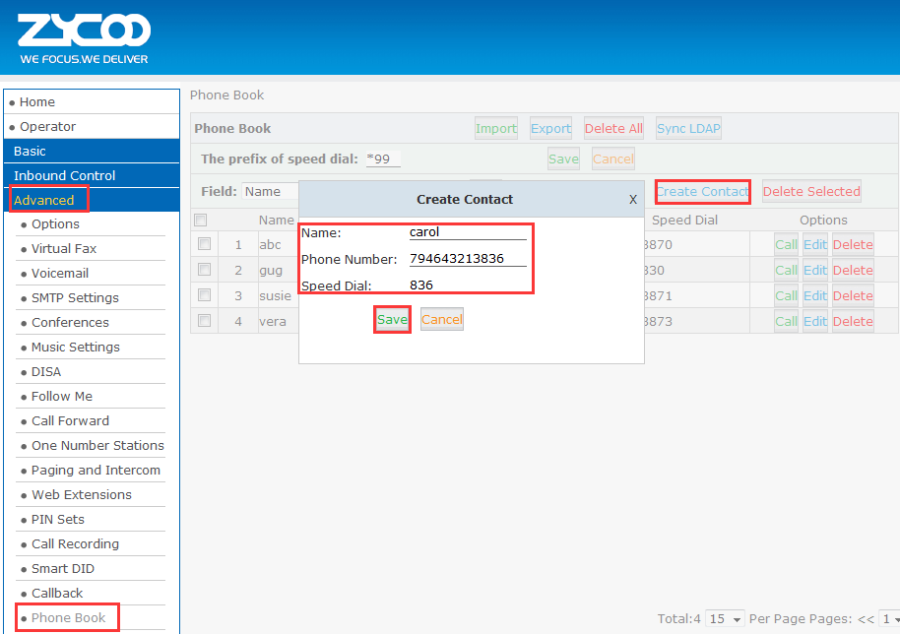
1,ZYCOO Phone System -> Advanced -> Phone Book,click to the Create Contact ,enable this function and fill out this configuration,then click to the save.
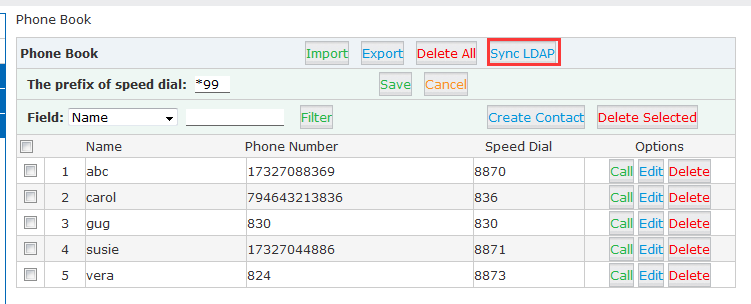
2,Click to the sync LDAP,then IP Phone can be synchronized.
How To Use
1, IP Phone web page->Directory->LDAP
2,IP Phone web page->Function Keys->Line Key
3,IP Phone display

Troubleshooting
This chapter provides general troubleshooting information to help you solve the problems you might encounter when using your phone. If you require additional information or assistance with your new phone, contact your system administrator.
Why is the LCD screen blank?
- Ensure that the phone is properly plugged into a functional AC outlet.
- Ensure that the phone is plugged into a socket controlled by a switch that is on.
- If the phone is plugged into a power strip, try to plug it directly into a wall out let instead.
- If the phone is powered from POE, ensure that you use a POE-compliant switch or hub.
Why does the phone display "Network unavailable"?
- Ensure that the Ethernet cable is plugged into the Internet port on the phone and the Ethernet cable is not loose.
- Ensure that the switch or hub in your network is operational.
Why doesn't the phone display time and date correctly?
Check if you have configured the phone to obtain the time and date from the SNTP server automatically. If the phone fails to connect to the SNTP server, you need to configure the time and date manually.