Metaswitch Configuring Guide
- Former user (Deleted)
Htek IP Phones Integrated with Metaswitch Configuration Guide V1.1
Getting Started
This chapter will show you the basic process of phone's start-up and instructions of the way to get the basic information of the phone. Topics include:
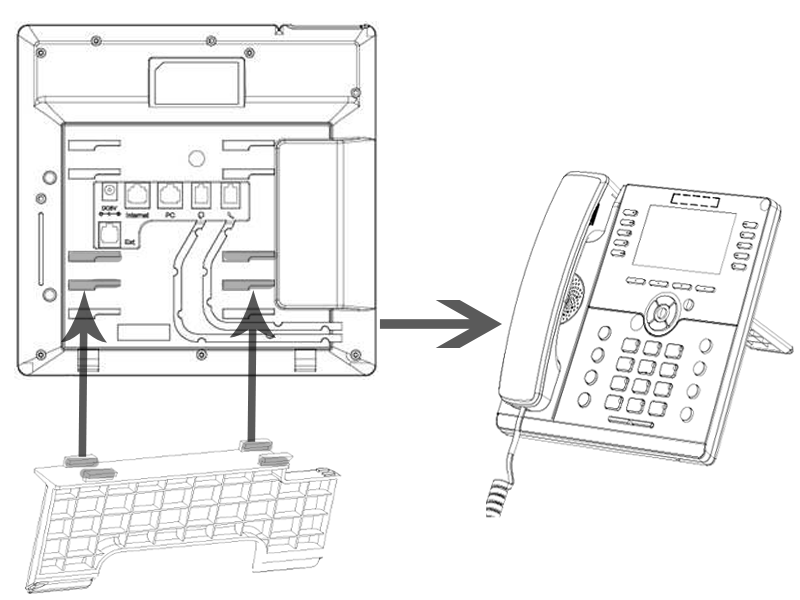
Phone Installation
1. Attach the phone stand
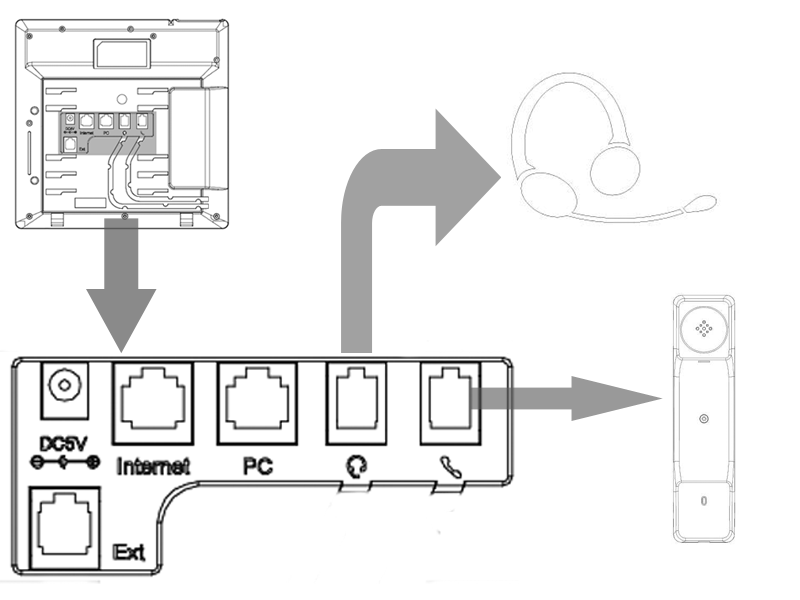
2. Connect the Handset and optional Headset
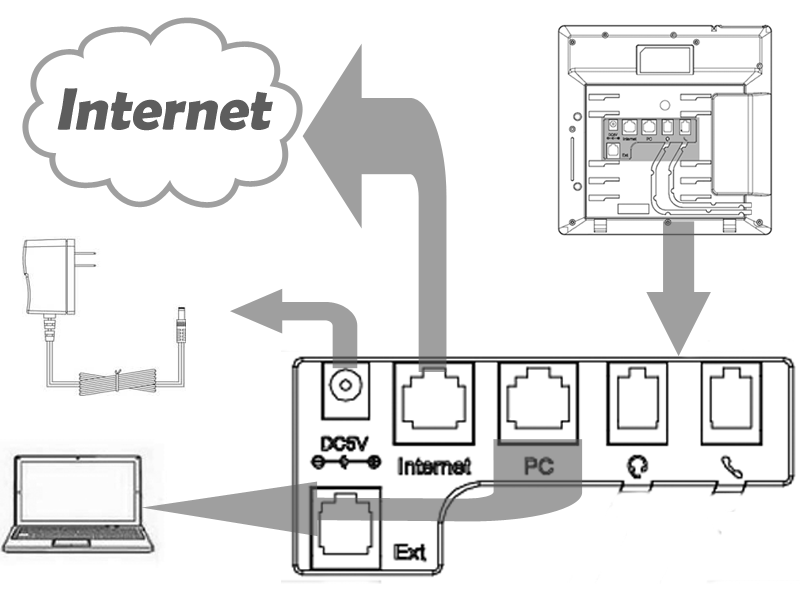
3. Connect the Network and Power
Network Setting
Htek IP Phone supports IPv4?IPv6?IPv4&IPv6.They have three mode of Network: DHCP, Static, and PPPoE. The default mode is DHCP, it will obtain IP address and other information automatically.
If your phone cannot contact a DHCP server for any reason, you need to configure a static IP address manually.
IPv4
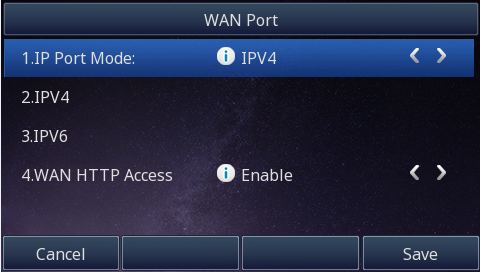
If you set IP Mode to IPv4,IP phone will use IPv4 address. IPv4 has three network modes: DHCP, Static, and PPPoE
To configure IPv4 via phone interface:
- Press Menu->Setting->Advanced Settings (password: admin) ->Network->WANPort ->IP Port Mode.
- Press
 or
or  to change the IP Port Mode..
 - Press
 or Save soft key to save the configuration.
To configure IPv4 via Web interface:
- Click Network->Basic-> Internet Port
- Select IPv4 for Internet Port
- Click
 for the setting.

To configure DHCP via phone interface:
- Press Menu->Setting->Advanced Settings (password: admin) ->Network->WAN Port IPv4->DHCP mode.
- Click Save and restart the phone.
To configure a static IP address via phone interface:
- Press Menu->Setting->Advanced Settings (password: admin) ->Network->WANPort ->IPv4 ->Static mode.
- Enter the parameters: IP, Netmask, Gateway, Pri. DNS(primary dns), sec. DNS(second DNS) in the corresponding fields.
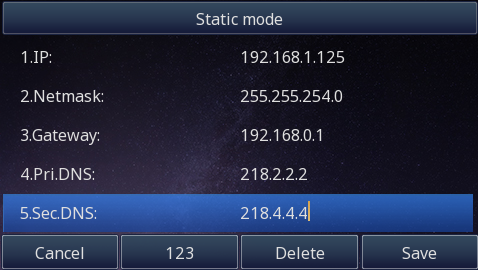
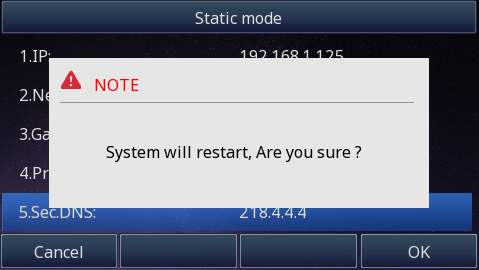
3.Click Save and restart the phone.
Press the Save soft key to accept the change or the Cancel soft key to cancel. If you are using an xDSL modem, you can connect your phone to the Internet via PPPoE mode. You can set a WAN port to be a PPPoE port. The PPPoE port will perform a PPP negotiation to obtain the IP address. Contact your system administrator for the PPPoE user name and password.
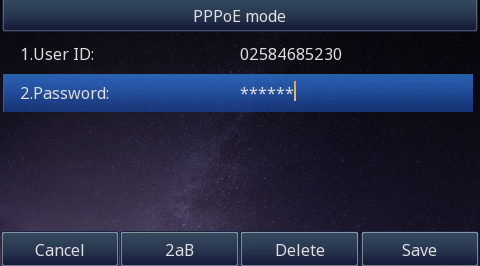
To configure PPPoE via phone interface:
- Press Menu->Setting->Advanced Settings (password: admin) ->Network->WANPort ->PPPoE mode.
- Enter the User ID and password
- Click Save and restart the phone
To configure Network via web interface:
- Click Network->Basic->IPv4 setting
- Select the desired Type: DHCP, Static or PPPoE
- Filled the necessary information.
- Click the SaveSet and restart the phone.
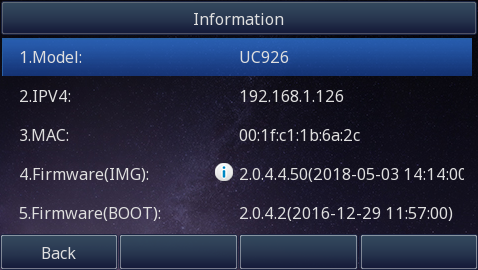
Phone Status
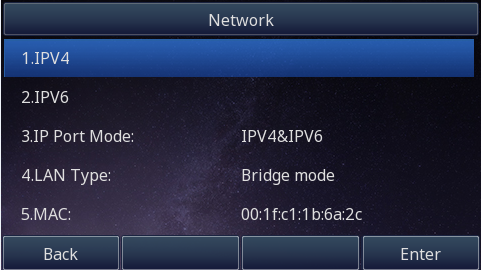
You can view the system status of your phone via phone user interface or web user interface. The information of phone status includes: Information (e.g., Model, IPV4,IPV6, MAC, Firmware, Hardware), Network (e.g., WAN Type, IP, Mask, LAN Type, Gateway, DNS …) Account (e.g., register status of accounts)
To view the phone status via phone interface:
- Press Menu →Status →Information Network/ Account
2. Press Menu →Status →Network
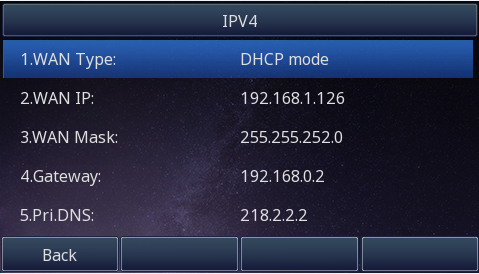
3. Press Menu →Status →Network→IPV4
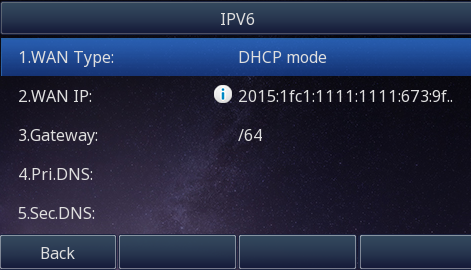
4. Press Menu →Status →Network→IPV6
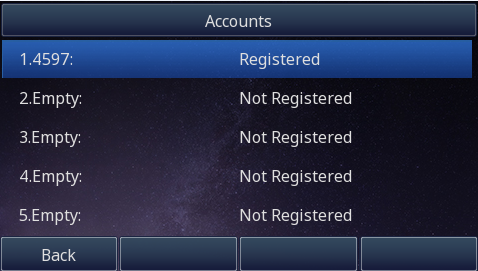
5. Press Menu →Status →Account
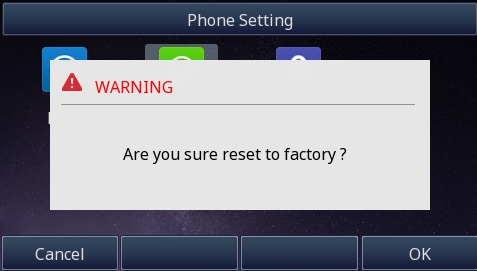
Factory Reset
To set Factory Reset by phone interface
Press Menu → Setting → Advanced (default password: admin) → Settings→ Factory Reset
- Press OK to confirm.
Provisioning
This chapter provides the following instructions of provisioning.Topics include:
Endpoint Pack
Htek has Endpoint Packs certified by Metaswitch. They can be downloaded from Metaswitch mosaic community:
https://communities.metaswitch.com/community/mosaic/sipps/endpoint_pack_releases
Alternatively, you can ask our support team for the latest Endpoint Packs (support@htek.com).
Then add the Endpoint Pack to your MetaSphere EAS. Please refer to Metaswitch support community for details (https://communities.metaswitch.com/index.jspa).
Obtaining URL
Htek phone supports 4 ways to obtain provisioning URL.
The URL format used on phone is
http[s]://example.com/sip-ps
DHCP Option
After powering on, Htek phone will firstly try to obtain provisioning URL from DHCP option 66 by default. The URL has to be pre-configured in DHCP server option 66.
RPS
If could not acquire URL from DHCP 66, the phone will request provisioning URL from Htek RPS server. This also require pre-set on RPS server. If you want to learn more rps use,you can ask our support team for the RPS Guide (support@htek.com).
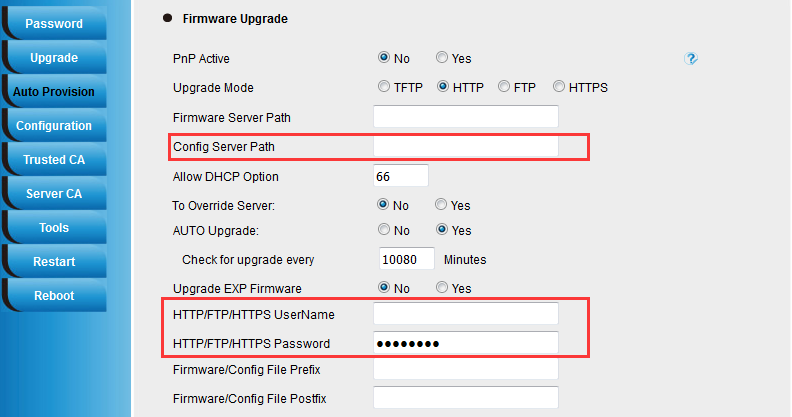
Web UI
Log in Phone's web UI (default administrator username/password: admin/admin), follow path: Management -> Auto Provision. Fill 'Config Server Path' with provisioning URL.
If need http digest authentication, in the same page, fill 'HTTP/FTP/HTTPS UserName' & 'HTTP/FTP/HTTPS Password'. Click 'SaveSet', then restart the phone or click 'Autoprovision Now'.
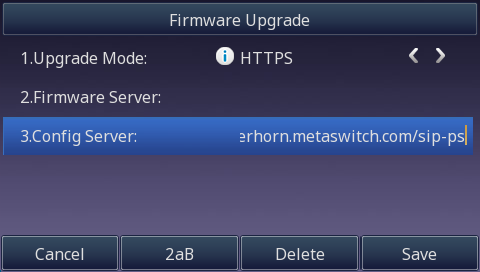
Phone LCD
Enter: Menu -> Settings -> Advanced -> Auto Provision. Fill 'Config Server Path', then save and restart the phone.
Getting configuration
Htek phone supports all 3 provisioning modes provided by MetaSwitch SIP PS. The protocol can be either HTTP or HTTPS.
MAC Authentication
Create a new device with MAC address on MetaView Web. Then provision.

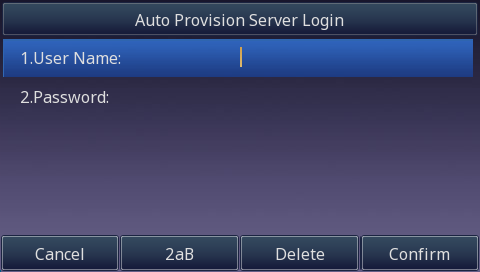
HTTP Digest
Htek phone also supports HTTP digest. The HTTP username and password can be pre-set on Web UI as stated before.
The username and password can be also set on LCD screen. This window will show when phone receive 401 challenge and username and password are null during provision.
Token
After initial provisioning, Htek phone can obtain new URL with a token in it from MetaSwitch SIP PS for updating configuration in the future.
Htek IP phones support many update modes. Here we take the followings as examples to introduce how to trigger the phone to perform re-provisioning:
Power On
The phone will perform the re-provisioning process to download configuration files via power on. Then You can access your newly changed configuration features on the CommPortal phone configurator via your phone.
Auto Provision Now
You can use Auto Provision Now method to trigger the IP phone to perform the re-provisioning immediately.
To trigger re-provisioning via auto provision now:
- Login web page->Management->Auto provision->Auto provision now
- Click 'Auto provision now'
![]()
Zero Touch
If you change the parameter settings on the CommPortal phone configurator, you can press the zero touch key (if configured) to quickly perform re-provisioning to apply the changes to your phone.
To configure a zero touch key via CommPortal phone configurator:
- Click on Programmable Keys - Line Key->Key X.
- Select Zero Touch from the Soft key action field.
- (Optional.) Enter the string that will appear on the LCD screen in the Label field.

4.Click Save changes to accept the change.
5.Perform re-provisioning on the phone to download above configurations
To trigger re-provisioning via zero touch:
- Press the zero touch key when the phone is idle.
The LCD screen prompts "Update now? 5s".
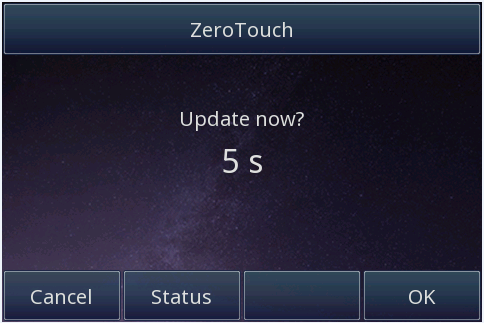
2.Press the OK soft key.
3.Press the Next soft key.
4.Press the OK soft key.
5.After the above configuration is completed, the IP phone will connect to the configured provisioning server and reboot to perform the re-provisioning process.
Upgrade
Once provisioning is successful, Htek phone will automatically download firmware within the Endpoint Pack which is currently using on SIP PS then upgrade.
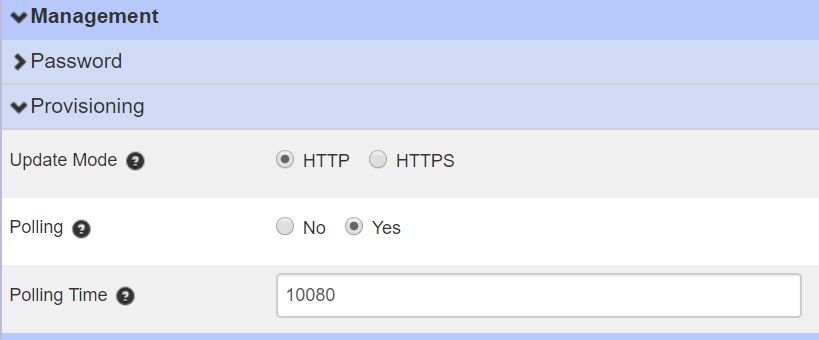
Polling
Profile editor UI: Management -> Provisioning
Enable Polling to automatically update configuration periodically. The Polling Time (update interval) can also be set (in minutes).
Customization
Htek phone can be customized through profile editor UI on MetaView Web.
Preferences
Editor UI path: Management -> Preference
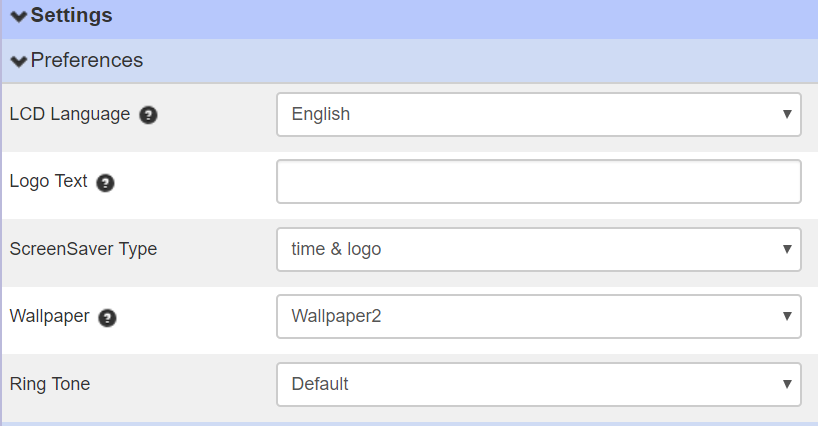
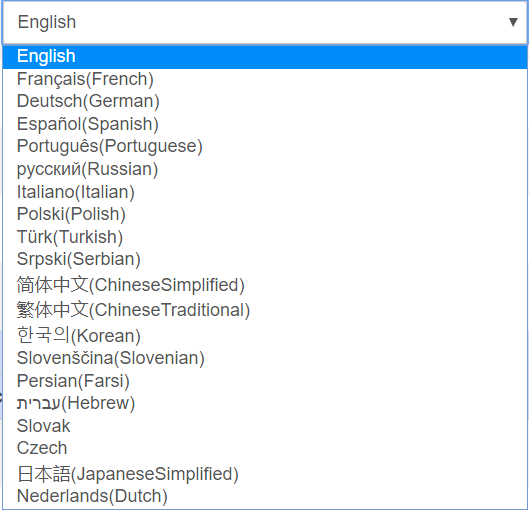
1. LCD Language
The language shows on phone's LCD screen can be chosen from options shown in figure.
2. Screen Saver
Screen Saver Type can be chosen among different displays, including 'time & logo', 'photo switch' and 'static photo'. When choosing 'time & logo', the logo can be set in 'Logo Text' field.
3. Wallpaper
Wallpaper can be chosen from 6 different pictures in the device
4. Ring Tone
Global Ring Tone can be set among 8 ring tones.
Date and Time
Editor UI path: Management -> Date and Time
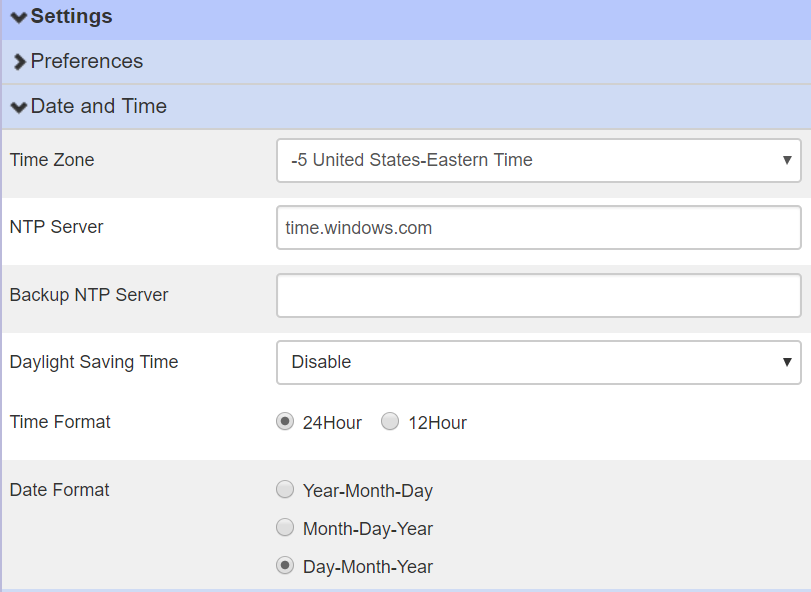
1. Timezone
Timezone can be selected from all 24 time zone worldwide, including certain half-timezones.
2. NTP Server
The default setting of NTP Server is time.windows.com. When the device is unable to resolve time from NTP server, it will turn to backup server for time request.
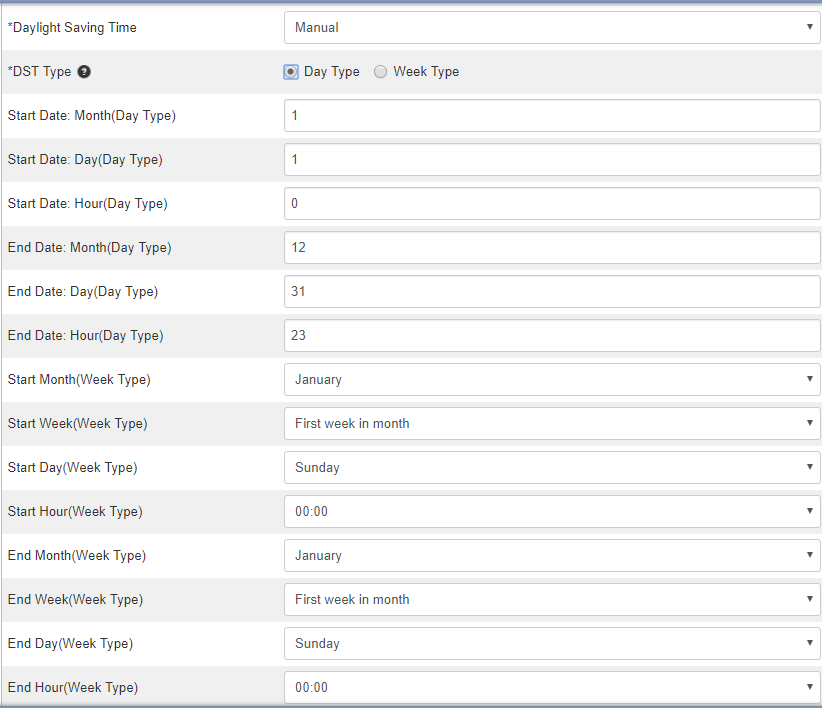
3. Daylight Saving Time
There are 3 setting modes of Daylight Saving Time – 'Disable', 'Manual' and 'Auto'. When setting to 'Manual' mode, the start and end day/week of summer can be set. Remember to choose using 'Day Type' or 'Week Type'.
4. Display Format
Time Format can be chosen between 24-hour and 12-hour.
Date Format can be chosen among Year-Month-Day, Month-Day-Year and Day-Month-Year.
Account Settings
Editor UI path: Account X
1.Basic Settings
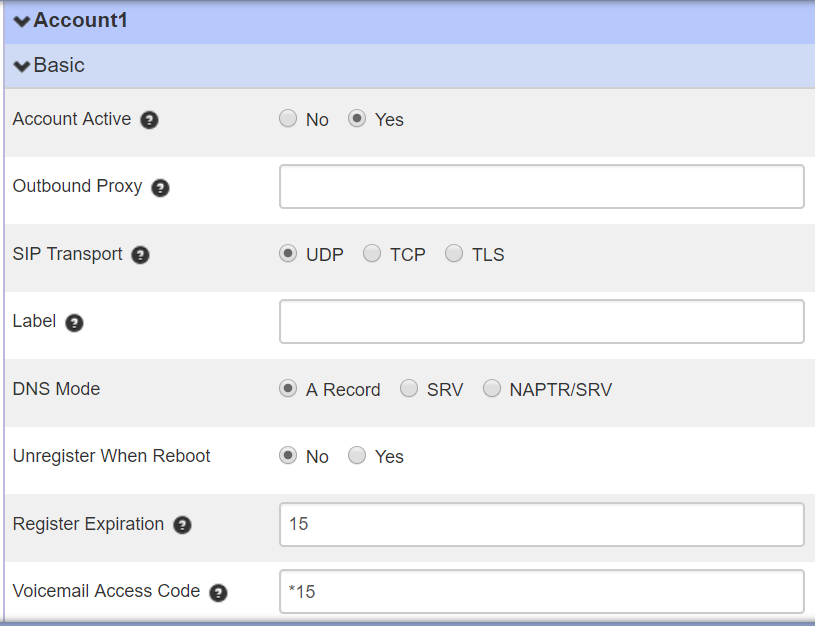
Normally, SIP host, SIP user id and SIP password are automatically filled in the account 1 of device during provisioning, so they do not need to be set in the editor UI.
Other basic settings such as Outbound Proxy, SIP Transport, DNS Mode and Voicemail Access Code are able to be set in the editor UI.
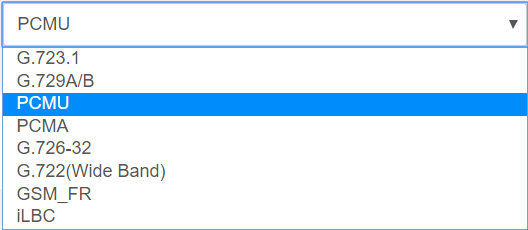
2. Codec Settings
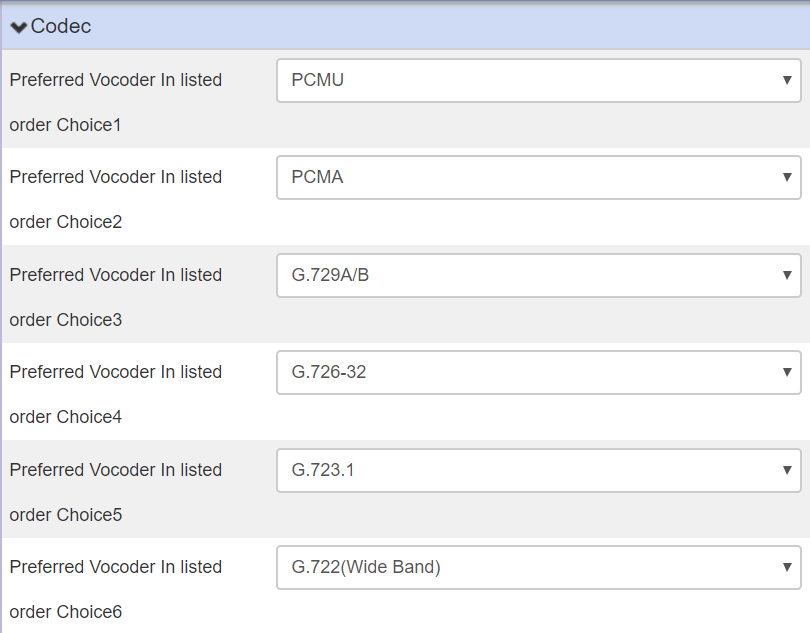
Audio Codec order in SDP in outgoing SIP can be set and Choice 1 represents the top order, while Choice 6 represents the bottom. Codec can be selected among ones in following figures.
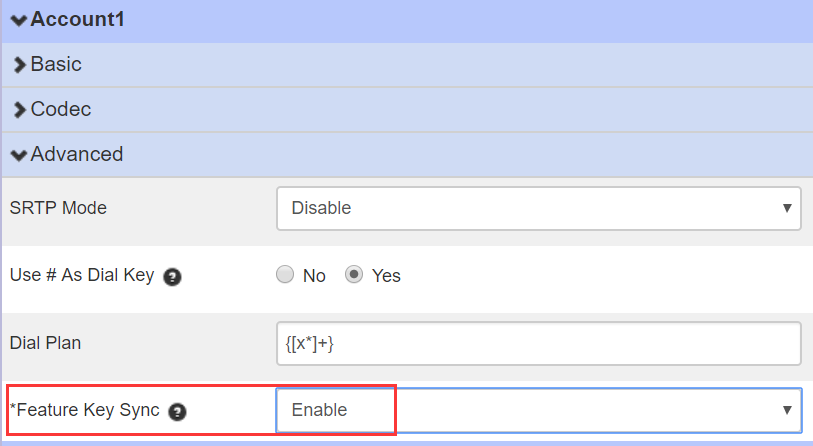
3. Advanced Settings
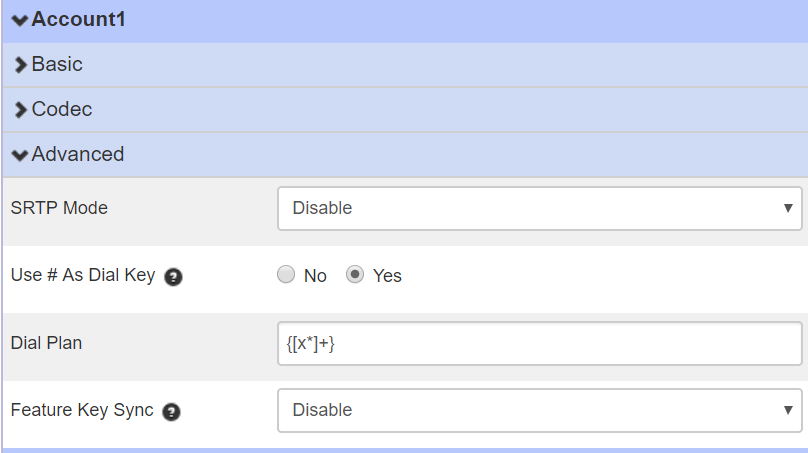
In dvanced settings, SRTP Mode can be chosen as Disable, Enable but not Forced or Enable and Forced.
Dial Plan as well as Use # As Dial Key can also be set here.
Feature Key Sync is to enable as-feature-event SIP Pack which will be used in Integrated DND feature.
Call Features
Speed Dial
With this feature, you can dial one number or code by pressing the configured speed dial key.
To configure a Speed Dial key via the CommPortal phone configurator:
- Profile Editor UI path: Line Key->Key X.
- Select Speed Dial from the Soft key action field.
- Enter the desired value(e.g,number:79202904591 or code:61 ) in the *Value field.
- Select Account X from the Account field.
- Enter the string that will appear on the LCD screen in the Label field.
Hot Line
Editor UI path: Features -> Hotline
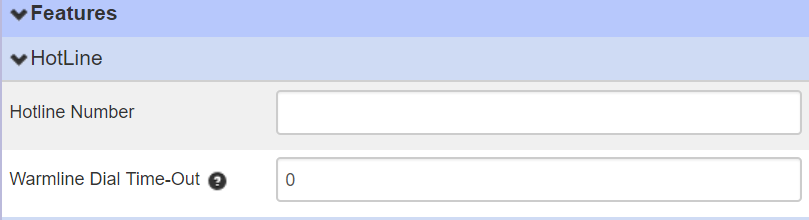
1.Hot Line
Fill the Hotline Number and the phone will dial the number immediately when hook off.
2.Warm Line
To operate Warm Line, fill the Hotline Number and the Warmline Dial Time-Out. phone will dial the number after preset seconds.
Do Not Disturb
You can use DND to reject incoming calls automatically on the phone. The message "n New Missed Call(s)" ("n" indicates the number of missed calls) will appear on the LCD screen, and callers will receive a busy message.
How to config and use the Integrated DND
1.To use Integrated DND, as-feature-event SIP Pack must be enabled.
To do so, in editor UI, find Account X -> Advanced -> Feature Key Sync and enable.
2.After pressing DND softkey on the phone to enable DND feature , the DND icon will show on the screen. At the same time, on CommPortal Web phone status will be synchronized.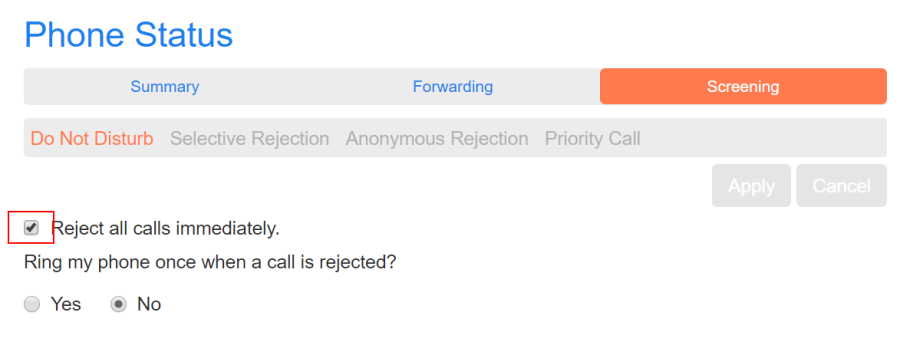
Automatic Callback
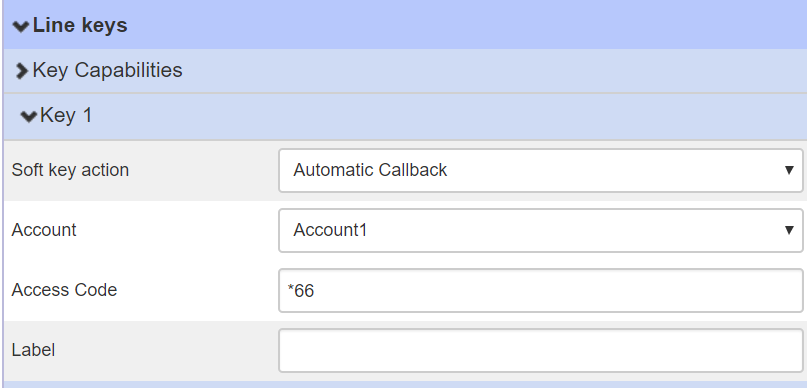
In line key settings, select desired line key and set soft key action as Automatic Callback. Then set Account and Access Code (default is 66). *Label is optional.
After calling someone who is busy, press the automatic callback line key to engage the service. You will hear a Metaswitch announcement, then hang up. Your phone will start ringing once the peer you just called is available and the CFS is trying to create a call between you and your peer.
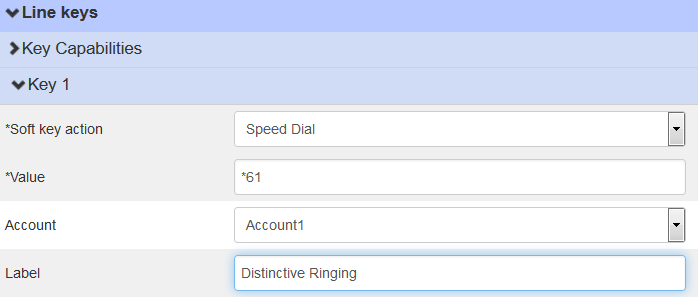
Distinctive Ringing
- Profile Editor UI path: Features -> Distinctive Ringing
- Select desired ring cadence in 'Alert Ring File X' for 'bellcore-drX' in Alert-info sip header.
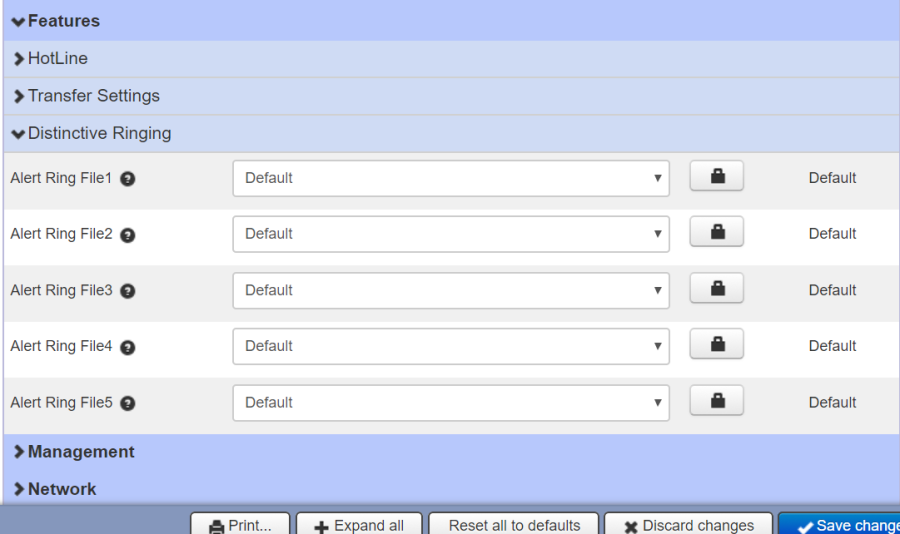
Then dial the feature access code (default is *61) or press the configured Speed Dial key to set priority call by following the instruction. When the number which you set as priority call is calling, the phone will play configured ring cadence.
Call Forwarding
You can forward a call to another party in one of four ways:
Unconditional Call Forwarding
Unconditional call forwarding can either be setup on the Metaswitch using the star codes (enable: *72, disable: *73) or can be configured on the UI.
With this feature, all incoming calls will forward immediately to configured number.
To be configured on the UI.
- Profile Editor UI path: Features->Forward->Always Forward:On
- Fill the Forward to Number.
- (Optional) fill the on/off code.
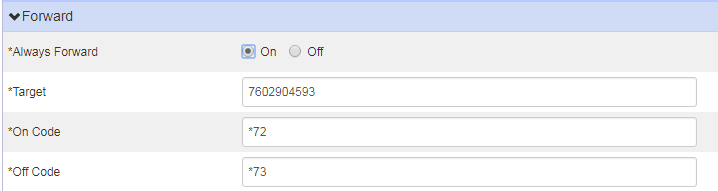
4.Click Save change to save the configuration.
5.Perform auto provisioning on the phone to download above configurations.
Selective Call Forwarding
Selective call forwarding can either be setup on the Metaswitch using the star codes (on ITG test switch: *83 and follow TUI instructions), or can be configured on the UI.
With this feature, the Entry number call will be immediately forwarded to configured Target number.
To be configured on the UI.
- Profile Editor UI path: Features->Forward->Selective Forward:On
- Fill the Target Number and Entry Number.

3. Click Save change to save the configuration.
4. Perform auto provisioning on the phone to download above configurations.
Busy Call Forwarding
The Phone should not have call waiting (otherwise it will not count as "busy" when called by other phone). Busy call forwarding can either be setup on the Metaswitch using the star codes (on ITG test switch: enable: *90, disable: *91), or can be configured on the UI.
With this feature, the incoming calls are immediately forwarded if the phone is busy.
To be configured on the UI.
- Profile Editor UI path: Features->Forward->Busy Forward:On
- Fill the Forward to Number.
- (Optional) fill the on/off code.
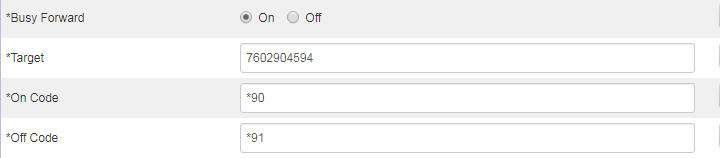
4.Click Save change to save the configuration.
5.Perform auto provisioning on the phone to download above configurations.
Delayed Call Forwarding
Delayed call forwarding can either be setup on the Metaswitch using the star codes (on ITG test switch: enable: *92, disable: *93), or can be configured on the UI.
With this feature,incoming calls are forwarded if not answered after some time.
To be configured on the UI.
- Profile Editor UI path: Features->Forward->No Answer Forward:On
- Fill the Forward to Number and After Ring Time:6(Unit:second)
- (Optional) fill the on/off code.
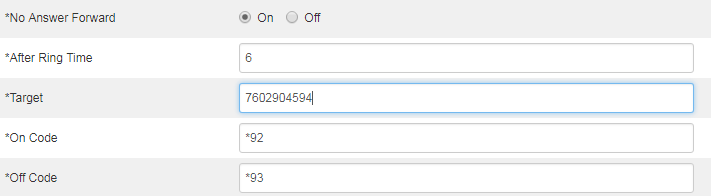
4. Click Save change to save the configuration.
5. Perform auto provisioning on the phone to download above configurations.
Call Jump
Call Jump allows users to seamlessly jump the current call to a predefined alternate or
wireless number by entering the designated hotkey.The hotkey is transmitted through DTMF.To use call jump feature, you need to set the value of the DTMF Type to Combined (RFC2833 and SIP INFO:ON,and IN Audio:OFF).
The main difference between call jump and call transfer is that when you transfer a call via call jump, the current call will stay connected instead of being placed on hold.
The following table lists the default call jump hotkeys configured by Metaswitch. Internet Telephony Service Provider can modify the hotkeys, depending on your actual needs.
Hotkey | Description |
*95 | Dial *95 to jump to your alternate number. |
*96 | Dial *96 to jump to your wireless number. |
*99 | Dial *99 to jump to another number. |
*94 | Dial *94 can be dialed to jump back to the original phone. |
Scenarios A
The system administrator has configured the alternate number (B) that phone A may want to transfer calls to in CommPortal.
To transfer active call to an alternate extension:
If C needs to consult A and B frequently, A can dial *95 press the configured Speed Dial key to jump the call to B during a call with C, then C can continue consulting B. Before B answers the call, A and C will stay connected.
Scenarios B
The system administrator has configured a wireless number that phone A may want to transfer calls to in CommPortal.
To transfer active call to an alternate wireless device:
If A and C have chatted on a phone for a long time, but A needs to leave home. In this case, A can dial *96 or press the configured Speed Dial key to quickly jump the current call to a wireless number without interrupting the conversation. Before A uses the mobile phone to answer the call, the call will stay connected.
Scenarios C
To transfer active call to another number:
If A need to transfer B to C(Designated number),to answer B related content. A during a call with B can dial *99 or press the configured Speed Dial key,then an announcement will ask you to dial the number to jump to, followed by #.If A has been jumped to, *94 or press the configured Speed Dial key can be dialed to jump back to the B.
Call Transfer
Blind Transfer
Transfer a call directly to another party without consulting.
When you use this feature, you can:
- Press
 or Transfer soft key during the conversation, the call is on hold now.
 - Enter the number that transfers to.
- Press , and now the blind transfer completed.
Attended Transfer
Transfer a call with prior consulting.
When you use this feature, you can:
- Press or transfer soft key during the conversation, the call is on hold now.
- Enter the number that transfer to, and press the send soft key or
 .
. - Start the second conversation, press or transfer soft key, then, transfer completed.
Semi-Attended Transfer
Transfer a call when the target phone is ringing.
- Press or transfer soft key during the conversation, the call is on hold now.
- Enter the number transfer to, and then press
 , then you can hear the ring tone.
 - Press or the Tran soft key, and now the Semi-attended transfer completed.
Conference
You can set up a conference call with other two parties. It supports up to 5 parties (including yourself) in a conference call.
5-way conference
- Assuming that call party A and B are in conversation. A wants to bring C, D and E in a conference
- A press line 2 key, the call is placed on hold.
- A enter the number of C and then press send soft key or
 .
. - C answering the call.
- A press
 or the conference soft key, then A, B and C are now in a conference. (and now this is 3-way conference).
 - A press line 3 key, the current 3-way conference is placed on hold.
- A enter the number of D and then press send soft key or .
- D answering the call.
- A press or the conference soft key, then A, B, C and D are now in a conference. (and now this is 4-way conference).
- A press line 4 key, the call is placed on hold.
- A enter the number of E and then press send soft key or
 .
. - E answering the call.
- A press
 or the conference soft key, then A, B, C, D and E are now the 5-way conference is built.
 - A end the call, the conference is finished.
3-way Consultative Transfer
Transfer On Conference Hang up feature enables the IP phone to transfer the local conference call to the other two parties after the conference initiator drops the conference call.
To configure the transfer on conference hang up feature via the CommPortal phone configurator:
- Profile Editor UI path: Features->Transfer Settings->3-way Call Release Type:Transfer
- Click Save changes to accept the change.
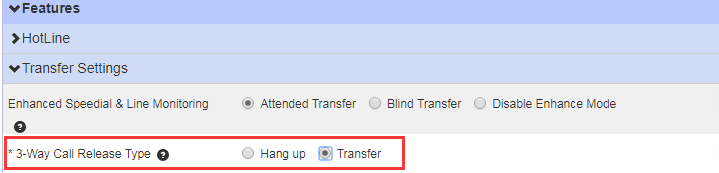
3. Perform auto provisioning on the phone to download above configurations.
Note:If you select Transfer, the other two parties remain connected when the conference initiator drops the conference call. If you select Hang up, the conference ends.
Call Pickup
You can use call pickup to answer someone else's incoming call on your phone. The phone supports directed call pickup and group call pickup. Directed pickup is used for picking up a call that is ringing at a target phone number. Group pickup is used for picking up a call that is ringing at any phone number in a certain group. The pickup group should be predefined, contact your system administrator for more information.
To use call pickup, you need to configure the directed pickup or group pickup key first.
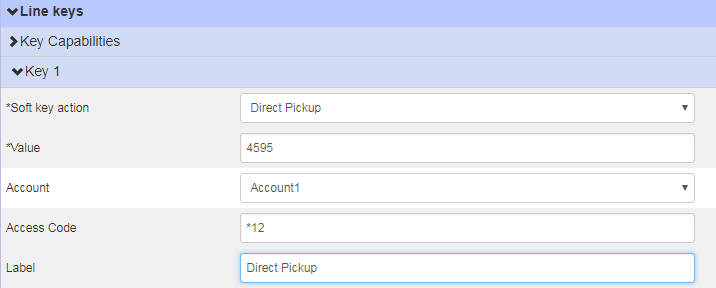
Direct Pickup
With this feature, you can pick up the set line when it ringing.
To configure a directed pickup key via the CommPortal phone configurator:
- Profile Editor UI path: Line Key->Key X.
- Select Directed Pickup from the Soft key action field
- Enter the target phone number in the Value field.
- Select Account X from the Account field.
- Enter the directed pickup code in the Access Code field.
- Enter the string that will appear on the LCD screen in the Label field.
- Click Save changes to accept the change.
- Perform auto provisioning on the phone to download above configurations.
To pick up a call directly:
When the target number (e.g.7602904595) receives an incoming call, you can dial the directed pickup code followed by the target number (e.g. *127602904595) to pick up the call or press the directed pickup key (if configured) to pick up the parked call directly.
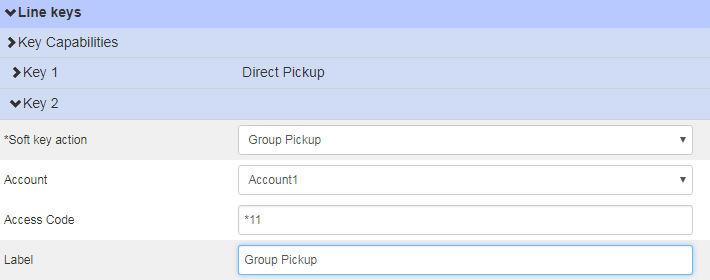
Group Pickup
With this feature, you can pick up the specified group that you want incoming calls.
To configure a Group pickup key via the CommPortal phone configurator:
- Profile Editor UI path: Line Key->Key X.
- Select Group Pickup from the Soft key action field
- Select Account X from the Account field.
- Enter the directed pickup code in the Access Code field.
- Enter the string that will appear on the LCD screen in the Label field.
6. Click Save changes to accept the change.
7. Perform auto provisioning on the phone to download above configurations.
To pick up a call in the group:
When the phone number (e.g., 7602904595) in the predefined group receives an incoming call, you can dial the group pickup code (e.g., *11) or press the group pickup key (if configured) to pick up the call directly. The call will be answered on your phone.
Call Park
You can use call park feature to park a call, and then retrieve the parked call from another phone (for example, a phone in another office or conference room).
IP phone supports park call and enhanced park call. For park call feature, the server will automatically hunt for the first available orbit in the call park orbits and parks the call there. The call park orbits should be predefined, contact your system administrator for more information. For enhanced park call feature, you have to specify a target orbit where you want to park the call to.
You can park an active call by pressing the Park Call key or the enhanced call park key (if configured) on the phone. If the call is parked successfully, you will hear a voice prompt confirming that the call was parked. You can retrieve the parked call by pressing a retrieve parked call key (if configured) or dialing the retrieve access code followed by the orbit number (e.g, *302100).
Park Call
With this feature, you can put a call on hold and continue the conversation from another phone.
To configure a park call key via the CommPortal phone configurator:
- Profile Editor UI path: Line Key->Key X.
- Select Park Call from the Soft key action field
- Select Account X from the Account field.
- Enter the directed pickup code in the Access Code field.
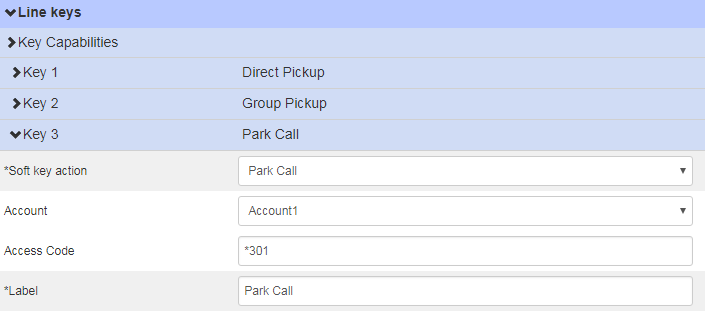
5. Enter the string that will appear on the LCD screen in the Label field.
6. Click Save changes to accept the change.
7. Perform auto provisioning on the phone to download above configurations.
To use Park Call Key:
- User on phone A places a call to phone B.
- User on phone A wants to take the call in a conference room for privacy, and so presses the park call key on phone A.
- the call is parked successfully, you will hear a voice prompt informing you of the extension where the call is parked.
- Press the Tran soft key to complete the park.
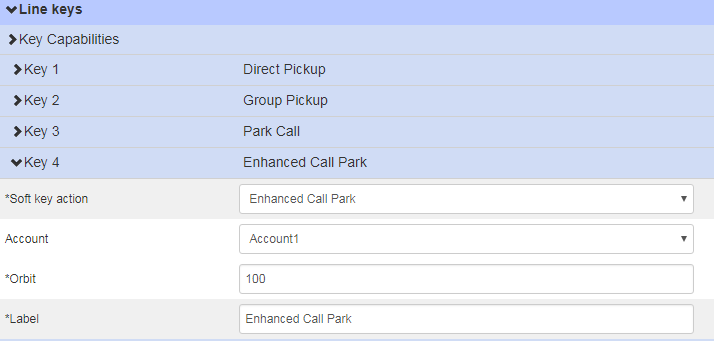
Enhanced Call Park
- Profile Editor UI path: Line Key->Key X.
- Select Enhanced Call Park from the Soft key action field.
- Select Account X from the Account field.
- Enter the Orbit(e.g,:100) in the Orbit field
- Enter the string that will appear on the LCD screen in the Label field.
6. Click Save changes to accept the change.
7. Perform auto provisioning on the phone to download above configurations.
To use Enhanced Call Park Key:
- User on phone A places a call to phone B.
- User on phone A wants to take the call in a conference room for privacy, and so presses the Enhanced call park key on phone A.
- The call will be parked to the orbit you designated in the Park Orbit field.
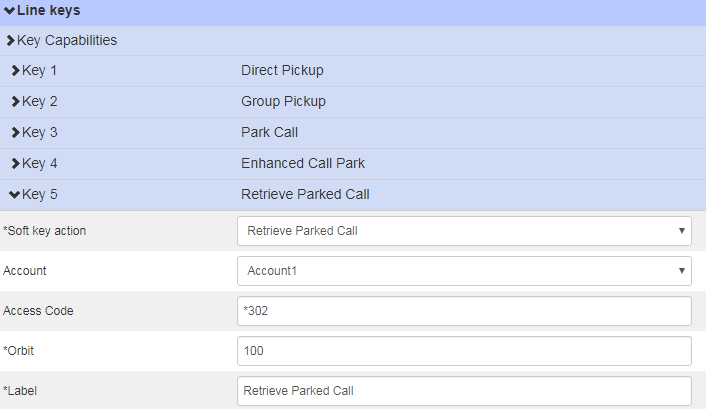
Retrieve Parked Call
- Profile Editor UI path: Line Key->Key X.
- Select Retrieve Parked Call from the Soft key action field
- Select Account X from the Account field.
- Enter the directed pickup code in the Access Code field.
- Enter the Orbit(e.g,:100) in the Orbit field
- Enter the string that will appear on the LCD screen in the Label field.
7. Click Save changes to accept the change.
8. Perform auto provisioning on the phone to download above configurations.
To use Retrieve Parked Call Key:
The user can dial the call park retrieve code followed by the target orbit (e.g.,*302100) to retrieve the parked call or press the retrieve parked call key (if configured) to retrieve the parked call after the user park call to the Orbit.
Enhanced Monitored Extension
You can use enhanced monitor extension feature to monitor a specific line for status changes on the phone. For example, you can configure an enhanced monitor extension key on the phone to monitor the status of a friend's line (busy or idle). The enhanced monitor extension key LED illuminates solid red when the friend's line is in use. The detailed information of the LED is shown below:
An enhanced monitor extension key:
LED Status | Description |
Solid green | The monitored user is idle. |
Flashing red | The monitored user receives an incoming call or the call is parked against the monitored user's phone number. |
Solid red | The monitored user is busy. |
Off | The monitored user does not exist. |
You can press an enhanced monitor extension key to dial out the monitored phone number when the monitored line is idle. You can pick up calls that are received on the monitored line.
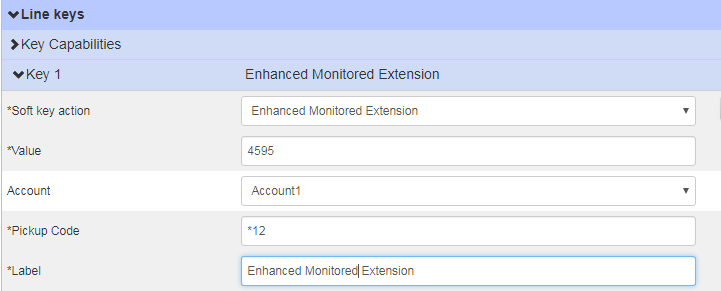
To configure an Enhanced Monitored Extension key via CommPortal phone configurator:
- Profile Editor UI path: Line Key->Key X.
- Select Enhanced Monitored Extension from the Soft key action field
- Select Account X from the Account field.
- Enter the directed pickup code in the Pickup Code field.
- Enter the string that will appear on the LCD screen in the Label field.
6. Click Save changes to accept the change.
7. Perform auto provisioning on the phone to download above configurations.
When the monitored line (e.g.,7602904595) receives an incoming call, the enhanced monitor extension key LED on your phone flashes red.
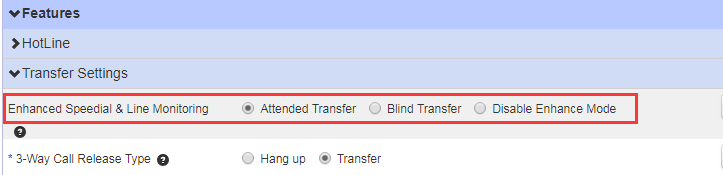
When there is an active call on your phone, you can transfer the active call to the monitored phone number directly by pressing the enhanced monitor extension key. The phone handles the active call differently depending on the transfer mode via DSS key.
To configure Transfer Mode via Dsskey feature via CommPortal phone configurator:
- Profile Editor UI path: Features->Transfer Settings.
- Depended on your selection:
- If you select Blind Transfer, press the enhanced monitor extension key to complete the blind transfer to the monitored number.
- If you select Attended Transfer, press the enhanced monitor extension key to dial out the monitored number, and then perform the attended or semi-attended transfer.
- If you select New Call, press the enhanced monitor extension key to place a new call to the monitored number.
3. Click Save changes to accept the change.
4.Perform auto provisioning on the phone to download above configurations.
Intercom / Push-to-Talk
Intercom is a useful feature in an office environment to quickly connect with the operator or the secretary. You can short press the Intercom/PTT key to automatically connect with a preconfigured target extension for outgoing intercom calls, and the target extension will automatically answer incoming intercom calls by default.
Push-to-talk is a variant of Intercom, you need to press and hold the Intercom/PTT key during the push-to-talk call. As soon as the key is released, the push-to-talk call is disconnected.
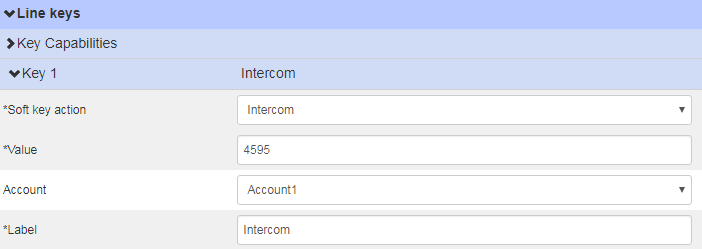
To configure Intercom key via CommPortal phone configurator:
- Profile Editor UI path: Line Key->Key X.
- Select Intercom from the Soft key action field.
- Enter the desired value in the Value field.
- Select Account X from the Account field.
- Enter the string that will appear on the LCD screen in the Label field.
6. Click Save changes to accept the change.
7. Perform auto provisioning on the phone to download above configurations.
To use Intercom Key to outgoing Intercom/PTT Calls:
You can press an Intercom key to automatically initiate an outgoing intercom call with a remote extension.
- To place an intercom call.
- Short press the Intercom key when the phone is idle.The called destination plays a warning tone and automatically answers the call in the speakerphone mode by default.
- To end the intercom call, press the Intercom/PTT key again or the EndCall soft key.
- To place a push-to-talk call.
- Long press the Intercom/PTT key for 1.5 seconds when the phone is idle. The called destination plays a warning tone and automatically answers the call in the speakerphone mode by default.
- Keep pressing the Intercom/PTT key during the push-to-talk call.
- To end the push-to-talk call, release the Intercom/PTT key.
To receive intercom/push-to-talk call.
You need to enable the phone to automatically answer an incoming intercom call.
- Profile Editor UI path: Profile X->Advanced

2. Select Allow Auto Answer Call Info:Yes
![]()
Group Paging (IP Multicast)
You can use multicast paging to quickly and easily broadcast time sensitive announcements to users who are listening to a specific multicast group.
You can configure a multicast paging key on the phone, which allows you to send a Real Time Transport Protocol (RTP) stream to the pre-configured multicast address(es) without involving SIP signaling. You can configure the phone to receive an RTP stream from pre-configured multicast listening address(es) without involving SIP signaling. You can specify up to 10 multicast listening addresses.
Originating multicast paging calls
To configure a multicast paging key via the CommPortal phone configurator:
- Profile Editor UI path: Line Key->Key X.
- Select MultiCast Paging from the Soft key action field.
- Enter the desired multicast IP address(e.g,224.0.0.100:5252) in the Value field.
- Enter the string that will appear on the LCD screen in the Label field.The valid multicast IP addresses range from 224.0.0.0 to 239.255.255.255.

5. Click Save changes to accept the change.
6. Perform auto provisioning on the phone to download above configurations.
To send RTP Stream:
- Press the multicast paging key when the phone is idle
- The phone sends RTP to a preconfigured multicast address (IP: Port). Any phone in the local network then listens to the RTP on the preconfigured multicast address (IP:Port). For both sending and receiving of the multicast RTP, there is no SIP signaling involved.
Receiving multicast paging calls
You can configure the phone to receive a Real Time Transport Protocol (RTP) stream from the pre-configured multicast address/addresses without involving SIP signaling. You can specify up to 10 multicast addresses that the phone listens to on the network.
How the phone handles incoming multicast paging calls depends on Paging Barge and Paging Priority Active parameters configured via web user interface.
Paging Barge
The paging barge parameter defines the priority of the voice call in progress. If the priority of an incoming multicast paging call is lower than that of the active call, it will be ignored automatically. If Disabled is selected from the pull-down list of Paging Barge, the voice call in progress will take precedence over all incoming multicast paging calls.
Valid values in the Paging Barge field:
- 1 to 10: Define the priority of the active call, 1 with the highest priority, 10 with the lowest.
- Disabled: The voice call in progress will take precedence over all incoming paging calls.
Paging Priority Active
The paging priority active parameter decides how the phone handles incoming multicast paging calls when there is already a multicast paging call on the phone. If enabled, the phone will ignore incoming multicast paging calls with lower priorities, otherwise, the phone will answer incoming multicast paging calls automatically and place the previous multicast paging call on hold. If disabled, the phone will automatically ignore all incoming multicast paging calls.
Multicast Codec?
You can only configure the codec by web interface.
To configure multicast listening addresses via the CommPortal phone configurator:
- Profile Editor UI path: Directory->Multicast Paging.
- Select the desired value from the pull-down list of Paging Barge.
- Select the desired value from the pull-down list of Paging Priority Active.
- Enter the multicast IP address/addresses and port number (e.g., 224.5.6.20:2000) which the phone listens to for incoming RTP multicast in the Listening Address field.
- Enter the label in the Label field.

6. Click Save changes to accept the change.
7. Perform auto provisioning on the phone to download above configurations.
Note:
The priorities of listening to multicasting addresses can be predefined: 1 being the highest priority, 10 with the lowest in priority order. Both the multicast paging sender and receiver's phones play a warning tone when establishing a multicast paging call. Listening to Multicasting addresses can be configurable via web interface only.
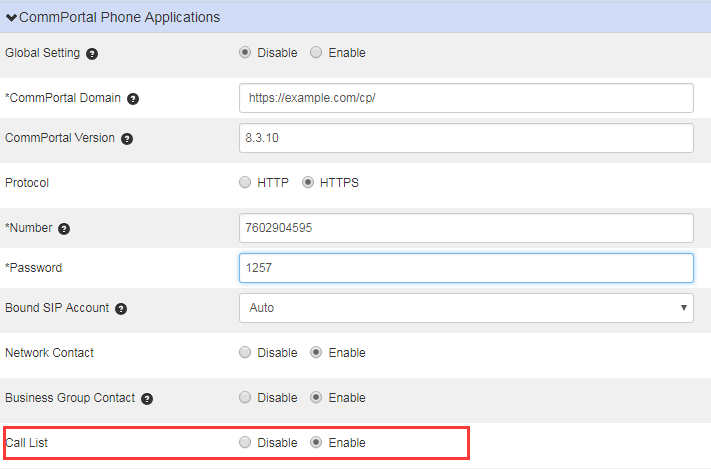
CommPortal Phone Applications
Htek CommPortal Phone Applications can perform parts of operations that CommPortal UI supports supplied by MetaSphere EAS, which allow subscribers to manage their own call services and settings.
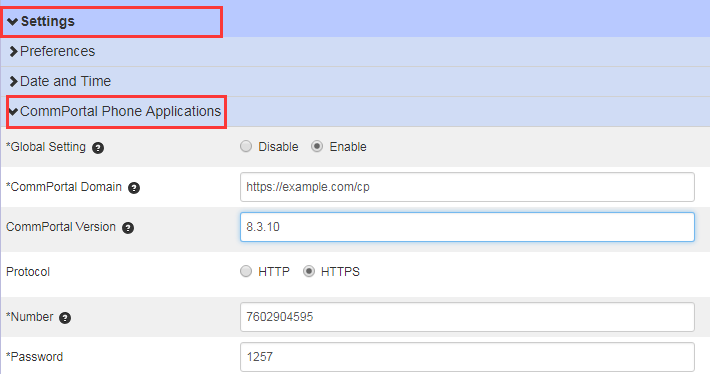
The basic parameters of CommPortal Phone APPs can be set in profile editor UI:
Settings -> CommPortal Phone Applications
CommPortal Domain is the domain name of CommPortal Server (e.g., https://example.com/cp/).
CommPortal Version is MetaSphere EAS version supported by CommPortal server. We suggest to leave it to the default setting, or you can change it if you know what you are doing.
Protocol can be set to use HTTP or HTTPS.
Number and Password are same as used to login the CommPortal Web UI.
Htek CommPortal Phone Applications include:
Network Contacts
You can access the Network Contacts through the IP phone. The contacts included in the directory are determined by system administrator.
There are three default groups in the Network Contacts: Contacts and Business Group.
- Contacts: stores all the contacts customized by user.
- Business Group: stores the contacts in the same Business Group as your account.
You can add or sort contacts, edit, delete or search for a contact in the Contacts groups, while you can only view, search or call contacts in the Business Group.
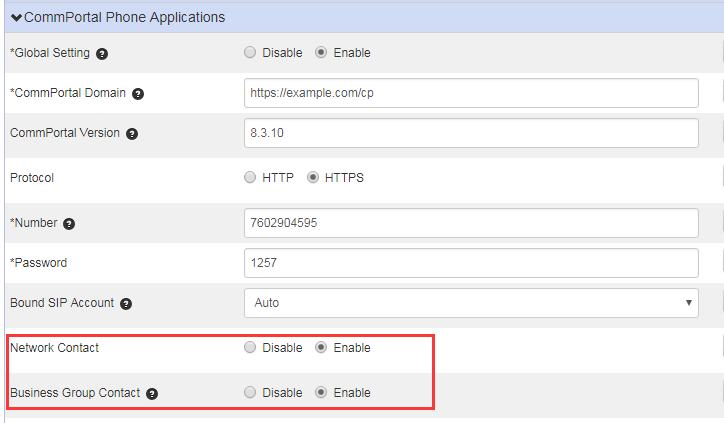
To configure Network Contacts feature via CommPortal phone configurator:
- Login in to the CommPortal phone configurator of the desired account (e.g.,7602904595).
- Profile Editor UI path: Setting->CommPortal Phone Applications.
- Select the Enabled radio box in the Network Contact field.
- Select the Enabled radio box in the Business Group Contact field.
5. Click Save changes to accept the change.
6. Perform auto provisioning on the phone to download above configurations.
To use Network Contacts feature:
- Press the Directory soft key->Enter the MetaSwitch Directory or Press the Menu soft key-> Enter the Directory->Enter the MetaSwitch Directory.
- Press Up or Down Key to enter between Contacts and Business Group.
- Press the Option soft key, and then select Detail/Add to Contact from the prompt list.
Depended on your selection:
- If you select Detail, the detailed information of the entry appears on the LCD screen.
- If you select Add to Contact, enter the contact information in the corresponding fields-> Press the Save soft key to accept the change->The entry is successfully saved to the Contacts group.
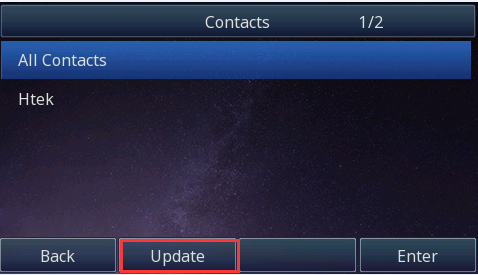
1. Press the Update soft key to update the Network Contacts immediately.Once you update the Contacts group, the phone will download the newest Contacts list from the server.
2. Select the desired group, and then press the Enter soft key to load the directory.Press the Search soft key.Enter a few continuous characters of the contact name or continuous digits of the contact number using the keypad.The contacts whose name or phone number matches the criteria entered will appear on the IP phone LCD screen. You can dial from the result list.

Network Call Lists
You can access the network call list through the IP phone. Each call list entry contains call information such as remote party identification, time and date. You can check call entries and place a call from the call list. The network call list allows you to view and dial the stored numbers in the following lists: missed calls, received calls, placed calls and all calls. You can check the call history, dial a call, add to Contact or add a Blacklist from the call history list.
To configure network call list feature via CommPortal phone configurator:
- Login in to the CommPortal phone configurator of the desired account (e.g.,7602904595).
- Profile Editor UI path: Setting->CommPortal Phone Applications.
- Select the Enabled radio box in the Call List field.
4.Click Save changes to accept the change.
5.Perform auto provisioning on the phone to download above configurations.
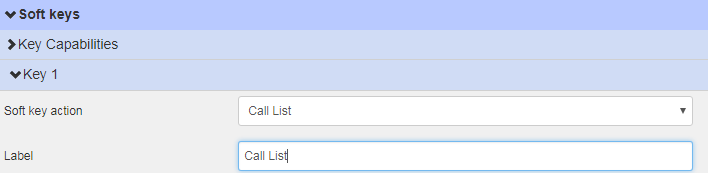
To configure a history key via CommPortal phone configurator:
- Profile Editor UI path: Soft Keys->Key X.
- Select Call List from the Soft key action field.
- Enter the string that will appear on the LCD screen in the Label field.
4. Click Save changes to accept the change.
5. Perform auto provisioning on the phone to download above configurations.
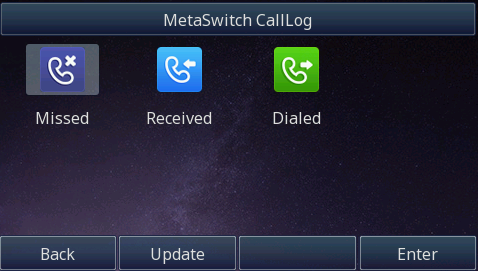
To use Network Call List Feature on the Phone:
- Press the History soft key->Enter the MetaSwitch CallLog or Press the Menu soft key-> Enter the History->Enter the MetaSwitch CallLog.
- Press Right or Left Key to switch among Missed Calls, Received Calls and Dialed Calls.
3. Press the Option soft key, and then select Detail/Add to Contact/Add a Blacklist from the prompt list.
Depended on your selection:
- If you select Detail, the detailed information of the entry appears on the LCD screen.
- If you select Add to Contact, enter the contact information in the corresponding fields-> Press the Save soft key to accept the change->The entry is successfully saved to the Contacts group.
- If you select Add a Blacklist,enter the contact information in the corresponding fields-> Press the Save soft key to accept the change->The entry is successfully saved to the Blacklist.
Automated Call Distribution
ACD feature is often used in offices for customer service, such as call center. The ACD system handles large volumes of incoming calls from callers who have no need to talk to a specific person but who require assistance from any of the different personnel at the earliest point. The ACD feature on the Htek IP Phone allows the ACD system to distribute calls from large volumes of incoming calls to the registered IP phone users. To use this feature, first you should configure an ACD key in the advance settings.
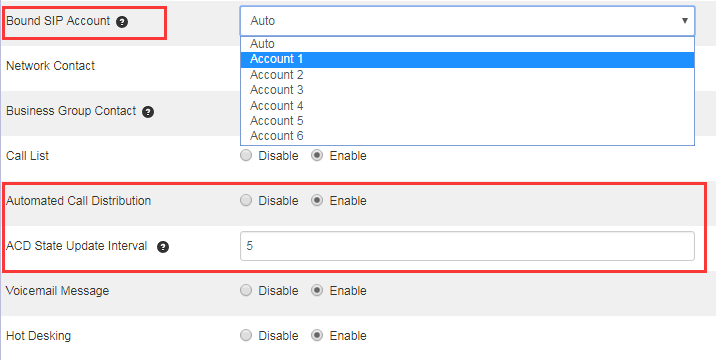
To configure ACD feature via CommPortal phone configurator:
- Login in to the CommPortal phone configurator of the desired account (e.g.,7602904595).
- Profile Editor UI path: Setting->CommPortal Phone Applications.
- Select the desired account to apply the ACD feature from the Bound SIP Account pull-down list.When set to 'Auto',Htek Phone will use account which has same SIP User ID as CommPortal Username.
- Select the Enabled radio box in the Automated Call Distribution field.
- Enter the desired interval in the ACD State Update Interval field. Phone APP updates ACD state periodically.The setting is in Seconds between 5s and 3600s.
6.Click Save changes to accept the change.
7.Perform auto provisioning on the phone to download above configurations.
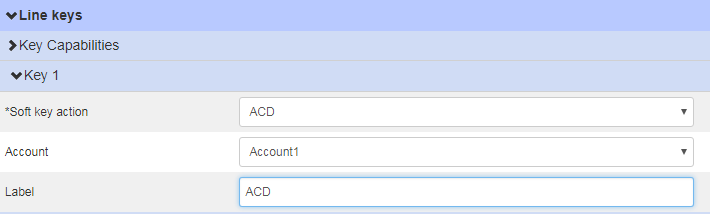
To configure an ACD key via CommPortal phone configurator:
- Profile Editor UI path: Line Keys->Key X.
- Select ACD from the Soft key action field.
- Select Account X from the Account field.
- Enter the string that will appear on the LCD screen in the Label field.
5.Click Save changes to accept the change.
6.Perform auto provisioning on the phone to download above configurations.
To use ACD Feature on the Phone:
1. Icon Instructions
Different line icons can indicate different ACD states. The line icons and the corresponding agent states are listed as below:
Line Icon |
|
|
UC901/UC902/UC903/UC912/UC921G | UC923/UC924/UC926/UC924E/UC926E |
|
|
| Logged Out |
|
| Logged In, Available |
|
| Logged In, Unavailable |
2. As a Member in Basic ACD Group or Premium ACD Group
If you are a member in a MLHG that is assigned the basic/premium ACD level by system administrator, you will be able to:
- Log in and log out as an agent
- Change the agent state
- Dial the MLHG Member
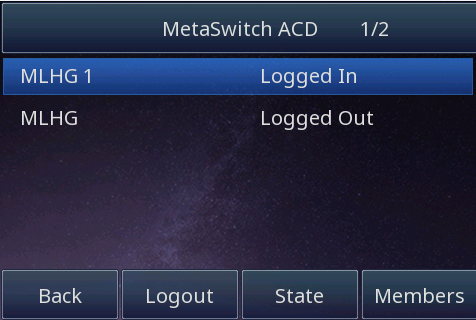
To access the basic ACD system via phone user interface:
- Press the ACD key when the phone is idle.
- The LCD screen prompts the MLHG queue you are in and your current state.
Log in and log out as an agent:
If your account has been forced to login into a MLHG by administrator, your state in the MLHG will be Logged In, and cannot be changed.If the administrator allows you to change your state, you can do the following to log in or log out the desired MLHG.
To login to the MLHG group via phone user interface:
- Press the ACD key when the phone is idle.
- Select the desired group and then press the Login soft key.
Then the corresponding state will change from Logged Out to Logged In.
To login out the MLHG group via phone user interface:
- Press the ACD key when the phone is idle.
- Select the desired group and then press the Logout soft key.
Then the corresponding state will change from Logged In to Logged Out.
Change the agent state:
If you have logged in an MLHG, your state is displayed on the idle screen.
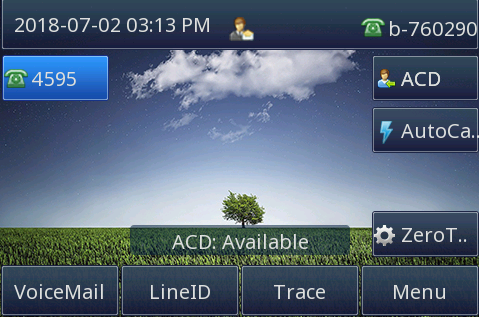
You can change state on the idle screen or the ACD configuration screen.
To change the agent state in the ACD configuration screen:
- Press the ACD key when the phone is idle.
- Press the State soft key, then select the desired state.
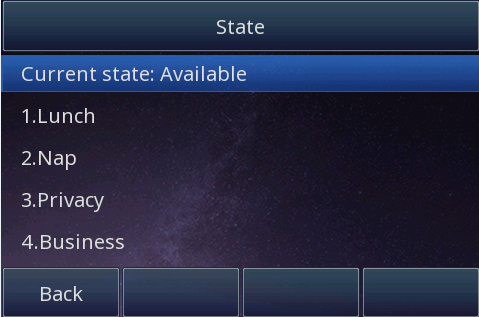
3. Press the OK soft key to confirm or the Cancel soft key to cancel.
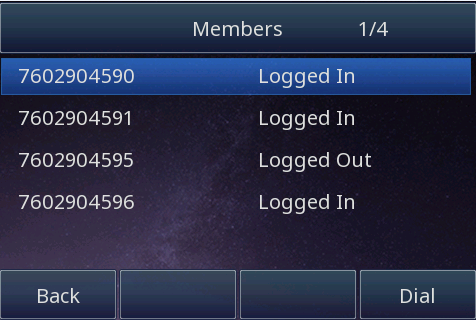
Dial the MLHG Member:
- Press the ACD key when the phone is idle.
- Press the Members soft key
- Select the desired member,then press the Dial soft key to dial the member.
To update ACD Information
ACD information can be updated in following situation:
- When you press the ACD key, the phone will connect to load the ACD information.
- After the configured interval of automatic update in the server.
- When you log in/out the MLHG or change state.
- When you finish a call from the ACD.
Voicemail Messages
Message list allows users to view a list of voicemails without having to follow the instructions by the interactive voice recognition menus (IVR). You can view who sent them, whether they are urgent and whether they have been heard, etc.
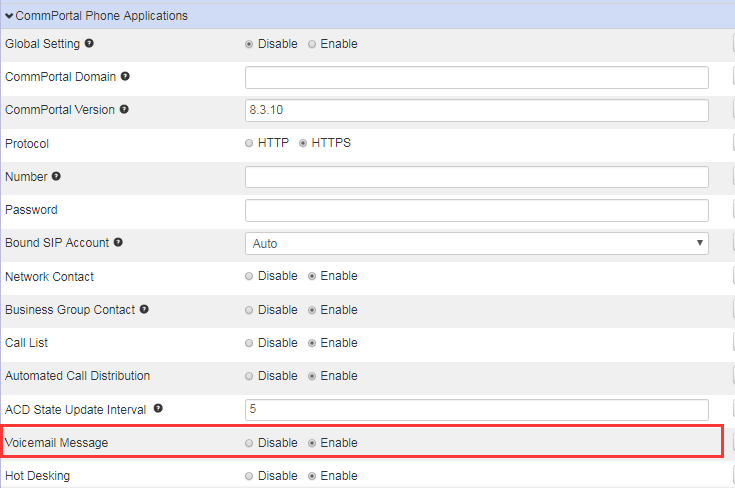
To enable the Voicemail Messages feature via CommPortal phone configurator:
- Login in to the CommPortal phone configurator of the desired account (e.g.,7602904595).
- Profile Editor UI path: Setting->CommPortal Phone Applications.
- Select the Enabled radio box in the Voicemail Messages field.
4. Click Save changes to accept the change.
5. Perform auto provisioning on the phone to download above configurations
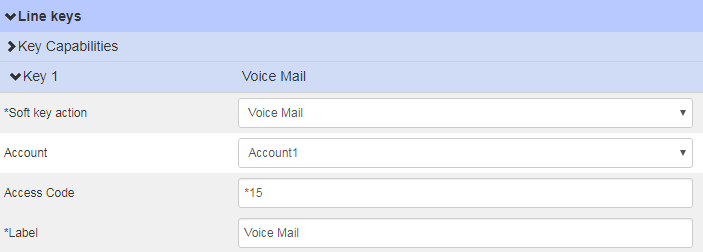
To configure Voicemail Messages key on the phone via CommPortal phone configurator:
- Profile Editor UI path: Line Keys->Key X.
- Select Voice Mail from the Soft key action field.
- Select Account X from the Account field.
- Enter the voice mail code in the Access Code field.
- Enter the string that will appear on the LCD screen in the Label field.
6. Click Save changes to accept the change.
7. Perform auto provisioning on the phone to download above configurations
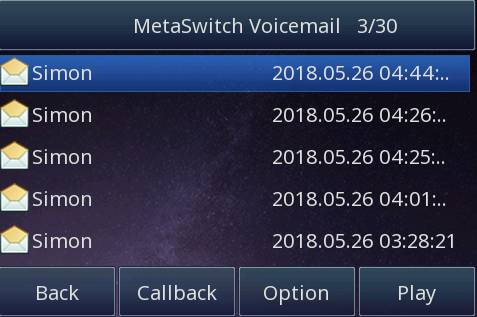
To use Voicemail Messages Feature on the Phone:
1. Press the Menu soft key-> Enter the Messages->Enter the MetaSwitch voicemail.
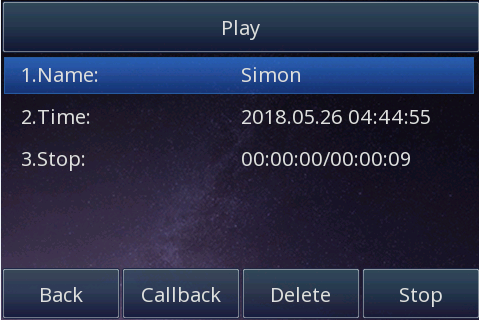
1.1 To play Voicemail
Select the desired voice mail,then press the Play soft key.
When playing voice mails, you can do the following:
- Press the Stop soft key to stop the voice mail.
- Press the Callback soft key to return a call.
- Press the Back to back the MetaSwitch voicemail page.
- Press the Delete to delete the voice mail.
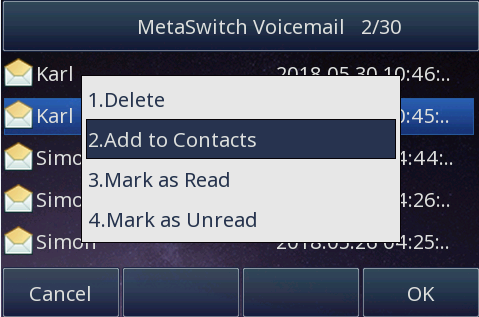
1.2 To add Contacts from the MetaSwitch voicemail
- Select the desired voice mail
- Press the Option soft key, and then select Add to Contacts from the prompt list,and Press the OK soft key.
3.Enter the contact information in the corresponding fields.
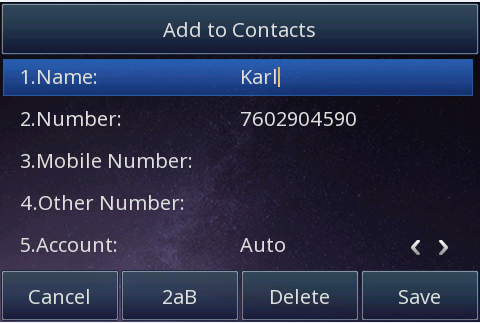
4. Press Lift or Right to select the desired account from the Account field.
5. If Auto is selected, the phone will use the default account when placing calls to the contact from the local directory.
6. Press Lift or Right to select the desired ring tone from the Ring field.
7. Press Lift or Right to select the desired group from the Group field.
8. Press the Save soft key to accept the change or the Cancel soft key to cancel.
1.3 To callback the call
Select the desired voice mail,then press the Send soft key.
You can also return the call when playing the voice mail.
1.4 To mark Voicemail
After you read some voice mails, you can mark them as new to avoid forgetting them. For some unread voice mails, you can also mark them as heard.
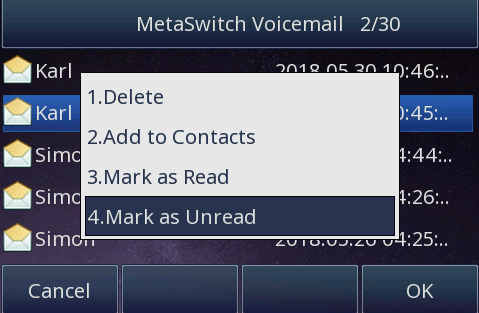
- Select the unread voice mail.Press the Option soft key, and then select Mark as heard from the prompt list.Then voice mail icon will change from
 to
to 
- Select the voice mail that has been read.Press the Option soft key, and then select Mark as new from the prompt list.Then voice mail icon will change from to
- To delete Voicemail
- Select the desired voice mail.
- Press the Option soft key, and then select Delete from the prompt list.
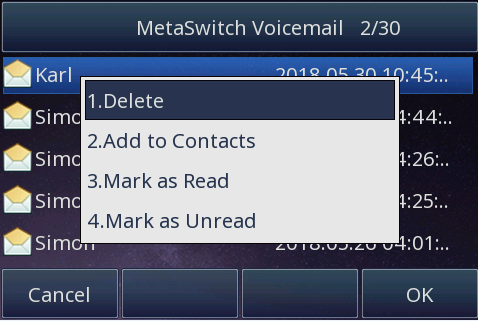
6. Press the OK soft key to confirm the deletion or the Cancel soft key to cancel.
2. You can also dial access code to listen to voice mails that are stored in a voice mailbox. Before listening to voice mails, make sure the voice mail access code has been configured. Contact your system administrator for more information.
2.1 Press the Voice Messages line key->Enter the MetaSwitch Voicemail
2.2 You can mark,read and delete, etc. according to the metaswitch server voice prompts.
Hot Desking
Hot desking originates from the definition of being the temporary physical occupant of a work station or surface by a particular employee. A primary motivation for hot desking is cost reduction. This feature is regularly used in places where not all the employees are in the office at the same time, or not in the office for very long, which means that actual personal offices would be often vacant, consuming valuable space and resources.
You can use hot desking on the SIP IP phone to log out of existing accounts and then log into a new account. As a result, many users can share the phone resource at different times. To use this feature, you need to configure a log out key in advance.
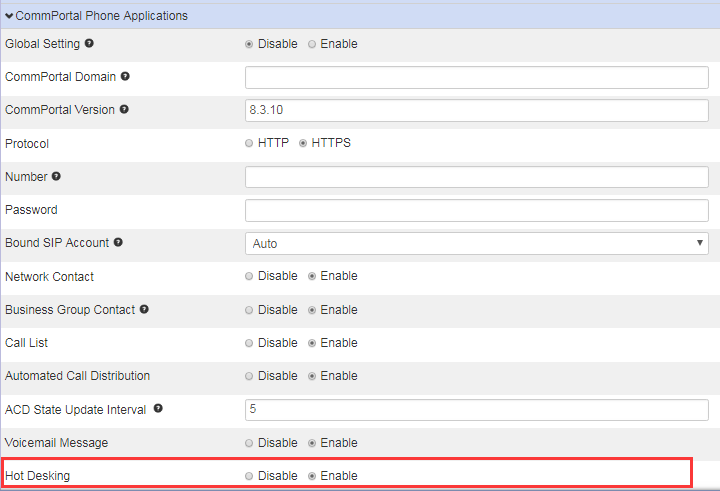
To configure Hot Desking feature via CommPortal phone configurator:
- Login in to the CommPortal phone configurator of the desired account (e.g.,7602904595).
- Profile Editor UI path: Setting->CommPortal Phone Applications.
- Select the Enabled radio box in the Hot Desking field.
4. Click Save changes to accept the change.
5. Perform auto provisioning on the phone to download above configurations.
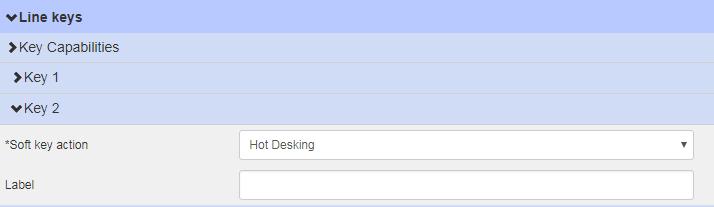
To configure an Hot Desking key via CommPortal phone configurator:
- Profile Editor UI path: Line Keys->Key X.
- Select Hot Desking from the Soft key action field.
- Enter the string that will appear on the LCD screen in the Label field.
To use HotDesking Feature on the Phone:
1.To log out of a phone:
1.1 Press the Log Out key when the phone is idle.
The LCD screen prompts the following warning:
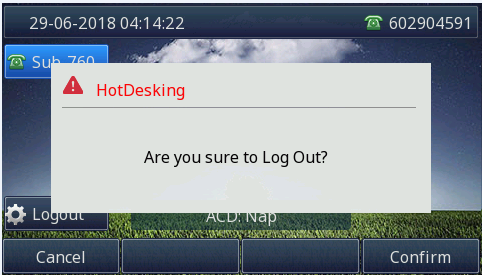
1.2 Press the Confirm soft key, the phone will reboot and the registration configurations of all accounts on the phone will be cleared immediately.
After you log out of the phone, the idle screen is shown as below:

2. To log into a phone:
2.1 Press the Login soft key.
2.2 Enter the account name and password in the User Name and Password fields.
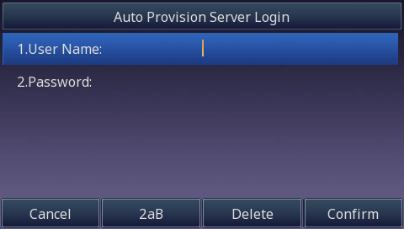
2.3 Press the Confirm soft key, then the phone will reboot for configuration to take effect.
Troubleshooting
This chapter provides general troubleshooting information to help you solve the problems you might encounter when using your phone. If you require additional information or assistance with your new phone, contact your system administrator.
Why is the phone LCD screen blank?
- Ensure your phone is properly plugged into a functional AC outlet.
- If the phone is plugged into a power strip, try plugging it directly into a wall outlet instead.
- If your phone is powered from PoE, ensure you use a PoE compliant switch or hub, or contact your system administrator for more information.
- Check if the power LED is on to ensure that the phone is powered on.
When the phone display "Network Unavailable"?
To resolve:
- Ensure that the Ethernet cable is plugged into the right port on the phone and the Ethernet cable is not loose.
- Ensure that the switch or hub in your network is functioning well.
- If the problem still persists, Contact your system administrator for more information.
When you can't I get a dial tone?
To resolve:
- Check for any loose connections and that the phone has been installed properly. For the Installation instructions, refer to the phone installation section.
- Check whether dial tone is present on one of the audio modes.
- Switch between the Handset, Headset (if you have) or Hands-Free Speakerphone to check whether dial tone is present for one of the audio modes.
- If the dial tone exists on another audio mode, connect a different handset or headset to isolate the problem.
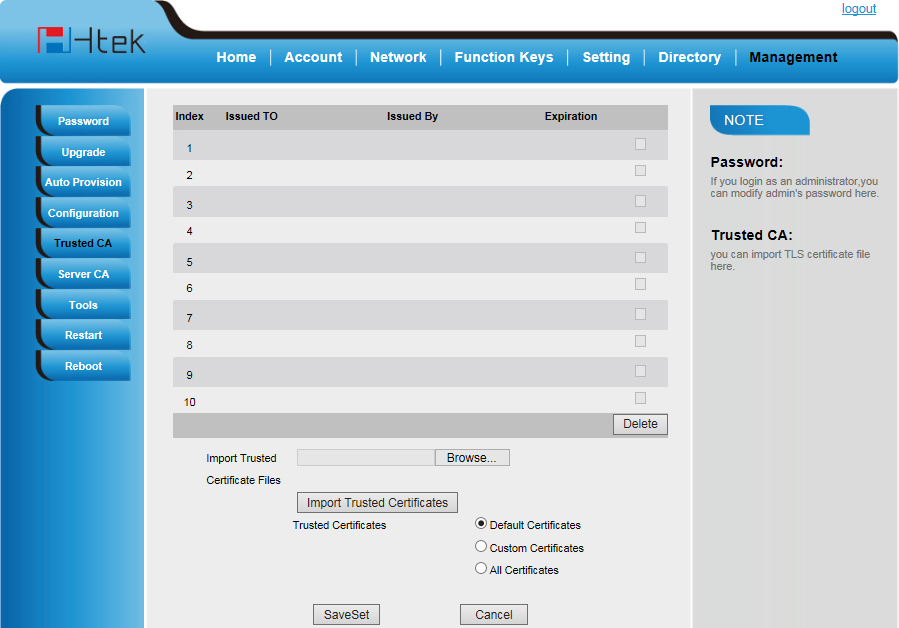
How to Import Trusted CA certificate?
- Click Management->Trusted CA->Browse your CA file and click Import Trusted Certificates
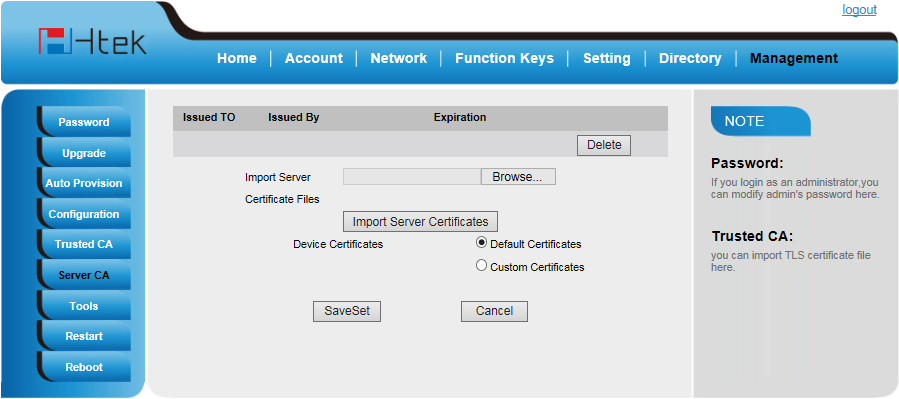
How to Import Server CA certificate?
- Click Management->Server CA->Browse your CA file and click Import Server Certificates
How to make Ringtone?
- Check for any loose connections and that the phone has been installed properly.
- Switch between the Handset, Headset (if present) or Hands-Free Speakerphone to check whether the dial tone is present for one of the audio modes.
- If the dial tone exists on another audio mode, connect a different handset or headset to isolate the problem.
How to obtain the MAC address of a phone when the phone is not powered on?
Three ways to obtain the MAC address of a phone:
- You can ask your supplier for the shipping information sheet which includes MAC addresses according to the corresponding PO (Purchase Order).
- You can find the MAC address on the label of the carton box.
- You can also find the MAC address from the phone's bar code on the back of the phone.
Why can't I receive calls?
- Check the SIP registration with your system administrator.
- Check that DND (Do Not Disturb) mode is deactivated on your phone.