Epygi Configuring Guide
- HTEK_admin (Unlicensed)
- stephen
About This Guide
Thank you for choosing the Htek IP phones, which are exquisitely designed to provide basic phone features plus advanced business features, such as Call Park, Call Pickup, Intercom and Enhanced Monitor Extension over IP network.
The purpose of this guide is to serve as a basic guidance for auto- provision. Htek IP phones supported by Epygi QX IP PBX:
Htek 9 Series: UC926, UC926E, UC924, UC924E, 923, 912G, 912, 903
Note: The configuration process outlined in this guide applies to Htek SIP IP phones running Firmware version 2.0.4.2.24 or later and Epygi QX IP PBX running Firmware version 6.2.26 or later. The configuration process described in this guide take the Htek UC924 as an example.
In This Guide
Topics provided in this guide include:
- Chapter 1 2625211
- Chapter 2 2625211
- Chapter 3 2625211
- Chapter 4 2625211
- Chapter 5 2625211
- Chapter 6 2625211
Summary of Changes
- V1.0 (2018-03-27):
Provide a basic guidance for auto-provision Htek IP phones with Epygi QX IP PBX.
Getting Started
This chapter will show you the basic process of phone's start-up and instructions of the way to get the basic information of the phone. Topics include:
Phone Initialization
After your phone is powered on, the phone will boot up, complete the initialization and check firmware. Please refer to the three phases of the LCD display:

![]()

![]()

In the process of initializing, the phone will attempt to contact a DHCP server in your network to obtain valid IPv4 network settings (e.g., IP address, subnet mask, default gateway address and DNS address) by default.
Phone Status
After the phone comes up, you can view phone status on phone user interface (LCD) via the following ways:
- Press "OK" button twice.
- Press the following button one by one: "Menu" -> "Status" -> "information".
Available information of phone status includes:
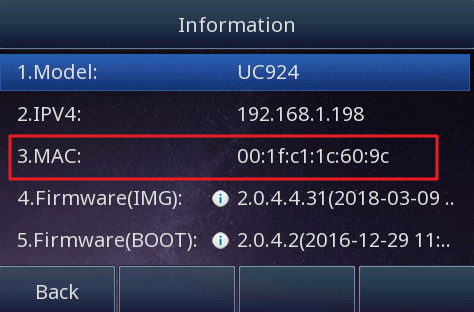
- Network status (e.g., IPv4 status, IP mode, MAC address).
- Phone status (e.g. product name, firmware version, MAC address and device certificate status).
- Language information.
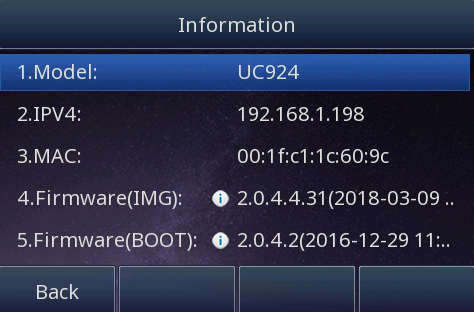 Press "Up" or "Down" to scroll through the list and view the specific information.
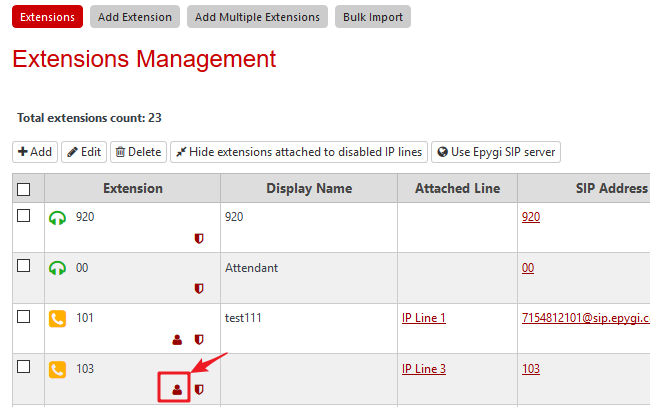
Attach an IP Line for using your phone
Over View
Extension should be attached to a line to be able to make and receive calls. Otherwise, the extension just be allowed to use a limited number of QX telephony services, such as the voice mail service to store and manage the messages from callers.
Operating Instructions
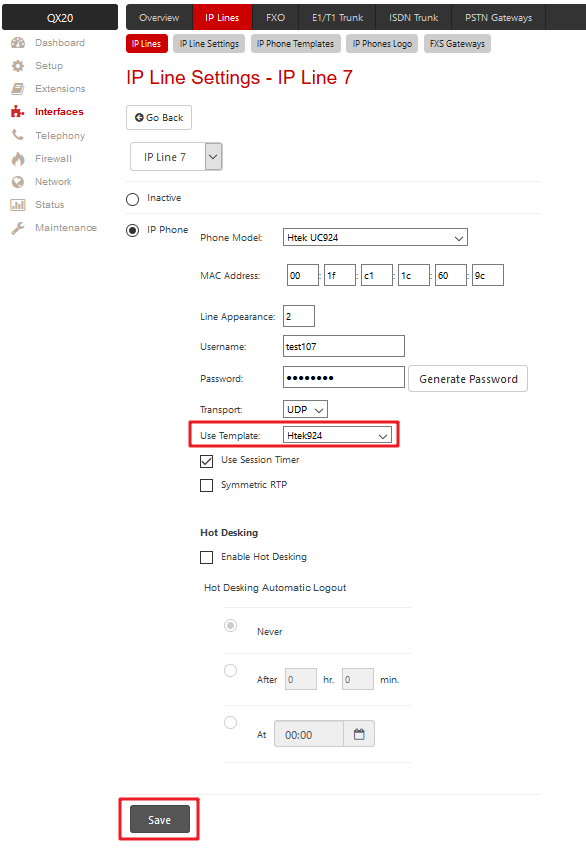
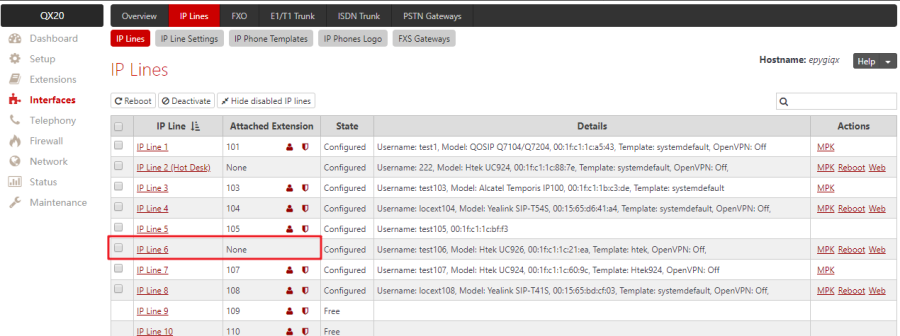
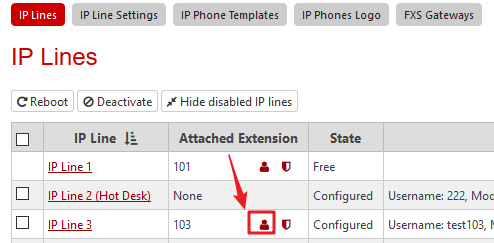
- Go to the Interfaces→IP Lines page.
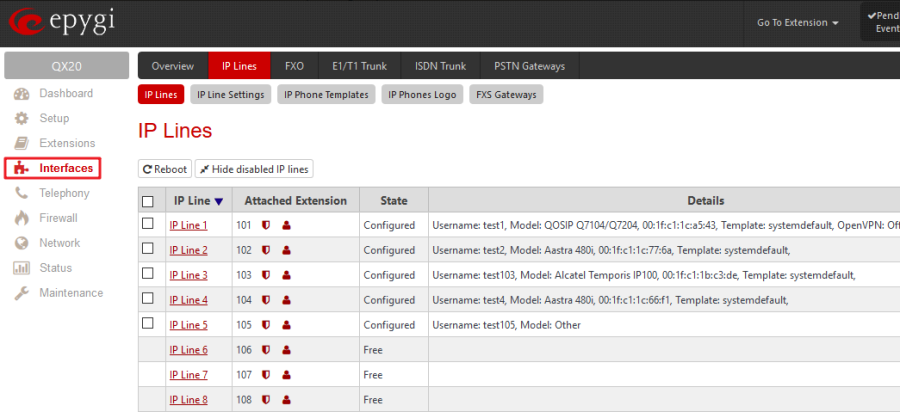
- From the Attached Extension column, choose an extension to be assigned to the IP phone and click on the corresponding IP line link.
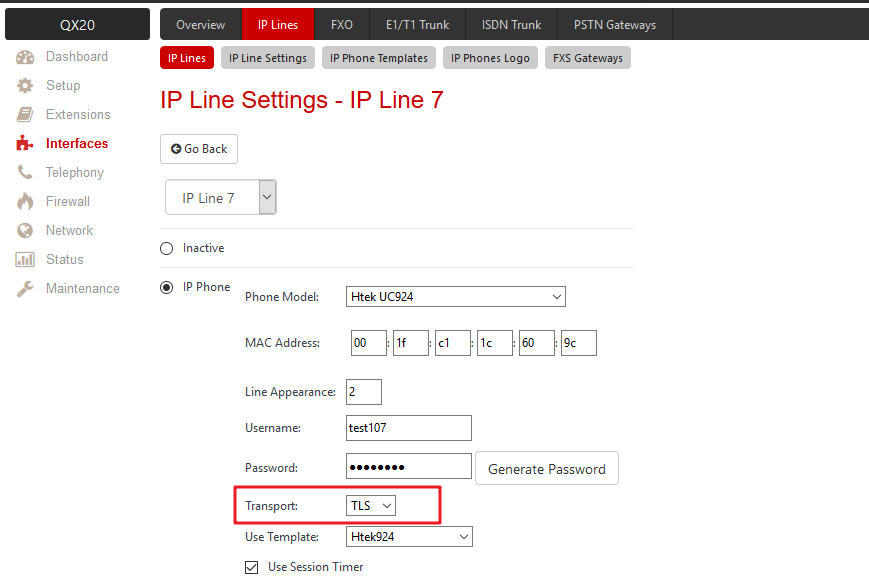
Note: This table lists only the extensions attached to IP lines. If the extension is not listed on this page, open the Extensions Management page and attach an IP line to the extension by editing the extension settings. - Click on the IP Line hyperlink, the IP Line Settings--IP Line# page will be opened.
- Select the IP Phone option to configure the line and choose the model of the IP phone from the Phone Model drop-down list.
- Enter the MAC Address of the phone.
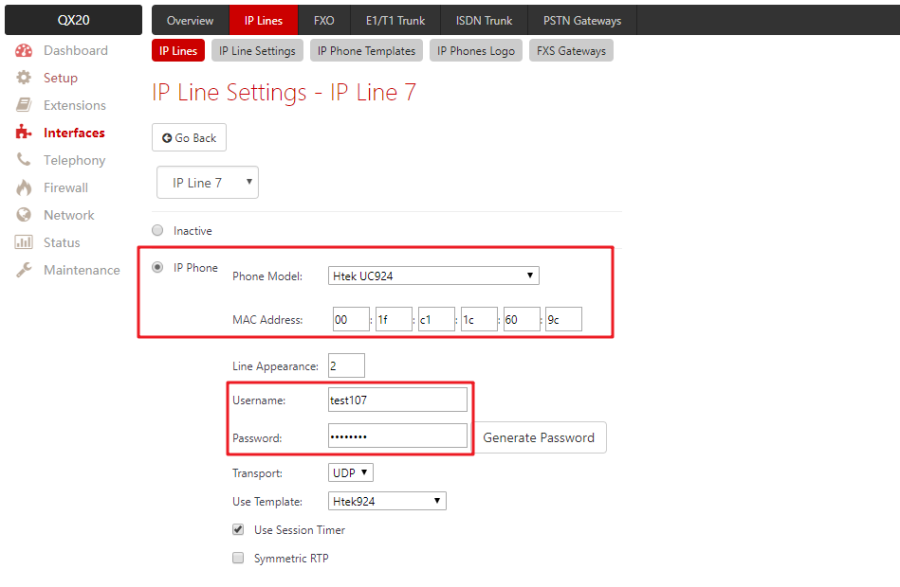
- Set the number for intended simultaneous calls (the total number of active and held calls), in the Line Appearance field. If this field is set to 1, only one active call will be possible on the phone. Making or accepting a second call while the other is on hold will not be allowed.
Note: The maximum allowed number of Htek 924 is 4, and Htek 926 is 6. - The QX authorizes each IP phone by a unique username and a password specified on the IP Line Settings page. In case of auto configuration, they are specified on the QX and are automatically included in the phone's configuration file generated by the QX. By default, the QX assigns a unique username and password to each IP line. The user may either keep these values or specify new ones. The Password field security strength is checked and displayed just below the entry. To achieve a well-protected, strong password, a minimum of 8 characters is required, consisting of letters in upper and lower case, symbols and numbers. If you are unable to define a strong password, click the Generate Password to use one of the system defined strong passwords.
- The Transport drop-down list is used to select the SIP protocol transport layer--UDP, TCP or TLS. For TLS you may activate the TLS certificate update mechanism from IP Phone to obtain the latest certificate generated by the QX.
- Click Save to submit the changes.
TIP: If the IP Line is activated successfully, you will see the Line's State changes from Free to Configured.
Configure your phone with QX IP PBX
The Auto configuration option should be used if user wishes to associate the IP phone with a certain extension or a certain IP line.
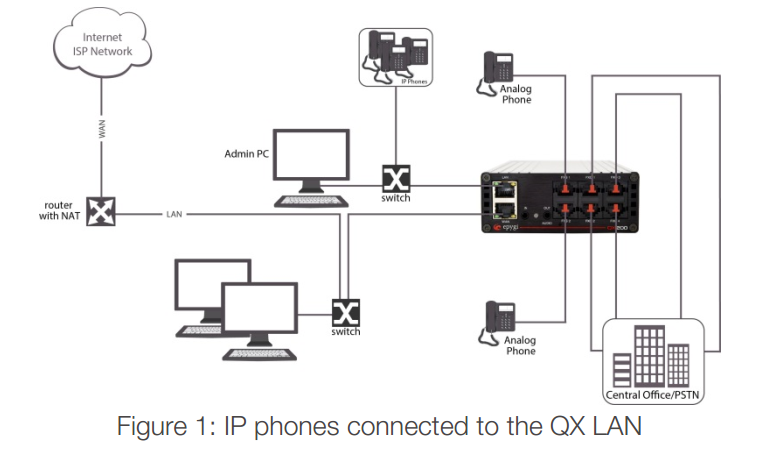
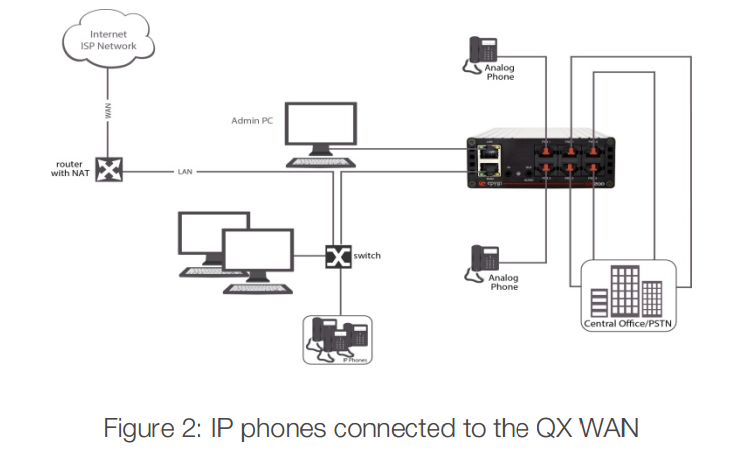
IP phones can be connected to QX via LAN, WAN or VLAN interface (Figure 1 and Figure 2). The QX will provide a configuration file to the phones that are locally connected to the same network. Note: The QX will not configure IP phones that are remotely connected. These phones will need to be manually configured.
 The following chapter will provide:
Auto Configuration
Over View
Auto configuration option simplifies the configuration procedure of the Supported IP phones. And the method is PnP (Plug and play).
The illustration is as follows:
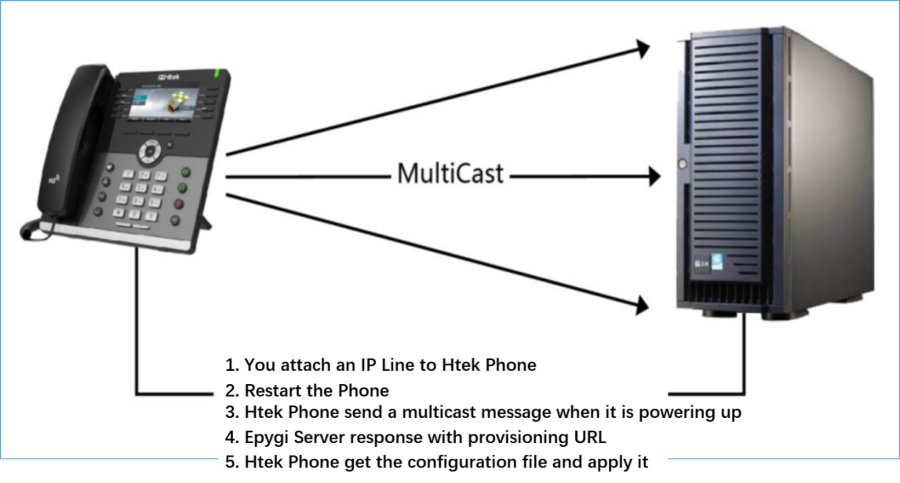
 The following shows you the details.
- When the phone connected to the network, it will send a multicast message with its MAC address.
- The SIP server receives the multicast message and when it recognizes that the MAC address is bound to an extension, it will send a response with 202 Accepted to the phone.
- Immediately, the server will send a NOTIFY message with the path of the configuration server.

- The phone response the NOTIFY message with 200 OK, then the phone will GET the configuration files from the received path.
Operating Instructions
- Attach an IP Line for your phone (you can refer to the previous chapter "Attach an IP Line for using you phone")
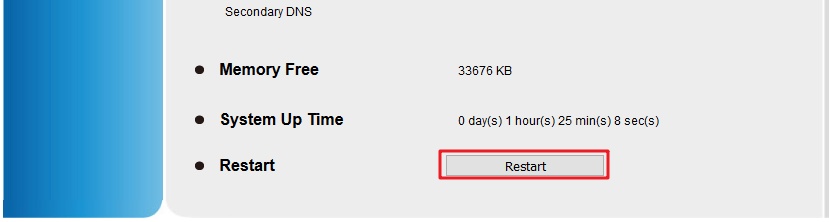
- To restart the phone as the following steps:
- Press Menu Soft Key.
- Navigate to Others and press Enter Soft Key.
- Select Restart and press Enter Soft Key.
 Now you just need wait for a while, the QX will automatically configure your phone with the IP Line which your phone attached to.
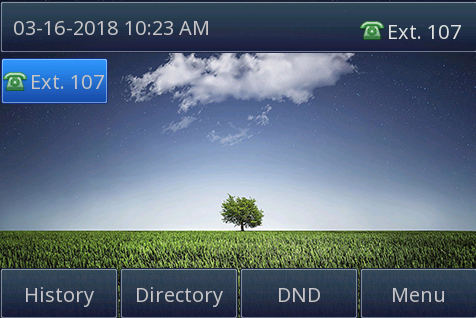
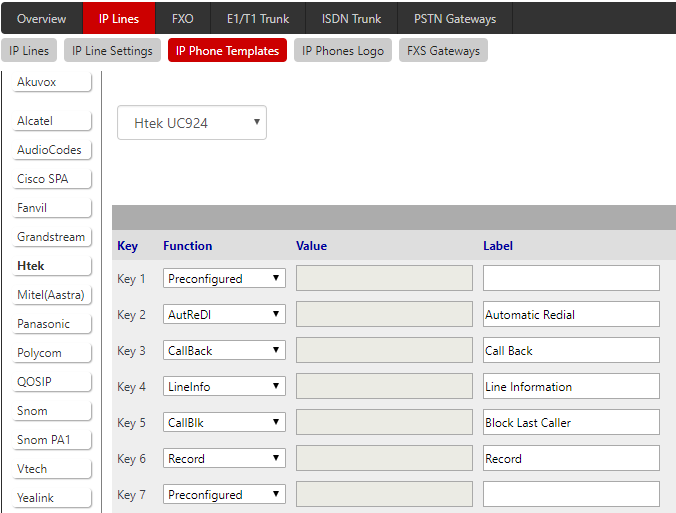
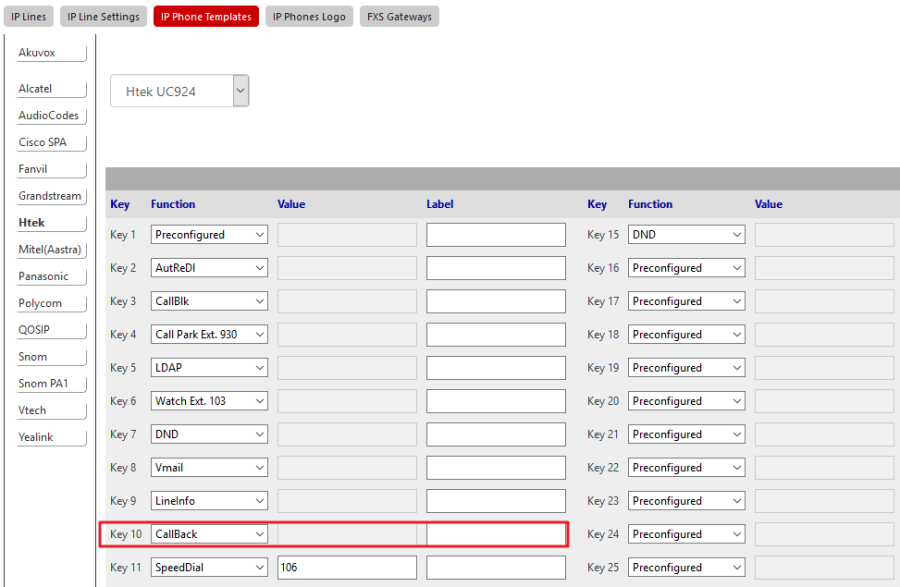
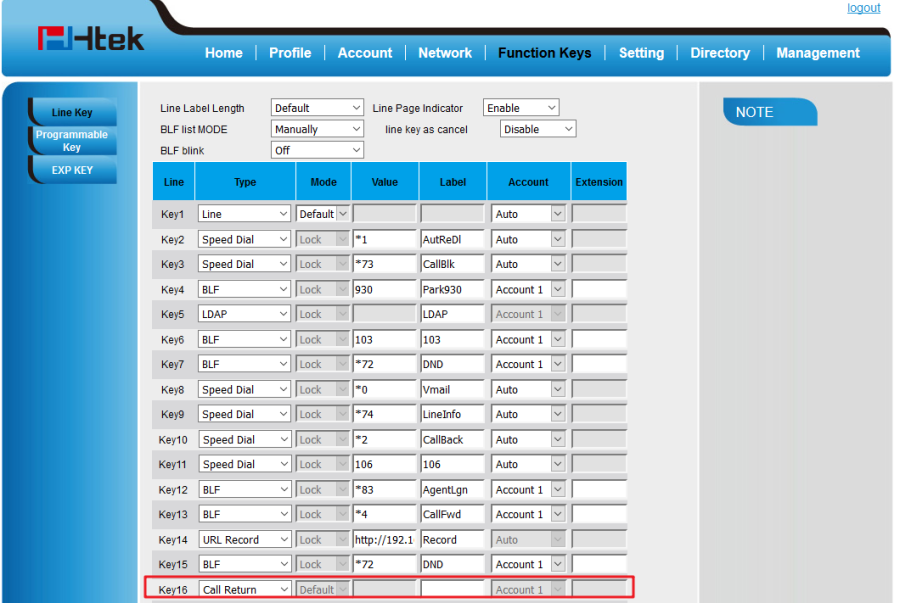
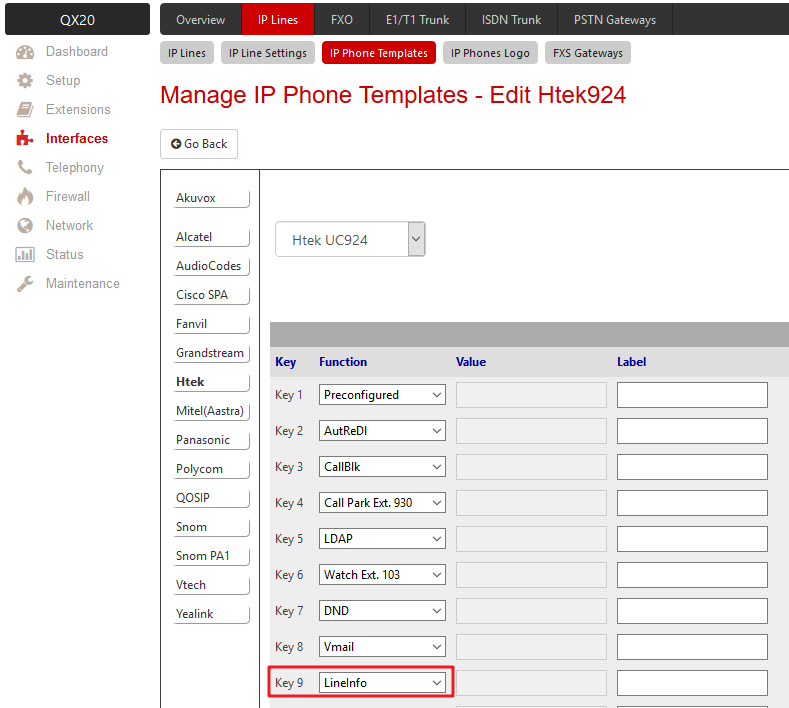
Edit Custom IP Phone Template
Over View
Maybe you are not satisfied with the default configuration of auto-configuration. So you can edit your own IP Phone Template on Epygi QX's GUI to configure your phone.
The following part "Operating Instructions" will show you how to modify the template by an example.
Operating Instructions
- Login QX's GUI → Interfaces → IP Lines → IP Phone Templates
- Click on Add, and type in the template's name and description.
- Save and the template will show on the previous page (Manage IP Phone Templates)
- Click on the hyperlink.

- Choose Htek from the sidebar to edit the template.
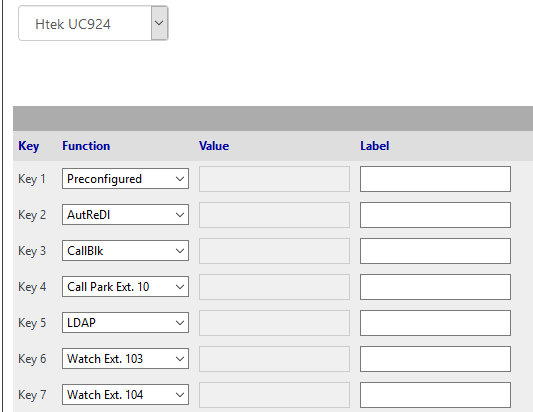
- After the General Settings is completed, choose your phone's model from the drop-down list to edit the Function Key.
- This is an example. You could make your choice by what you want.
- To use the template, you should choose it in the IP Line page. And after you confirmed, the system will reboot the phone to apply the template.
Use Epygi Integrated Feature
Feature List
This chapter provides the detail instructions and configurations for the following Epygi integrated features:
Basic Setting
Over View
This chapter introduces the necessary configuration of common optional configuration. Topics include:
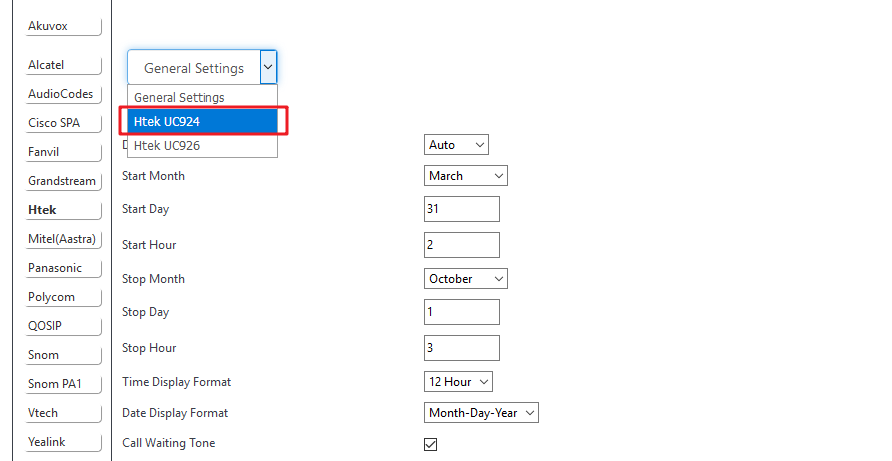
Time & Date
- To configure the Time Zone via QX GUI
Setup → Basic → Date and Time
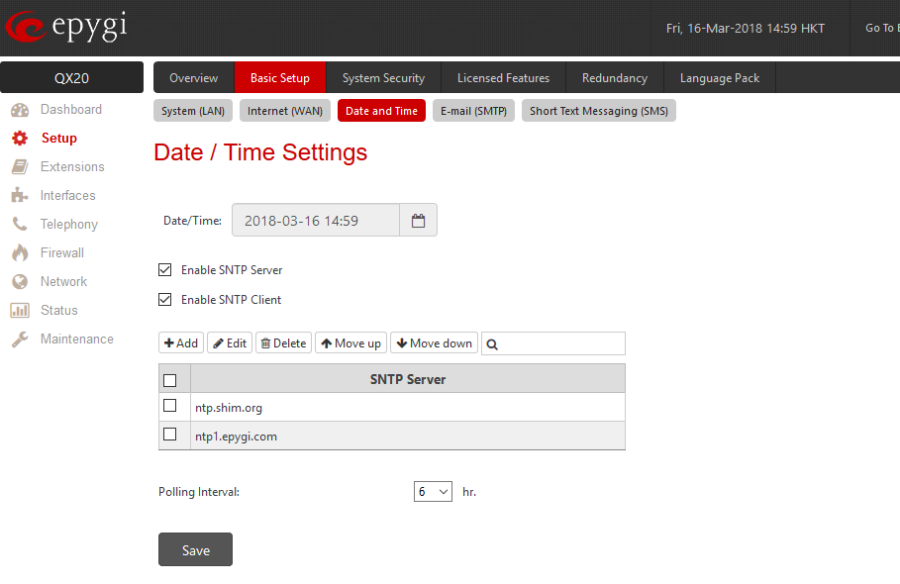 If both services enabled simultaneously, Epygi QX20 will retrieve the time from the Internet (as a SNTP Client) and distribute it to all stations within the LAN (as a SNTP Server).
There are two ways to fetch the time from the server:- Use a template to configure the phone
- Set it (QX's IP address) to the NTP server on phone's web GUI.
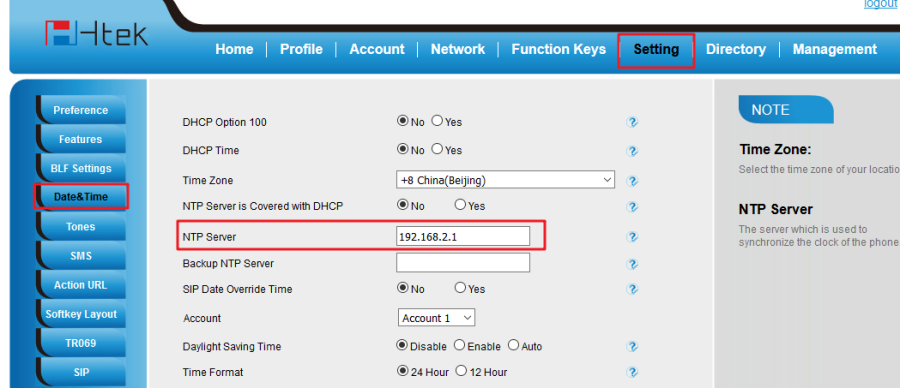
- To configure the NTP server via phone user interface (LCD)
- press Menu -> Setting -> Basic Setting -> Time & Date -> SNTP Settings -> NTP server.
- Enter the specific NTP server.
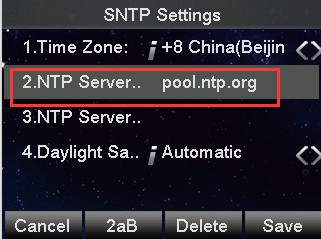
- Press the Save soft key to accept the change.
Secure SIP
Configuring IP Phones with TLS
- Login QX's GUI, click on Telephony→SIP→TLS Certificates.
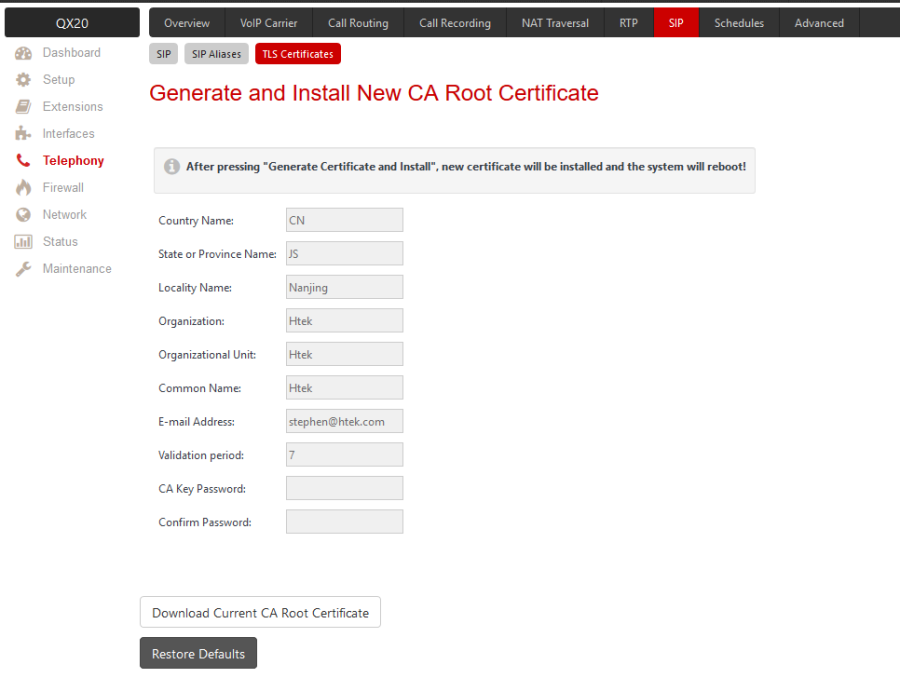
- Complete the blank field and Save.
- The QX system will reboot automatically, the same with phones which was connected with the QX.
- When the QX and phones startup, modify the TLS port to 5061 on the SIP Settings page.
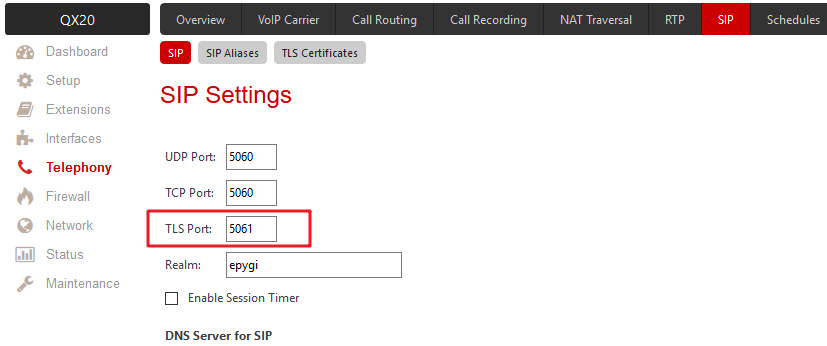
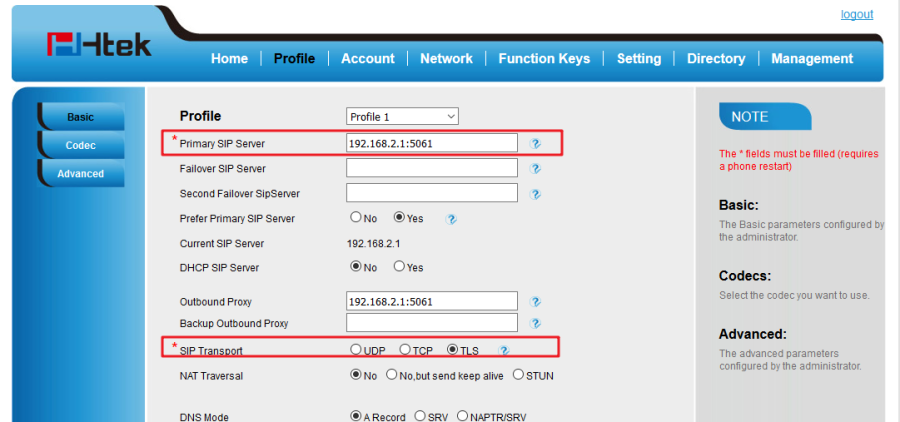
- If you want to use TLS transport, you can modify the SIP Transfer method on the phone's Profile page, or you can change the QX IP Lines page to auto-configure the phone.
Hot Desking
Over View
If Epygi QX20 has limited number of IP phones connected, but much more users wishing to make and receive calls through the Epygi QX20, some of the connected phones can be announced as public. Public phones have no static owners; they are just connected to the IP lines. Each user that accesses the public phone should first login with personal settings, such as the extension's number and password of previously configured and dedicated him virtual extension.
How to Configure
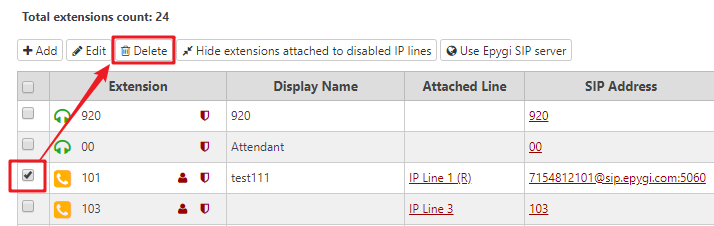
To use the Hot Desking, you need an IP Line without any extension attached (The contacts of Attached Extension should be None). So, check the Extensions page at first.
 If there is no available Line, you can choose one of the them and Delete the attached extension of the line on Extensions page.
 Now you have an IP Line for Hot Desking.
Enter the IP Line Settings page, fill in the necessary information of the IP Phone which will used as a Hot Desk. (Phone Model, MAC Address…as the same as attach an IP Line for your phone)
And then, check the Hot Desking option.
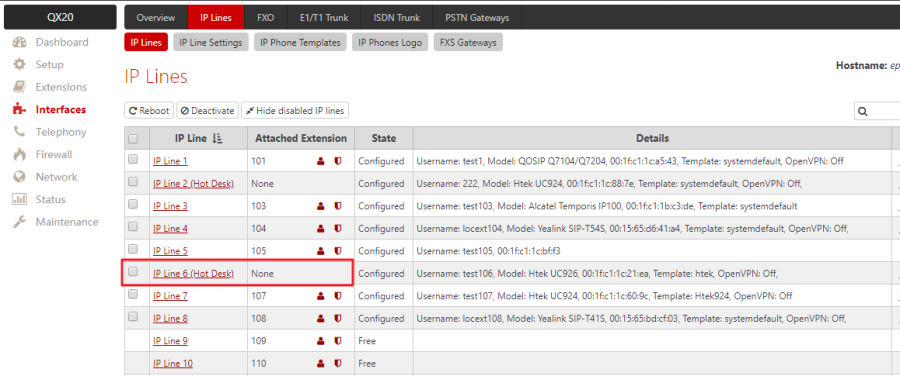
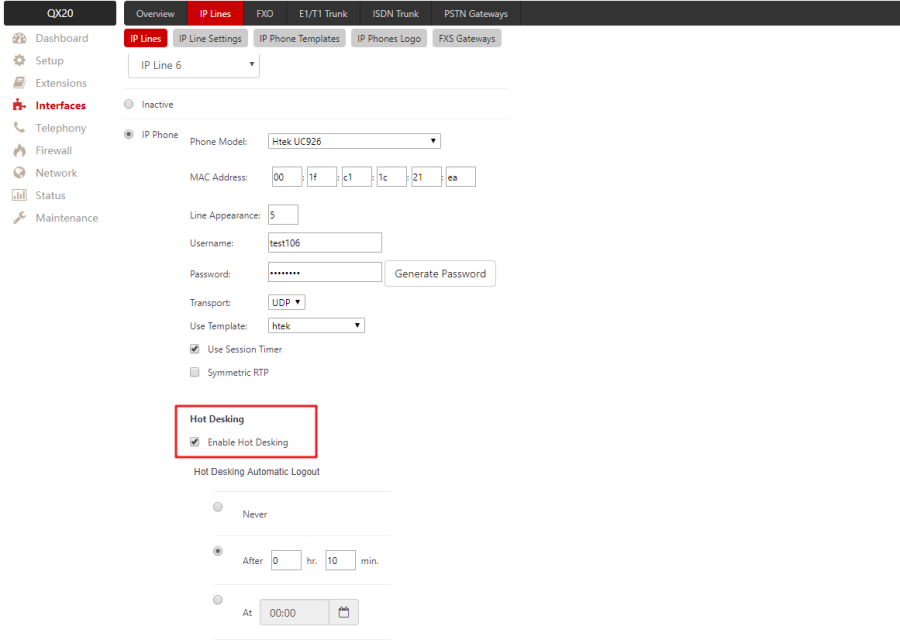 If you have successfully activated Hot Desking, the words Hot Desk will appeared behind the corresponding IP Line.
How to Use
1. Use by dial feature code
Dial *78 to configure Hot Desking service:
1.. Dial *78 to login.
2. Enter the extension number and press #.
3. Enter the extension password and press #.
After successful login, the phone becomes a full featured phone connected to the Epygi QX20. You can place and receive calls and use all supplementary PBX services of the Epygi QX20.
When having finished using the phone, logout.
1. Dial *78 to logout.
2. Enter the password of the current logged in extension and press #.
When logged out, the public phone becomes available for other users.
2. Use by Function Keys
Configure a Function Key instead of manually dial feature code. The other operations are the same.
Call Forward
Over View
Epygi supports the use of Forward functionality in 4 situations (Unconditional/Busy/No Answer/Unregistered or Inaccessible). According to your needs to choose which to use.
How to Configure
Login QX GUI → Extensions/Interfaces → User Settings →Caller ID Services.
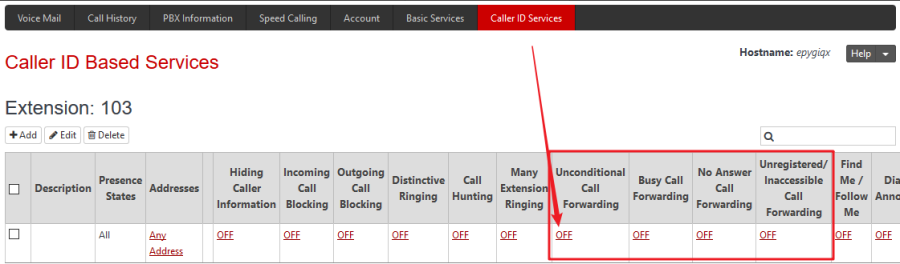 For an example, if you want to use Unconditional Call Forwarding, click on the hyperlink OFF.
Then, click on Add.
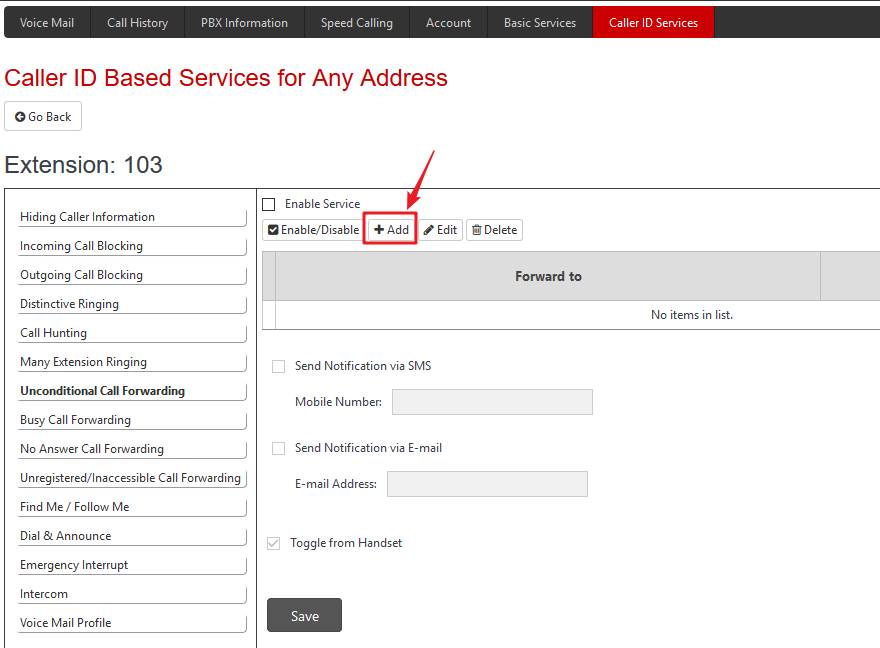 From the drop-down list, choose an Extension, e.g. 105.
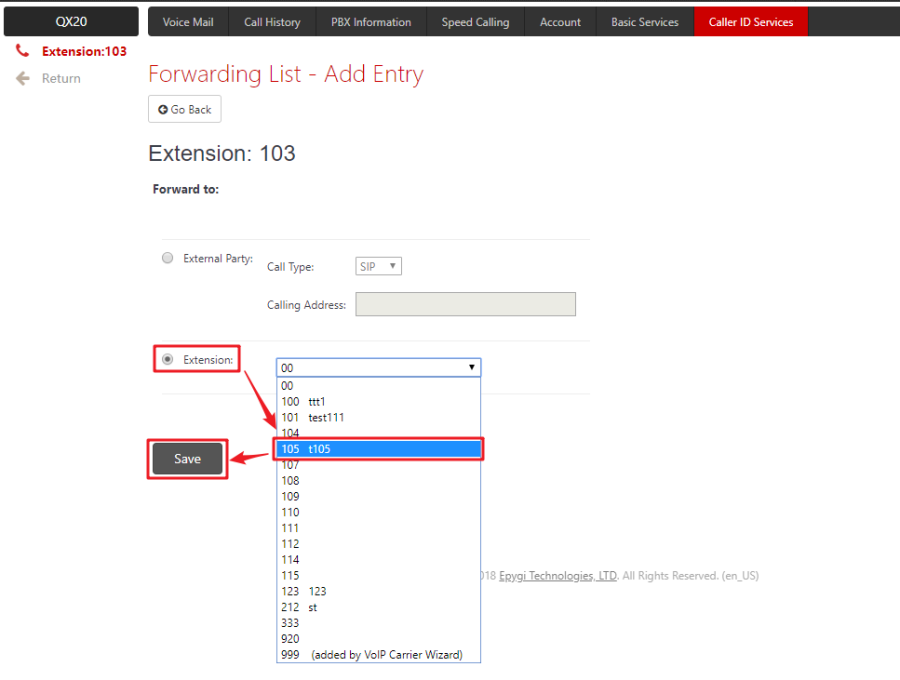 Save, the page will automatically jump back to the previous page.
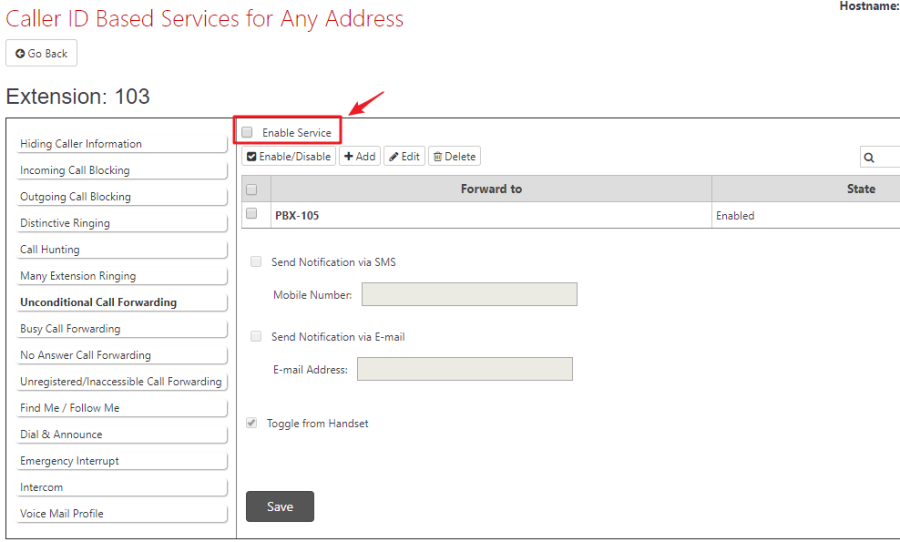 Check on Enable Server option and Save.
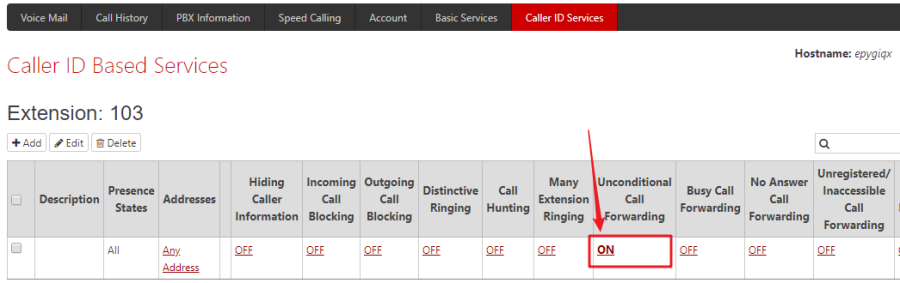
If the function is activated, the OFF will change to ON.
How to Use
1. Unconditional Call Forwarding
a. There are three IP phones 103, 104, 105. And 103 set Unconditional Call Forwarding to 105.
b. 104 call 103.
c. The call will be forwarded to 105 immediately, and 105 will received the call.
2. Busy Call Forwarding
a. There are three IP phones 103, 104, 105. And 103 set Busy Call Forwarding to 105.
b. If 103 is in idle, and 104 call 103, 103 will ring.
c. If 103 is in busy (e.g. 103 is talking with another extension or 103 rejects the call from 104), the call will be forwarded to 105, and 105 will received the call.
3. No Answer Call Forwarding
a. There are three IP phones 103, 104, 105. And 103 set No Answer Call Forwarding to 105.
b. 104 call 103.
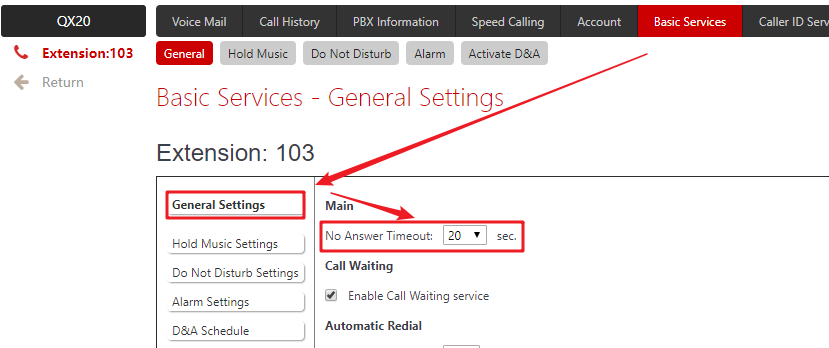
c. 103 will ring, but if there is no one to answer, the call will be forwarded to 105 as soon as the No Answer Timeout configured on the called extension (103) expires.
 4. Unregistered/Inaccessible Call Forwarding
a. There are three IP phones 103, 104, 105. But 103 is unregistered or unreachable. And 103 set Unregistered/Inaccessible Call Forwarding to 105.
b. 104 call 103.
c. The call will be forwarded to 105, and 105 will received the call.
Call Transfer
Over View
You can transfer a call to another extension by three ways:
Blind Transfer: Transfer a call directly to another party without consulting.
Semi-Attended Transfer: Transfer a call when the target phone is ringing.
Attended Transfer: Transfer a call with prior consulting.
How to Use
- Blind Transfer
- When you (107) are in calling with 103, you want to transfer the call to 104, press the Transfer soft key.
- Enter the target extension number (104).
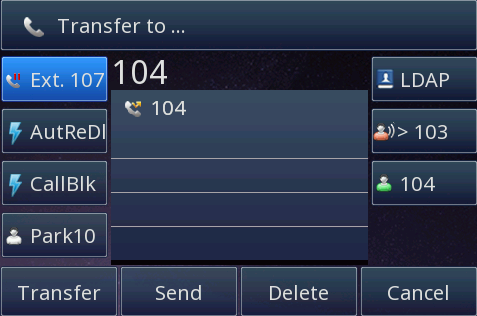
- Press the Transfer soft key again, then 104 will be ringing and your phone will back to idle, the call is transferred to 103 and 104.
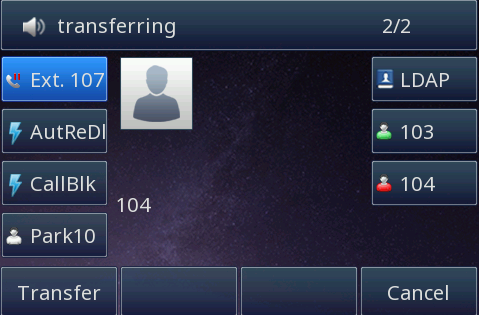
- Semi-Attended Transfer
- When you (107) are in calling with 103, you want to transfer the call to 104, press the Transfer soft key.
- Enter the target extension number (104).
- Don't press Transfer but press Send.
- The target phone will be ringing, and before he answered, press Transfer.
- Attended Transfer
- When you (107) are in calling with 103, you want to transfer the call to 104, press the Transfer soft key.
- Enter the target extension number (104).
- Press Send.
- Wait for 104 answered, and tell him that you want to transfer a call to him.
- Finally, press Transfer.
TIP: You can cancel the transfer before the call is connected by pressing the Cancel soft key.
Additional Function of Transfer
Login phone webpage->Settings->Features->Transfer Settings. There are some additional settings of transfer. Please refer the following picture.
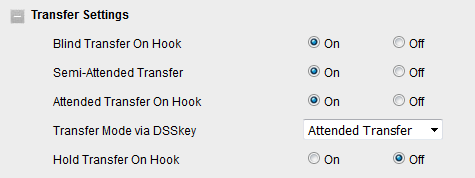
- Blind Transfer On Hooks
If you have already enter the target number, the transfer will be completed in the form of Blind Transfer even if you hang up directly.
This means that the on-hook action replaces pressing the Transfer soft key again. And the Semi-Attended and Attended Transfer On Hook are the same. - Transfer Mode via DSSkey (DSSkey type must be BLF)
This feature allows you to complete the transfer in one click.
For an example, set the Line Key as BLF or Transfer, the Value is target number 104. And the Transfer Mode via DSSkey is Blind Transfer.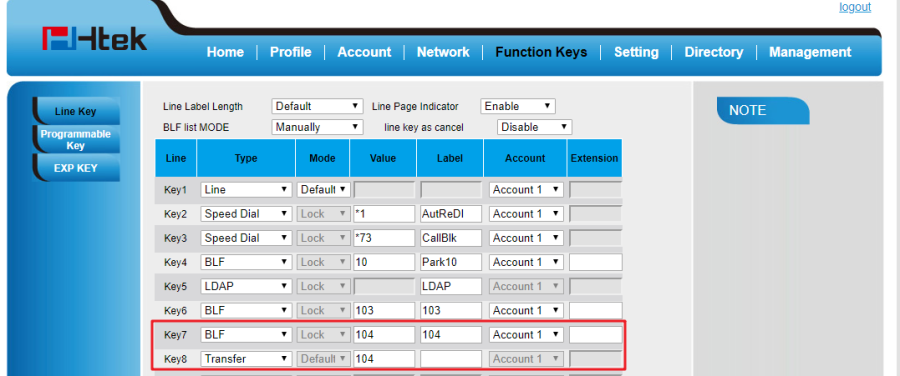 When you are calling with 102(e.g.), press the BLF key (listening to 104), the call will Blind Transfer to 104 directly.
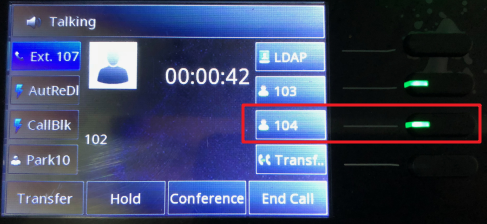
Do Not Disturb
Over View
The Do Not Disturb is used to turn off the phone ringer for a while. If you have Do Not Disturb service enabled along with the Voice Mail Service, all incoming calls will directly go to the extension's voice mailbox.
How to Configure
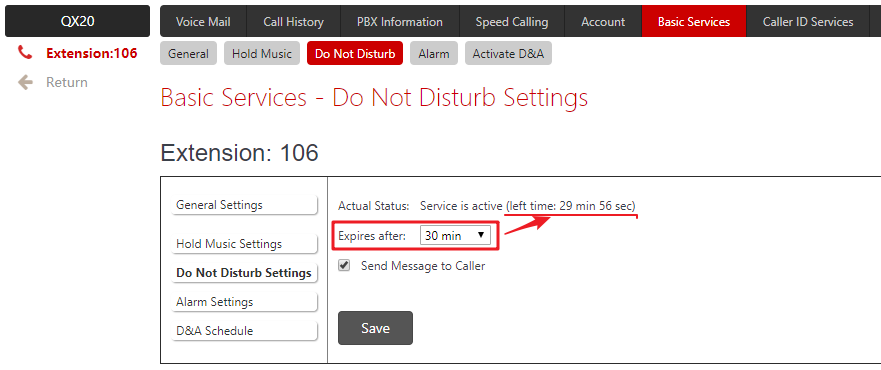
On Extension→Basic Services→Do Not Disturb Settings page , you can set the expire time and enable/disable the feature of Send Message to Caller.
- If you have set an expire time, the left time will display behind the Actual Status. At the end of countdown, the DND function will be closed automatically.
- If you select Send Message to Caller, the voice mail greeting message will be played to caller and call will be redirected to Voice Mailbox (if Voice Mail Service is enabled on the extension). If selected, but the Voice Mail Service is disabled, a voice message (called number is temporarily unavailable) will be played to caller. If not selected, incoming call will be redirected to Voice Mailbox (if Voice Mail Service is enabled on the extension) or disconnected.
How to use
You can dial *72 directly, or configure a programmable key on your phone, then press the key to enable/disable the function.
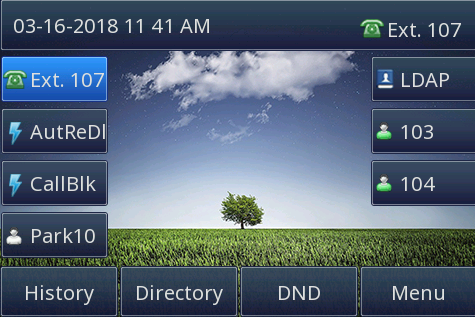
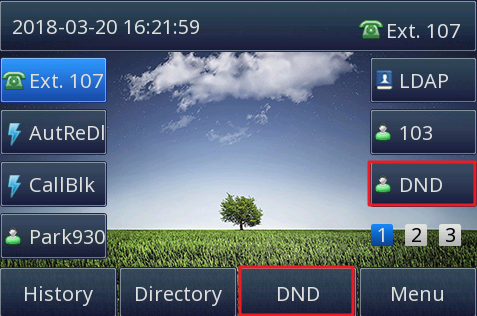 On the right side of the screen is the function key configured in the IP Phone Template, and the bottom of the screen is the soft key of the phone itself, they can all realize the function of DND.
Conference
Over view
You can create a conference with other extensions. And the maximum number of participants is 5.
How to use
To create a conference
- Place a call to the first participant.
- When the call established, press the Conference soft key to place a new call. And the ongoing call will be put on hold.
- Enter the number of the second party and press # or the Send soft key
- When the second participant answered, the 3-way conference established.
- If you want to add more participants, press Hold → New Call, and dial the extension of the new participant.
- When the new participant answered, press Conference, then 4-way conference established.
- Repeat the step 5 to add the fifth participant, the 5-way conference was established finally.
During the conference, you can do the following actions
- Press the Hold soft key to place the conference on hold.
- Press the Split soft key to split the conference into four individual calls, and these calls are all on hold.
- Press the End Call soft key.
- If you are the initiator of the conference, the conference will end.
- If you are a member of the conference, you will exit and the others will continue the conference.
BLF
Over View
You can use BLF (Busy Lamp Field) to monitor the status change of a specific extension. By press the corresponding BLF key when the extension is free, you can also call the extension which is being monitored.
How to Configure
1. Configure via Epygi IP Phone Template
1.1 Log in Epygi WEB GUI → Interfaces→ IP Lines → IP Phone Template.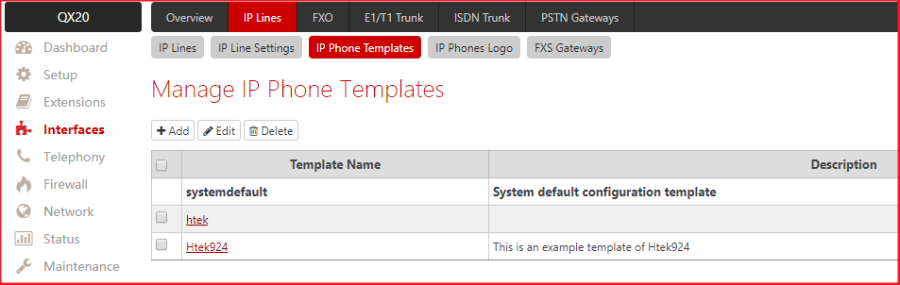 1.2 Choose a template to modify.
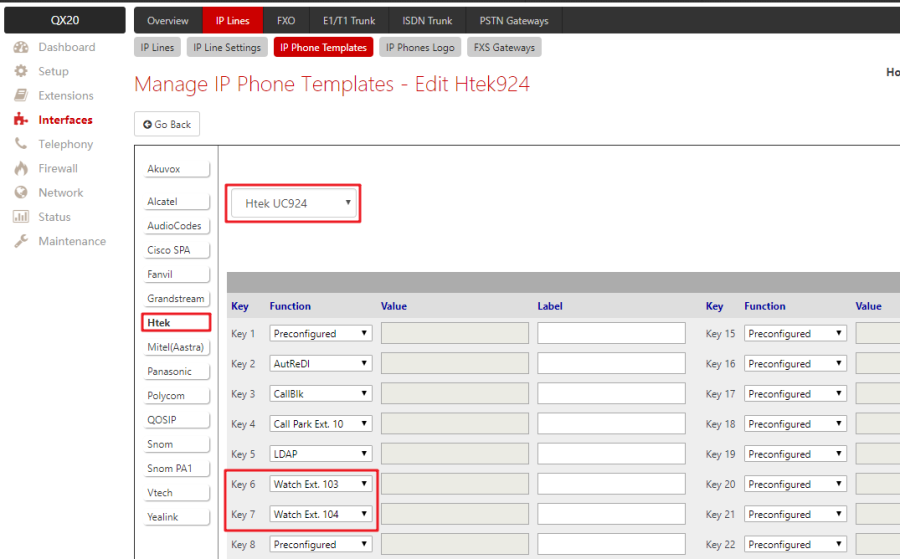 1.3 Choose the entry Watch Ext. (extension) and save when you are configured.
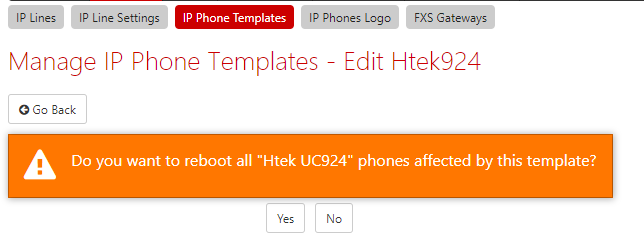 1.4 If you are consent about your configuration, click on Yes to apply the new template.
2. configure via phone WEB GUI
2.1 Log in Htek phone WEB GUI → Function Keys → Line Key.
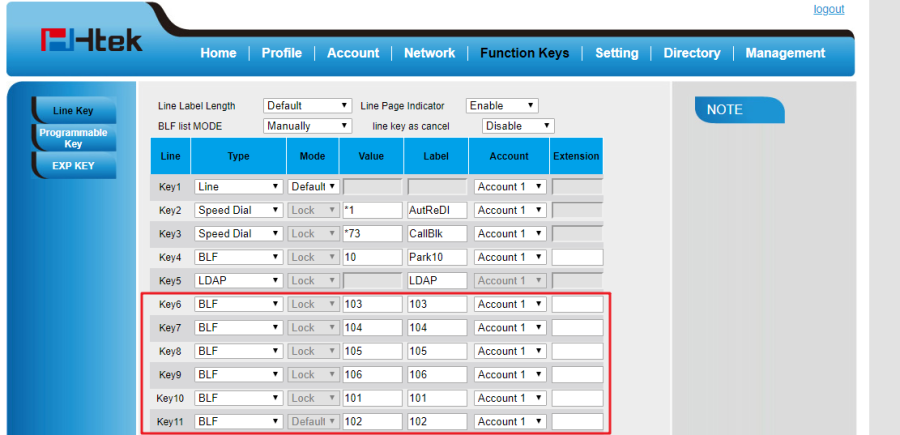 2.2 Choose BLF from the drop-down list, then fill in the extension in the entry Value.
2.3 Click on SaveSet.
How to Use
- When the monitored number is in idle status, the BLF key light and the icon will be solid green.
- When monitored number has an incoming call, the BLF key light will be flashing red and the icon will be solid red.
- When monitored number are talking, the BLF key light and Icon will be solid red.
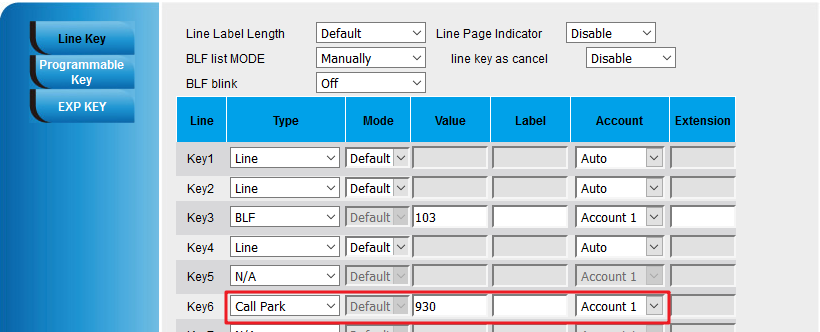
Call Park
Over View
The Call Park service allows to park a call (the call will be automatically placed on hold) then retrieve the parked call from another phone by dialing the Call Park extension number.
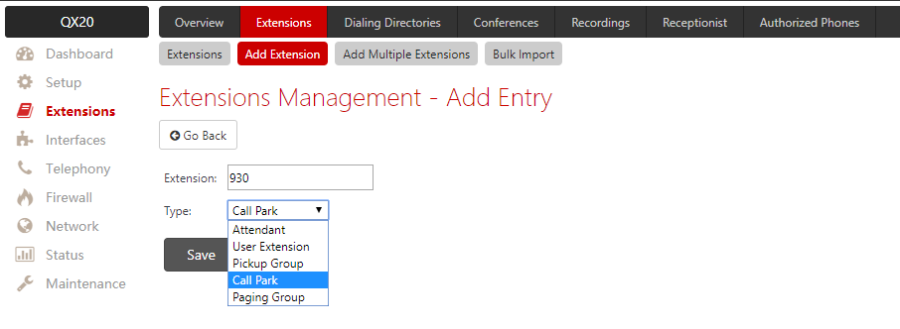 Before you start to use the function, you need add a Call Park extension first.
Log in QX WEB GUI, Extensions→Add Extension→choose Call Park from the drop-down list. After filled in the extension's number, click on Save, then the Call Park extension will display on the Extensions page.

How to Configure
1. Configure via Epygi IP Phone Template
1.1 Log in Epygi WEB GUI → Interfaces→ IP Lines → IP Phone Template.1.2 Choose a template to modify.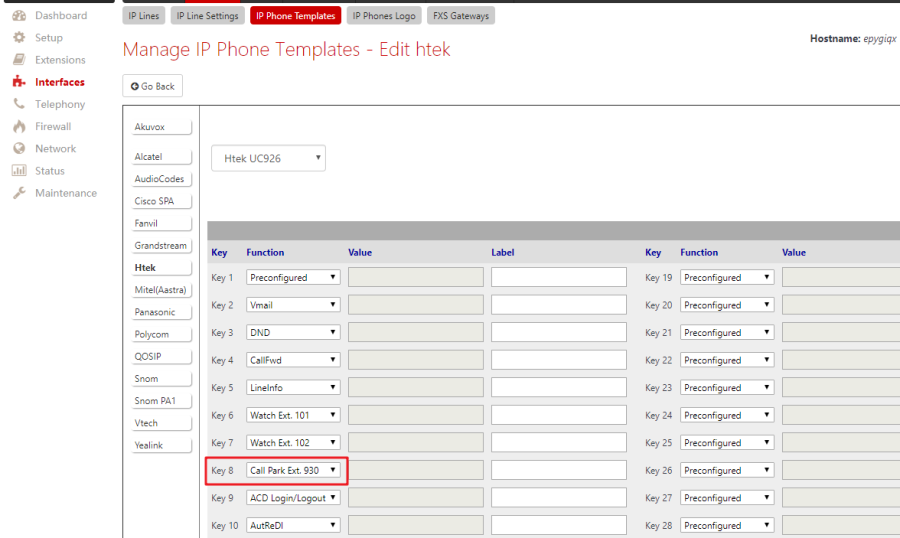
1.3 Choose the entry Call park and fill in the extension's number. When you finished, press Save.
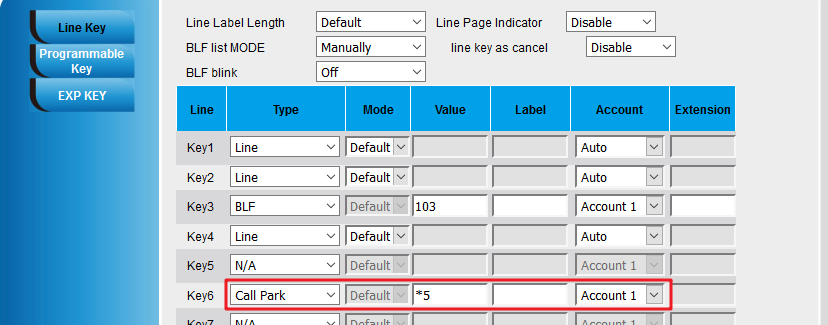
2. configure via phone WEB GUI
2.1 Log in Htek phone WEB GUI → Function Keys → Line Key.
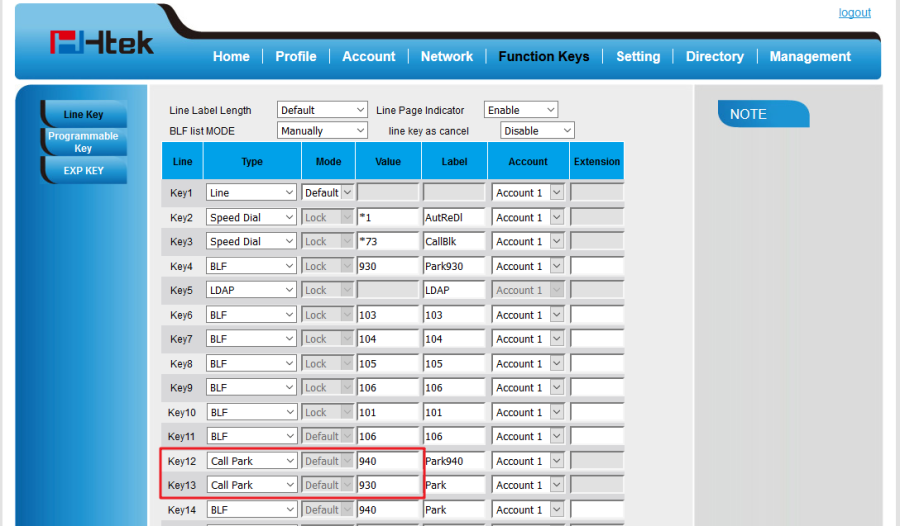 2.2 Choose Call Park from the drop-down list, then fill in the Call Park extension's number in the entry Value.
2.3 Click on SaveSet.
How to Use
- Call Park
- Press
 or Hold soft key during an active call. The call will be put on hold.
 - Press New Call soft key, then dial *5 and press # or Send soft key to park the call to the first available park extension.
- Press
- Directed Call Park
- Press or Hold soft key during an active call. The call will be put on hold.
- Press New Call soft key, then dial Park extension number and press # or Send soft key to park the call.
- Press
- One-button operation
If you wish, you can use Function Key for one-button operation.
- For Call Park, configure *5 as the value of the Function Key.
- For Directed Call Park, configure the directed number as the value of the Function Key.
- When you want to park a call, you just need press the corresponding key.

- For Call Park, configure *5 as the value of the Function Key.
Speed dial
Over View
Speed dial allows dialing the desired destination by using a preconfigured speed dial code (shortcut number)
How to Configure
1. Configure via Epygi IP Phone Template
1.1 Log in Epygi WEB GUI → Interfaces→ IP Lines → IP Phone Template.1.2 Choose a template to modify.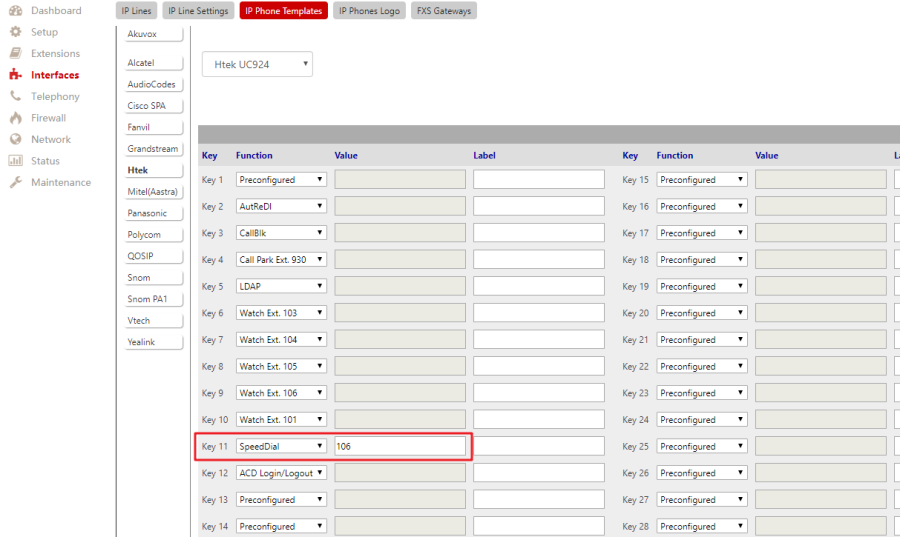 1.3 Choose the entry Speed Dial and fill in the extension's number. When you are configured, press Save.
2. configure via phone WEB GUI
2.1 Log in Htek phone WEB GUI → Function Keys → Line Key.
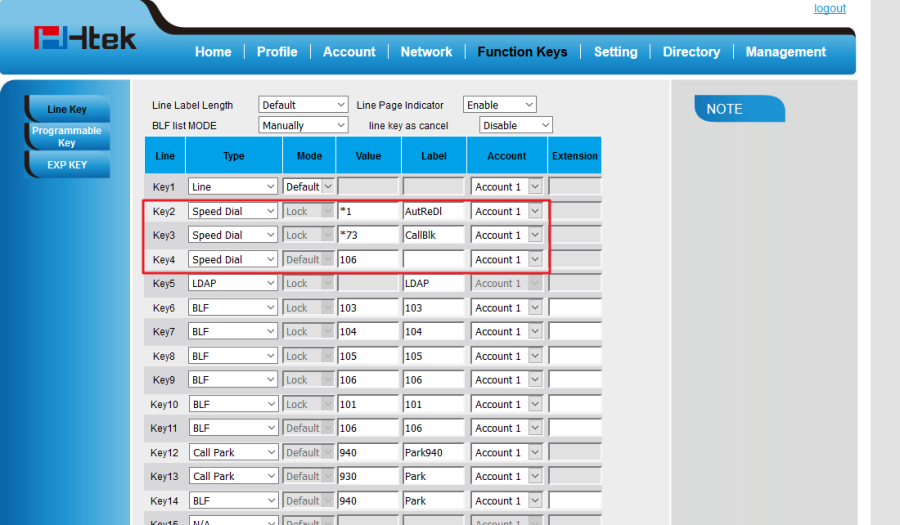 2.2 Choose Speed Dial from the drop-down list, then fill in the Call Park extension's number in the entry Value.
2.3 Click on SaveSet.
How to Use
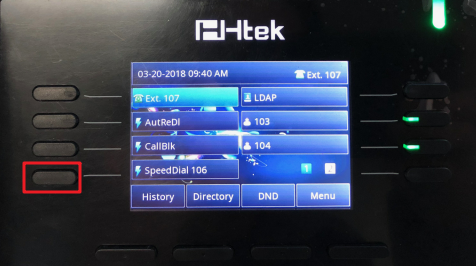
When you complete the configuration, if you want to call 106 quickly, you can make a call by pressing the speed dial key directly.
Other available features
Over View
There are also some available features to help you to use the phone more conveniently. And they can all be configured in the template.
Feature List
Operating Instructions
1. Automatic Redial (AutReDl)
If the called number is busy after dialing *1 or press the corresponding function key AutReDl keep the handset lifted to activate the auto redialing of the last called number. The connection will be established immediately when the called destination answers the call.
TIPs:
1) This service is functional for SIP and PBX calls only.
2) This service works when the Voice Mail and Call Waiting services are disabled on the called destination.
2. Call Back
If you want to call the last caller directly, you can dial *2 or press the corresponding function key CallBack.
Configure CallBack in the IP Phone Templates to provision your IP Phone automatically.
 Or set the Line Key as Call Return on the phone's WEB GUI.
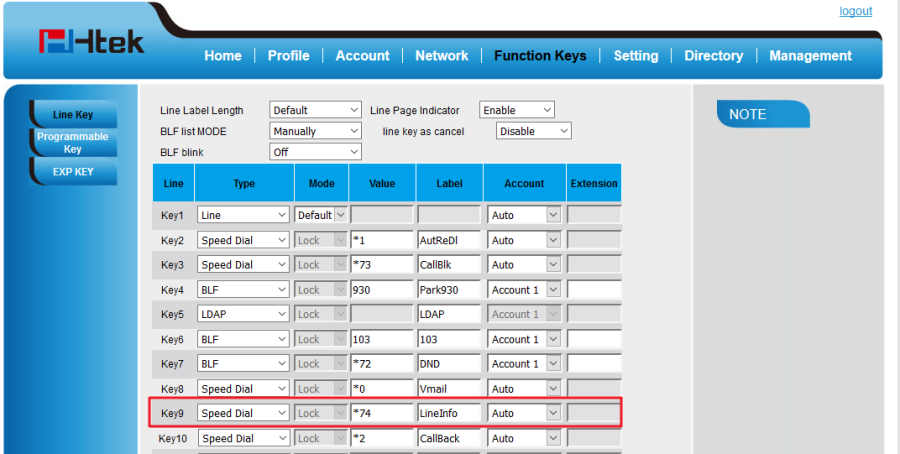
3. Line Information (LineInfo)
Dial *74 or press the corresponding function key LineInfo, you can get the information about the IP line, attached Extension number and SIP username.
4. Block Last Caller (CallBlk)
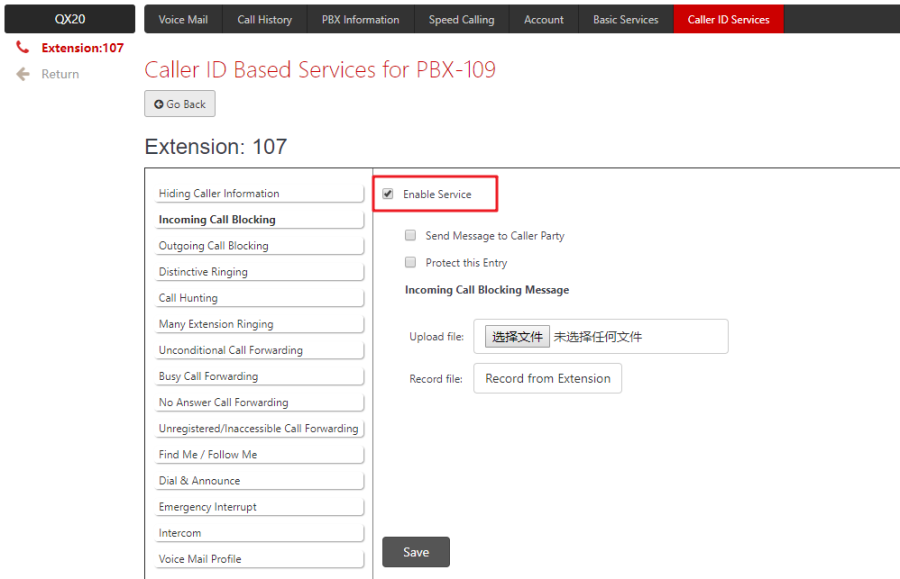
Dial *73 or press the corresponding function key CallBlk, the last caller will be blocked and added to the Caller ID Based Services table.
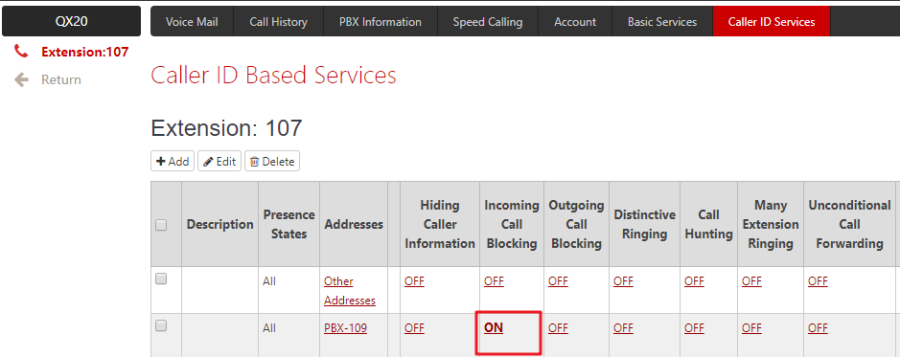 To unblock the caller, go to the Caller ID Based Services page and disable the Incoming Call Blocking service for the blocked address.
Troubleshooting
This chapter provides general troubleshooting information to help you solve the problems you might encounter when using your phone. If you require additional information or assistance with your new phone, contact your system administrator.
Why is the LCD screen blank?
- Ensure that the phone is properly plugged into a functional AC outlet.
- Ensure that the phone is plugged into a socket controlled by a switch that is on.
- If the phone is plugged into a power strip, try to plug it directly into a wall out let instead.
- If the phone is powered from POE, ensure that you use a POE-compliant switch or hub.
Why does the phone display "Network unavailable"?
- Ensure that the Ethernet cable is plugged into the Internet port on the phone and the Ethernet cable is not loose.
- Ensure that the switch or hub in your network is operational.
Why doesn't the phone display time and date correctly?
Check if you have configured the phone to obtain the time and date from the SNTP server automatically. If the phone fails to connect to the SNTP server, you need to configure the time and date manually.
Why the phone can't auto-configuration successful?
- Make sure that the Internet port of phone is connect to the LAN port of QX successful.
- Make sure that the model of your phone is supported by Epygi.
- To reset the phone as the following steps:
- Press Menu soft key.
- Navigate to Settings and press Enter soft key.
- Select Advanced and press Enter soft key.
- Enter the password (admin by default) and press Enter soft key.
- Select Settings and press Enter soft key
- Select Reset and press Enter soft key.
- Press OK soft key to confirm, the phone will reboot and perform a factory reset.
About This Guide
Thank you for choosing the Htek IP phones, which are exquisitely designed to provide basic phone features plus advanced business features, such as Call Park, Call Pickup, Intercom and Enhanced Monitor Extension over IP network.
The purpose of this guide is to serve as a basic guidance for auto- provision. Htek IP phones supported by Epygi QX IP PBX:
Htek 9 Series:UC926, UC924.
Note: The configuration process outlined in this guide applies to Htek SIP IP phones running Firmware version 2.0.4.2.24 or later and Epygi QX IP PBX running Firmware version 6.2.6 or later. The configuration process described in this guide take the Htek UC924 as an example.
In This Guide
Topics provided in this guide include:
- Chapter 1 Getting Started
- Chapter 2 Attach an IP Line
- Chapter 3 Auto Configuration
- Chapter 4 Use Epygi Integrated Feature
- Chapter 5 Other available Features
- Chapter 6 Troubleshooting
Summary of Changes
- V1.0 (2018-03-27):
Provide a basic guidance for auto-provision Htek IP phones with Epygi QX IP PBX.
Getting Started
This chapter will show you the basic process of phone's start-up and instructions of the way to get the basic information of the phone. Topics include:
Phone Initialization
After your phone is powered on, the phone will boot up, complete the initialization and check firmware. Please refer to the three phases of the LCD display:
![]()
![]()
In the process of initializing, the phone will attempt to contact a DHCP server in your network to obtain valid IPv4 network settings (e.g., IP address, subnet mask, default gateway address and DNS address) by default.
Phone Status
After the phone comes up, you can view phone status on phone user interface (LCD) via the following ways:
- Press "OK" button twice.
- Press the following button one by one: "Menu" -> "Status" -> "information".
Available information of phone status includes:
- Network status (e.g., IPv4 status, IP mode, MAC address).
- Phone status (e.g. product name, firmware version, MAC address and device certificate status).
- Language information.
Press "Up" or "Down" to scroll through the list and view the specific information.
Attach an IP Line for using your phone
Over View
Extension should be attached to a line to be able to make and receive calls. Otherwise, the extension just be allowed to use a limited number of QX telephony services, such as the voice mail service to store and manage the messages from callers.
Operating Instructions
- Go to the Interfaces→IP Lines page.
- From the Attached Extension column, choose an extension to be assigned to the IP phone and click on the corresponding IP line link.
Note: This table lists only the extensions attached to IP lines. If the extension is not listed on this page, open the Extensions Management page and attach an IP line to the extension by editing the extension settings. - Click on the IP Line hyperlink, the IP Line Settings--IP Line# page will be opened.
- Select the IP Phone option to configure the line and choose the model of the IP phone from the Phone Model drop-down list.
- Enter the MAC Address of the phone.
- Set the number for intended simultaneous calls (the total number of active and held calls), in the Line Appearance field. If this field is set to 1, only one active call will be possible on the phone. Making or accepting a second call while the other is on hold will not be allowed.
Note: The maximum allowed number of Htek 924 is 4, and Htek 926 is 6. - The QX authorizes each IP phone by a unique username and a password specified on the IP Line Settings page. In case of auto configuration, they are specified on the QX and are automatically included in the phone's configuration file generated by the QX. By default, the QX assigns a unique username and password to each IP line. The user may either keep these values or specify new ones. The Password field security strength is checked and displayed just below the entry. To achieve a well-protected, strong password, a minimum of 8 characters is required, consisting of letters in upper and lower case, symbols and numbers. If you are unable to define a strong password, click the Generate Password to use one of the system defined strong passwords.
- The Transport drop-down list is used to select the SIP protocol transport layer--UDP, TCP or TLS. For TLS you may activate the TLS certificate update mechanism from IP Phone to obtain the latest certificate generated by the QX.
- Click Save to submit the changes.
TIP: If the IP Line is activated successfully, you will see the Line's State changes from Free to Configured.
Configure your phone with QX IP PBX
The Auto configuration option should be used if user wishes to associate the IP phone with a certain extension or a certain IP line.
IP phones can be connected to QX via LAN, WAN or VLAN interface (Figure 1 and Figure 2). The QX will provide a configuration file to the phones that are locally connected to the same network. Note: The QX will not configure IP phones that are remotely connected. These phones will need to be manually configured.
The following chapter will provide:
Auto Configuration
Over View
Auto configuration option simplifies the configuration procedure of the Supported IP phones. And the method is PnP (Plug and play).
The illustration is as follows:
The following shows you the details.
- When the phone connected to the network, it will send a multicast message with its MAC address.
- The SIP server receives the multicast message and when it recognizes that the MAC address is bound to an extension, it will send a response with 202 Accepted to the phone.
- Immediately, the server will send a NOTIFY message with the path of the configuration server.
- The phone response the NOTIFY message with 200 OK, then the phone will GET the configuration files from the received path.
Operating Instructions
- Attach an IP Line for your phone (you can refer to the previous chapter "Attach an IP Line for using you phone")
- To restart the phone as the following steps:
- Press Menu Soft Key.
- Navigate to Others and press Enter Soft Key.
- Select Restart and press Enter Soft Key.
Now you just need wait for a while, the QX will automatically configure your phone with the IP Line which your phone attached to.
Edit Custom IP Phone Template
Over View
Maybe you are not satisfied with the default configuration of auto-configuration. So you can edit your own IP Phone Template on Epygi QX's GUI to configure your phone.
The following part "Operating Instructions" will show you how to modify the template by an example.
Operating Instructions
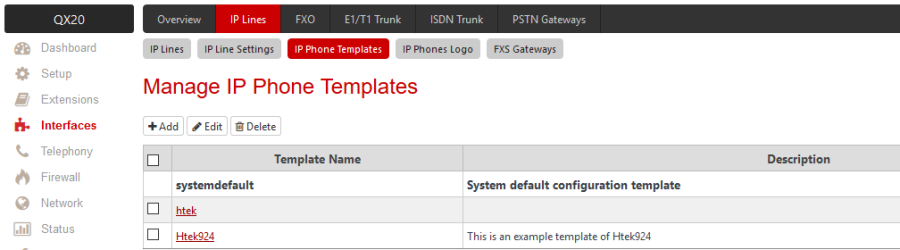
- Login QX's GUI → Interfaces → IP Lines → IP Phone Templates
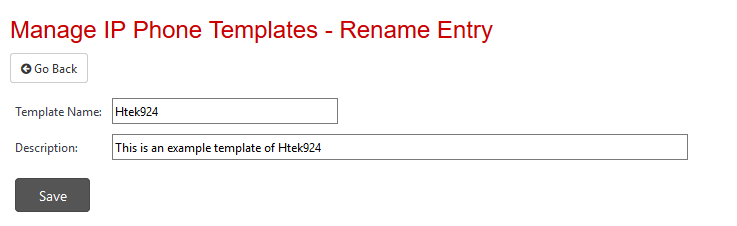
- Click on Add, and type in the template's name and description.
- Save and the template will show on the previous page (Manage IP Phone Templates)
- Click on the hyperlink.
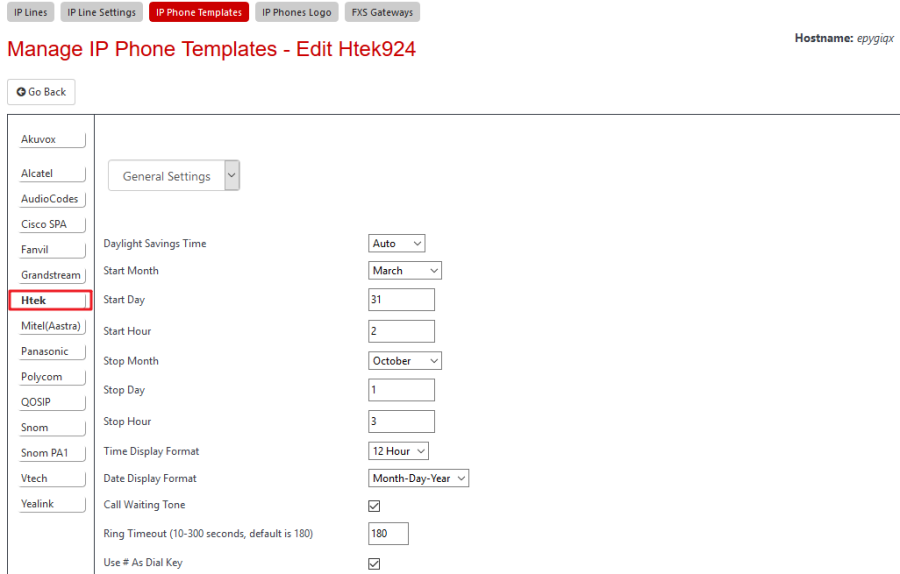
- Choose Htek from the sidebar to edit the template.
- After the General Settings is completed, choose your phone's model from the drop-down list to edit the Function Key.
- This is an example. You could make your choice by what you want.
- To use the template, you should choose it in the IP Line page. And after you confirmed, the system will reboot the phone to apply the template.
Use Epygi Integrated Feature
Feature List
This chapter provides the detail instructions and configurations for the following Epygi integrated features:
Basic Setting
Over View
This chapter introduces the necessary configuration of common optional configuration. Topics include:
Time & Date
- To configure the Time Zone via QX GUI
Setup → Basic → Date and Time
If both services enabled simultaneously, Epygi QX20 will retrieve the time from the Internet (as a SNTP Client) and distribute it to all stations within the LAN (as a SNTP Server).
There are two ways to fetch the time from the server:- Use a template to configure the phone
- Set it (QX's IP address) to the NTP server on phone's web GUI.
- To configure the NTP server via phone user interface (LCD)
- press Menu -> Setting -> Basic Setting -> Time & Date -> SNTP Settings -> NTP server.
- Enter the specific NTP server.
- Press the Save soft key to accept the change.
Secure SIP
Configuring IP Phones with TLS
- Login QX's GUI, click on Telephony→SIP→TLS Certificates.
- Complete the blank field and Save.
- The QX system will reboot automatically, the same with phones which was connected with the QX.
- When the QX and phones startup, modify the TLS port to 5061 on the SIP Settings page.
- If you want to use TLS transport, you can modify the SIP Transfer method on the phone's Profile page, or you can change the QX IP Lines page to auto-configure the phone.
Hot Desking
Over View
If Epygi QX20 has limited number of IP phones connected, but much more users wishing to make and receive calls through the Epygi QX20, some of the connected phones can be announced as public. Public phones have no static owners; they are just connected to the IP lines. Each user that accesses the public phone should first login with personal settings, such as the extension's number and password of previously configured and dedicated him virtual extension.
How to Configure
To use the Hot Desking, you need an IP Line without any extension attached (The contacts of Attached Extension should be None). So, check the Extensions page at first.
If there is no available Line, you can choose one of the them and Delete the attached extension of the line on Extensions page.
Now you have an IP Line for Hot Desking.
Enter the IP Line Settings page, fill in the necessary information of the IP Phone which will used as a Hot Desk. (Phone Model, MAC Address…as the same as attach an IP Line for your phone)
And then, check the Hot Desking option.
If you have successfully activated Hot Desking, the words Hot Desk will appeared behind the corresponding IP Line.
How to Use
1. Use by dial feature code
Dial *78 to configure Hot Desking service:
1.. Dial *78 to login.
2. Enter the extension number and press #.
3. Enter the extension password and press #.
After successful login, the phone becomes a full featured phone connected to the Epygi QX20. You can place and receive calls and use all supplementary PBX services of the Epygi QX20.
When having finished using the phone, logout.
1. Dial *78 to logout.
2. Enter the password of the current logged in extension and press #.
When logged out, the public phone becomes available for other users.
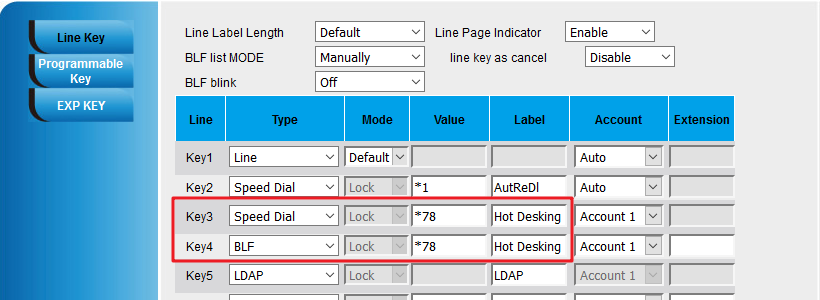
2. Use by Function Keys
Configure a Function Key instead of manually dial feature code. The other operations are the same.
Call Forward
Over View
Epygi supports the use of Forward functionality in 4 situations (Unconditional/Busy/No Answer/Unregistered or Inaccessible). According to your needs to choose which to use.
How to Configure
Login QX GUI → Extensions/Interfaces → User Settings →Caller ID Services.
For an example, if you want to use Unconditional Call Forwarding, click on the hyperlink OFF.
Then, click on Add.
From the drop-down list, choose an Extension, e.g. 105.
Save, the page will automatically jump back to the previous page.
Check on Enable Server option and Save.
If the function is activated, the OFF will change to ON.
How to Use
1. Unconditional Call Forwarding
a. There are three IP phones 103, 104, 105. And 103 set Unconditional Call Forwarding to 105.
b. 104 call 103.
c. The call will be forwarded to 105 immediately, and 105 will received the call.
2. Busy Call Forwarding
a. There are three IP phones 103, 104, 105. And 103 set Busy Call Forwarding to 105.
b. If 103 is in idle, and 104 call 103, 103 will ring.
c. If 103 is in busy (e.g. 103 is talking with another extension or 103 rejects the call from 104), the call will be forwarded to 105, and 105 will received the call.
3. No Answer Call Forwarding
a. There are three IP phones 103, 104, 105. And 103 set No Answer Call Forwarding to 105.
b. 104 call 103.
c. 103 will ring, but if there is no one to answer, the call will be forwarded to 105 as soon as the No Answer Timeout configured on the called extension (103) expires.
4. Unregistered/Inaccessible Call Forwarding
a. There are three IP phones 103, 104, 105. But 103 is unregistered or unreachable. And 103 set Unregistered/Inaccessible Call Forwarding to 105.
b. 104 call 103.
c. The call will be forwarded to 105, and 105 will received the call.
Call Transfer
Over View
You can transfer a call to another extension by three ways:
Blind Transfer: Transfer a call directly to another party without consulting.
Semi-Attended Transfer: Transfer a call when the target phone is ringing.
Attended Transfer: Transfer a call with prior consulting.
How to Use
- Blind Transfer
- When you (107) are in calling with 103, you want to transfer the call to 104, press the Transfer soft key.
- Enter the target extension number (104).
- Press the Transfer soft key again, then 104 will be ringing and your phone will back to idle, the call is transferred to 103 and 104.
- Semi-Attended Transfer
- When you (107) are in calling with 103, you want to transfer the call to 104, press the Transfer soft key.
- Enter the target extension number (104).
- Don't press Transfer but press Send.
- The target phone will be ringing, and before he answered, press Transfer.
- Attended Transfer
- When you (107) are in calling with 103, you want to transfer the call to 104, press the Transfer soft key.
- Enter the target extension number (104).
- Press Send.
- Wait for 104 answered, and tell him that you want to transfer a call to him.
- Finally, press Transfer.
TIP: You can cancel the transfer before the call is connected by pressing the Cancel soft key.
Additional Function of Transfer
Login phone webpage->Settings->Features->Transfer Settings. There are some additional settings of transfer. Please refer the following picture.
- Blind Transfer On Hooks
If you have already enter the target number, the transfer will be completed in the form of Blind Transfer even if you hang up directly.
This means that the on-hook action replaces pressing the Transfer soft key again. And the Semi-Attended and Attended Transfer On Hook are the same. - Transfer Mode via DSSkey (DSSkey type must be BLF)
This feature allows you to complete the transfer in one click.
For an example, set the Line Key as BLF or Transfer, the Value is target number 104. And the Transfer Mode via DSSkey is Blind Transfer.When you are calling with 102(e.g.), press the BLF key (listening to 104), the call will Blind Transfer to 104 directly.
Do Not Disturb
Over View
The Do Not Disturb is used to turn off the phone ringer for a while. If you have Do Not Disturb service enabled along with the Voice Mail Service, all incoming calls will directly go to the extension's voice mailbox.
How to Configure
On Extension→Basic Services→Do Not Disturb Settings page , you can set the expire time and enable/disable the feature of Send Message to Caller.
- If you have set an expire time, the left time will display behind the Actual Status. At the end of countdown, the DND function will be closed automatically.
- If you select Send Message to Caller, the voice mail greeting message will be played to caller and call will be redirected to Voice Mailbox (if Voice Mail Service is enabled on the extension). If selected, but the Voice Mail Service is disabled, a voice message (called number is temporarily unavailable) will be played to caller. If not selected, incoming call will be redirected to Voice Mailbox (if Voice Mail Service is enabled on the extension) or disconnected.
How to use
You can dial *72 directly, or configure a programmable key on your phone, then press the key to enable/disable the function.
On the right side of the screen is the function key configured in the IP Phone Template, and the bottom of the screen is the soft key of the phone itself, they can all realize the function of DND.
Conference
Over view
You can create a conference with other extensions. And the maximum number of participants is 5.
How to use
To create a conference
- Place a call to the first participant.
- When the call established, press the Conference soft key to place a new call. And the ongoing call will be put on hold.
- Enter the number of the second party and press # or the Send soft key
- When the second participant answered, the 3-way conference established.
- If you want to add more participants, press Hold → New Call, and dial the extension of the new participant.
- When the new participant answered, press Conference, then 4-way conference established.
- Repeat the step 5 to add the fifth participant, the 5-way conference was established finally.
During the conference, you can do the following actions
- Press the Hold soft key to place the conference on hold.
- Press the Split soft key to split the conference into four individual calls, and these calls are all on hold.
- Press the End Call soft key.
- If you are the initiator of the conference, the conference will end.
- If you are a member of the conference, you will exit and the others will continue the conference.
BLF
Over View
You can use BLF (Busy Lamp Field) to monitor the status change of a specific extension. By press the corresponding BLF key when the extension is free, you can also call the extension which is being monitored.
How to Configure
1. Configure via Epygi IP Phone Template
1.1 Log in Epygi WEB GUI → Interfaces→ IP Lines → IP Phone Template.1.2 Choose a template to modify.1.3 Choose the entry Watch Ext. (extension) and save when you are configured.1.4 If you are consent about your configuration, click on Yes to apply the new template.
2. configure via phone WEB GUI
2.1 Log in Htek phone WEB GUI → Function Keys → Line Key.
2.2 Choose BLF from the drop-down list, then fill in the extension in the entry Value.
2.3 Click on SaveSet.
How to Use
- When the monitored number is in idle status, the BLF key light and the icon will be solid green.
- When monitored number has an incoming call, the BLF key light will be flashing red and the icon will be solid red.
- When monitored number are talking, the BLF key light and Icon will be solid red.
Call Park
Over View
The Call Park service allows to park a call (the call will be automatically placed on hold) then retrieve the parked call from another phone by dialing the Call Park extension number.
Before you start to use the function, you need add a Call Park extension first.
Log in QX WEB GUI, Extensions→Add Extension→choose Call Park from the drop-down list. After filled in the extension's number, click on Save, then the Call Park extension will display on the Extensions page.
How to Configure
1. Configure via Epygi IP Phone Template
1.1 Log in Epygi WEB GUI → Interfaces→ IP Lines → IP Phone Template.1.2 Choose a template to modify.
1.3 Choose the entry Call park and fill in the extension's number. When you finished, press Save.
2. configure via phone WEB GUI
2.1 Log in Htek phone WEB GUI → Function Keys → Line Key.
2.2 Choose Call Park from the drop-down list, then fill in the Call Park extension's number in the entry Value.
2.3 Click on SaveSet.
How to Use
- Call Park
- Press or Hold soft key during an active call. The call will be put on hold.
- Press New Call soft key, then dial *5 and press # or Send soft key to park the call to the first available park extension.
- Press
- Directed Call Park
- Press or Hold soft key during an active call. The call will be put on hold.
- Press New Call soft key, then dial Park extension number and press # or Send soft key to park the call.
- Press
- One-button operation
If you wish, you can use Function Key for one-button operation.
- For Call Park, configure *5 as the value of the Function Key.
- For Directed Call Park, configure the directed number as the value of the Function Key.
- When you want to park a call, you just need press the corresponding key.
- For Call Park, configure *5 as the value of the Function Key.
Speed dial
Over View
Speed dial allows dialing the desired destination by using a preconfigured speed dial code (shortcut number)
How to Configure
1. Configure via Epygi IP Phone Template
1.1 Log in Epygi WEB GUI → Interfaces→ IP Lines → IP Phone Template.1.2 Choose a template to modify.1.3 Choose the entry Speed Dial and fill in the extension's number. When you are configured, press Save.
2. configure via phone WEB GUI
2.1 Log in Htek phone WEB GUI → Function Keys → Line Key.
2.2 Choose Speed Dial from the drop-down list, then fill in the Call Park extension's number in the entry Value.
2.3 Click on SaveSet.
How to Use
When you complete the configuration, if you want to call 106 quickly, you can make a call by pressing the speed dial key directly.
Other available features
Over View
There are also some available features to help you to use the phone more conveniently. And they can all be configured in the template.
Feature List
Operating Instructions
1. Automatic Redial (AutReDl)
If the called number is busy after dialing *1 or press the corresponding function key AutReDl keep the handset lifted to activate the auto redialing of the last called number. The connection will be established immediately when the called destination answers the call.
TIPs:
1) This service is functional for SIP and PBX calls only.
2) This service works when the Voice Mail and Call Waiting services are disabled on the called destination.
2. Call Back
If you want to call the last caller directly, you can dial *2 or press the corresponding function key CallBack.
Configure CallBack in the IP Phone Templates to provision your IP Phone automatically.
Or set the Line Key as Call Return on the phone's WEB GUI.
3. Line Information (LineInfo)
Dial *74 or press the corresponding function key LineInfo, you can get the information about the IP line, attached Extension number and SIP username.
4. Block Last Caller (CallBlk)
Dial *73 or press the corresponding function key CallBlk, the last caller will be blocked and added to the Caller ID Based Services table.
To unblock the caller, go to the Caller ID Based Services page and disable the Incoming Call Blocking service for the blocked address.
Troubleshooting
This chapter provides general troubleshooting information to help you solve the problems you might encounter when using your phone. If you require additional information or assistance with your new phone, contact your system administrator.
Why is the LCD screen blank?
- Ensure that the phone is properly plugged into a functional AC outlet.
- Ensure that the phone is plugged into a socket controlled by a switch that is on.
- If the phone is plugged into a power strip, try to plug it directly into a wall out let instead.
- If the phone is powered from POE, ensure that you use a POE-compliant switch or hub.
Why does the phone display "Network unavailable"?
- Ensure that the Ethernet cable is plugged into the Internet port on the phone and the Ethernet cable is not loose.
- Ensure that the switch or hub in your network is operational.
Why doesn't the phone display time and date correctly?
Check if you have configured the phone to obtain the time and date from the SNTP server automatically. If the phone fails to connect to the SNTP server, you need to configure the time and date manually.
Why the phone can't auto-configuration successful?
- Make sure that the Internet port of phone is connect to the LAN port of QX successful.
- Make sure that the model of your phone is supported by Epygi.
- To reset the phone as the following steps:
- Press Menu soft key.
- Navigate to Settings and press Enter soft key.
- Select Advanced and press Enter soft key.
- Enter the password (admin by default) and press Enter soft key.
- Select Settings and press Enter soft key
- Select Reset and press Enter soft key.
- Press OK soft key to confirm, the phone will reboot and perform a factory reset.